Thursday, May 26, 2011

Frozen...

A busy week just passed. Busy in the sense of chasing around for your needs and never find a match. Not much to be with my camera (on a vacation from that remember?) and not much to be done with my Ayvarith project and voice recording, only roam, roam, roam...
I've been moving like a bee from one electronics shop to another looking for two things: A shower heater, and a PC terminal head. The former for my bathroom of course, 'cause I'm no Eskimo with the central boiler turned off, and the latter was for my sound trigger circuit, which arrived two weeks ago and never got the chance to work with it because I didn't have the head (they didn't send it along with it) to connect it to my flash. However, I went around that in some primitive way.

Wanted. Cut or a whole.
PC Terminal head (connected to a hotshoe).
Source (B&H)
Monday. Been moving from one store to another looking for a wire with such a head or just the head (better), but all of that went null, except that in one shop specialized in photography tools and lighting equipments had some adapters that I've been looking for in a long time; adapters to fit the small screw of my tripod into the larger hole size of my VR-head. They weren't cheap too! I didn't find though the device that I want, a shower heater. It's common outside, but not in here. I think it is the fantastic solution for the boiler's problem in many houses here, also, it saves energy.
The next day, Tuesday, I went even to the local Canon's (not Shannon, not Conan) store here looking for such a wire. Something I was trying to avoid to do from the beginning because I know the average of prices in such stores. However, the result was null, again. Not only that, but the guy there didn't even realize there is such a cable! Now, being desperate to try my new toy, I decided to do it the manual (unprofessional) way. Well, like I am professional already? All what I wanted to see is if this thing works or not!

At home now, with a sleeping time that got screwed up before my tired dead-body. I don't know even how I'm typing this! Anyway, woke up like 3 hours before midnight, and without a dinner or anything decided to raise up and do my experiment with the sound trigger without the head itself. I've decided to connect the wires from the circuit to the flash directly without a head, simply by plugging the wires into the port or the plug point of the flash unit. Unfortunately I didn't take a picture of that setting...

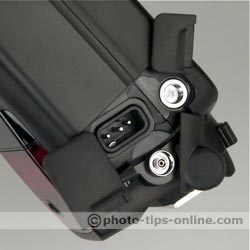
PC terminal plug point at the bottom (2 concentric circles)
It was simply but delicate; the positive (red) wire goes inside the small circle, while the ground (black), with the help of a clip, attached to the outer circle. I was afraid that they would touch and make a short in the middle of my work, but all went fine. Once I connected the wires, the baby started to shoot randomly at my face turning me partially blind. I had to decrease the sensitivity at once!

SK2 or Sound trigger circuit, from Hiviz. Connection wire to the flash unit not assembled here.
Source (Hiviz)

Finding out that the circuit works indeed, does not mean my life will become easier now. The hardships just began in fact. In the darkness I was trying hard to find my way and to set the focus from the right angle and with the right zoom, and after each failing trial I had to collect the coins. Yes, coins. I didn't want to use water here because it is an old idea AND it would make a mess in the place. Coins were better for my situation here. However, after many trials and errors; ups and downs and fixing the power and the angle of the flash, I think I did something suitable (even though it got rejected from some stock sites for noise level, as it was shot in ISO400)...

Savings

Some friends suggested that I would clone some coins out to fill in the gap in the middle, as the slide of the coins from my hand was not smoothly done. It is a good idea but I think it might make a repetitive pattern, which I'm trying to avoid most of the time (exceptions: architectural or landscape, where it occurs naturally). Another thing was sort of annoying me here is the flare reflection from the edge of the jar as I was not using a diffuser (and the flash was set to 1/128). With the image above, such settings were modified by RAW editor and later on with some extra layers in Photoshop with dodge and burn techniques (and faux dynamic range increment). The problem is, if the flash was to be hitting on the front, the background (black paper) would turn bluish! It would be awesome if I can, instead of triggering a flash, use some normal light bulbs on light stands (desktop lamps or the like). I bet there is a way, but I'm never good with electronics! Just thinking about it now, seems all what I have to do is bring a desk lamp and instead of having to switch it on, I plug in this circuit as a switch. Well, this is the idea in my mind but seems it's not quite the right thing to do...
However, with this capability, new ideas are flowing in my mind. Damn, I just can't control thinking about it even after the "break" that I was planning for myself.

Finished reading one book already. The fastest read so far. It's the Freelance Photographer's Handbook, by Cliff and Nancy Hollenbeck.

Freelance Photographer's Handbook: Success in Professional Digital Photography, 2nd Edition

I've wrote a review for it on Amazon, and generally I think the book is good, and tough as well. The authors want you to be professional, and that means no DIY stuff or anything like that. Well, I like such stuff!!! Anyway, it is quite the book for beginners and discusses many issues related to the freelance photographer in various aspects, even personal manners and attitude, up to laws and regulations. Maybe most of the talk would be in the circle of the American law, but nevertheless, it is useful to know about such steps and regulations in advance. Who knows; I might have my own business one day? Hmm...
Now the work is on reading the other portraits book which I got from Amazon as well, beside some other book lying at home on my bed waiting to be read!

The Portrait: Understanding Portrait Photography

Time ticks slowly now, and my mind is busy, while the work is piling up. Can I see that someone one day? I think I'm losing my connection with this world...
I need to write more poetry...


Thursday, May 19, 2011

Drifted...

Well, it was a busy and a quiet week in the same time. Quiet for my camera work (as I tried to stay away a bit from my camera for the sake of working with my Ayvarith project), but it has been busy for driving here and there doing some chores. With chores, comes responsibility, as I received my shipment finally from DHL after being held for around 5 days in customs! Well, might be 4 days...
The final result is that, I had to work with my camera in order to test my new Vivitar x2 teleconverter (2XMC7), which doubles the focal length of your lens. Hence, I worked less with my Ayvarith project, and to top it all, my daydreaming addiction is drifting me away...

Vivitar Teleconverter for Canon EOS series (2XMC7)

As a test for this new tool, I directly had in mind a shot for the moon, because it is something I did before and I know the capabilities of my lenses with this object. The best image I've created for the moon was done with my Tamron 70-300mm lens. I was lucky now to have the full moon at this time, although I was a bit unlucky on Tuesday when it was exactly a full moon time, because we had some rains and I was not able to go on the roof to shoot. Thus, I had to wait for the next day, Wednesday, to do this.
I was lucky here once again, to have a full moon, that by 8:00 or 9:00 p.m., was not directly above me as it is usually whenever I want to try my luck with it! But instead the moon was above the horizon a bit (and that made me think of another shot for it). As a comparison now, I've combined 2 shots, one with Tamron lens alone at maximum  length (@300mm) and one with Vivitar's teleconverter and Tamron @300mm as well.

Two images taken for the moon at same focal lengths; one without teleconverter (left) and one with it (right). The two images were overlapped and cropped, then size reduced to 16.7% of the original. I had to focus manually here, thus the right image might be a little bit blurred. Blame it on my eyes!
One of the problems here though, is the connection. Vivitar's teleconverter do support AF (autofocus function) but, with Tamron being already slow in AF, expect to have more slow action. Well, with time now with my lenses, I've become sort of less reliant on AF functions, but it is essential after all of course.
After finishing from this shot, some scene captured my eyes specially that the moon is above the horizon and not on zenith (above my head), making a good catch for some composition there. I have to admit though, that the structures in front of me did not really impress me. The houses in a countryside or villages would be more fit for such a scene (to my eyes) rather than the houses of the urban areas here. In case we talk about cities, yes, the moon fits there as well I think to be pictures above NY or LA for example with all these big stuff covering the horizon. However, I was not going to miss this chance anyway and went on trying to "HDR" the scene. But that was not as easy as I thought...

Nox (A Night)
In the beginning, I tested my simple Canon lens of 18-55mm, but I didn't like the portions and ratios even @55mm. The moon was so distant and it won't be easy to show its details here. Thus, I changed to my other Canon lens, 55-200mm. I think I've found the perfect view I want @90mm. But problems are yet to come.
Before attending to this scene and while shooting the moon in its single form in the beginning (for comparison) I was already trying to get a bracketed sequence of (-2,0,2 EV), but that was not easy because the moon moves so fast. The further you zoom away from the moon, the more it looks like a stable object, but in a close up as @600mm or even @300mm, you will notice that an exposure of 30 seconds is enough to blur your shot. I usually shoot for HDR on Av mode (Aperture value priority), where you fix the aperture and the camera takes the rest for the shutter speed fixing. Thus, I had to put the aperture at maximum (i.e. small f-number) to increase the shutter speed reasonably.
Even @90mm though, the moon tends to move faster for the lens. The first bracketed shot at -2,0, and 2, was not enough because they seem to put the moon so bright without any details. Because of this I thought I might combine up to 6 shots for this HDR, and pulled down my EV scale to take another bracketed shot at -62/3, -42/3, -22/3. In case you are asking why I did fix the interval with (2/3) additions, this is mainly to avoid having 2 images with -2 EV, because Photomatix (or any other HDR merging software) will give you a message about this overlap, and probably won't merge (Photomatix gives you the chance to assign the values of EV manually for each image, which is also not an easy task if you ask me). Having some dark images here, I thought I'm ready, but this wasn't the case. Probably the problem could have been resolved with proper training with metering, but with my lack of training about this matter, I really didn't know where it is most proper to meter for the light for such a scene. I think metering for the moon (the brightest object in the scene) would make the rest of the scene dark. However, HDR is there to resolve such problems, presumably.
On PC now. As I started to work with these images to merge them into HDR slide, I figured out that the images are hard to be merged because the moon did indeed change its position significantly even @90mm zooming. I tried the manual ghosting removal provided with Photomatix, but no use as it proved to be worse (giving black spots around the ghosting place). For a moment, I gave up the HDR idea and tried to do something similar to what I did with several tone-mapped images for the sun one day...


Sunset
Several tone-mapped images for the sunset at fixed intervals were combined and blended together automatically by Photoshop, resulting in completely eliminating the sun disk and keeping vivid colors for the sky.

I was hoping for something similar to the image above in the beginning, but no, that did not happen. Finally, I had to resort to one final trick that I didn't want to use really but I had no choice. After merging the first 3 brackets, the result was fine but only the moon disk was so bright with no details. After that I simply layered one of the dark images (with some details of the moon) on top of my tone-mapped slide, and erasing everything, but keeping the moon disk (and blending it with Overlay). The result is what you see above (after some polishing of course) for the intensity of colors. The original image was intense in the reds and yellow, and I had to put it down a bit. One final thing I have to say here about this image and this process, is that the blue-to-red gradient in the sky is not a result of the HDR processing. This gradient was there INDEED in the sky, but the HDR only put on some saturation to it. I had to crop a little bit from the left side with aspect ratio just to remove a shed on the roof of the other house.

Now, beside my Vivitar teleconverter, I got also 3 books that I'm starting to read now (can't wait to post this and head to read one of them now), and a sound trigger from Hiviz. This tool is essential for high speed photography, but unfortunately I couldn't try it so far because I need something called a PC-terminal head to connect it to this circuit and hook it to my flash unit.


PC terminal in Canon EX580 II (the lower circular port).
Source.
Thus, until I find a head to fit this port in the flash, I don't think I'll be able to use it! I have to roam the hardware shops again (did search one already).
A little break to my vow for giving the camera a break (yeah, just a little), I've decided to go on and do some photo shots of myself, but this time with the help of my brother. Some people wanted to see me after the hair cut. Yeah, TJ had a hair cut, can you believe it? The change of the world as we know it. What to expect next? ... TJ is a human being? hmm...
Anyway, with several shots (which my brother screwed up with focusing), I've started to do him several shots, and finally I got to test my Tamron 70-300mm macro lens on his eye.

Stare

First of all, I had to do some of my favorite adjustments to his eye here; like adding pupil lines and brightening the eye little bit and whitening the eyeball (his eye had some hard red lines or veins). After all of that, I've finally converted the whole thing to black and white. Most of the images I've taken for him were converted to black and white in fact because, I find them more expressive that way and put more emphasis on the expressions or the drama that I desire to add to the scene or the look. Here though, despite adding a black and white adjustment layer, I didn't want to leave it like that. I think mainly because the light direction in the first place didn't add much drama to it. To go around it, I thought of adding a "tonality" or a "tint". The tint here was a bluish hue. To my eye, the color fluctuates between silver, gray and light blue. Now depending on your monitor and how you look at it, the pupil can be brighter or darker. Finally, and to give some sharp look, I've used the Liquify tool in Photoshop to pulls the sides of the eye a bit. To my simply experience with the eyes, some eyes give a strong stare when they are sort of half closed and when they are so, usually their sides are pulled little bit, specially the inner side of the eye (closer to the nose). I have to mention at the end that before doing all of these adjustments, there was already a work done to the RAW file originally, specially with Clarity option, to soften the skin and hide some of unwanted features!

With this little tour with my camera, and with me neglecting more of my duties toward my beloved conlang, Ayvarith, I'm trying to force myself to believe I have a beautiful life. Such optimistic trends were never my thing, but trying hard to adjust something, and along with that comes a lot of daydreaming. Hard to resist the temptation here, and hard to settle down. I have what I need, or so I convince myself, I just try to be happy with what I have at hand. As for what I don't have yet.......... ?


Saturday, May 14, 2011

Again...

I lose. Again...

There are times when the world seems to have no meaning. Plain... boring... and inside you just lose the ability to feel emotions; yours and others'. A week that begins with a panic shouldn't be considered a week on your calendar. Started this week off with realizing the fact that my passport is missing, and after looking around for 2 days, at home and at work place, it didn't show up. I was going to inform the nearest police station about the missing passport (the procedure to get a new passport here), or should I say I did go indeed, but they told me that I have to come by day time in the official working hours and not afternoons. Then, as if by a miracle, ta-da and the passport was in my hands. In the place I've least expected: my camera bag. Why? Don't ask me please.
Seems I'm growing a trend of "geekalization" in my blood. Why do I feel so comfortable going around in circles in ACE hardware store? I have to say that just looking up at tools (even those in the pet section) might, at any moment, spark some ideas for your camera. I'm going there from time to time just to check the latest WHILE looking for some tools that I do need indeed.
Even though I've decided to have a vacation from my camera for some time, still, I'm working with it somehow, by force, as my brother wanted me to take pictures of some products to help him in some graphic design he is working on for an ad. Not that my brother forced me to do it but I had to do it to help him out, using my softbox and my humble desk lamps and shot with my Tamron 70-300mm macro lens. The challenge was in using the flash unit (strobe as some call it). I'm still not mastering the lights, and needless to say, I don't have the right equipments. Is it time to order EZcube? I don't know...
As a new break to my vow, I made a trial with this "spiderpod" that I've got from ACE last week. I was afraid that it won't bear the weight of the camera, but it was fine. It can bear the heavy weight of Canon EOS 7D and a lens attached, to some limit, until you lower the camera level so much that the legs don't stand a chance for a support, then you might need to use your fingers or something at the base. Spiderpod is useful for many other situations of course, because of the flexibility of its legs, but for the time being, I just aimed at using it for a ground level photo shoot. The target: my car.

Seat Altea 2006
I didn't notice the cat until I began processing the image!
And just a glimpse on how it looks to be using a spiderpod on the ground...

Spiderpod in action
I took many shots from different angles in this experiment, but I've decided that the best angle is what you see above. Also, I was aiming for a focus stacking. My fisheye lens was configured on f/2.8 which means a shallow depth of field, and this is the effect I wanted in fact but I wasn't sure how to focus specially with the spiderpod being so slow (I'm not going to lay on the ground, would I?). Here, I've used the Manual Focus and rotated the ring according to the approximate distance as measured by my eyes.

Canon 15mm Fisheye lens. The focus ring and the distance indicator can be seen.
Source (B&H)

Despite the fact that we use the metric system, and all our education is in metric system, but sometimes it is useful to use the imperial (?) or measurements in feet instead of meters. This is because, as the name implies, the foot is indeed approximately more or less, the same length of your own foot. When I used to go for some field trips for my work and I needed to take some long measurements and the measuring tape would fail me because it is short somehow, I would simply count my steps and divide the number by 3 (if I'm having a calculator at hand that would be 3.3) and my steps are converted to meters now. Of course the whole thing is not supposed to be precise, but to give an estimation. I think we really need to distinguish between cases in our daily life where we need to be perfect and where we need to be, simply, practical. Well, Maybe matters of the heart are an exception.
However, this is what has been done here, the distance between me and the car front is about 0.5 meters with my own eyes, but I took also shots fixing the focusing ring at distances longer and shorter than 0.5 meters, thinking that I would go on focus stacking, but I realized when I checked the shots on PC that there is no need for all of that. One final shot was enough.
Photomatix, again, played some weird role. This time even though the slide was a single slide, and I'm not doing any batch processes, it did show white edges. The edges were not removed until I turned on the option to crop the images after aligning. The thing is, the pictures are aligned by the virtue of the spiderpod. I just keep the option to align the image on all the time because I don't like to change the options often when I work in between the projects. Cropping your images when doing a batch process in Photomatix, as by means to prepare for stitching a panorama later on, might cause you some headache. Most of the panorama stitching programs would give you a notice that the dimensions of your images are not equal, and maybe some of them won't stitch the images at all because of that (I remember AutoDesk Stitcher would display the images with equal dimensions only and neglects the different ones).

Trying to find some means not to work with my camera as before and take a break, I turn from time to time to my arsenal of images from Ireland (2009 and 2010) and the Scientific Center, unless some idea pop up in my mind and makes me on the go and MUST use my camera. This will happen soon with the arrival of the sound trigger that I've ordered. For the time being, I've been re-submitting some of the old sketches I've made during the boring meetings or simply when my mind was having a walk in its own world...

Africanus
Zombie Survivor (renamed)
I remember saying to myself that I want to take a break from my camera in order to handle other things that are hanging around, like my Ayvarith conlang. I've started already recording some verses but it was a slow start with some technical problems, hopefully though I will fix this soon. I was recording my voice in 16bit format, but seems I have to do it in 32bit, just to make the transition smoother, as the 16bit recording appears to be cut sometimes into some fragments. Either that, or simply, my PC processor is so slow at the moment! However, just as an example for how Ayvarith sounds, you can get a little MP3 file here. And just in case you need to follow up as well here comes the English and the Ayvaric text...

English:

Once upon a time in the dusty past
when tribes dominated and hatred spread
the destiny was waiting and waiting it was
for the man of might who will come and unite
so destiny chose a man called Alexander
far away from the land of Caqobdar
king of kings whose father was Pilippán
ruled with just and spread the wise word
the kingdom of Caqobia now is unite
the kingdom of Caqobia now is mighty

Ayvaric:

wáħád maąiþ baZmén hú ğabrán
baMat xawanim sabíŧún ąaramramún mağ maskamah
xawan e-qazalzul minŧár vi-minŧár hú xawan
leAdam vu qáħayluþ yi ga-yiyawħad e-ħayyúþá
kazá e-qazalzul baxtar adam hú ąališgandar
mí hínhín, mí ąiric húþ Caqubdar
malík e-malíkún yi avvú xawan hú Pilippánút
yi dakal vi-našŧar e-miąšavúþá mağ ąadnakút
malakúþá Caqubdar húþ haylá mayawħadiþ
malakúþá Caqubdar húþ haylá qavíriþ
During reading some of these verses, I've noticed that my perception for the vowels' lengths had slightly changed, or it might be affected by my desire to say things in a hurry to sound like a fluent speaker of Ayvarith. The experience here is that, in the beginning of the creation of this conlang, I was concentrating on each individual word and how it sounds (to me of course), but the story was changed completely when these words are added together to form sentences; the level of hardship in pronunciations got elevated. Nevertheless, I'm on the way. Who said a language doesn't evolve? I realized even that the original UDHR (Universal Declaration of Human Rights), that I've made in the early beginning of the creation of Ayvarith, is considerably wrong to the current state of Ayvarith and its grammar.

Well, for now I'm going to finish The Playful Brain, as soon as I can, as my shipment is on the way. It is here already but waiting for the clearance to finish. If I'm lucky (huh?) then I would be able to pick it up today. I've been trying to write something with a gush of emotions, and made something out of the haste...

It was but in these eyes,
one truth above my lies,
when everything scattered away.
Trying hard not to cry,
though my heart is set to fly,
from me, far, far, away.

Now it's like from above,
cruelty won over love,
wishing you good luck over my pain.

A tear on the cheek
laughter is all I seek
now, it's all over again
it's all over again
Learning how to survive
digging for a life
it's all over again, now
it's all over again
My life is beginning,
all over again...

Weird things happen, I know,
but to be lonely again, no, no,
I'm not identified, again.
Shadows of my past,
and the gloom they cast,
am I scared of love, again?

Now it's like from above,
not a thing to be thinking of,
two hearts dancing in the rain.

A tear on the cheek
laughter is all I seek
now, it's all over again
it's all over again
Learning how to survive
digging for a life
it's all over again, now
it's all over again
My life is beginning,
all over again...
all over again...


Thursday, May 5, 2011

Dear Camera, See You Later...

ayħav húþ ğašar mí e-harrá yaw e-dum yi hú báy
lávin anná húþ baZú daynúr majŧún?
šá ąél kil mší yixwan gavvá liQiliváy?
mat hú zmén e-ranáħah, liZú ąayun?

Some "Ayvaric" thoughts has been around, trying to change or edit the literature that I've been inventing for some time now. This time, it occurred to me that usually in English, the word "between" is used usually in combination of two objects, while "among" is for objects more than two. Thinking about it, there is the same thing almost in Arabic and Hebrew (I guess), but it's not a number-related. There is "bayn" [بين] and "ma bayna" [ما بين], but I'm not sure of their exact classical use. To me, I seem to say them fluently according to the speech but without knowing the grammatical reasons for this! In Ayvarith, there is a similar situation even though I've made up some explanations for this without really noticing them myself: (bayun) and (mabyun); clearly close to the Arabic version, but as far as I remember the Hebrew and Aramaic versions are not far from this either. I'm thinking of upgrading the meaning to make (bayun) used for two objects while (mabyun) for further numbers above two. Just a thought.
I've renewed my account on Writing.com for another year. Doing that sort of gave me the pinch to keep up with my other projects. A very bad habit of mine: starting things and never finish them up. I'm looking forward for more tiresome days specially during the summer and the heat here, with the expected renewal of my duties into field trips. Field trips, games, photos, daydreaming, a conlang and poetry (specially poetry. I didn't write in some long time now with all the gush in emotions in my mind). My life truly is a mess that went out of control. Trying hard to keep up and organize my time and even exercise to enhance my physical vitality to cope with my own requirements and my own projects, but even that require time, and to screw things completely, sometimes I'm ready to screw up the world and sleep. Just sleep, like I always wanted (but that never really happened).
I think I do need a vacation from my camera. I don't know why I feel the need to take pictures so often. It's becoming like an addiction, and every addiction is simply bad, be it drugs, drinks or even a hobby like photography. But what you know, once I'm dropping down the camera I'm going to head to that Ayvarith project and web page that I didn't work on for some months now.
I'm back now with my own research about myself, my brain, my skills, and how everything works together. Most of such research is done at work actually not back home, because simply back home I don't have time now to sleep, and if I did, I'm going to screw up the day and just do nothing at all (probably only play those games I want to). With this said, I'm back to some of those free tests online (yep, another addiction), and along with that a belief of some thread of ADHD in my (neurological) blood. While reading The Playful Brain, I'm paying more attention to my simple actions and notifications and trying to analyze them under the light of what I've understood lately. I've noticed what is said to be an "easy puzzle" can take me a longer time to solve more than what is supposed to be a "hard puzzle" of the same type or rank. Also, I've been fluctuating my attention from one object to another (looking at a book to pick it up, and an agenda lies in the way between me and the book, thus I remembered something suddenly for that agenda and picked it up totally forgetting what I wanted to do with the book). Looking at some videos on Youtube about ADHD cases makes me feel superior though. It's not like that with me and yes, I don't think I do have ADHD at all now, but why do I lose my focus that easily? Why I keep flipping channels in my mind? Is it the damned Maladaptive Daydreaming again? I know that I've not been the hard fighter lately against this habit, mainly because I'm exhausted and in fatigue.

Decision is made now. A break from the camera for some time.

I should add to that a break from chocolate and coffee as well. Speaking of my mental status as well, in fact, I don't care much anymore about what people think of it now, but I like to explore my mind little bit further. I'm doing some EIQ (Emotional IQ) tests but I don't count on such results as the questions tend to be highly relative to the culture I guess, but anyway, my score was low. Not surprised though. I'm a loner after all.
On the other hand, I'm back to my senseless sketches as the attacks of boredom do visit me at work from time to time and makes me unable to read the book at hand...

The Devil's Automobile
The idea was to create a head with some brain popping out of it, but with such epileptic art form, expect the unexpected.

Sensory Man
This sketch was done horizontally (90 degrees to the left or CCW), and my mind didn't make sense of it as usual except later when I changed the angle of view and rotated it 90 clock-wise to realize it looks like a man's face.


Now back to my camera before I leave it alone for some time. I did my experiment now for catching a flowing water with the help of ND filters, and hence I couldn't use my Tamron, but instead I've used my old Canon 55-200mm, because I do have an adapter ring for the diameter of this lens (Ø52mm). The result was not exactly what I wanted, specially when it comes to the angle of view, but it was some trial that I hope I've learned something from...

Aqua Viridis (Green Water)

The whole problem is about doing the right exposure under the green flood light. One of the techniques that I've came up with is to use the (M)anual mode completely to achieve this. The (M)anual mode gives you the ability to change the shutter speed and the aperture (f-number) as desired and with a half-press to the shutter button the camera would give out an estimation of the light level in EVs. Everything was fine, except of 2 points that I was puzzled with:
  1. Where to focus? to the furthest edge or to the nearer one? Here, I tried to focus in between (I focused without the water flow in the beginning thus it was an approximation).
  2. What aperture size should I use? I used maximum f-number (narrowest aperture size) but probably I should have applied the principle of Hyperfocal distance? Though I think this concept is mainly used in landscape photography and not in close-up photography.
The main important thing is that I've fixed the shutter speed. Few seconds were enough to make the water flow in a blurry way like a dream effect (in fact it looks like milk to me!). After setting the shutter speed to 3 seconds, and the aperture to f/29, I did simple half-press, checked the EV and then put on some filters corresponding to the mount of EV I want to reduce. The EV reading without putting the filters on was close to +3, thus I've fixed three ND filters: ND2, ND4, ND8. They correspond to a reduction of -1, -2, and -3 EVs respectively, and thus totaling -6 EV putting the scale down from +3 to -3 (3+(-6)=-3, simple calculus). However, even though the picture was fine to some extent, I had to edit the RAW file as well and adjust some sliders and finally, with the help of adjustment layers in Photoshop, I've removed the green color from the background and kept the water and the mug in green only. I'm not satisfied with the sharpness of the water flow itself.

And still dwelling in the bathroom trying to catch up a panorama for this narrow place. I think it's around 2x2 meters (~ 6.6x6.6 ft). It is indeed a challenge to do a panorama in such space. The only panorama, probably, that I did in such a narrow place (and without the VR-head back then) was for the inside of the little tower back in Aughnanure castle in 2009...

The inside of the little tower in Aughnanure castle field, Co. Galway, Ireland.
But, this panorama, taken without the VR-head and definitely a narrower place than my bathroom, but after all I minimized it to 360 panorama (horizontal line only). The hardships of the bathroom were different, specially that I wanted to take the panorama from a level higher than my head, and this time I used my new tripod and not my monopod.
  1. With a tripod, the base was stable, but the tripod's head itself was shaky a bit making a small tilt for the VR-head on top of it.
  2. The narrow space of the bathroom made the lower angles, where the tripod's legs show usually, a serious issue.
  3. Tried shooting with flood lights and not my usual bathroom lights, but the ceiling's plugging point was narrow and the flood light could not be fixed there. In order to solve this problem I had to think of some way to lengthen or extend the plugging point further. Luckily, I got some converting heads (for light bulbs) in the family shop near by and connected two of them to extend the plugging point. I had to work on smoothing the edges a bit because they didn't fit in the first place so I had to widen one converter and narrow the other. I have to say I was working for more than one hour taking the panorama and afraid of this bulb to be falling down on my head at any moment!
  4. The usual problems with the stitch in PTGui, but this time accompanied with a glitch from Photomatix when merging all in HDR format. Seems that the new Photomatix has a glitch in batch processing bracketed images. Usually I see such errors and broken lines when different images are merged by mistake, but this time I double checked my images' sequences and there was no mistake. Simply, this one particular slide which showed a strong error had to be done again alone separately. Only then, the HDR slide for that angle appeared perfect.

The flood light with extension made of converting heads (or plugs). The arrow points to where drilling was used (with a special head to soften the area and not drill through it)

The right side of this HDR (tone-mapped here) slide became partially white with broken lines even though the bracketed sequence is correct! It wasn't the only slide, but it was the worst...

The whole point of using flood lights here and not the regular light bulbs that were already there is that I wanted to avoid the WB (White Balance) problems that I had before in my first experiment in this bathroom. If you read my post last week you'll find an explanation of the problem and how it was hard, somehow, to choose a particular WB with such lights. Here, after fixing the flood lights, I've simply shot the panorama with Daylight WB.
As for the glitch in Photomatix, I thought it might be because I was setting the options for reducing the "ghosting" artifacts to "high" while the camera didn't shake so much and there were no moving objects to eliminate, thus I processed the package again in a batch process but turning of the "ghosting" correction off. Yet, the weird artifacts kept on coming.
It is always hard to set control points for the make of a HDR panorama, probably because of the exposure data embedded in such files that makes PTGui unable to set the control points properly. However, I've tried the old trick which seems to be working fine for now (but that didn't spare me the troubles): tone-map the HDR slides under certain settings, then stitch them and save the file as a model. Then, open the HDR panorama file and apply that model. That way, all the control points that were applied perfectly for the tone-mapped images will be applied to the HDR panorama in the same systematic way (providing the control points are perfectly situated in the tone-mapped model). I've stitched the HDR panorama then without even optimizing. All the errors that occurred while trying to align the HDR images disappeared simply depending on the tone-mapped counterpart. Why not simply tone-map and then stitch? Here you go:
  • HDR panorama will have exposure information rather than a tone-mapped version (even in 16-bit TIFF). This option gives you more control over the light effects.
  • There are occasions when you think it is better to manually edited the HDR file for some reason (changing hue before tone-mapping, changing exposure of certain areas only before tone-mapping, ...etc).
  • If you are thinking of making a QTVR (QuickTime Virtual Reality) file, it is important to match the exposure of the left and right sides of your panorama, otherwise in the QTVR file you will notice a strange straight line while rotating your QTVR. This option, to match the two sides in exposure, is available when you tone-map in Photomatix (and other programs), while stitching already tone-mapped images won't give you such an option and you might have to find other ways to solve the problem.
  • PTGui got an option to fix the exposures for the whole HDR panorama before stitching. Useful sometimes to make an average of all the slides' exposures.
After stitching the HDR panorama, there was a heavy load of work with Photoshop to clone out lot of the undesired objects to make the panorama normal as much as possible. Parts of the VR-head did appear so much in this panorama specifically, and it is hard to simply remove by cropping; I have to clone out instead. I think it is time to re-consider the way I work with vertical angles, as it seems a 45 degrees up and down is causing me problems! Beside these parts, some weird artifacts in red appeared as well, and still I can't explain what are these as there is simply no reason for them to occur!

Lavatrinum
My bathroom, and still you can see some red artifacts in a larger view. I had to cut out the roof because the green light was subjected to "poster" effect, or banding artifacts.

And one of  my biggest mistakes, again, is using a large f-number (narrow aperture) causing a lot of sparkles caused by the lights. If I remember correctly, it was f/20.
After this panorama, I think I will get back to the sweet old Photomatix instead of the new one because there are many issues now that I've noticed that are caused for no specific reasons. Such glitches didn't appear in the old Photomatix (version 3). The only problem with the old Photomatix was the weird squares that appear on the viewing window (I think related to the insufficient memory as my PC runs for long times). So just to be systematic:
  • The new Photomatic (version 4), has a problem in tone-mapping window. As you work according to what you see while you tone-map, once you hit the "Process" button, the final image would come different to what you have seen in the tone-mapping window.
  • The new Photomatix has a problem with batch processing RAW files. As it turned out, some HDR slides were merged with strange white bands or broken lines (like what happens when two different or so much shaky images are merged), while when these specific slides done as a single process, this problem doesn't occur. Talk about time-consuming!
  • Related to the problem mentioned in the beginning, some weird artifacts, in form of colors or shapes, appear after tone-mapping (e.g. in my example above, red areas appeared and had to be cloned out, and banding of some colors making gradual change appear as blocks of pixels).
I don't think, however, I'm going to do it all over again with the old Photomatix, but I learned my lesson I'd say. I have to check further with my VR-head and the best way to deal with low angles to avoid including the body of the VR-head itself into my panorama. It's not completely evadable, but at least the effect can be reduced somehow.

Finally, my order(s) had been processed and I'm waiting for their arrivals. I'm doing it slowly so that I'd have more time reading The Playful Brain. Three photography books, one teleconverter, and a sound trigger. Did I say I need a break from my camera? hmmm......