Awareness Month
February of every year is named as Awareness Month for Retinitis Pigmentosa, a genetic disease that I suffer from already (beside an older brother and an older sister). I did one shot last year which took a lot of time from me but the result were not to the level I hoped for, but well, it was something done with gratitude.
 |
| Despite February, 2016. |
This year, I've remembered the fact by coincidence (via @rp_hub on Instagram), and decided to do something quickly because I had my load of work to be done already. Since the most significant feature about Retinitis Pigmentosa is the tunnel vision and the loss of peripheral field of vision (slowly to complete blindness in extreme cases), thus I've decided to depict that.
I've used here a small snoot (by impact) made specifically for speedlites. I had to unscrew the back of the snoot and fit my lens there. It was a matter of time to balance the camera, but as the problem prevails here, it was hard to center my eye (working alone as usual). In the beginning I was working with Voigtländer 20mm lens, but it occurred to me that since the lens will inside the snoot already, why not go big with a real fisheye: Rokinon 8mm; which it was.
 |
| Peripheral Damage Rokinon 8mm fisheye, f/16, 100-1sec, ISO100. |
Despite the hard conditions here (everything is dark and light hard to reach inside) but I had to work with f/16. I've used all my speedlites here (3 of them), putting 2 close to my face and one at the back in hope it slips some light inside the snoot. Did many shots and probably this was the best, and I've discovered that the dramatic impact can be improved (and also eliminating some color problems) by simply switching to B&W. At the final stages of processing, I've sharpened the central circle only. The leader of our group liked the idea but he preferred the eye to be at the center, and that's why I need to re-do it!
Rotundum
In a moment of boredom, inspiration seemed to strike me out of nowhere. Now I'm wondering how come I didn't think of it long ago!? The whole thing started with a cup of Turkish coffee on weekend. I've always wanted to take pictures for the inside of the cup, since I've been hooked to this type of coffee. The purpose? Well, cup reading. My silly thoughts lead me even to do a panorama in some way from inside the cup in some way, but with time, the idea died out in my mind. However, with my new mobile phone and its camera, I was ready to play around and got some good results!
 |
| Turkish Coffee |
I have to say that I didn't expect such result from playing around with Photoshop. Probably, however, that the object (or cup) should be curvy and does not form a perfect cylinder from the outside to have some sufficient details as in Turkish Coffee. Anyway, the method was simply that of changing the the coordinates from polar to rectangular, and that way a circular object would be flattened. Yet, I had to experiment with other circular cross-sections.
This method, now, sparked me mind for more ideas as I'm looking around for circular objects to be shot from the top (and in fact this is not the first time for me to be fascinated by the Circle). On the list I have mugs of various liquids as well as ordinary objects, like a pack of coloring pencils!
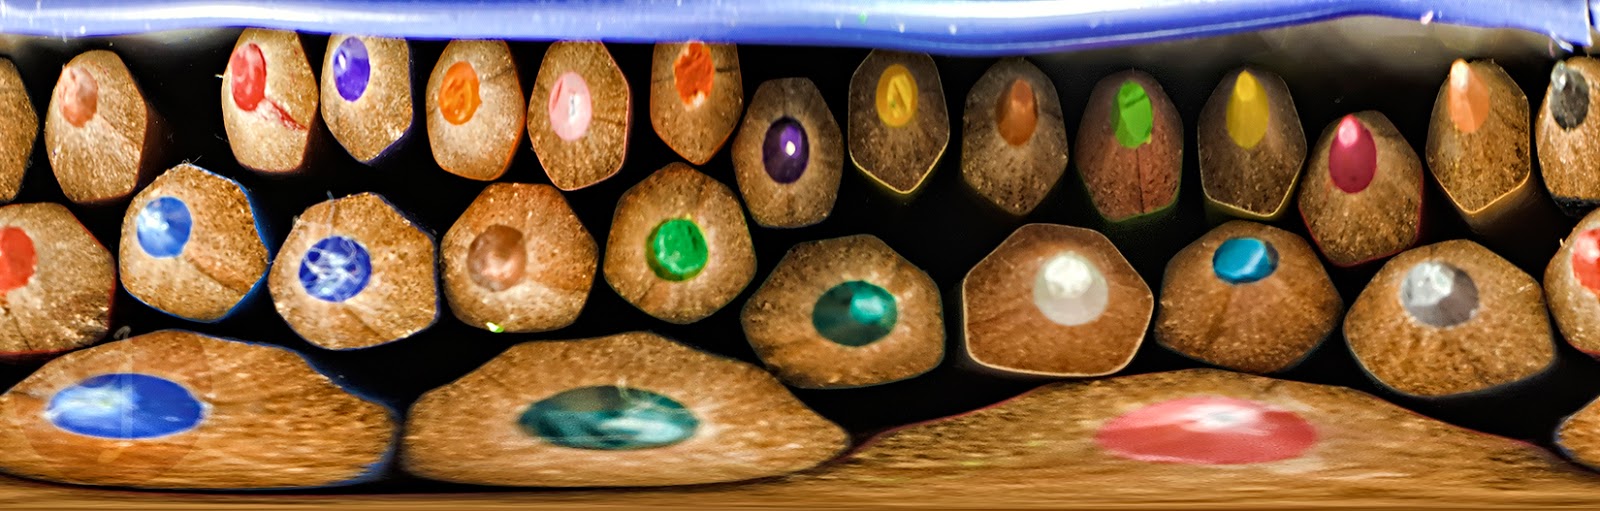 |
| Pencilorama |
I'm not stopping at this limit though. I've been trying already to see if any QTVRs are possible or could produce some interesting results. The view was surreal...
Peripheral Damage in QTVR.
 |
| Source: Amazon |
This technique is not something new in fact; it is indeed one of the earliest methods to establish panoramas and fake-planets (fake-planets as in a planet formed from a single image instead of a real stitched panorama). The thing here is about reversing the technique and converting the circle into a rectangular. The original technique involves shooting a mirror ball from various angles to form several images of the place and then converting these circular shots to rectangles. Such technique was discussed with some detail in Christian Bloch's The HDRI Handbook; I have an earlier edition but there had been updates to the book! Even though such technique for panoramas seems to be obsolete by now (not sure) but still such things and techniques are worth learning!
Finale
Now I've been busy with the arrival of Austria's International Photography contest (Trierenberg Circuit) and many things on my table, beside the monthly project. I had some ideas to shoot but unfortunately the time slipped out of my hand and I couldn't submit some of these ideas to the specific sorting meeting for images of members for this contest. Ah well...
I still have things to be done and some images to be re-made in hope that they will pass the second sorting process. Working alone in this gives me many back pains. I can't wait to have some proper sleep. But seems I won't be having that until I travel out for some time…


No comments:
Post a Comment