Showing posts with label lenses. Show all posts

Thursday, May 4, 2017

Stacked…

It's a slowing down time, and summer is hovering heavily with its beginning here. Air breezes are slow and barely enough to breathe here, with waves of dust suspended in the air. I miss winter already. I didn't do much photography lately but few video shooting, again, as I'm waiting to settle down with a topic for the project of the month of May. We'll see what that would be. I had some work with macro shooting too as I was trying my old rail to do some focus stacking, which I have to say from now, it was a fail for many factors. However, I got still some nice out come as well.

VaVaVoom...

Let's head first to the video. In my last post in this blog I've posted mainly 2 infrared videos done as I was driving. It was about time, however, to do the same while using my B+W 403 Black UV-Pass filter. I didn't want to use the old and cumbersome 18-55mm kit lens which fits this filter perfectly and I didn't have any wide angle lens better than my Voigtländer 20mm semi-manual lens, which has a diameter of 52mm, and thus a step-up ring is needed.


Without going into details here with the settings I've been using (basically automated), you might have noticed vignetting around the corners. I need to do a thorough check up and comparison with my other B+W 092 infrared filter and Voigtländer 20mm lens, as it seems that vignetting happens only with this lens, for which I use a step-up ring to fit those circular filters (all of them are 58mm in diameter while Voigtländer 20mm is 52mm). If vignetting appears with both filters then, of course, it has to be the step-up ring, but if not, then it has to be the filter itself and its nature and make. However, in regular single shots, fixing the vignetting is quite easy but with a video clip, I'm still not sure about my capabilities in that venue. 
Sigma 12-24mm for Canon.
I thought I was over with videos until I've noticed that some of the infrared images online are actually, and most likely, images taken with a converted camera but without any filter, which produced a strange hue of colors because of the full spectrum involved (specially when the sun is shining), and then colors would be converted (sometimes) and the resultant image is something "fantastical," so to say. This is what I planned to do then specially after acquiring a new lens (but an old one) from a friend who converted to Nikon. The lens is Sigma 12-24mm. It is a big and a bulky lens but the range of zooming here is quite useful for me specially for recording a video inside the car, and with the absence of any 18-55mm kit lens in my collection (it's there, but it's old and hardly used).


Again, sorry, I have to remove the audio here (for your own safety trust me). I was lucky and unlucky in the beginning of this video as you can see: I was trapped between my brother's car (which is red but turned blue with channel swapping) and our neighbor's car on the right, yet it was a good chance for some interesting footage! Anyhow, I think I'm going to like this new old-lens. There are some problems though which I'm hoping to find a solution for later:
Rokinon 800mm f/8.0 Mirror Lens
  • The lens with its case is too large for my camera bag, even if the case is to be removed.
  • The lens front is fisheye-like, meaning no filters can fit. But there is a special hood to cover the front of the lens and provide a base to attach filters, yet it can hardly be used for now since it's 82mm in diameter.
  • The rear of the lens is large as well and it might be hard to stabilize any gel filters at the back.
Nevertheless, I still think this old lens will be of great use in the future. If only I can find a proper place to store it. This brings me memories of my Rokinon 800mm mirror lens which I didn't use much as well and I have to see about using this lens as well and getting active with it too! As you can see from the video above, the colors are pretty close to, for example, many portraiture shots that are said to be taken in infrared. This makes me think that many of these infrared shots are actually, simply, taken with a converted camera without an infrared filter. I've seen some pretty colored infrared shots that are said to be taken with Hoya infrared filters, with threshold of 720nm; Yet, I don't understand the vibrant colors which I don't even get with my B+W 092 infrared filter of 650nm in threshold. This needs more research!

Minute

Min-Yoot; to be precise about the pronunciation. Along with my videos, I've taken my chances to work with my old macro-rail for a while, as some tiny plants are blooming at home and I didn't want to lose this "rare" chance without documenting some of them. Got to say that the aroma that spread around the place in the early morning hours is just refreshing (despite the bad weather of dust and humidity sometimes).

Beauty Explosion
Canon EF 50mm + 56mm ET, f/11, 10-1sec, ISO250.
Focus Stack

I have to say though that all my trials with the rail were a chain of failures. Yet, some people liked some shots despite the errors like Beauty Explosion, which was shot indoors (after moving the pot inside). Yet, I made a mistake for not using higher f-number. Despite being inside, the branch was still shaking because of the slight breeze from the AC! This was so obvious even with 1.12X magnification, so I can't imagine what kind of shake I would be witnessing if I went over this ratio of magnification even! The 20mm and 36mm extension tubes would be used for every railing experiment still. It can be noticed in Beauty Explosion how some areas are smudges; those are specifically some merging errors probably cause of the little shake of the branch and changing the position and also there might be some missing millimeters along the way as I was rotating the knobs of the rail (making more than 20 shots along the way). The colors here are, of course, a result of swapping Red and Blue (the shoot was done using my converted Canon EOS 7D but without any filters).

SpectraOnion
Canon EF 50mm + 12mm ET, f/22, 30-1sec, ISO100.

Away from that plant, outside under the blazing sun, I got some memories back of me doing some of my first 3D with onion blooms, and we have it again! I didn't want to skip the chance so I tried my luck with it, this time with my converted camera. In SpectraOnion, I've the 12mm extension tube just to get closer to the bloom, as the 50mm lens has a minimum focusing distance of 45cm, and I needed to get closer than this distance. My aim wasn't really going into the field of macro here, yet I got a nice close up, despite the back-breaking situation (very low) and the blazing sun. Of course,  I didn't forget to aim for a 3D rendition so I've taken several shots by nudging the whole tripod to the left gently.

SpectraOnion (3D)

I've examined doing the 3D anaglyph on both, colored and B&W versions and, despite the distractions with the colored version, it seems that it stands out more than the B&W version. Not sure why, but it is kind of weird to see such thing with my own eyes, because it is believed, typically, that B&W images are better for anaglyph rendering to reduce the color distractions in general! Anyway, it looks fine to me specially at the base of the little stems as they stand out when viewed with anaglyph glasses. Moreover, I had a go with swapping the channels as usual with such images specifically.

SpectraOnion (Red-Blue channel swap)

Being beautiful as well, but not favored over the original by some, probably because the original has a strong color contrast between yellows and blues (the two are opposites on the circle of colors). However, another trial took place and this time I've done it outside (for the same plant) in a somewhat quite evening with barely some breeze. The light outside was strong so I was relying a bit on the fast shutter to stabilize the image with the same settings for the previous experiment: 50mm lens and 20+36mm tubes.

Stacked Bloom
Canon EF 50mm + 56mm ET, f/22, 5-1sec, ISO400.

As it can be seen, I was wrong. Though I increased the depth to f/22 but the shutter slowed down significantly. For this reason, I had to time my shooting, holding the remote in one hand and trying to block the air current with the other, and shooting only when I feel the branch was stable enough. The ISO had to be raised significantly which meant more noise. However, I can say that the range of proper merging here is better than my first trial despite the fact that I was doing it outside in the fresh air. Here in Stacked Bloom we see that it's all blue after channel swapping unlike the very first trial, Beauty Explosion. This is probably related to the change in IR levels from indoors to outdoors (outdoors being more, naturally).

Crystal Bloom
Canon EF 50mm + 56mm ET, f/16, 10sec, ISO100.

In my final trial, Crystal Bloom, I've decided to cut a portion of the branch and it take it inside then stabilize it further by holding it with a paper binder. The length was small so AC air breeze wouldn't have an effect on it, which encouraged me to go mad with the exposure! At that moment I've remembered my problems with my Canon EF 100mm f/2.8 macro lens, and thus decided to work with f/16 instead of f/22, as I thought it might be a factor playing in the mishaps with merging the focus stack. In average, the exposure for each shot in the stack was between 8 seconds to 10 seconds and the total was about 40 shots. Tried to be precise as much as possible with the rail this time and moved 1mm between each shot and the other. However, in merging the focus stack, things went OK except at some portions close to the edges away from the center of the image. This leads to me think that what is happening here is a change in the virtual size of the image beside the change in the focused area, and for this reason the stacking doesn't go well. There is, of course, some room for human error, always. Also, it might just be that using many extension tubes like that doesn't go well with the rail method? Not sure. Too bad I didn't think of doing reversing lens back then since I have the proper gear for that. According to calculations (which I hope are right!) if I'm to use Voigtländer 20mm lens in reverse, the magnification power is supposed to be about 2.5X. The question remains though about how practical the focusing distance would be (it is REALLY close already with extension tubes and 50mm at 1.12X magnification!). Seems we'll have another round with that. I didn't forget as well to render a 3D out of these images!

Crystal Bloom (3D)

Finale

This was a... brief (?) about what was going on with my life lately. Excluding the ups and downs and the mood swings. There was a bubble of eagerness to write a poem with all that mix of feelings inside me, yet I couldn't find the power nor the mental order to pin it down. I think my dreams of seeing Morocco must be kept for some other time. I've signed in for a leave for the whole month of Ramadhan and it will start by May 28th and will end by June 22nd. Thus, I'm not sure if there is any chance for a vacation this year either. All what is left for me here, I presume, is the company of my own thoughts, and projects…


Stock photography by Taher AlShemaly at Alamy

Thursday, November 21, 2013

Macro++

That was some amount of rains that we received this week! It's just amazing, but sad in the same time because I couldn't do much with it. I'm not driving my car, and didn't do any photography in such weather (and it would be better to have weather-proof protection stuff). My car was supposed to get fixed this week as the garage called me and said the chip they need arrived from outside and needed my permission and my agreement for the price to work on. According to them, they said 1 or 2 days will suffice. But with such rains, I didn't get any calls yet. Probably the rains are the reason for this. I can't believe I will see this car again. I'm growing sick driving other cars.

Macro Plus
I've been continuing my work with trials to do macro shots (or extra macro I should say). The work wasn't much of a success in fact for many factors. It made re-think my approach to do the whole thing really.

The System!
Click to Enlarge
As you can see on the left, the system is truly cumbersome. Long set of lenses and extensions, portable monitor, (shaky) tripod and lateral arm, with weights (dumbbell weights) added inside a sack to keep the arm and tripod balanced. I didn't make a glass surface for the macro experiments but I've been using the glass door that fell from the cabinet (the one in the picture). Sorry about the image quality as the image was taken with my mobile. I kind of suck at such images!
For the purpose of lighting I've bought two somewhat powerful LED torches or flashlights that got about 24 LEDs on one surface, plus 3 or 4 on the side in case a narrow beam is required. I think I might need to add a mirror.

Leaf

One of the shots done with the system shown above is a shot for the surface of a small leaf. As you can see above, the image is out of focus. Focusing is one of the big issues here and this is why such system as the one above is a cumbersome technique. According to some websites (they are a lot you just have to Google around) the magnification factor can be found by: Focal Length (1) / Focal Length (2), that is, the ratio of the focal lengths of the two reversed lenses, where (1) is for the lens attached to the camera, and (2) is for the reversed lens.
Hence, it is logical to attach the longest focal length possible to the camera, and the smallest focal length possible in reverse. I think I will use the notation "FL1/FL2" when it comes to image descriptions later. In my case, the largest focal length I could achieve is using the (broken) Tamron lens at 300mm plus two teleconverters, yielding 1200mm in total. The smallest focal length that can be attached in reverse is 18mm (with my old 18-55mm), and the result would be 1200mm/18mm, equals to 66.66X or approximately 67X! Meaning an object would be magnified 67 times its original size! Unfortunately, this was just a theory and in practice, working with such tools isn't plausible at all and can hardly do any good. Thus, I've neglected this approach for the time being and started to do it in other ways, like using the Canon EF 100mm macro lens in reverse with the 50mm lens.

Shaving Razor

Onion Peel
One of the issues that I was investigating is the placement of the teleconverters and the extension tube before the first lens (or the primary lens, attached to the camera). In some websites, they emphasize the placement of the extension tubes in between the converters and the lens. However, practically, seems the situation is the same in terms of magnification power, but probably it works better with the teleconverters attached in between the tubes and the lens. Maybe it is just a coincidence that it worked that way with me anyway, as most of the images here like the Shaving Razor and Onion Peel were all taken with such configuration. Later on, however, I started to use that system without reversing the lens, but simply using the 100mm macro lens with extension tubes and teleconverters.
The light direction was drastic for some shots, specially for translucent objects. Again, No lens reversing this time but I did have hard time focusing. The shake took its toll on the shoot.

Comparison

The leaf shot above is taken once with LED lights below the glass plate, and once on the sides of the leaf. One of the somewhat awkward features for using LED lighting is the bluish streak. The Automatic WB setting wasn't enough to correct the colors but it was (somehow) corrected in post-processing. Anyway, it is obvious that the look changes drastically with the change of light direction, like if it s a 3D object. Personally, I do prefer the lighting on the sides. However, this might not possible all the time, as the set of lenses can get to the subject so close that leaves no room for the light on the sides, the lighting from below is the only solution.

Beard
Canon EF 50mm+36mm extension tube,
f/22, 40-1sec, ISO400.
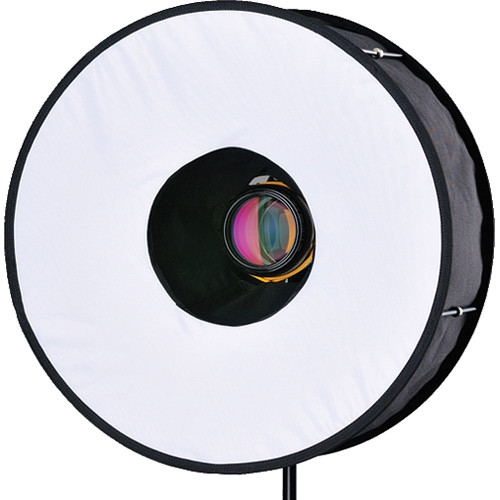
RoundFlash
Source: B&H
Along with it, I've decided to do some test for the RoundFlash. This time, it's not an extra macro shot but a simple one with my 50mm and 36mm tube. This simple trial did indeed show me how the length of the lens (not the focal length but the physical length) and the closest focusing distance do play a role when using this flash add-on. I think the optimal use would be for a lens that does not protrude much outside the limits of the RoundFlash and if the subject is considerably far from the RoundFlash to allow the light to fill it properly. Here with my beard experiment, the distance was so close (and literally part of my chin was inside the RoundFlash!) because of the extension tube, and that caused a bit of smooth light and shadows (but with the help of relatively high ISO as well). The RoundFlash seems promising but I'm sure it's not a complete replacement for the typical ring flash, and for that I did place several items in my B&H wishlist which are both, expensive and cheap.

Thoughts
With this work with some macro ventures, I've somehow formulated some ideas and thoughts that might lead my work in the future:
  • Practically, using extension tubes alone is enough to get a magnified and well viewed image. I think I was obsessed with the idea of turning my camera and lenses into a microscope and I didn't look at the validity of such practice and how it would reflect on my artistic side.
  • I've been using a remote cable with a delay, plus the 10sec timer in the camera itself, and yet seems the images do have a shake. Probably it is because of the mirror (even though I do use the LiveView mode to hold the mirror), and the mirror lock-up mode doesn't work with the remote cable and Bulb mode (as some of these exposures took a minute to achieve). There must be a way to reduce this shake at least if not stop it.#
  • Because touching the system with so much lenses together does produce a horrendous shake on the macro level, probably it is better to move the plate or the surface and keep the system stable as much as possible; and this is exactly how a microscope works! This, however, requires some mechanism work!
  • I do own an old microscope. Is it possible to implement that system into my camera and lenses? It is easy to talk about afocal system when it comes to astrophotography or bird watching; but on a macro level? I'm not sure if this is even possible.
  • Aesthetically: what do I want? It is obvious in such field, most of the shots would be scientific-like or simply abstract. Now if it is an abstract, arranging the lines and the edges of the frame is of a prime importance. The possibility of such arrangement, though, is yet to be questioned and experienced practically.
These are some of my thoughts so far about macro (or extreme macro) shooting, and more work has to be done soon and yet I have to discover some good subjects to shoot at!

Nostalgia
Among the other things that I try to do to keep me busy, there are some photos that I've decided to turn into something else. simply by converting them to B&W. Probably I was looking for some venting for my feelings specially that most of these images are those taken while traveling. I guess it is a case of nostalgia, for some days that can't be repeated, not in the meantime at least, to say.

Ghostly Room (B&W)
The Victorian B&B, Staten Island, NYC.

Thornbrook House B&B (Re-Visited)
Cashel, Co. Tipperary, Ireland.

Re-visiting old photos and converting them into B&W can be fruitful in a new set of images, specially in a time where my activities are hitting low. However, the trend is always to convert color images to B&W (for various reasons and not merely just to change the feel), but would there be a trend of changing B&W photos into colored ones? I'm not talking about the technique of coloring the old photos and movies, like those documentaries done for WWI and WWII, but I'm talking about digital photography and RAW files. I remember one time I've created 2 albums for a set of photos from Ireland, in which one was colored and the other was B&W for the same set of images, but probably I've done that without thinking deeply into that matter back then. Initially, what I think, is that coloring that B&W images adds almost nothing, since the B&W gains strength in its composition in the first place, and in the tonalities involved second. The introduction of colors into images that are already strong and fine-looking in B&W seems to be breaking the harmony and should be avoided, unless there is some good reason to do this! Generally speaking though, the B&W style seems to be the proper representation for nostalgia after all.

Geltani
This project has been on hold for weeks. Anyway, I've started to work a bit more right now and I've almost finished the set of leading parts of the syllables. What's required now is to polish this set, and try more grammar and more sentences. Initially, the order is supposedly to be S.O.V., mimicking the Turkish grammar. On the other hand, there are still some details that should be worked out. I have to check how to make a simple introductory page for Geltani to represented on Omniglot, in case it is to be accepted. Moreover, the syllables to write foreign words and names into Geltani has to be checked out again since it seems that I've made up some mistakes before.

Finale
Currently, it seems that I'm under pressure to do the most I can do with my camera, just before my eyes get bitter sooner or later. Next Monday will be the day of my appointment to do some tests. I'm still waiting for my car as I see some hope that it will be fixed soon according to the garage's statement. All this time, they were waiting for the spare part to be delivered from outside, as it is cheaper than the local vendor. As soon as I get MY car, I have to plan for a trip to Failaka island. Such weather is not to be missed on the island!

Source: Amazon
I've mentioned before that doing a panorama with my new IR gel filter is on the list of things to be done. However, this can't be done right now easily after the wave of rains that we received this week, and needless to say that I do need some "nice" location, to say the least. Yes, I can do it at home, but I'm bored of this place already. On the other hand, I'm planning to put Allison Earnest's book into practice by implementing her ideas and methodology. The book is quite good and systematic in its approach. Probably it doesn't give much details concerning calculations and evaluations of light levels, but it does provide great deal about sculpting light and how to approach a project. My work though would be using my two speedlites with some of the light modifiers I have already. The difference is, with studio lights, you can use modeling light to properly position the light and check the expected shadows location before the actual shot is taken. However, with speedlites, the modeling is limited to the pilot button which casts a fast light strike into the scene. Thus, understanding the power of the speedlite is critical. I guess I will be starting with simple objects around the house.
Finally, this leaves me with my own self at the end. With all these projects in my mind and these trials to push myself to be active by force, all seems but just a trial to escape from my own feelings about life and my own self. I think I'm in a status where I'm not sure if I should embrace loneliness, or curse it. Even a loveless marriage didn't work out with me to leave this house. It does sound more like being in a jail rather than a home. Even a prisoner might have someone to talk to, to share thoughts with,  to have hopes with - yet, I don't see this coming my way at all. It's simply a dead heart walking...