However I try to take it slowly seems my life pace just doesn't want me to. Having hard time cutting out my coffee habits and drinking hibiscus instead to lower down the blood pressure as much as possible whenever possible. I'm sick of the traffic jams everyday, so I'm having a little vacation for myself. Just one week off work trying to have fun (sleeping) as I like and going out as I like (whatever!). I might even try to go to Failaka and check for other locations here and there in this deserted island. On the other hand, I'm trying to enjoy my time in weekends, pulling myself back to the seaside and the photography there. Now with my Tamron 70-300mm I can sort of aim at birds from, somewhat, conventional distances, like I did some weeks ago with that lovely heron...
The Observer
I was lucky that he (or she!) didn't move and fly away directly. I took tens of images for it while it was moving and this is just one of them. The dusty weather here made me add lot of enhancements in the image (and nope, it's not in HDR technique). Herons are said to keep a constant distance from people, thus every time you get closer they would step further away to keep the distance for their own safety sake. However, seems the rule is not included in the situation here! I was stepping on the rocks and algae in a fast pace with my camera attached to the monopod with its 3 mini-legs spread trying to take some nice position. Another target for my Tamron was the morning sun with its sweet reddish hue in the horizon and the not-so-harsh beam of light. In fact, it was bright, but with minimizing the aperture (high f-number) and speeding up the shutter speed, I was able to catch a simple, yet interesting, image...
Sunspots
If you see the image in a larger view, you will notice some small black dots in the direction of 7 o'clock. I've read once that such black dots, in early morning, can be in fact for Mercury and/or Venus passing over the disk of the sun, but it can be also sunspots probably! However, I have to say that taking pictures for the sun with a normal DSLR is a dangerous trial, because it can harm the sensor severely. Just be careful in case you want to try something like that.
But not only suns, herons and Tamrons would go together, as I was chasing a pigeon with my Canon 18-55mm all the way to the moment of its flight above the ground. The reason I was chasing it actually was not for mere fun nor that I did indeed want to, but it was something completely different...
Acrobat
The story behind this shot was: I was in the Marina Crescent, the opposing side of the Marina Mall here in Salmiyah (area or city, whatever). I was in the exact position that you may check in the link above after taking pictures from the beach, not far from this location. After working on taking pictures for the yachts in the marina some sucker called a SECURITY came to me saying gibberish with "forbidden" at the end (in Arabic of course). I said sure, and walked away with my tools. I knew he was following me with his eyes so I walked to my car not far from the location and put my stuff there except of the camera and my 18-55mm lens, with a fisheye lens in my pocket. In fact, I was almost finished from the location but I just wanted to take a picture of the palm trees reflection on water when this sucker came in! I took a walk trying to get back to my previous position or to the opposite side of the marina to get a better view for the reflection, but there was another sucker roaming around and looking at me as well, hence I knew there was no way around it. On the other side of the dock, on the beach, there was this lonely pigeon walking around so I decided to play with it a bit hoping that this sucker will move away and leave me alone, but after taking all these images for the pigeon, he was still there, so I had to get back home.
However, after this little drama, I did have the chance to use my fisheye once and my 18-55mm another time to take pictures for the yachts and try even a 3D shoot. I'm going to share them here despite all the suckers in security suits who suck and make me sick of this suckering sickening world! (yeah, try to say that again fast enough...)
Yachts Awaiting... (BW,3D)
Yahcts Awaiting... (Color,3D)
Vivid Yachts
Vivid Yachts (3D)
Taking a new venture now with my camera, trying to take 3D photos, but this time, real 3D photos. This is done usually by rotating the object in constant angles and taking a snap at every angle. Supposedly later on, you would need some program to make this "object QTVR" rotating. The more angles, the smoother transition you would get. However, my aim now is not to rotate the object, but to make it "flat".
Unfortunately for me, things doesn't work like it is in spherical panoramas in the big big world. PTGui does not realize surfaces that easily and was not able to connect them to make a flat "peeled" surface of the object, even after putting my own control points to guide it through like blind. Seems there is no escape from doing this manually with Photoshop as it was in the old days when I saw one tutorial about this for doing a profile for a man's face and making it flat like if it was peeled (like an orange). This way you can see all features of the object without the need to rotate it or anything! This, to me, is more beneficial than creating a rotating QTVR. So far, I've failed, but I'm planning to continue with this.
My tools here were simple (in my terms as I didn't have to buy anything). I already have the VR-head (yeah, bought that back in 2009 or 2010) which can be used as a turntable base when disassembled. I looked around and didn't find something better than a CD and some kids' clay. Fixed the CD on the top of the base of the detached turning node of my VR-head with the clay and used some clay on the top of the CD to stabilize my object: A Seashell.
Now, we got some problems here:
The CD's reflective backside might not be good impression in general for the high and wide spectra reflected from it. It's better to be a white or black background below the object.
Because of my laziness, I used my monopod on its 3 tiny legs, which was shaky of course, specially with my 70-300mm macro lens. The turntable itself was fitted on my old tripod. Maybe it's not an issue but I didn't feel like removing my tripod from my car. It is already there for video recording!
Unable to put proper lighting, thus I depended solely on the room's lights without playing around. I can't attach the lights to the tripod and I don't have carriers for them.
One product though is quite useful and it is a complete set (beside having a turntable, it is generally a softbox) can be found from EZcube products here. It's a nice set for serious people, but since I'm not giving much thought about it, I will continue working on what I have. After all, seems as I said before, Photoshop is the one to solve the problem for profiling the object in a flat shape...
The Seashell on the CD. The yellow spot under is the clay holding the CD to the rotating base, and also there is a piece of clay under the shell itself to stick it a bit to the CD. Rotating the base was not an easy task as I thought.
Although increasing the amount of angles taken into the camera for the object would make a better transition, but since I'm not apt to make a rotating object in 3D but a flat body of the object, I'm planning to study somehow the relation between the field of view, and the size of the object, and how many angles are needed in minimum to take all the details of the object. This is tricky. Because we are using here lenses of changing focal lengths and zooming plays a role, thus it's hard to tell what's exactly the field of view we got at hand. I know there must be some formulas for this, but for the time being, I will try to stay away from those and hypothesize that the object fills the field of view (FOV). I need a paper and pen now. Back to the old days of Physics. Just imagine how it is useful to see a jar, a can, or even a car, made into a flat image to study all the details and connections at once, like a plan for making a cube! Awesome isn't it?
On the other hand, there had been some work on the other 3D realm; The Anaglyphs. I try to make one every time I get the chance (and I think I will do one for the seashell above). However, last week I got the chance to stay awake all the way to the morning time and headed to the beach for snapping some shots with the sunrise. I was late abit but nevertheless, it did the job and I had the chance to make myself dirty a bit in the sand (or mud?). Yes! Walking on the sand is really awesome! I felt really refreshed, and my footprints proved for real that I do have FLAT feet...
Steps (HDR of course)
This image is taken with a fisheye lens and cropped from the top to make the destination somehow aimless. I was moving my lens here and there, left and right trying to figure out the best way of mimicking the left and right vision in order to combine it all in one anaglyph. It was hard I have to say, as it is normally with a fisheye lens, but at home and after viewing the slides, I made the central focusing point to be the heel print of the first step at the bottom as it was the most stable one with moving the camera few degrees to the right...
Steps (3D)
I don't think this is a really good one though. But a new experiment for me was to take pictures for the junk that was dumped in front of my work place (yeah, we have so much respect here), and believe if I say so, JUNK is not a junk to the camera. When you go for HDRs or even normal images, junk can be a good source for inspiration, really...
Junk
Now, as you can see, I don't know what the hell this pipe was used for, oil or gas or water, whatever. But this same pipe, gave me a valuable lesson here. The bad point though (and this was taken with my fisheye lens as well) is that I was focusing to infinity, making near by objects blurred a bit like this pipe here, but nevertheless, the effect is there! Just get your 3D glasses ready...
Junk (3D)
Concentrate on the pipe here. The circular head of the pipe is the center point of focusing (i.e. in layering the 2 images together, not the camera focusing itself). It seems, to me, that one of the good points to make a 3D image is to make the object in a non-dull position, and by non-dull position I mean simply, not into a straight line all the way, horizontally or vertically. Make some movement in your scene; foreground close object and far background or such is the case here with my image, a diagonal line (the pipe) with some perspective look as if it is popping out of the page. One further point to mention here is that in processing the 3D images, you have to have in mind that after all you will crop the image to remove some excess parts that don't go along with your image, thus the resulting image could be smaller way too much sometimes (specially if it was taken in a fisheye lens).
Now to explain one funny coincidence before posting this. It's an image that I've called Departed. In this image I was aiming to the horizon and the sun with my fisheye lens, forgetting about the footprints that I've made myself on the sand and that a fisheye lens does have a wider FOV. After getting back home I've noticed that my footprints were in the view and cutting them out (keeping the ratio aspect 3:4) would actually minimize the scene so much. Finally, I decided to leave it like that and give the picture a theme... Departed!
Departed
My point here is: Whatever, however, your image was, you can always do something about it. That is, if you like to! The real thing now is whether this is applicable in real life or not, or is it possible or not.
Not the usual time for writing my blog, but I decided to put this down today. It feels like a day when and where all what surrounds you is stupid, or you might feel yourself stupid. I just want to break everything I see in my face. I want t yell and shout but even that I can't do.
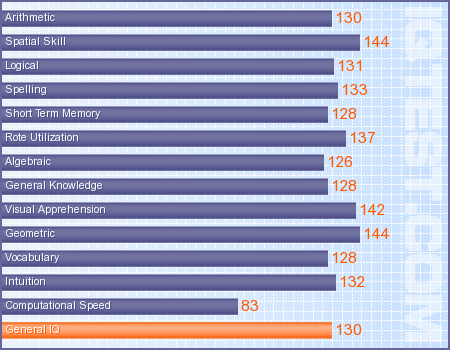
For my own satisfaction, I did take (and pay) for this simple IQ test, just to make myself feel better. The current score is 130, but I've discovered that I've did it before under another email, and my score back then was 121.
General IQ Score
Your General IQ Score of 130 shows how able your mind is in general. Anyone with a General IQ Score this high is considered to be gifted. This score is better than 97.72%
of all persons taking this test. Virtually all occupations can be
comprehended with a General IQ this high. You should be able to handle
almost all academic challenges.
You scored higher than your General IQ Score in 7 individual ability categories. 3
of these better scores could be called statistically significant and
may indicate special abilities, or that you were distracted on those
parts of the IQ Test that counted more heavily in the other ability
categories.
Arithmetic
Solving many of the IQ Test's problems required the ability to add,
subtract, multiply, and divide numbers mentally. Many mental tasks
require arithmetical operations even though numbers may not be involved,
and thus number manipulation abilities can strongly indicate general
intelligence.
Your Arithmetic IQ score of 130 is not significantly different from your General IQ score.This score is better than 97.72% of all persons taking this test.
Spatial Skill
Understanding what changes will occur when conditions vary is a deep
and powerful ability of the mind. All invention and creativity of every
sort is based upon this ability. Although test problems usually involve
manipulation of objects in space, persons with a stronger ability to
spatially manipulate can also be expected to use this ability to be able
to better predict how social and psychological situations would change
due to variation.
Your Spatial Skill IQ score of 144 is exceptionally higher than your General IQ score.This score is better than 99.83% of all persons taking this test.
Logical
This is the ability to determine if a set of rules has been correctly
followed. This ability is most useful in combination with other mental
skills listed above. Those with strong logical ability are quicker to
see where a given set of conditions is going to lead, have a strong
sense of justice, and better understand--from an intellectual
analysis--the benefits of harmony.
Your Logical IQ score of 131 is not significantly different from your General IQ score.This score is better than 98.06% of all persons taking this test.
Spelling
The ability to spell can indicate general intelligence. Remembering a
set sequence of letters indicates the mind's ability to retrieve
remembered facts. Learning how to spell and use the words of a language
is almost a complete IQ test in itself. Although poor spellers with high
IQ scores can be found, it is rare, and in general--everything else
being equal--the better spellers have higher IQ scores.
Your Spelling IQ score of 133 is not significantly different from your General IQ score.This score is better than 98.61% of all persons taking this test.
Short Term Memory
The ability to remember things for a short period of time allows the
mind to check back and retrieve facts needed to complete a problem
solving operation. This ability becomes more critical when problems have
many aspects that need consideration and/or need to be solved mentally.
This ability strongly determines how efficiently one handles the many
aspects of normal life. If your short term memory ability is strong you
are much less likely to seem inattentive or "slow to get it" to others.
Your Short Term Memory IQ score of 128 is not significantly different from your General IQ score.This score is better than 96.90% of all persons taking this test.
Rote Utilization
This is the ability to take a set of memorized facts and mentally
extract and/or operate with or upon the facts within the set that are
pertinent to the problem at hand. Persons with more of this ability can
be expected to spell well, remember telephone and other numbers easily,
be more adroit in procedural operations, and have a stronger foundation
for tasks that require the use of memorized material.
Your Rote Utilization IQ score of 137 is not significantly different from your General IQ score.This score is better than 99.32% of all persons taking this test.
Algebraic
This is the ability of the mind to abstractly handle quantities and
qualities. Persons who are strong in this ability can more quickly and
more deeply understand analogies, stories, derivations, equalities, and
hierarchical structures.
Your Algebraic IQ score of 126 is not significantly different from your General IQ score.This score is better than 95.85% of all persons taking this test.
General Knowledge
Knowledge that is casually picked up and remembered can indicate
intelligence, because persons with higher intelligence will exhibit
greater retention of those pieces of information that are encountered
less often. Because higher intelligence allows a person to have a deeper
appreciation of the connectivity of facts that may seem disparate to
others of lesser intelligence, memory of such facts becomes easier.
Your General Knowledge IQ score of 128 is not significantly different from your General IQ score.This score is better than 96.90% of all persons taking this test.
Visual Apprehension
This is the ability of the mind to mentally picture visual
information and to be able to extract portions of that information for
separate use. A person whose visual apprehension is strong enjoys a
richer, more creative appreciation of visual aspects of experiences.
Your Visual Apprehension IQ score of 142 is exceptionally higher than your General IQ score.This score is better than 99.74% of all persons taking this test.
Geometric
How well one can comprehend geometric relationships of lines, sides,
planes, angles, and topological properties strongly determines one's
ability to make sense of visual information. The strength of one's
geometric ability can strongly determine how quickly knowledge can be
absorbed if it is presented visually.
Your Geometric IQ score of 144 is exceptionally higher than your General IQ score.This score is better than 99.83% of all persons taking this test.
Vocabulary
Knowing the meaning of words is an ability that directly increases
along with the increase of general intelligence. The meaning of a word
is more easily remembered with higher intelligence, because it takes
more intelligence to understand and correctly use words based upon the
subtle differences between words with similar meanings and to comprehend
difficult concepts which are sometimes symbolized by a single word.
Your Vocabulary IQ score of 128 is not significantly different from your General IQ score.This score is better than 96.90% of all persons taking this test.
Intuition
Intuition is defined as that ability of the mind to develop answers
to questions without consciously dealing with the problem at hand. Often
a question will provoke your mind to answer without using conscious
processing time, and the answer is said to come "out of the blue" or
"suddenly, it just struck me". Of all the many abilities of the mind,
this is one of the most often used. Just knowing what to do is often an
automatic process that occurs without much conscious figuring. Those
with stronger intuition make less mistakes and can seem luckier, wiser,
or more mature.
Your Intuition IQ score of 132 is not significantly different from your General IQ score.This score is better than 98.36% of all persons taking this test.
Computational Speed
If you can correctly solve a variety of problems faster than another
person, you may be demonstrating a generally more orderly internal
arrangement of your mind's problem solving methods. While speed cannot
be the sole factor in determining overall superiority in one mental
operations, in general faster computational speed will often indicate
that a problem's comprehension was more complete. With everything else
being equal, a person with faster computational speed than another
person's will be better at tasks that require the synthesis of many bits
of information.
Your Computational Speed IQ score of 83 is significantly lower than your General IQ score.This score is better than 12.85% of all persons taking this test.
Been a slow week somehow. The week began with heavy headaches, starting from Friday. It was not a pleasant beginning for my last weekend at all. It was one of the rare times that I would sleep for 12 hours (not in a row though); from Thursday afternoon, until Friday's morning. Woke up then with a pain in the shoulder and neck (and the back of course), but the most annoying thing was, the headache. This headache reached its "climax" whenever I do some activity that would cause my blood pressure to raise up; my head would feel like blown out and I almost wanted to scream from the pain.
I waited for 2 days, because I thought it is what usually is; the regular pains of long sleep. Unfortunately, the headache did not calm down. The only way to calm it down was to have some pain-killers. I decided then to check with a doctor in case it is something serious. However, with some blood analysis that I just got its results on Wednesday, it turns out that there is nothing serious. I did such analysis back in November or December and this enabled me to make some comparison between the two. My cholesterol level is lower (but still bitty bit high) than the previous time and also my salts level. The doctor didn't add much to the general recommendations; sports, diet, and being away from salts as much as possible. My headache now is gone and I don't get it whenever I do some activity, but I have to keep an eye on my body now. I think I have to change my bed or do something about it.
Been carrying my tripod and camera wherever I go in hope of catching something; just anything. Life had become a bit dull, and with this daily traffic jam from work, the situation is a complete set of misery. I find it hard even to stay awake in the afternoons after coming back from work. I hate to nap at this time in regular week days but my fatigue wouldn't allow me to stay awake, and with my concerns about my blood pressure, I had to reduce my intake of caffeine for now. No redbull in early morning and no coffee at home or in the office, but I keep telling myself that this is just a temporal procedure. I already had a nap in the office twice this week!
Back to the camera. I've started to take my stuff with me almost anywhere I go, trying to find something to catch. I still have images to process from Ireland, but I don't come closer to them anymore. I think I'm exhausted for the time being and might get back later. For the time being I'm looking around the places I go to. In fact, it is indeed your eyes that see what is beautiful and make it, not the place itself. I experienced that when I paid a work-related visit to Anjafa Beach. It is somehow a quiet beach, quieter than the usual beach where I take my photos from, The Corniche or Salmiyah seaside. I intend to take some pictures from there, despite the location is somehow sensitive because of some villas around the place. Villas, for people I don't want to interrupt!
Nevertheless, I've been taking some pictures from the beach. The usual beach. After I left the clinic on Monday, having my blood taken for tests, I headed to Burger King on that beach to break the fast. I noticed some features that I did like to take some pictures of, although the sun elevation in the sky is not quite what I desire, and the weather is not cold any more like it was in those "lovely" winter mornings before...
Beach Shed
Despite the harsh sun here, I've used Fluorescent WB here to reduce (somehow) the sun's flare. Amazingly, it kind of gave out (with HDR tone-mapping of course) some sense of a night scene. I took several shots for this scene from different angles but I guess this one was the most appealing, and also after doing that, I remembered that I need some items into my 3D collection, so I went for it as well. This time I didn't use the fisheye lens, as I wanted to concentrate on the structure of the so-called "shed" here. It is the main subject that interested me in the first place for such 3D play-around. Fisheye also proves problematic for some structures as will be shown later...
Beach Shed (3D)
It was one of my interests really to make 3D images (anaglyph) with fisheye lenses, and even I'm thinking of expanding this ambition to do it with panoramas, but it's early to talk about that for some reasons. I believe in case of a fisheye 3D image, the aim must be a a landscape or a wide area in the first place and not one specific structure (and I believe this is natural and obvious because of the nature of a fisheye lens). Now, what happens sometimes is that the structure itself, doesn't help at all to be a good 3D under a fisheye lens. This makes me a bit picky with when to use a fisheye lens. In the following example, it's my work place in 3D trial, but the problems occur with the pillars. The nature of the fisheye lens, to bend the scene on the edges, makes the difference between the left and right portions (i.e. the left and right images) at extreme on the edges while minimum in the center (that is if we were focusing on the center like I did here)...
Work Place (3D)
Maybe the only thing, in my eyes, that did really pop-up as a 3D object was the bushes or trees behind the cars (that silver one on the left is mine by the way :) ). There is a lot of "ghosting" in this image specially at the edges (like the top of the pillars or the top of the building on the right side). Ghosting here is not like ghosting in HDR processing. In HDR, usually, we say "ghosting" about some phenomena that causes some blurring in the final HDR slide when combined from original bracketed images because of some moving object in the scene which the software that combines these bracketed images, in order to minimize the differences between the images before merging into HDR, tries to eliminate and replace the pixels, and the end result is some blur or a light shadow of some object. In 3D images, Ghosting means the fact that the red and blue (or Cyan or Green) portions in the image itself are so wide that the eye of the viewer can't combine them anymore to form one image in the spot. Ghosting in 3D images is somehow normal and like there is no really perfect 3D image (to some extent) but there are limits I believe to really settle down with such defections. Sometimes the ghosting effect can overwhelm the whole image making it meaningless! I have to admit though, my HDR tone-mapping for this image might have been a bit "over done".
Anyway I kept using my fisheye lens in the location that day (Wednesday) and focused on one of the trees. At this point I think I'm sort of made a mental point for myself on how to use a fisheye lens to do a 3D image...
Surreal Tree (3D)
I made this one here in Black and White to avoid the noise coming out from the shades of green and blue, and in fact, they say Black and White images make the best anaglyphs because there are no color confusions that might disturb the view. This sample in fact (with a previous one) made me almost sure that to use a fisheye lens for making a 3D image, your focus should be on the edges (left and right in case of landscape orientation or top and bottom in case of portrait orientation). This will leave of course the rest of the image and specially the opposite side of the focus point highly venerable for ghosting effects, but nevertheless, these ghosting are far away (relatively) from your focus point and maybe won't catch a glimpse at all!
3D Infinitum
Focusing on the lower center rock
Seems so much notes to keep in mind right now. However, with working a lot around this matter, it will eventually become like a second nature. More work needed here.
Now, to the matter of panorama in 3D. This is something I've been thinking about for some time but I didn't settle down with an opinion of my own and I just don't know how to achieve something like that! The main problem here is that when doing a proper panorama you actually use VR-heads to rotate the camera around the no-parallax point of the lens+camera combination (to avoid stitching errors resulting from parallax errors of course). Now, isn't 3D processing is generally made by overlapping 2 images with a tiny parallax error in between them? Because this is how our eyes work in the first place!
Exercise: extend your arm in front of your face with your thumb up. Now, look with one eye for a moment, then close this eye and open the other. How does it feel? Isn't the background, sort of, moving? This is exactly the parallax error that happens in the camera and prevents the PC from stitching!
If I take a panorama in the old way before getting my VR-head, i.e. using a tripod alone, that means stitching errors and a bad stitch (and I already get bad points of stitching even when using VR-heads!), while the parallax error is somehow the main factor for achieving some good 3D image at some point (concentrating on a point and letting the other differ in portions of red and blue). The process here is quite complicated and maybe can be achieved only with using 2 cameras altogether at once and not only one, and these two cameras should be leveled horizontally in a perfect manner while pointing in opposite directions with difference in few degrees. For the time being, the only cheap solution I have in my mind is to overlap 2 layers of the same panorama and shifting one of them a little bit to the left or right and do the process of combining into a 3D. OR, as an option, is to lengthen the process of taking a panorama a bit and take the whole scene in one spot and then do it again after shifting the tripod itself few inches or centimeters (or whatever units).
I'm, myself, still not sure on how to exactly take two images for 3D processing (handheld): should I shift the camera itself to the left or right a bit, or should I rotate the camera some few degrees. Logically, seems rotating is the good solution, and again, this solution won't work with panorama processing because you are in fact rotating your camera already! Unless... you re-take the whole panorama not by shifting the tripod this time, but by starting from a different angle, few degrees away from the first starting point. So many ideas that I need to test!
I've took the chance to take some pictures for the moon, or what they called the "super moon" as it is the closest distance for the moon to Earth in the past 18 years! So they say, anyway. However, my main goal was actually some time-lapse movie for the moon moving along. Anyway, I did take the chance to do some bracketing for HDR slides and I think I did learn a lesson or two from this experiment...
The shoot was done by Tamron 70-300mm with its full zoom at 300mm. The short time lapse was done on the roof of my house with some breeze, and as it is well-known, with great zooming a little shake in the tripod is noticeable, and hence some images were a bit shaky but with minimizing the size of the frame they are barely visible. The shoot almost took around 30 to 45 minutes with a shot every 5 seconds, and the little clip was combined with 10 fps. Now, for the HDR trial. HDR here proved to be hard to be tone-mapped because of the noise level that occurs in the black areas around the moon. The idea I had in my mind was that to show more details of the moon's surface, then HDR is a normal choice, but I think it didn't really matter in this situation...
Normal (WB: fluorescent)
Tone-mapped HDR (with some artifacts)
I used the fluorescent White Balance here to reduce some of the white bright areas in this glowing moon and to help on pronouncing more of its details a bit. Lot of people like the normal version more than the HDR version and I don't blame them for that. I myself don't like the HDR moon very much, but yet, I do feel the need of more power in my zoom, and for this reason I'm thinking of getting one of those "focal length extenders" (probably one made by Vivitar) to extend the zooming power behind the current limits.
Right now I've began recording videos while driving (2 days now) in the early morning. Just trying to catch a nice moment or so, and that makes me stabilize the tripod in the car most of the time and remove it only when really need it. This thing now kind of keep scattering my tools, in the car and at home! Oh well... isn't it worthy?
Well folks, it is a sad week all over the world. I don't think I'm able to write something here for the time being, so I've decided to give some space for some humble effort from my side to help with the catastrophe in Japan.
I've tried hard to imply here some links for donations and I've emailed some donation websites to provide me with some clues, unfortunately none did reply, except of PayPal, which actually guided me to put my own icon and I then, should transfer the funds to donating organizations, which is a responsibility I'm fearing to take care of. One of the trusted websites as I believe must be the Red Cross, you can start from there if you really want to give donations and help give a life to someone on this globe, and surely one of these would be The Red Cross, or The American Red Cross here, as well as similar Red Cross bases all around the world. Also, PayPal's blog got interesting information if you are willing to help in some other way.
君が代は
千代に八千代に
さざれ石の
いわおとなりて
こけの生すまで
Looking up the Japanese national anthem to post it here, opened my eyes on interesting information and history behind the shortest national anthem in the world.
Maybe my words are not eloquent enough to describe the sympathy with the Japanese after such a disaster, but I tried to write something, and hope the overall meanings of my words reach to their ears and hearts as well. You are not alone...
The Rising Sun
Oh land of the fury,
the past shame and glories.
The happy moments,
and the animated stories.
On the edge now,
passing the train off by.
Like the world stumbles,
for a rage down from the sky.
Through the hardships,
through all sorts of pain.
The light kept shining,
so it will be again.
Raise a rainbow,
flip up a frowning face.
Time is a healer,
this courage I praise.
Devastation,
mounts of desperation,
unconscious sensation,
several might knock you down.
Trust me,
the world looks down so humbly,
and just crying so simply,
for a smile at dawn.
Kneeling, while I'm praying,
begging and praising,
amid the cries and keening,
to the Grace of One.
Look over here,
over this shoulder,
a caress in a finger,
just watch, the rising sun...
Losing your faith?
I understand...
The tears are down?
just take my hand.
Is it blowing?
not a damn.
Feeling cold?
here I am.
Crazy world,
evolves so fast.
No respect,
not a simple heart.
Just who cares,
when you smile?
Innocently,
from the pile.
And then,
if you have to mention,
all about this tension,
that goes in your heart.
Then know,
I am in here also,
for sharing a rainbow,
that won't depart.
Kneeling, while I'm praying,
begging and praising,
amid the cries and keening,
to the Grace of One.
Look over here,
over this shoulder,
a caress in a finger,
just watch, the rising sun...
Oceans of troubles under your feet,
Shakes and shakes, nothing to be feared.
Just like the world's king,
eternity seeking.
you are,
just like a rising sun...
Please note that there are some fake organizations that do take donations under such circumstances, so please, check into it more and make sure they are official.
Our hearts as well go along with the peoples of Bahrain, KSA, Libya, Tunisia, Egypt, Yemen, Oman and probably Syria on the way. Just like how the Tunisian poet ِAbu Al-Qásim Al-Sháby [English here] (1909-1934) said in his poem (and how ironic his own people started the flare of freedom in the Arab world as well):
إذا الشعب يوما أراد الحياة *** فلا بد أن يستجيب القدر
ولا بد لليل أن ينجلي *** ولا بد للقيد أن ينكسر
If the people one day desired life *** Destiny then must obey
And the night must clear out *** And the chain must break
Been a lazy week on one frontier and a busy one on the other. Lazy in the sense of my own projects, and sort of my photography, and busy with my work place somehow. I've been roaming around looking for chances to get a scholarship, again. I stopped looking for some time because many events took place and I was not in the mind for it but I'm in again and trying to find my way around. Still, there are many places to ask in. All of that gave me no time to write a poem, which is annoying really because I do have a sort of a wave of feelings, but yet, I can't write them down for the lack of words. A line or two and that's it. Also, been looking around for some other host to build my Ayvarith page, since the discovery I've made, which is: Fortunecity, sucks. I can barely upload some images there; no audio, no clips, no MOV files and probably no SWF (flash) files as well? The thing is that publishing the Ayvarith transliteration of Alexander's story online via WDC is on hold, because I need to add these vocal samples, which I need to dumb online first. I'm still looking and didn't make a decision yet. There are lot of webpage-building websites with ready-made templates, but those don't suit my needs.
Grabbing my backpack wherever I go, trying to get my eyes on anything I can catch, but with not much to be done. I'm trying to get back to the 3D realm, that time when I used to take pictures and convert them into 3D anaglyph (red-blue) images, but so far, I couldn't find good subjects. Only once though, with that scene from the beach...
3D Infinitum
I'm on the look for more appropriate subjects, and taking my backpack of cameras and lenses and the tripod wherever I go almost, even to work. At home too, trying to come up with something, but the trials aren't always successful. Not successful in the means of having my own satisfaction with it. You can tell I spend so much time alone and have nothing to do, yet my mind is in turmoil and barely able to do anything. It's like being paralyzed "ethically". However, doing more trials with my Tamron 70-300mm telephoto macro lens, I remembered that I do have an old collection of seashells that I've collected from the nearby shore, and it was a thought, long time ago, to take a close-up for some of them. I had to settle it down somehow (and it hard, because I didn't want to use glues) and went on shooting (with brackets of course)...
Seashell
I had to stay away from my self-made softbox for about one meter or so (~3 ft), and I think the zooming factor is good, having in mind that the shell is actually the size of my thumbnail (or less). One of the hardest things in the image above to settle down, was the White Balance (WB). With HDR tone-mapping you can change the WB as you wish but also the original WB used plays a role, and I think the original was Daylight WB. I figured that Daylight WB is more flexible to change when doing tone-mapping after doing HDR. Having Tungsten or Fluorescent WBs (i.e. cool temperatures for the images) makes the original images bluish and when tone-mapped and changing the WB to something close to "hot colors," usually the images end up with a violet or purple hue that, most of the time, won't be suitable for the general mood of the image. However, doing this, will still require some extra work for boosting the contrast and tweaking the general temperature or fixing the color balance, and all done after tone-mapping in Photoshop. I tried to do some 3D effects here but, unfortunately, the fact that the subject is in a softbox and not much of an interesting background makes it really dull and useless to do it in a 3D anaglyph image.
How to do a 3D Anaglyph?
Just some steps that you might want to try out to make these things, but remember it doesn't work all the time because it all depends on the composition of the image and also depends on the visual capabilities of the viewers themselves. Have in mind that you will need some editing software like Photoshop. I believe some other freeware stuff can do. So, here we go:
In this process you will need to take 2 images of the scene to mimic the human vision; one left-eye image and one right-eye image. You can do this by 2 cameras if you like, but for me I always go with one camera and after the first shot I would pan the camera (or rotate it around its body axis) for few (not much). This distance in few degrees is just to mimic the distance between the two eyes. You can as well simply, while standing in the same position and being stable, move the camera's viewfinder (if you are using it) from your left or right eye to the other eye and focus on the same subject. Remember, there should be one object at least that is the center of the focus in the image, because this point of focus is important for later process. Having this idea in mind, you can go around with your tripod if you like for more stability, if you like.
Now processing. You got your images correctly hopefully (and maybe you'd better be shooting in JPEG rather than RAW but the choice is yours). In Photoshop (or any other software) you should open your images and layer them one upon the other. You should mark carefully which one is for the right-eye and which one is for the left-eye. You can check for yourself easily as you notice the relation between the focus point and the background; things tend to shift to the right when viewing with the left-eye, and vice versa. Put the right image on top.
Reduce the transparency of the top (right-eye) layer to 50%, or to whatever suits your level of vision, and now drag your layer around to make the focus point coincide with the focus point in the lower layer. Remember, it is not necessary to make it 100% perfect, as there might be some difficulties coinciding the two foci. The major idea here is to make the distance between the two images as minimum in that particular area of the image (parallax error?), while neglecting (somehow) the rest of the image for the time being. Once this is done, get the transparency back to normal (100%).
Now, the setting is Right on top, and Left is below. Now take the Right image and suppress the RED component (I'm supposing you are working in RGB color system). This can be done in Photoshop by pressing Ctrl-L (or by using the menus to get to Levels command, or by adding an adjustment layer of Levels over the Right image). Once you get the dialogue box of "Levels", change the drop down menu from "RGB" to "Red". Now, move the White arrow at the bottom (not the one below the histogram which corresponds to highlights, but the lowest one) to the far left (or simply put "0" in the number box). Thus, you will have the black and white arrows all together in one place and your image will look bluish. Make a mind connection here: Right <=> Red channel. For me, I got the habit of using adjustment layers and I don't edit the images directly, thus whenever I use them in this case, I make sure I use the clipping (right click the adjustment layer itself and it's there). This will make sure that this effect will affect the layer just below the adjustment layer and nothing else. Just in case.
As you did with the Right image, you will do with the Left image below, but this time you have to suppress the Green and Blue channels, and your image will look reddish.
Change the blend mode of the topmost layer (Right image) to Screen. You image now should look something similar to what I've done above. Crop the excess on the sides as you wish, though I prefer you do it with respect to the aspect ratio between the height and width. To crop with respect to the aspect ratio of the image itself, pick up the crop tool and mark the whole area of the image. Then, move the corners as you wish but while pressing the SHIFT on your keyboard to ensure that the ratio is preserved.
After cropping and everything, your 3D image should be ready. Try it out and view it through the special glasses if you have any. Remember, you might want to try it more often to get some satisfaction and not every scene is capable of producing some astonishing results. To my experience, I think spherical objects have the potential of giving out great 3D view.
On the beach still, trying to go out there specially in the times of low tide to fish for some chances. I was lucky one time which kind of sparked my mind on another purchase on the list of my endless dreams...
The Observing Heron
I was working on my monopod (because the tripod was fixed inside the car to take some videos while driving) and it was sort of flexible with me, with its 3 mini-legs expanded. The monopod was collapsed o its minimum height and using the full zoom of Tamron 70-300mm and switching to Macro focusing as well, I had some how a nice shot of this fella. I took so many images (of course not bracketed) trying to get everything i can from his own movement over the surface just before he flies away, and then I would sort them out back home. The weather was dusty and didn't help much in this, but at home I picked one image and did the "magic" to eliminate the yellowish hue and enlighten the body of the heron. Herons by the way are immigrants, but by time they somehow settled down in Kuwait. This is what I've been told by someone in the know. Despite the dust that day, HDR imaging somehow improved some images as well...
Infinitum II
Processing the previous image was not an easy task for the level of noise that was present with tone-mapping. This is one awkward point in doing HDRs. You have to develop some strategy to overcome this somehow and after all, several ways might not work at all. Been receiving some attacks on HDR images and that it is not a real photography, and I'm tired of explaining myself that my goal is doing something beautiful and HDR is merely a technique for me to extract as much details as possible out of the scene. Strangely, in the last image, I did things unconsciously. After I got back home I remembered the advice of Alain Briot in his book, when he talked about capturing interesting lines and shapes, and specially the S-curved lines.
Also, this short trip to the seashore in the last weekend made me find out a fact about the Tamron lens I have; it has a tendency to show some strong chromatic aberrations. Now, this is somehow contradicting my own belief that wide lenses are the ones that exhibits such phenomena the most. I've read somewhere that it's a common feature for wide lenses and fisheye lenses to have chromatic aberrations specially if the object is back-lit. You would find some thin lines of red (or magenta), blue, cyan and yellow around the edges of the object. This is exactly what showed up in some of the images I've taken with this lens. Fixing it should not be hard task but when HDR technique is involved, it is worse than solving an equation in physics. HDR, and because you are combining several exposures, tends to somehow intensify the effect of the aberration and adding some contrast. Hence, it's hard sometimes to remove it with the usual "lens correction" procedures provided in Photoshop or any other software. I did go around it sometimes, but still it is not a practical mean nor successful all the time. One of these procedures is using the Hue/Saturation adjustment layers to suppress the magenta or cyan channels and confine these changes to the edges of subjects in the image. Photomatix, my favorite so far, got an option to remove chromatic aberrations from the RAW files as it combines them into HDR, but this option seems not quite the useful one here. It doesn't work most of the times. Maybe the best thing is to give up the RAW (and the stored dynamic range in them) and fix these aberrations in RAW then convert the images to TIFF16 format, and start the HDR from that point. One of the ways to go around this, is what I did with this image. Simply, converted to Black and White:
Terra Algae
The sun reflection from the water surface was strong even in a dusty haze, making all kind of aberrations around the edges of the rocks on the ground. Final solution I had in my mind is to give up colors and go Black and White! So much green in the image anyway and it sort of lost its magic in my eyes.
Currently, I've been worried about my tendency to be an "addict" to chocolate. Now with my life style like a single guy trying to do his own food most of the time, I do tend to eat some snacks rather than "real" food, and most of the time, it is chocolate. Well, I do change to candies but that's seldom. It's chocolate all the way. To be more specific in fact, it's only one brand that brings me joy: Kinder Bueno! Can't have my enough of that!
I do cook sometimes, say thanks to the microwave. The guy who invented the microwave got to be
a single guy as well. Turkey sausage wrapped in egg (stuffed with cheese, tartar sauce and cucumber with some spices).
All done in microwave.
Majorly now, all what I have in a day is one meal, and the rest is just bits of this and that and some snacks. In fact, once I get back home I don't feel like eating (probably because I've already filled myself with chocolate and candies in my work place). Most of the time this one meal is a dinner; be it a simple corn flakes dish, or some cooking I do when I have the mood for it, or simply and order or a take-away.
It's Thursday now, TGIT. Hopefully, I will try to take a second try on shooting the Chinese restaurant from the inside as I was planning. Few days ago I was there as early as 7 P.m. just to reserve that corner of the restaurant for my work but unfortunately, there were already some people there in that specific corner. Maybe I should work late, despite the fact that the owner wanted to show the dishes on the table to add "life" to the image. However, that night I got several shot from several angles for the restaurant from outside, but none was what I aimed for. The long exposure time and the large f-number (small aperture) made it hard all the way.
Golden Chopsticks
Although I used somehow a small aperture to make a star effect as you see, but seems my choice was wrong. I think the star shine effect is not good in such a scene, or maybe it was way too hard on the scene. As you can see, the cars didn't spare me here. Some of them even had the mind to come forth and then go on reverse in front of te camera (the big white beam on the left). Unintentionally, the speed-lights covered the number plates of the cars in some nice effect. I don't want to expose these numbers to the public!
I took images with my 15mm fisheye and 18-55mm, but this one was the most appealing to me so far despite all the wrong-doing in it. It's taken with the fisheye, as you can tell from the edges of the image. The WB here is set to Tungsten, but the scene didn't go bluish in an ugly way. I should memorize this lesson now as I might as well use it for shooting inside, which has a reddish atmosphere as well. The WB here emphasized the bluish trend for the spot lights at the top while keeping the main building within its hot colors atmosphere (reducing the red a bit of course). Next time, I will try using a larger aperture (small f-number) for fast shutter speed, and to avoid the star shine effect which is not appealing here. I hope I can do this tonight.
I leave you now, with two videos. First one is one of my trials with time-lapse photography, with me going back home from work. The camera was programmed to take a shot every 2 seconds, and to minimize sizes and make sure that the memory card will take it all, I've changed the settings to shooting in medium sized JPEGs only. In the traffic jam who knows when will you be reaching home!?
The FPS (frames per second) here is 10, and I made several versions to check for the speed, and probably this is the best one. At the end it gets fussy because of turning around like a bee trying to reach home from the other end of the street. However, the generally quality is reduced of course for web purposes.
Secondly, I leave you with something I got addicted to at the moment. Old stuff (relatively), but addiction-trigger, to me...
Been one of the most catastrophic holidays I've encountered so far. Four days of complete boredom. No going out because of the jams (jams of celebrations), and barely doing some activities out of home in the mornings, and now, trying to organize my room little bit. TJ, cleans his room! This is what life is coming to!
I've taken the chance one morning to go to the beach, again, to try out some time-lapse with the sunrise and this time with my intervalometer. Because I was so lucky, and please note the sarcasm, the weather was foggy at the day in which I was able to go out in the morning. That was the morning of Friday, February 25th. I'm trying to pull myself back to photography on the beach. I didn't do that in a very long time now, specially at times of low tide. Sometimes, I do hate my work because of missing such moments in my life.
Anyway, In the fog there were some chances worthy for taking. The turbulent movement of the sea (high tide with some wind made the waves crush against the rocks on the shore), made some kind of effect when I processed the images in HDR, similar to the effect of using a slow shutter speed (long exposure) with moving water...
Terra Natantes
Floating Land
I almost got myself wet to take this photo, going a bit deeper into the beach and closer to the water. It was wet sand already and the air blowing almost pushing me towards the water. The fisheye was the first option here to add some weird depth to the image, but I was thinking of getting even lower than this, but the conditions didn't help. I didn't want to cover myself in mud!
The effect of the sea turbulence was greater when I snapped directly into the sea from the top of the rocks, just at the back of some restaurant (I think it was pizza hut)...
Fogland
This shot specifically was merged into HDR under ProPhoto space. I was kind of "missing" working in that space. Yet, because I was concerned about uploading this image into some websites that do not support such space, I had to pull back and put it into Adobe 1998. Because of this change of space, the bluish hue turned dull, and I had to add extra layers to put it back as I want it. By the way, the concrete structure in the middle is in fact a sewage outlet pouring into the sea! And despite this, and despite all the warning signs, people still do go to swim in that area! However after taking that picture I've been snapping with my 70-300mm macro lens, zooming into the rocks trying to catch a splash of water, and I had to use high ISO, as high as 2000...
Splash
Monday now, February 27th and the last day in this boring long holiday, I've decided to go out a bit and do some activities. Had lunch in my favorite Chinese restaurant and at day time, the beauty of the decorations is pronounced more. The only special thing at night time inside the restaurant is the spot lights which make it more interesting. My brain was wandering off in style of a daydream about possible shots inside the restaurant. I made a plan that I might ask the owner for her permission to take pictures from the inside and the outside for this restaurant. The facade of the restaurant MUST be photographed at night, otherwise I believe the image won't be that interesting at all. Even some thoughts for a panorama went on but a complete panorama should be taken away off the center to show a special Chinese-like lantern in the middle of the restaurant, hanging from the ceiling. Being under that won't be of much interest (not even in a QTVR).
On the same day, I've went for a car wash and it was such a crowded place. Took me around one hour to get out of that place! However, I managed to settle the tripod and the camera with the timer remote control in front of the seat next to me and started to take shoots for every 5 seconds. The situation was shaky and the camera fell down with the tripod on my first turn out of the station, thus I had to drive slowly and holding the tripod with one hand while driving. At home, I managed finally to combine the slices to make a simple time-lapse, without any sounds of course...
I still need to learn more about these codecs and formats. It took me some time just to get it in a suitable size! Now since this one is done, I thought of the previously done manual time-lapse for the sunset from the roof. This time-lapse was done in HDR and then tone-mapped, but something went wrong in some slides making the sides of the JPG files go dark or bright (all HDR slides were processed under same settings with a batch process command). I had to struggle a bit with this one to fix the size of the file and the dimensions of the clip.
The timer remote control is a must in time-lapse photography, and I thought in the beginning that I can't take bracketed images with a time-lapse process. I was wrong. Don't blame it on me though because the manual didn't mention any tricks about that. I emailed the support center for Canon-US, and they gave the answer in the very same day (thank you guys):
Thank you for contacting Canon product support regarding the Timer
Remote Controller TC-80N3. We value you as a Canon customer and
appreciate the opportunity to assist you.
This is possible, though a combination of features on the camera and on
the timer. On the camera, set the drive mode to continuous, and
configure Automatic Exposure Bracketing (AEB). In this configuration,
you can hold down the shutter and take three bracketed shots in rapid
sequence, and then the camera will stop after the third shot even if you
continue to hold the shutter. On the remote, configure your intervals,
and then also configure the exposure time for 3-4 seconds. This will
"hold the shutter button down" long enough for the three bracketed shots
on the camera. This should achieve the effect you are aiming for.
Please let us know if we can be of any further assistance with your
Timer Remote Controller TC-80N3.
Thank you for choosing Canon.
Sincerely,
Dirk
Technical Support Representative
Such trick was not really mentioned in the manual and I never thought about it. The way that the manual put it is just so specific and to the point. Every mode in the intervalometer has a job to do and that's it. However, I tried what the support suggested and it worked! I spent a nice one hour on the roof of my house just relaxing beside my camera and tripod in the nice breeze while reading. Eventually I had a nap on my chair that got me a stuff neck!
There were 24 slides of HDR after all, and each slide (or bracketed sequence) is taken in an interval of 3 minutes. I wished to make it smoother than this really but I was afraid of my CF memory card limitations. I might try shorter time in some other occasions. The tone-mapped images were then combined into the video you see above and I had to struggle again to limit the size and other things. Now what came as a surprise to me is the following: I was trying to combine several slices into one image (not a movie), as I was aiming to make an image showing the sun on the move. I used the Photoshop's blending, and I never had in my mind (which should be something natural but I think I was dreaming or something) - never had in my mind that the first thing blending command in Photoshop would do is to eliminate the difference to make one coherent image. I'm talking here about "image stack" blending and not "panorama blending". Image stacking is usually used for increasing depth of field when you take several images with changing focus zone (specially with macro techniques). However, the result was astonishing. A nice blend of colors (which is more vivid in ProPhoto but I had to put it down to Adobe 1998)...
Sunset
Not all the 24 slides were combined actually, but I picked them out on an interval of 3 (i.e. 1, 4, 7, ...etc). This is because I had in my mind the movement of the sun in the sky, but I never thought that Photoshop will simply eliminate the sun in ALL of the slides and keeps up with the color blend. I think this unexpected result is a lesson! I think it would be something similar to the Exposure Fusion (EF) technique that I used before to blend several images with different White Balance (WB) and not different Exposure Value (EV) as it is the usual with HDR images. However, I will try to work on my previous aim, that is creating an image with several suns in it. I did it before but it was simple that time and not many frames involved.
Today, I've finally managed to stabilized the tripod inside the car on the back seat. I did take a video already this morning and I'm aiming for time-lapse from inside the car. In practical use, I've discovered that 18-55mm is better than 15mm fisheye lens when taking a video from that angle. Mainly, this is because the tripod is so tied to the back seat and laid back a bit and a fisheye would show unneeded parts of the car inside. Still though, I might want to achieve such effect later. I learned also that it is better to leave the EV level at 0, instead of raising it to +1 to brighten the things inside the car. The front (the road) was so bright in the videos. Is this a trend towards videography that came over me? This is a bit scary 'cos mainly I've always hated to take or watch videos (movies and shows, ...etc) - but only a few of them. It's fun though with people looking at you thinking how weird you are!
Now Ayvarith-wise. Fortunecity, which was my last hope, made me sick now. I can't upload anything to that website and barely able to upload some pictures. No audio no video, just plain! I'm looking now further to see any place that can host such files. I don't want to squander my files here and there, like building the web page in Fortunecity and host the audio files somewhere else. It's going to be a tiresome process that way. For this problem now, I'm sort of delaying my recording for the Ayvarith text of Alexander's story. I've finished recording the samples for the Preface (samples of how to say the letters), and all I need now, a place to host them. Yuck!
I'm trying to get myself busy as much as possible despite my physical capabilities, but well, I don't know where I'm heading at... man, I need a shower...