In a nutshell, I'm sick of summer. Can't wait to have winter around me here. In Kuwait, we don't have the typical 4-season scheme; It's either summer, or winter. Winter though is more or less like spring for us.
Anyway, there had been some good news around and some more experimenting with my camera as I'm feeling more free and out of my obligations. Yet, I'm trying to find the power and time to work on some projects.
Peeking
One of the projects I've started to experiment with here is the usage of my idle pinhole camera cap from
Rising, which I've used only twice previously before this time. Now, I'm trying to get used to it and trying to be more creative about it, specially with its fuzzy and blurred images.
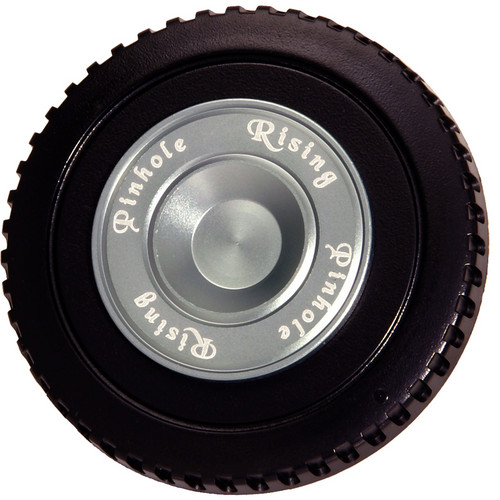 |
Rising Standard Pinhole
Source: B&H |
The "adventure" of using such a pinhole to take pictures took me around with some simple mathematical ventures as I was trying to calculate what is the proper wavelengths and what are the proper sizes for pinholes, and I'm even thinking of making my own. Surfing around about pinhole photography, there is a plenty of text (or most of it actually) talks about analog rather than digital, and even though most people do state the fact that it is one of the features of pinhole photography to be blurred and fuzzy and create such a mood, but some others do also speak of infinite sharpness as well! Well, people in the latter type are few. This makes me think continuously of finding a way to merge such a small aperture with some lens. But what do I need to create a sharp image with such small aperture (and high f-number)? The answer is kind of complicated and involves lot of calculations but I'll leave it there at the moment.

According to the Specs mentioned for this pinhole (one of two types), it states that it is 0.22mm in size with f-number of f/222. However, I'm not sure how it was calculated since according to my own investigation here, this should be f/200, because the focal length or the distance from the mount to the sensor (a.k.a. flange distance) for EF and EF-S mounts is 44mm, and calculating the f-number using the relation:
N=f/d yields 200, and not 222!
 |
Visionem Infirmus (weak vision)
0.22mm Pinhole, 6m51s, ISO100. |
Away from calculations what is supposed to be or not to be, I've managed to try it out and I really like some aspects about using a pinhole, specially when it comes to the flare as seen in
Visionem Infirmus. Lot of people think those are light bulbs, but they are candles actually (long and short ones). Because of the perfect circle of the aperture here, the flare is more pleasant it seems and provided such a halo effect; How I wish my regular lenses would do the same! While doing
Visionem Infirmus, I didn't really know what I'm doing exactly, it was a random setup just to test this pinhole. There is a mystic feel to it after all (probably because of the talisman too).
 |
0.22mm Pinhole Selfie
6m51s, ISO100. |
Even though the exposure times are pretty long (since I prefer using ISO100 most of the time), but I think this is what creativity is about after all; doing something unusual. Thus, I've decided to go on and do a selfie that took almost 7 minutes to do. I wouldn't mind the long exposure here as long as I'm cozy in my lazyboy. Hope you pardon my tired face and sleepy eyes! I could have done something more creative here even, like moving my head slowly or striking some pulses of flash or many things with such long exposure, but this is enough for now as I'm doing these tests and doing some calculations.
Calculations-wise, there might be a hope to create something sharp, or at least sharper than usual, if I just find a way to nudge the pinhole cap for about 5mm forward (or to be precise even further, for 4.8mm).
Taking images with my Canon EOS 7D with a manual lens (e.g. Rokinon 8mm f/3.5 fisheye) or like this pinhole, it rigesters the value of 50mm as the default focal length of the camera, which I have to consider as the real focal length. However, my previous work with macro photography and shooting into the microscope, made it clear that the flange distance (or distance from sensor to the mount) which is supposed to be the pinhole focal length is indeed 44mm (all my calculations for the magnification ratios were based on 44mm and shown correct in practice). Mirrorless cameras do have a shorter focal length by the very nature of their design, but they might be more appropriate for pinholes because of this shorter focal length under the light of the relation:
d=2√(fλ); where "d" is the diameter of the pinhole, "f" is the focal length, and (λ) is the wavelength of the light (typically fixed at 550nm). With some algebra here and solving for (f), it seems the proper focal length for 0.22mm pinhole would be
22mm. As far as I know, Canon's mirrorless cameras have 18mm flange distance; close.
Meanwhile, I'm expanding my experiment with the pinhole further to my converted Canon EOS 7D, as I'm trying various filters with the pinhole (taping it on the top of the pinhole). Pinholes though, under the light of the formula mentioned above, can be quite sensitive to the wavelength under inspection. However, thinking about it, it seems this is my only hope to get a proper UV image; since most of the lenses I have are coated with Anti-UV protective layer and might not be blocking essential wavelengths in UV range. Thus, I'm set to try this out soon (and of course using a hot mirror to block IR over my UV
B+W 403 filter). Pinholes, of course, do not have coatings and thus might be the only way for me right now to shoot decent UV despite the fuzzy image I'm going to get.
Dream Coming True
For about a month or so I've been going around and trying to find a way to get a permit to shoot some pictures inside a theater. Not any theater. It is a theater that bears a memorial for the Giant of Kuwaiti acting field, AbdulHussain AbdulRidha, who passed on August 11
th, and we are still mourning him almost every day since then. A rare man who witnessed the rise of this country, as well as its changes from old to modern (and not to say I do like the modern). The significance of this work is that, I dreamed about it, and it came true indeed. I couldn't apply some ideas I had in my mind prior to the work but at least I've done a masterpiece panorama for this memorial.
 |
زارع البسمة وفخر بلادي
The Smile Giver and Pride of My Homeland. |
I will not get into much of the details of how I got into the theater, since it is a lengthy talk and took me around a month o talking my way through. Who cares for an amateur photographer trying to take a photo for a memorial on a wall? Anyway, let's get down with business about the panorama-making.
First of all, I paid a visit once I got a phone call that I can go into the place. This visit is to set some ideas straight and a get proper vision for the place. In fact, I once thought that there are two paintings: a mural and a portraiture painting. However, later I've discovered that it is actually one painting, and it is the mural that everyone was talking about. The mural or painting is a masterpiece painted by the artist
Ahmad Muqeem. Not sure about its dimensions, but the height of the painting is surely somewhere beyond 2 meters (~ 6ft) and the width is around 2 meters as well. This changed some of my ideas as I was planning to pick my brother and make him read Quran in front of the mural, but since it is elevated off the ground, I think it won't be of much use here (or it might in fact but I didn't think that way back then). My main focus was the panorama.
 |
Rear view of
Canon 15mm f/2.8 fisheye
with its gel filter pocket. |
In 2 days time, I was ready with my gear (spent the day before cleaning them and tidy up my scattered tools and cameras). Headed there around noon time with my brother (as a model). Despite the fact that I've picked my location in my visit before, but I noticed that the artwork would appear small relative to the whole scene, thus I've decided to do it up-close and climbed the stairs. However, much of the details of the place (which were important for me) would disappear and I decided to go back to my original place (after shooting some already) as it can be seen in the image above. In this panorama, I've used my
UV gel filter for the first time in a panorama. It is a gel filter equivalent for the typical UV-reduction filters which are placed on lens, but this one is placed at the back of my
Canon EF 15mm fisheye lens (in a special pocket for filters). In fact, thinking about it a bit, it might have helped a bit to reduce any bluish streaks, but since the job was indoors, it is unlikely that UV would affect my work here much. Nevertheless, it is an experiment and the panorama was clear with no problems.
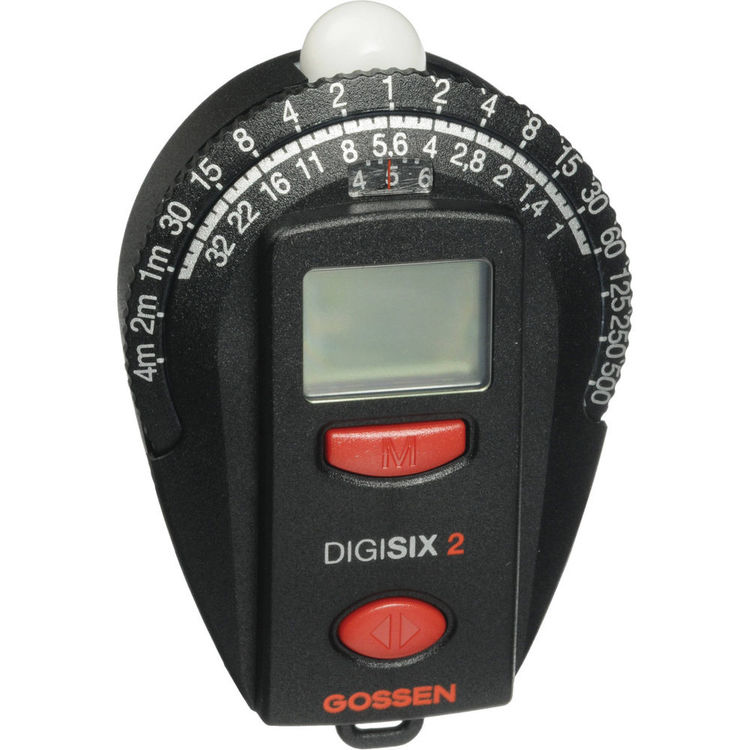 |
My old light meter.
No ON and OFF button,
thus I have to remove the batteries
after using it. I'm literally sick of
changing batteries for it!
Source: B&H. |
Typically, when I do such panoramas that involve merging people, I would do the whole panorama first, and then start shooting the model separately and merge the two in the stitching process. This plan makes me at least grant my chances for a regular panorama in case the merging of the model or there was some shake when the shot for the model was taken (the shooting was for HDR, i.e. bracketed shots, and I do not guarantee the stillness of the model during the whole 3 shots). Before shooting, I've started metering the light all around the tripod-camera set and made an estimate about the least EV. It had been my practice, when shooting bracketed shots for HDR and doing a panorama, to reduce 1 or 2 stops from the minimum reading possible by the light meter. This practice, so far, proved to be a great savior. Sometimes, stretching the dynamic range does make gaps in the HDR histogram and some details are lost for good. Here, even though I've used my White Balance disk before the work is done, during the process (specifically when tone-mapping), I had to adjust the WB further for a nudge or two, as the whole image was a bit bluish (and I don't mean the blue streak from the glass facade, but the wall of the mural and the white details in the mural itself). Posing my brother here as a model took place in the end after finishing the regular panorama shooting and I've tried several poses at the same angle, and seemed to me that the prefect pose (and size ratio) was for him to stand on the stairs instead of up close against the mural. Nevertheless, there is the problem which could not be solved whatsoever, which is the absence of the facial expression (and it is almost impossible to get anything clear with this lens and at that scale). Thus, I had to depend heavily on hand and body gesture and pose. For this, I asked my brother to change the gesture several times with the change in his position relative to the mural.
 |
زارع البسمة
The Smile Giver |
After finishing the work with the panorama, I've started planning for a single shot. I had plans prior to the visit to the theater, but as I've said before, I had to change, and because of the fact that I cannot re-visit the place again (for the lack of time and probably I won't be allowed to easily), I've decided to get my essential gear without any lighting gear (speedlites and power packs, plus some modifiers) which I keep in 2 traveling cases. Here, again, I had to rely on (and trust) bracketing for HDR to be able to control the light as much as possible. Again, I had problems with a proper angle. When shooting these single shots from a close distance as seen in
The Smile Giver, I was in dilemma as to what lens I should use. However, because of some "wash" out or undesired light reflection on the mural, I had to think about using a polarizer, which eventually forced me to use my Voigtländer 20mm; the only problem here is my limited space to move backward a bit to include the whole scene and give some space around the mural. In
The Smile Giver, I had to fix the distortion and straighten some lines (or rather make them parallel) and, of course, crop the surplus. The photo was tone-mapped from HDR twice, as the first time had some problems that I didn't notice in the first glance. Probably,
The Smile Giver, so far, gained more popularity rather than the panorama itself, but I'm not sure is it because of the details that show up clearly, or for the nature of the shot (portraiture) itself.
 |
Planeta AbdulHussain
كوكب عبدالحسين |
 |
| Vertical AbdulHussain |
Finishing from all that essential work, it was time to try out some surreal projections for the set. Here, again, comes the benefit of shooting without a model first and then merging the model. With such surreal projections, the model would be stretched extremely and would add such a disturbance to the general view. However, because of the nature of this panorama, and the concentration over the mural itself more than anything else, the geometrical play here was not important for me but rather how to pop-up the mural to the eyes of the viewer. Because of this, my choices for these various projections was limited.
Generally speaking, I think I was lucky here with this architecture, as I noticed that the lines (floor lines and the surrounding wooden decor) do point somehow to the mural and act as a guide line to the eye. I didn't notice that in the first place when I was doing it till I had to process the panorama. Anyhow, I think my choices here are limited to vertical and planet projections; and the latter required some angular adjustments to displace the location of the mural in the scene.
VR
Of course I wouldn't pass the chance of creating a VR out of this panorama. Moreover, I think I will adapt to the practice of uploading my panoramas to
360Cities and get an
embed link for my blog here. This way I can avoid many plugins issues I guess and they provide further options to view the VR as well. Unless the VR is not significant, I might upload it the old way (spawning the file somewhere and embedding the link here).
The Smile Giver
A good thing here is that 360Cities provides the option for viewing the VR with VR goggles (on smart devices) which enables the viewer to roam the place by moving his head (or the device that is) around instead of being static and roaming the place by the controls.
If you are reading this and do enjoy VRs, I'm asking you to, please, Like it and share it with people you know. Unlike the rest of my panoramas, this is a work and a job I'm proud of, as a tribute to a personality that means so much to me, personally. Thank you.
Finale
Well, I feel like a bulk of load is removed off my shoulders. Some issues at work are
finally done for good, and I've finished the panorama that I've always wished to do, I think now it is time to dream a bit again and think of something else to do. I do have some ideas to experiment with, like the pinhole and UV photography, beside some other ideas of "regular" photography. The problem though, as usual, time, and further more, the need for help (from my brother mainly who has other responsibilities). I think detaching myself a bit from the photo-club which I'm part of did give me further motivation and time to try out my camera. Probably I'm the type of photographers who cannot work in a team and rather establish himself alone. Anyway, time to post this, and go on dreaming, again…


No comments:
Post a Comment