Sounds it's been ages since I've typed anything here. Actually I was busy with my other Arabic blog putting up an article discussing the "Native ISO" as a concept, and how to find it out practically for the camera under question. It seems anyway that most, if not all, Canon cameras do have a native ISO of 160. I used to mix up the concept of the lowest ISO and the Native ISO, but it turned out this is not correct. After testing, I find it indeed as it was mentioned in many websites and discussion threads, the Native ISO of 160 for Canon has less noise than ISO 100 (the lowest)! Not only that, but even one full stops from ISO 160 (e.g. 320, 640) do show lesser level of noise from those less and those more in one third stop for each value. This is one major step of knowledge in fact, as gaining 2/3 of a stop without sacrificing the quality to the noise can do wonders, specially when working with speedlites and high-speed photography. Thus, from now on, I'm going to set my ISO on 160 by default!
Scopone
It feels like being in a head-lock with this Scopa project. Been days now, or rather weeks, without doing anything about it. This is mainly for the lack of people (models) who are willing to take the step with me, as I've finished all the regular cards, and now it is time to shoot the court cards which must contain a person.
 |
| Fante di Denari |
My first trial was to shoot the Fante di Denari with my nephew; A shot that needs to be re-done apparently. The shot was taken with my Voigtländer 20mm lens which apparently proved to be a bad choice here, not because of the distortion (barely visible here), but because of the extra spaces that I needed to deal with and which resulted in some space above the head, and that, should not there. Adding to that, my nephew's devilish looks were not, well, devilish enough! After this shot, I've decided to shoot next with my 50mm, which is in fact the correct choice for portraiture photography on cropped sensors like my camera's, because it approximate the perspective of 80mm lens on full-frame camera. So I moved next to do the Fante di Spade, and this time the victim is the usual brother of mine. One day I think he would be killing me but I can't find any better replacements!
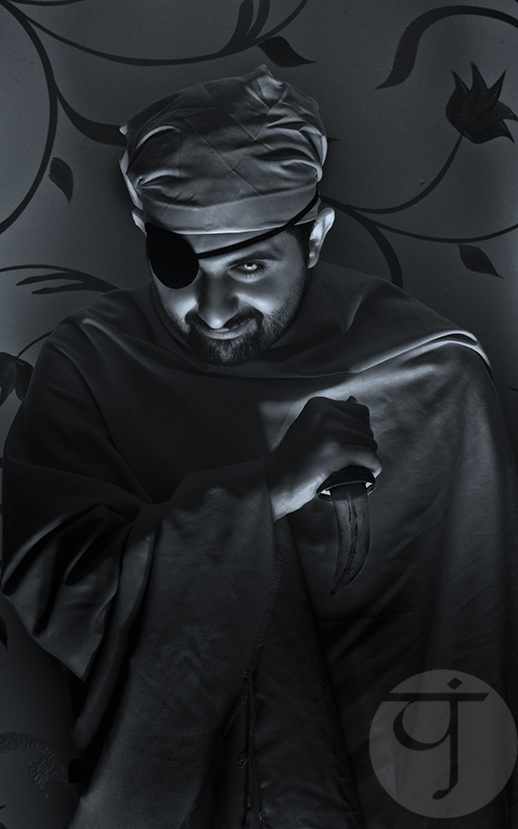 |
| Fante di Spade |
Beside changing the lens to 50mm when doing the Fante di Spade, I've also changed the position of the speedlites. Instead of striking from below on the side as in Fante di Denari, I've placed them right in front of my brother in Fante di Spade. Because of the lack of space inside the frame, I've changed here to a dagger instead, as placing a sword in such narrow space would eventually cause it to protrude outside the frame. Can't say I'm satisfied about his hand placement with the dagger but I need to satisfy myself with it for the time being, after directing his pose myself (ahem). He had some hard time wearing all these stuff already! With him, a devilish face was achieved, and I pretty much liked it that I've made his head shot into a separate image by cropping from the original before converting the whole image to B&W.
 |
| Il Fante |
It's a good thing that I've been doing all this project's shots in infrared, as it opens such a wide gate for creativity instead of sticking to the original colors, and not to mention the fact that our eyes turn bluish in such images making them a bit more interesting!
 |
| Exactly how my chess horse looks like. |
Now to add to my obstacles and problems, we have the issue of the Cavallo, the Horseman or Horse card. Of course I will not be shooting a real horse, but it was time to think further of some substitute. Initially, my idea was to find a horse head costume, but seeing how it was hard to get a crown for my Re (king) shooting later on (and I'm not sure if they will fit properly even), so I had to think of something else. It seems inevitable to do some photo editing and montage and the idea was there for me: Superimposing an image of a horse over the original shot. Thought of downloading the image from some photo stock website, but then I thought why not shoot it myself. My first target was my chess pawns, but that thing did look like a Scottish terrier more than a horse!!!
Since my Scopa project is undergoing a stalemate, I've decided for a big part to dig up and check old photos and apply some techniques that I've not used in a long time, namely the LAB Editing technique, in which colors are enhanced or modified by converting the image to LAB from RGB (and back to RGB later). Meanwhile, I did indeed discover some stuff, and also I did process some pretty old images that I've totally neglected because of various reasons (mainly being of bad exposure or shaky) - so old were they that some of them actually date back to 2009 with my first visit to Ireland with my old Canon 350D and 2 kit lenses! Moreover, there were some "artistic" editing to some images, doing effects and all these stuff... you know.
It started well with some neglected shots from The Chinese Scholars Garden on Staten Island; shot back in 2012. I've neglected some of these shots mainly for not being "interesting" enough or simply because I was not able to think outside the box of HDR rendering. Thinking about HDR, sometimes, made me neglect those images with one shaky exposure. Moreover, some overexposures were and could have been fixed in certain techniques, and I failed to see through it back then. That's why I always hold the believe to always keep the "apparently" not so good images. You wouldn't know when it will be good, at least for the social media!
For many of these shots, the LAB Editing technique comes to the rescue even though the angle can be somewhat "boring." Indeed, I didn't even imagine that people would express their liking for Tranquility by The Pond or By The Pond at all. Worth noting here as well that reflections off the surface of the water were enhanced further by doing such technique and enhancing the colors in general (I didn't have a polarizer back then and I doubt I would be using it if I had it back then even). Probably it would have been even better with a polarizer for sure but at least something is saved and shown! Important thing though is: Editing the RAW file to enhance the shadows and show some details there, specially if it is the darkest exposure of some HDR bracketing trial.
When it comes to overexposure for some areas, and to be specific to the sky, where there are no details, like it was the case with Tríd an Triantán, a simple masking and adding a background would do the trick. I could have added some background from another source, but I always preferred to add from the same image, mostly by duplicating the layer and adding a layer mask to it, then moving it (while detaching the layer mask from the main layer). Some cloning work might be due though, just to add few touches or fix something. In Tríd an Triantán, which was shot in 2009 in the periphery of Ashford Castle (with 18-55mm kit lens), I tried to apply another effect to mimic the shallow depth of field; Say, just to keep it interesting. I've applied this effect before to another image from Staten Island, The Moon Gate, but probably it fits Tríd an Triantán more because of the angle of view (it goes straight, while it is somewhat upward in The Moon Gate).
To apply this effect, I had to use Lens Blur instead of the usual Gaussian Blur, and it had to be applied on 3 layers with 3 different levels of blurring. This is essential as in reality the shallow depth of field starts light and ends up heavy in the horizon (or at infinity). Moreover, such an effect is better off with Lens Blur because the algorithm used in this effect mimics the shallow depth of field for the lenses, while Gaussian Blur effect does not (and more systematic). Thus, to keep things real: Please use Lens Blur!
However, with all that work to revive some old forgotten shots, I'm doubtful about their "Printability" - Yes, that's word I've made up just now. Many of these shots look good in small sizes making them good for social media posting and all, but the original ones are unlikely to be printed in large sizes, say like A3 or A2 for any expo to come. This is mainly because of the noise level which, if cleaned, might take off more details than it should. But I wouldn't know for sure till I try, so we'll see!
This is something I've been trying for a while since I'm not doing anymore panoramas; So just to create something new out of my previous work. This thing is mainly creating animations out of panoramas, and specially those planet or circular panoramas. Sometimes though, instead of animations, some tessellation-like patterns are made (and uploaded to the stocks!). The main target was Instagram in fact, but with those large files of tessellations or patterns, it did sound feasible to be uploaded (after reducing their dimensions) to the stocks.
As for the animations, the main problem was the reduction in resolution with the ongoing rotation with each frame (rotating each frame 5°). To minimize this effect, I had to work on larger file sizes and in 16-bit TIFF if possible. However, later on and after reading some threads online, it seems that such a reduction is caused mainly by Photoshop itself for some algorithm-related problem it seems. Meanwhile, rotating an image to the main cardinal points (90°, 180° and 270°) does not reduce the quality of the image. Then it occurred to me, to do four specific layers of the image with each oriented to one of these cardinal directions and rotate each for 5° (making up for 17 frames per copy). This way, the quality loss will be lesser. Adding to that, I still do work with a large file and reducing it to a small size (with a crop) and then rendering the video for Instagram at even a smaller size. All that work is done with JPEGs images and not TIFF anymore, so sparing me the memory crisis! With the addition of Actions, the work now is even a piece of cake; All I have to do is click a button several times and now I have 17 frames rotating with 5° each.
For the time being, the favorite size to render these animations to is 600X600 pixels. However, it seems that I have to uplift the limit a bit and try 800X800 pixels, as it might look a bit stretched on some devices. And speaking of animations, there is another useful usage for them for regular horizontal panoramas, where I used to cut these into 3 slides (most of the time) and post them in a Swipe or Album manner on Instagram. Posting them like that did make up for some awkward alignment and that's why I would need to add a 4th slide to put things in a proper perspective. Now though, doing animations, this is not necessary anymore. I can simply move the panorama horizontally and it is played back as a video in the same window and no need to swipe!
There is a tiny problem with these horizontal animations though, which is how to divide the horizontal movement on equal number of pixels that matches the width of the panorama. Thus, unlike with polar/circular images, with displacement measured by degrees, the movement on the horizontal plane is measured by pixels. Hence, it does look sometimes as if the animation has jumps and not going smoothly. The loss in quality during these displacements though seems close to null apparently, which is good!
Vertical twisted panoramas as well appeal more to me for making textures like those above and I'm planning to do more of them soon. Those can make up for really huge files, but unfortunately, no stocks would be accepting them (maximum as far as I know, is around 30MB). It would be a great addition to have such files uploaded online at sizes of 100-300MB! To end this matter for now, here is a funny story:
With this long post, it does seem like I'm having a lot of activities in my life, while the truth is the opposite in fact, as I didn't touch my camera much and most of my work is about re-working old photos and trying to create something out of old things (even out of my selfie on the left). My mind is busy, and so is my schedule and body unfortunately. I do have a number of ideas I need to do, specially with February approaching; the Retinitis Pigmentosa Month. Just so to see, let's list these ideas down for the moment:
Re-Discover
Since my Scopa project is undergoing a stalemate, I've decided for a big part to dig up and check old photos and apply some techniques that I've not used in a long time, namely the LAB Editing technique, in which colors are enhanced or modified by converting the image to LAB from RGB (and back to RGB later). Meanwhile, I did indeed discover some stuff, and also I did process some pretty old images that I've totally neglected because of various reasons (mainly being of bad exposure or shaky) - so old were they that some of them actually date back to 2009 with my first visit to Ireland with my old Canon 350D and 2 kit lenses! Moreover, there were some "artistic" editing to some images, doing effects and all these stuff... you know.
 |
| Tranquility by The Pond |
 |
| By The Pond |
For many of these shots, the LAB Editing technique comes to the rescue even though the angle can be somewhat "boring." Indeed, I didn't even imagine that people would express their liking for Tranquility by The Pond or By The Pond at all. Worth noting here as well that reflections off the surface of the water were enhanced further by doing such technique and enhancing the colors in general (I didn't have a polarizer back then and I doubt I would be using it if I had it back then even). Probably it would have been even better with a polarizer for sure but at least something is saved and shown! Important thing though is: Editing the RAW file to enhance the shadows and show some details there, specially if it is the darkest exposure of some HDR bracketing trial.
 |
| Tríd an Triantán (through the triangle) |
 |
| The Moon Gate |
To apply this effect, I had to use Lens Blur instead of the usual Gaussian Blur, and it had to be applied on 3 layers with 3 different levels of blurring. This is essential as in reality the shallow depth of field starts light and ends up heavy in the horizon (or at infinity). Moreover, such an effect is better off with Lens Blur because the algorithm used in this effect mimics the shallow depth of field for the lenses, while Gaussian Blur effect does not (and more systematic). Thus, to keep things real: Please use Lens Blur!
However, with all that work to revive some old forgotten shots, I'm doubtful about their "Printability" - Yes, that's word I've made up just now. Many of these shots look good in small sizes making them good for social media posting and all, but the original ones are unlikely to be printed in large sizes, say like A3 or A2 for any expo to come. This is mainly because of the noise level which, if cleaned, might take off more details than it should. But I wouldn't know for sure till I try, so we'll see!
Panoramic Endeavor
This is something I've been trying for a while since I'm not doing anymore panoramas; So just to create something new out of my previous work. This thing is mainly creating animations out of panoramas, and specially those planet or circular panoramas. Sometimes though, instead of animations, some tessellation-like patterns are made (and uploaded to the stocks!). The main target was Instagram in fact, but with those large files of tessellations or patterns, it did sound feasible to be uploaded (after reducing their dimensions) to the stocks.
As for the animations, the main problem was the reduction in resolution with the ongoing rotation with each frame (rotating each frame 5°). To minimize this effect, I had to work on larger file sizes and in 16-bit TIFF if possible. However, later on and after reading some threads online, it seems that such a reduction is caused mainly by Photoshop itself for some algorithm-related problem it seems. Meanwhile, rotating an image to the main cardinal points (90°, 180° and 270°) does not reduce the quality of the image. Then it occurred to me, to do four specific layers of the image with each oriented to one of these cardinal directions and rotate each for 5° (making up for 17 frames per copy). This way, the quality loss will be lesser. Adding to that, I still do work with a large file and reducing it to a small size (with a crop) and then rendering the video for Instagram at even a smaller size. All that work is done with JPEGs images and not TIFF anymore, so sparing me the memory crisis! With the addition of Actions, the work now is even a piece of cake; All I have to do is click a button several times and now I have 17 frames rotating with 5° each.
For the time being, the favorite size to render these animations to is 600X600 pixels. However, it seems that I have to uplift the limit a bit and try 800X800 pixels, as it might look a bit stretched on some devices. And speaking of animations, there is another useful usage for them for regular horizontal panoramas, where I used to cut these into 3 slides (most of the time) and post them in a Swipe or Album manner on Instagram. Posting them like that did make up for some awkward alignment and that's why I would need to add a 4th slide to put things in a proper perspective. Now though, doing animations, this is not necessary anymore. I can simply move the panorama horizontally and it is played back as a video in the same window and no need to swipe!
There is a tiny problem with these horizontal animations though, which is how to divide the horizontal movement on equal number of pixels that matches the width of the panorama. Thus, unlike with polar/circular images, with displacement measured by degrees, the movement on the horizontal plane is measured by pixels. Hence, it does look sometimes as if the animation has jumps and not going smoothly. The loss in quality during these displacements though seems close to null apparently, which is good!
Vertical twisted panoramas as well appeal more to me for making textures like those above and I'm planning to do more of them soon. Those can make up for really huge files, but unfortunately, no stocks would be accepting them (maximum as far as I know, is around 30MB). It would be a great addition to have such files uploaded online at sizes of 100-300MB! To end this matter for now, here is a funny story:
As I was digging my old files looking for old panoramas and old neglected shots to do some art with them or animations, I've noticed that I didn't make a planet panorama from inside the Chinese Scholars Garden; specifically around the pond. I've made only a flat version of that place. Probably I've neglected this option because of some of the hardships and errors, I don't know! But looking at it now, it does sound good enough to be displayed.
Planeta Fenestra
To add some spices to "my discovery," I've edited the image with LAB technique again and tried to enhance some colors as well as reduce the overexposure (which is probably why I've neglected this panorama for long). And with this, we have a happy ending for this story and who knows, I might discover another neglected panorama!

Finale
 |
| Selfie Seal |
- Doing something for RP month as mentioned above.
- An old idea inspired by Sabah Fakhri, and still cannot do because I do need special arrangement and a narrow space.
- Infrared panorama indoors which would involve a hand (of a human or mannequin, whatever).
- Photo shoot for some selfies to be combined later on with Photoshop, reflecting schizophrenia or multi-personalities disorders.
- Photo series with chairs reflecting on corruption and old mentalities at work.
- Shooting through the microscope (again).
- Doing a photo shoot reflecting my personality as I deducted lately from some personality tests, where I got the classification of INFP-T (The Mediator type).


No comments:
Post a Comment