Showing posts with label expoimaging. Show all posts

Thursday, August 16, 2018

InfraFestiva…

Well, I'm not sure if I should type this post but not typing it would make me absent for 2 weeks from this blog. My life had been a bit dormant lately despite the light work conditions and the lesser traffic jams currently - but thanks to the heat which leaves me exhausted most of the time and disturbed sleeping as well. Meanwhile, my mind has been kind of empty of ideas to work with except for few trials which I'm going to talk about here right now. I do deserve a little vacation though (on a personal level) since Friday is my birthday; So I'm signing for a day off on Thursday and I didn't want to type anything in this blog for this week specially for this! But oh well... let's see what horrible things I did the past 2 weeks…

Change of Perspective

Well, there had been some continuous work with texture-creating which I've posted about in the previous post (and this might continue for a time maybe) but I won't waste much time here talking about these abstracts and textures, but I prefer talking about something else.
I'm still on a roll trying some more experimenting with my new Neewer infrared filters, and specifically, the IR950 filter (which, supposedly, has a threshold of 950nm). I've showed some pictures in the previous post taken with this filter and how it did help on showing some veins in my hand (and foot to some extent), even though according to what I've found online, a threshold of 850nm is just as good for showing the blood vessels under the skin. Such shooting was done under the harsh sun to have a wide band of wavelengths in the range of infrared to get some nice results. Now it was time to change the perspective.
I was somewhat inspired by the medical field here, where some new inventions are coming out to help medics on checking the blood vessels under the skin using infrared beaming. Also, I did encounter some texts about using "infrared flash," where the flash is somewhat modified (or filtered) to issue only infrared radiation without the visible wavelengths! This is useful in a number of ways; Mainly, for not blinding people with my flash (my brother specifically!) when shooting for them in infrared, this is beside (and this is the greater advantage) using the camera and focusing in a normal regular way instead of struggling with the LiveView method which is a MUST when the infrared filter is placed on the lens (since it's opaque, it's impossible to use the viewfinder to check the scene). Using the LiveView has its (somewhat) disadvantages in my case because some functions do not work there and the metering method just changes drastically, in addition to the increase in handshake.
ExpoImaging Rogue Grid
Anyway, since my infrared filters here are circular and made to fit lenses, I had to come up with some way to fit them onto my speedlite here (while the gel filters are limited and I don't have a large enough piece to cover it). So, I thought of putting the filters inside ExpoImaging Rogue Grid System which I got long time ago (along with a full set of light modifiers). They fit with some gap but they do cover the bulk of the speedlite head. The main issue here, though, is that this method would direct the speedlite into a beam (because of the grid), and that might be problematic if the aim was for longer distances. Anyway, this would do for now.

Left: IR950.
Right: B+W 092.
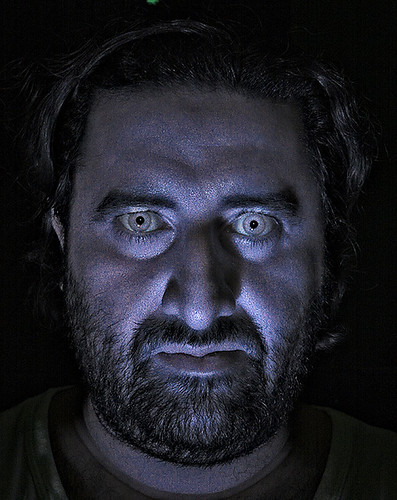
Of course, the first target was to take a selfie using this method. The results were astonishing indeed. Color-wise, the results are similar to fitting the infrared filter on the lens actually, but there is a bit of difference here with the shot taken with IR950 filter. The one you see here had some increase in saturation but it's not quite the bright infrared shot I used to see when shooting a selfie (the eyes specifically); This result was weird but anyway I did put it to some good use!

Conriocht - Werewolf - مستذئب

The work was simple here: lighten the eye, and sharpen some more, and you got yourself a Werewolf. Anyway the question remains here as to why it showed like that while that did not happen exactly when using the B+W 092 infrared filter. After checking again and again, it seems that because of some gaps around the filter disk, some light from the speedlite itself did leak and thus giving some mix up between infrared and visible spectra (remember that we are using the filters on the speedlite and not the lens, so the camera really is catching everything on its way!). When I fitted these gaps, the resulting image was indeed like the one I usually get when placing the same filter on the lens, just like the case with the image taken with B+W 092. It's kind of a lesson here that being perfect is not always a good thing. The joy here was that it was all done without going blind because of the flash pulse into the eye or anything! That would help me greatly in some tasks (specially when I have my brother as a model; He is greatly annoyed by flashes).
Variety of spectra for various flashtubes.
Click to enlarge.
Source: Wikipedia.
My next target was to shoot the veins or blood vessels using a speedlite and IR950 filter. Even though it is somewhat common to use the threshold of 850nm for infrared beams dealing with blood vessels imaging, it seems that 950nm would add a bit more contrast to the matter. After all, I did try the IR950 already under the sun and it did show the veins of my palm! My trials, however, were in vain, and apparently, it is not the filter we are talking about here but the source of the infrared - And for that reason the sun works fine to show the veins but not the speedlite. According to little research I've done, Canon Speedlites use Xenon flashtubes, and the spectrum of such gas go downward (as seen in the diagram) around the value of 800nm (0.8 microns on the diagram). There are ups and downs in the graph but the bulk of the power seem to be in the range of 400nm to 600nm somehow. I'm not sure what is the intensity of the 580EX II speedlite compared to this diagram for Xenon flashtube, but the general scheme, as I believe, applies anyway; And probably speedlites are not the best infrared source to be working with when it comes to IR950 and some veins work! In fact, even IR850 which has a lesser threshold did not yield a clear image for the veins of the palm when used with the Speedlite. Thus in conclusion: Speedlites are not a good source for infrared when it comes to penetrating the skin to show the veins. Tungsten lamps, on the other hand, look promising from some test shots. Still though, I had some ideas to implement even with speedlites using IR950.
Der Erschöpfte (the exhausted)

Source
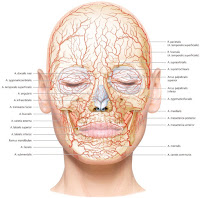
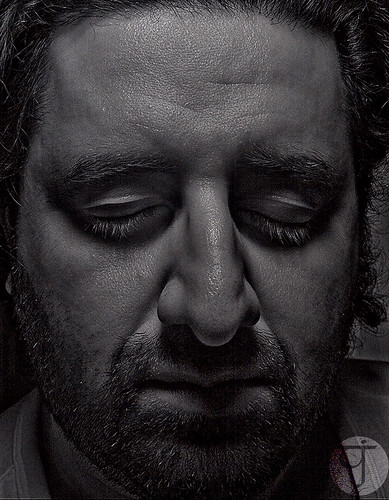
In the beginning, my aim was to picture the blood vessels in my face (got inspired to do this after checking some anatomical images online), and ironically, I can't remember if the IR950 infrared filter was placed on the lens or on the speedlite. However, judging from the direction of the light in Der Erschöpfte, I presume the speedlite was on the camera actually and I think the filter was placed on the speedlite with some extra stuffing (probably duct tape around its circumference) to fill the gaps and trap the speedlite light. Anyhow, after taking several shots I've picked the one you see above to be my target for processing even though all of the shots didn't show any signs for blood vessels. In processing this image, I tried to keep the histogram in the dark region as much as possible without being cut off, and thus having minimal details in the shadows BUT not lost details in that region.

Histogram for Der Erschöpfte, with Adobe 1998 color space.

I like to be somewhat delicate sometimes when processing B&W images. Pulling the histogram to the left further to an extreme made some interesting touches of light on the nose tip and the eyelashes. Notice that the image would look a bit brighter than it should on some displays (I work with a calibrated monitor to ensure correction rendering for colors and luminosity). As I work on a PC and a laptop, I can see there is a difference in the looks; My laptop is not calibrated and I can see the background of the image here, while originally it is dark and hard to see any significant details, giving the image dark and mysterious look. It is amazing how I got my white-ish skin to be so dark with a glimpse of infrared! This experiment needs to be redone probably under the sun for better details if any (or is my face skin that thick?!). There is a holiday coming and after a period of turmoil at home because of renovations, I can get out and shoot some selfies in the sun with these filters and check the results.

Finale

Originally, there was so much I wanted to talk about in this post, like my experiments with hand-made pinholes, but I'll keep that till I get more material and more thought about it. I've been also trying to push my mind into poetry again but the words did not really accumulate into a single verse to be posted along. I hope words and ideas come together in the coming week, though. Beside that, I'm trying also to check some older images to see what new processes can be done (specially to those neglected images deemed useless before).

An Chathair Dhorcha (the dark city)
Infrared shot for Kuwait city done in 2015 and processed this week only.
Shot from the 60th floor of Al-Hamra tower.

Arts away, I do have also some plans to "pamper" myself a bit, starting with a day off (today) as a gift to my own self for my birthday. I'm also planning to have some "adventures" of mystic nature, such as doing a palm reading (not the first time). Then, I'm off to a LOT of sleeping, and dreaming of some travels as well. I can have some days to myself just inside away from this harsh sun that cooked me alive already. Should my birthday be in such time? After all, I'm a Leo, and it's hard to complain about it…

Stock photography by Taher AlShemaly at Alamy

Thursday, September 27, 2012

Architectural Amuse...

(Some large files in this post, please give some time to load!)

The days are running fast, and the travel time is getting closer, and yet I'm not sure what to prepare first. I feel lazy and sluggish in these days and now I do wish if I signed for my leave from work earlier than I did already. My leave starts only 3 days before my travel on October 10th. However, I'm trying to use my time there with reading the books that I've received already and I'm digesting them now slowly. It is just the matter of sleeping more that makes me wish for an earlier leave.

Amuse
After some struggle and almost dipping myself in water, I've managed to take a full panorama from the gazebo, of the secret spot. Upon reaching the place, I've realized that I cannot expand my tripod over the diameter of the fountain, thus, the best choice I had is to stay close to the edge; a dangerous situation for sure. Talk about stress, people looks, clumsy movement (and I'm renowned for that) and fearing to dip the camera into the water... all in all, it was an uneasy process. Why close to the edge? Of course, to have the dome centralized as much as possible.

Radiosus

Working with this panorama alone was tedious, or maybe I should say more tedious than I've previously encountered. Because the location was a delicate one, I had to think about shooting the nadir point. The ground bears interesting details that can't be missed like any other place - we have  fountain there. For this, I've brought my monopod and my lateral arm.
Now, the rewards of doing a panorama is several sets of projections. But, initially, some parameters must be set right. In this workflow, I've tried to centralized the camera and align it exactly with the fountain's outlet. However, I've realized later that my alignment was not really precise and I had to adjust some angles when checking out the panorama stitch. For each projection I try, I save the file as is for later stitching - because my mind was burning for visual stimuli and I didn't want to stop it for a long process (that would take 6 or 7 hours sometimes).

Radiati
Well, I'm not going to talk much about the stitching errors here. If you are a follower, I guess you already know the tedious part; not to mention the fact that I'm stitching a nadir here beside a zenith. Taking the panorama itself was a struggle by itself because I had to wear my backpack and move my monopod and lateral arm from one side to another (because I kept it prepared for the nadir before I proceed with the usual shoot); all of that to keep the scene clean from my stuff. The nadir was taken at the end with a slightly different point of view (of a different elevation from the original position of the camera during the panorama shooting) but seems PTGui took good care of perspective fixing.
One of the good decisions I've made here is to raise the camera above my head level for this panorama. One of the bad decisions? Well, it was to raise the camera above my head level! We'll see about that later.

Radiosus Rectus

As you would notice here, I've made 2 flat versions of this panorama (originally 3 but stitched only these 2); Radiosus and
Radiosus Rectus. The main reason for the former is a flat panorama that shows some details of the dome and the fountain together, while the latter is a simple regular flat spherical panorama, to be used later for QTVR rendering. I like the wavy columns in both versions after all! However, 3 projections that I've considered, personally, as masterpieces.

Radiatio

The first masterpiece (to me) to be created was Radiatio. It is a typical tunnel view like I did before with many other panoramas. I was going to name it as Spaceship or Mothership, but to keep it consistent with the rest of the panoramas, I've decided to name as Radiatio; Radiation.
I've mentioned previously that one of the good decisions I've made here is to raise the camera above my head level, and it is also bad in the same time. It is good because by raising the camera's level I would include some space for the nadir point and also it helps the perspective in such projections - the bad point is operating the camera at such level is difficult - specially when I have to look at the number of degrees on the rotating plates for the camera's tilt.

Planeta Columnium

The other projection, which I had visions for since the early beginning of my work is the planet projection, as you can see in Planeta Columnium. In this projection, I had to crop the outer zone to remove the remnants from the dome and leave the columns dangling in the air in a surreal form. It was not possible to remove the dome by changing the perspective alone, but however, in PTGui itself, I can set the limits and boundaries for the zone to be stitched.

Astracolumnae

 The last piece is what I called Astracolumnae. It never occurred to me to use the circular projection in PTGui. However, I do wish if it was rendered in some other way other than this. I think it would be great if the symmetry was sustained on all axis of pillars pair. Anyway, I have to satisfy myself here with this result for the time being, and I'm happy that I've discovered some new point of view! such points of course would be more interesting if the panorama was taken under a common central point (hence I think it is more useful indoors rather than outdoors). In Astracolumnae, I've removed the background and saved the file in JPG and PNG for web usage. However, some websites don't identify the transparency in the background and replaces it with white tone. The embedded image here is PNG and needs some time to load (~2MB).

QTVR

The QTVR was rendered from Radiosus Rectus, and luckily for me the nadir point was stitched gently despite the difference in the perspective. Some cloning was needed of course to hide the legs of the tripod (which I used to support the monopod holding the camera with the lateral arm).


The original Radiosus Rectus produces a larger QTVR of course which sized up to 9MB, and it has more details than the smaller version (and more crisp). The smaller version of Radiosus Rectus is soft somehow because of the noise cleaning process which was done more than once. I didn't care much about details at this small size anyway! Most of the details relate to some dust particles or faint cracks in the floor, and some cavities in the pillars which can be hardly seen anyway!

Toys!

Source: B&H
Source: B&H
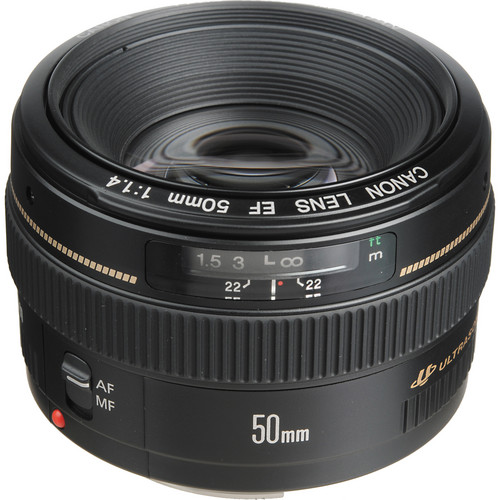
The toys are finally here. Namely, the Canon 50mm (normal) USM lens, of f/1.4. I'm already thinking of some work to do with this lens before traveling. As a fun activity (and a challenge), I'm thinking of taking my camera with this lens alone - no accessories, no other lenses, no tripod. Just me, camera and 50mm lens - and head out looking for some photos to catch on the way. In hope that this activity would spark some imagination and enthusiasm for more productivity. The 50mm lens is called Normal usually because at this focal length the lens matches almost the human vision (in terms of the field of view). However, with a cropped sensor like mine, it is not exactly normal. Anyway, it is a prime lens after all and  I should satisfy myself with the quality that can be produced from such lens.

The other toy is the ExpoImage Rogue Master Lighting Kit, which consists of some light modifiers for speedlites. So far so good, and the modifiers are nicely designed. However, for each type of modifier there is only one piece, so you won't be able to use the same modifier on two speedlites in the same time - but I don't think it is a big deal right now.
Just as a simple test for the kit, I've tried to take a head shot for my brother using some reflectors and a diffuser on my two speedlites (580EX II, 430EX II) and formed an oyster-like formation - with 580EX II on-camera, and 430EX II held by hand below the camera's level. 

Canon 50mm, f/8, 500-1sec, ISO 400.

You might have noticed here that I've used a shutter speed exceeding the typical sync speed (250-1sec for Canon EOS 7D). I was simply using the speedlite in High-Speed mode, to kill the ambient light and light the face with the speedlites alone. The overall goal was to give a soft light to light the face, and brighten the eyes as much as possible. Well, we are Middle Easterners and typically our eyes are dark brown and hard to be lit in that way I presume. I would say I'd need another speedlite with a snoot directed to the eyes. I tried here not to adjust too much in Photoshop - only few edits in the RAW editor (e.g. contrast, clarity) and in Photoshop some noise cleaning and sharpening without trying to lighten the eyes (as I usually do in my spare time with girls' head shots!).

Digesting!
Source: Amazon

Then come the books with the arrivals in the last shipment. They are two books and I'm trying to read them both in -somehow- scheduled manner. The first book is Build a Better Photograph by Michael Stern. This book is relatively thin and I think I would finish it in a course of a week or so! In the first chapter there was somehow a heavy load of Photoshop talk and making composite images - interesting but not quite what I was looking for, as I think right now I'm in a developmental stage where I care for aesthetics and ideas more than I do care for working around Photoshop. However, the technical aspects mentioned here are good and can be kept for a reference. The surprise was on the second chapter, when Stern talks about 3D scanning and how to make some art through regular desktop scanner! Inspiring for some ideas (specially that I wanted to do a scan for my ring long time ago!). So, the book really is not about camera work specifically, but about visual artistic talents in general, if I should say.

Source: Amazon
The second book is The Art of Photography by Bruce Barnbaum. I was surprised, sort of, for the size of this book and its weight! I'm reading this book slowly now (dedicating the last hour in my working time to read some of it). This book now is heavily about aesthetics and how to see a photograph. It is about the philosophy behind photography - exactly the type I was looking for. I think I will be taking this book with me when I travel to read some, if I got the time to (or maybe at night to force my eyes to sleep!).


This has been the journey for this week. There are some thoughts other than the travel and the camera that had been occupying my mind, and they do cause a huge unrest. I need to travel for now for the necessity of a vacation, but also for the necessity of going on with my life - there had been a lot of plans in my head that I've postponed because of this travel. 
My sight for the coming future is shrouded and unclear - if only I can sleep as I like right now. Without nightmares...