Showing posts with label office. Show all posts

Thursday, November 18, 2021

The Office…

Alright! I think I can literally say that I'm officially retired now! I didn't go to work for more than a week now (or by the time this is posted, it would be 2 weeks), and as I'm writing this, some papers need to be signed and completely detach myself from that workplace (and it is vexing me off).
I have to say though there are some bitter-sweet moments involved here but I'm trying not to gaze upon these for a long time now and just keep going. I'm not sure where I would be going from here, but the joy of not having to drive the car daily to and from a specific place routinely is just overwhelming!

Last Encounter

As I've mentioned in my last post here, in which I was updating about my life, I've already made some shots in my workplace, specifically for the office where I used work. This is like a tribute and a farewell. Honestly though, I do wish of shooting other buildings around my workplace as they are more interesting (architecturally), but I'm not sure how to be permitted to do so. I might ask about it later.

The last Meeting

So, I've posted The Last Meeting in my last post and I didn't go about the technicality here. Originally, this shot was taken using Hα filter fitted on Voigtländer 20mm lens. The shooting was bracketed but I picked the darker frame of the three to process as it yields the mood better. The colors look almost natural after fixing the WB, and this is typical for Hα filters when used in this manner (the effect is exaggerated way more when doing it outdoors and shooting plants). In the process, diffusion was added on purpose as well to add more to the mood. There is a building showing from the left window, thus it was yellowish.

The Dark Meeting

And because of the number of these shots taken with Hα filter, I've decided to process one of them without adjusting the WB just to see the look and mood of it, as seen in The Dark Meeting. I think not bad for something to give dark vibes. Interesting though to see Blue/Cyan/Green tones are somewhat preserved (though faintly) in this dark version.

Workplace

Then of course we have some words with panoramas, but the big talk about panoramas will be left for later for the time being. After doing the main panorama in the office (which was faced with some struggles), I've headed out to shoot some handheld panorama for the building in general. It was quite an opportunity because things were quiet and just my car is there to add some element to the building. Probably you've guessed it already that Workplace was shot using Hα filter, fitted on Voigtländer 20mm lens. Actually, I've shot it more than once, as the sun didn't allow me to judge the proportions correctly from the LCD (and in fact it was a bit soft and needed to be sharpened). In fact, I did shoot in brackets in order to merge images into HDR slides and tone-map them later after stitching, but turned out that it was not quite needed as not much can be yielded (or let's say, not much drama could be deduced from the scene). 

Workplace II

I made 2 versions of the same panorama by swabbing the Red/Blue channels (quickly by using the Invert layer trick) and in fact I've liked the swapped version, Workplace, more than the original one after stitching, which happens to be Workplace II. Such swapping is common in such images taken with special filters, in order to turn the red sky into blue and give some mixed sense of normalcy and surrealism. Anyway, for me at least, I judge by the overall looks and I do prefer Workplace to Workplace II. Probably the proportions are not quite fit as the ground occupies more space than the sky (and I consider it a bad thing really) but I couldn't ask for more in such a handheld panorama.

The Office

Now, the big part of that "session" in my workplace was a panorama for my office, and I got all my gear for that; Well, most of it… I'm not a picky person when it comes to the gear that I should include when visiting a location.
Anyway, I've already set some basic ideas to set the mood or the general looks for such a panorama:

  • Dark mood, so the panorama would be shot with lights switched off.
  • Reflecting my life in the office, so most of the things in the office should be untouched and not re-organized (except for few items of course).

With these in mind, I've started to settle down with my tripod in that narrow space between my desk and the meeting table (my office is originally a meeting room).

The Office

The shooting went relatively smooth and it was my luck that I got a mix of yellow and blue lights (or warm and cool) from the door and the window respectively. In this shoot, I've tried to capture the nadir point as well in hope that I can stitch it as well with the rest but things didn't go well in that perspective. I was hoping to do that to increase the space at the bottom if possible and not make things look quite close to the edge of the frame in this panorama.

The Door Upward

Of course, the shooting went bracketed for HDR merging later on and I had a peculiar problem there when some specific slides  (and for a reason I'm still not sure of) where the bracketed images were not aligned properly by Photomatix and caused quite a hassle when I tried to stitch them. I've discovered the reason later on, and it was some option in Photomatix for aligning the images; Everything should be off except for By Matching Features (or in fact, I might have turned this off as well!). Anyway, what puzzles me is why that specific set of bracketed images that was affected? I still have no answer. And for sure, one has to turn off the Crop aligned output option. This is designed for handheld panoramas and not a systematic one done with proper tools like this one. I found out all about this the hard way.

At The End of The Office

And of course, if you've known me for a while and my work with panoramas, you might know as well that I won't just satisfy myself with only one version of the panorama. Each projection style has a potential to carry on some kind of message or feeling (or mood) that has a big chance of being different than the original flat normal version. Now the difference of course is not to be understood as "diverse" but let's just say: Tweaked little bit.
So, the 2nd version I've made, The Door Upward, can be interpreted in 2 ways; Either as the door that lead my up (on a financial scale) or the door exiting from which would lead me upward. I'm appreciative toward my work, but I'm just not in harmony with the people in it or the system.
Then I made a 3rd version, which is based on the typical "little planet" projection, and actually I used to call such style "wide view" projection or style. In At The End of The Office I was lucky that the light from the door kind of met the light from the window (with a little help in editing). But this version, unfortunately, is not suitable for big format because of the mess in the ground from trials to remove the tripod remnants. This is one of the reasons that taking the nadir shot and stitch it altogether was a goal when doing this panorama; With such differences in light and tones on the ground, it's just not that easy to clone out the tripod/head remains in the image. I think this version kind of mimics going in a trapped environment and then freedom shows somewhere at the far end. You are free to read it as you wish of course.

Ethereal Opposites

And finally, the 4th version of this panorama and I would say probably my least favorite. In fact, this is one of the reasons that I've done a "wide view" version before the typical "little planet" version (and consequently the "tunnel view" version above). In fact, I've didn't make a little planet out of this panorama (so far) as I couldn't feel the aesthetics behind it. Not only that, but removing the tripod remnants from the little planet would also require a great deal of time (if it is possible to begin with). So in a sense, the tunnel view version, Ethereal Opposites, was quite easier to be done and be dealt with than the little planet version. I don't like the general composition formed by the inner elements of this version but I just like the way the light from the door sweeps through (and I've added more of it in the HDR phase) which somehow gives a sense of spiraling from the center going outwardly. Emotionally, well, I don't think I can feel much out of this version really.

Finale

Well, I've posted everything new that I've made lately in this post, but there are more which was done from old images, some of which do roll back in time to 2010. I'm not sure where to start with.
On the other hand, and as I'm typing this post, I'm still having problems with the management in my (ex-) workplace with the final procedures to get my "leaving certificate". Because of these delays, it is quite probable (or even for sure) I won't be getting any salary or pension for the month of November. Papers here, papers there, and then I've been told things are to be done online, and then after some told me you don't have to do a thing, things will be done automatically and all I have to do is to check my custody; Which is a burden worth a week of work I presume. I'm digging old files and documents to track these items AND I do need to find someone to transfer to. Otherwise, all of these valuable scientific instruments might go away for good with no return. For this matter, I'm officially retired, but I'm bond to go to work now and then to check things and to follow up. One of the jokes I've been told just lately, is that one of the critical websites that I need to complete some of the procedures, would not open from outside; It must be opened with a connection from my workplace. Did anyone laugh? No? Good…


Thursday, August 11, 2011

Ouch, My Head...

Seems that in Ramadhan and despite the fact that people are fasting, I'm the one to be buzzing like someone struck with ADHD. I'ts not all bad but when it comes to sleeping at night before going to work in the morning, this is the real headache. With all this fuss and sleepless nights, I've decided to go ahead and finally record something for my Ayvarith: the story of Alexander. The recording is still going on and I can't believe it is that much fun even though it is a headache to edit the sound files and correct them and remove these parts where I cracked up laughing! The progress is just beginning, and the real heavy work is left for chapter 6!
You can check Chapter 1 in Ayvarith transliteration, and you can listen the text. Hopefully it is a good quality (MP3 files): Chapter 1 (Ayvarith). It might be a good idea though to read the Preface before checking Chapter 1. The whole story in English can be checked out here.
The process of adding these sound recording is going slowly though, but at least I'm pushing myself now and trying to overcome my mood when I see my papers scattered around me without working on them. However, I had different stories to tell for this week!

I. Kackerlacka in The House!
Done it! Finally, it's here! Well, not so perfectly done in fact but still the best I could achieve with some minor errors. I had to plan for this procedure and I have to admit that it is impractical, but after all it is still the best I could do.
The panorama that made me sleepless is finally done. A low-level panorama in the bathroom, mimicking a view of a cockroach! Well, the first thing that would give you a headache in such panoramas is the narrow space that you have to work in...

General setting in the bathroom

This time though, the tripod legs were pulled back a bit and shortened but the camera level is almost the same. I didn't go further as to elevate the camera upward for 45 degrees, but it was enough to test the theory I've planned on paper to achieve a 360 panorama on a low-level. I'll make an analysis in a form of points to make it easier a bit to understand what we are working with here.
  • Target: Low-level panorama in a narrow space (my bathroom) using my new tripod, whose central column can be flipped upside down to fit the camera downward closer to the ground. An impressive perspective if you ask me!
  • Problem: Tripod legs must show. The whole planning is to eliminate these legs in the final stitch of the panorama. To add to my misery, there are shadows (but I didn't bother much about them) and there is no lock on the central column of the tripod; meaning, if I want to rotate the tripod by lifting it from the hook on the top, the legs will definitely flip back and won't be kept steady in their places to rotate them. This recalls for another treatment: using both hands to keep the legs as they are.


The first and the main part of the problem is the legs of the tripod. I knew a solution to this is to actually take the panorama twice; each time with the tripod legs in different positions. This is natural thinking I believe, as the goal here is to get specific angles with the legs showing once, and then another time with the legs not showing then, and overlapping the two to eliminate the legs completely. This requires a VERY measured workflow. Another solution would be to simply hang the whole thing from the ceiling without the help of a tripod and we wouldn't have to bother about the legs at all! Simple, isn't it?!

The Workflow

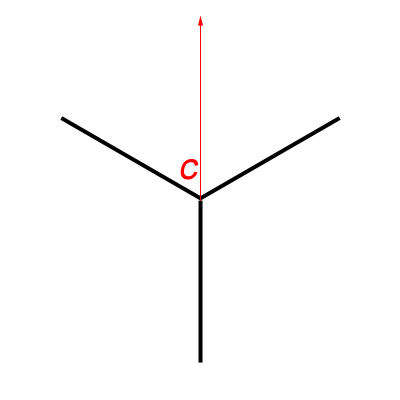
1. In the beginning, and to make it easier to align things perfectly, I've decided to align the camera forward to one of the legs. But first, I had to rotate the VR-head disk (which clicks every specific angular amount as you specify) and fix it on Zero, and then I've loosened the base to rotate the whole base freely and aligned it to one of the legs. This can serve as a starting point and will help us to align the angles as perfectly as possible later on.

The camera (C) pointing to one of the legs directly

2. This alignment, means that we can start from exactly the same point, when the tripod is rotated for 180 degrees. All what we have to do is rotate the camera (and the VR-head) 180 degrees as well and we can start from the same point to do the second panorama. This angle of rotation, 180 degrees, is best in this situation because it guarantees that in the two panoramas, the 3 legs of the tripod will NOT fall in the same place or angle between the two panoramas. If any of the legs in the first panorama falls in a certain angle and another leg, in the second panorama, falls on that same angle, then our overlapping goal fails and the tripod leg in that specific angle can't be removed! (Make a mental image and rotate the triangle in the figure above to 90 degrees around its center).

The camera (C) starts for the second panorama from the same point as before after rotating the tripod 180 degrees (half a circle), and also rotating the camera 180 degrees to make it point to the starting point.

3. As stated before, it is hard to rotate the tripod from the hook on the top, because the legs would close down and I would have to stretch them back as they were before, and in doing so I will definitely loose coordination. Hence, I needed a method to align the center of the tripod in the same point after I rotate it with my hands. Unfortunately, this was impossible to do because the VR-head occupies the space and it was hard to align the center to the ground and put a mark there. I had to resolve the problem in another way, away from its center! Simply by noticing that a two overlapping triangles can form a circle, we can sort something out!

The two positions for the tripod for each panorama. The tips can be connected to form a circle.

4. Instead of aligning the center, we can then use the concept of the circle to point and predict the position of one of the legs when it is rotated. The best leg to be rotated here is the one aligned with the camera (this is the reason in the first place to align the camera to one of the legs). To predict its place after rotation, we measure the the distance between the leg tip to the center of the tripod (radius: r) and then count as much on the other side, and put marks on both positions (mine yielded a radius of 49.5cm).

The radius on both sides: the original starting point for the first panorama, and the predicted place after rotating the tripod for the second panorama.


5. That's it! After doing the first panorama (360 panorama) with one orientation for the tripod, I carried the tripod with both hands and aligned the leg+camera alignment with the second mark. At this point, I've rotated the camera 180 degrees to the back to start from the same point as the first panorama. This order is critical when files are managed by PTGui later on.

The whole process took around 45 minutes, excluding the time spent to adjust the tripod out of the bathroom, and adjusting the camera and lens settings as well. I tried here to use the hyperfocal concept to ensure that the whole range is in proper sharpness, because setting the fisheye lens to infinity here (as I usually do with normal panoramas) will make the floor closer to the camera blurred too much. The camera was finally adjusted to a hyperfocal at f/8. Simply set the camera to f/8 and manually rotate the focusing disk to fix the infinity symbol over "8" on the right side of the middle point. 

Canon 15mm f/2.8 Fisheye lens
Source: B&H

Then after, the struggle of PTGui begins. In fact, the stitch was not at all perfectly good but it was way far better than my previous trials! I'm happy for this despite the broken lines and the weird exposure spots and noise (say, even a normal panorama has those!!). The HDR images were prepared in Photomatix 3 instead of 4 to spare myself some headache. But later on I used version 4 for tone-mapping only.
As a beginning, I've decided to make use of the Blending Priority in PTGui before I begin aligning the images in the very beginning, and this option is supposedly only a numerical value that bears priority but nothing else, i.e. the number you put there is not entered in any calculations but PTGui uses this number to order the importance of the images and which to blend the most and the least (However, I tend to think of it as how much radius of the image is taken into). By default all images are given a value of 100, and as a starter for me, I've reduced this number to 50 for every image that has a leg from the tripod. The initial result was astonishing, and some tuning was done later on to some images to hide more from the legs or broken lines around the toilet seat, which worked as well (but not for the tripod leg which I had to clone later on).

Kackerlacka

In case you wonder about the name, Kackerlacka, it means "cockroach" in Swedish (yes, again). I just liked how it sounds, so I've changed the name from Cockroach to Kackerlacka!
The major fixes were done in HDR mode to hide the remnant of a tripod leg (above the bath tub) which is something I couldn't hide using Blending Priority option. I had to cut a piece from the adjacent walls and stick them there over the remnant of the leg. Also, some spots of colors were there, in HDR mode, under the washing basin and I had to clone these out too. The other fixes were done after tone-mapping the HDR panorama and majorly they were broken lines on the floor and else where, but I didn't fix them all. I was happy enough that my plan worked already and decided to give myself a rest from all the headache of fixes! Taking a row at 45 degrees upward was an idea, but I've neglected that for the time being because I do need to raise the camera a bit more from the ground. In my first trials with this panorama, the camera rotation when it was tilted, caused the setting's center to shift from its place causing more chaos when it comes to stitching! For the time being, this is enough, and might even fit a simple QTVR!

II. Moon on The Roof:
Spent Monday night on the roof trying to test some long exposure procedures. It was a hasty work really and no intention to make some art work out of it. I barely metered and settled everything on the roof (and forgot that the WB was set to K3000). However, with my fisheye lens not much can be done and lengthen the exposure time because I don't have the proper filters that fit to it. I wanted to use this lens specifically for the distortion and the wide view, but I might try to test my 18-55mm lens since I have a filter adapter to this one.
Anyway, this experiment was useful in some aspects. I've realized some problems and aspects that might be helpful for me in the future.
The longest exposure I could get was for 8 minutes, and for some reason I was not able to automate the whole process. I had to come back and forth to the tripod to do the exposure again, as I had some overlapping layers in my mind. To make sure that the breeze won't move the camera I've hung the camera back on the hook on the central column.

Night Photography: Finding your way in the dark

Lance Keimig in his book mentions a lot about the histogram and doing tests before doing the long exposure, but I have to admit I didn't do any of that. I was working in a haste. One thing though was proved as Lance mentioned: the heat produces more noise. The temperature was around 40C (~104F) and that definitely produces not only luminance noise, but also chromatic ones like if the ISO was not set to 100. However, the results were interesting indeed...

Falling Moon

In the beginning I've decided to work with DPP (Canon's software) because as, again, I read in Lance's book, the software of the camera manufacturer is best suited to deal with the noise recorded into the RAW file, while third-party editors, like Photoshop or Lightroom, do not identify this data (but they do give a way to clean the noise and sharpen the image). Long story short, it didn't work. It didn't fit my workflow and I made some mistakes (converting the RAWs to TIFFs in sRGB space) and DPP do not provide ProPhoto space (the highest space I guess was Wide Gamut RGB, which is still lesser than ProPhoto space). One thing though surprised me, sort of, and that was the "Linear" option in DPP. In fact, the Linear option, when turned on, did change the image into the "real" atmosphere that I was looking at on the roof!

One RAW slide before ticking Linear option.

The same RAW slide after ticking the Linear option. This how the sky was in real.

Anyway, I didn't want things to go the normal way, so I followed my old routine with Photoshop. Fixing the WB made an interesting blue sky, the only thing that was missing is a long line made by the moon. However, since I had shot several exposures, I wanted to overlap them. It was not an easy task and the auto-blending in Photoshop didn't help me much so I had to do things manually, and that was awkward! All in All, it was a struggle against the noise and I tried to make a trade between details and the noise...

Luna Cadit (Falling Moon)

Another surprise was waiting for me in this scene though. This little surprise was a delicate one, that with some noise cleaning it just disappears. My place is in the middle of a urban area and of course in such places, it is hard to see stars. Seems, however, this is not the case always...

Click for enlargement to see more clearly.

I think I can learn now for sure that the longer the exposure, the more lights from the stars can be in even in a busy area with so much light pollution like the city. But, this is not an excuse for not going to the desert or any isolate place to take some star trails. I'd love to do this one day, if only I got the means. Hmm, maybe light painting is my next target? Who knows...

III. My Busy Schedule:
After managing some aspect of panoramas in the past 2 weeks, specifically in the Kackerlacka and Asylum panoramas, and looking at the knowledge gained in the past weeks specially about what is related to the Blending Priority in PTGui, I've decided to go for another round and do a panorama that was done some long time ago (and probably in a time when I didn't have even a VR-head). That is a panorama in my office, including myself in it.
I've learned my lessons already from the previous trial, but I never thought I would be doing it again. One of the critical things in such panoramas, and because I have no one to help me out as it should be, the scene must be STATIC. Yes, in bold. A slight movement can screw the whole scene for you. In my case now and with my new trial with this, I did face further problems, as I do with any panorama, yet, I did fix some aspects that did make troubles for me before. I learned new lessons as well this time too!

I'm Busy

I won't go and talk about the nadir point this time. I guess, if you were following the past posts, you know already what kind of headaches involved here and that's why this one is cropped from the bottom (yet, a QTVR can be done later, and this is what I'm thinking of).
The panorama was done completely in the beginning (including taking the nadir and zenith points) and then, carefully without moving the tripod, I've tilted the camera down 45 degrees (because on the couch, my feet won't be showing if the camera was not tilted down). After putting the camera down, I've decided carefully for my places to sit (or lay) and I had to do this VERY slowly to avoid moving any object (and holding the wireless remote of course). I've added myself three times in three close positions on the couch and this was a mistake. The couch stretches and changes its shape when you sit on it, and this is not good for the stitching process and I had to sacrifice this appearance and drop down two slides for me sitting on the left and right. Attention to such details is a MUST.

Playing around with Blending Priority (raising and lowering) was fine in the beginning until I discovered after the FIRST stitches (I made already 3 projections of this panorama) that there was some "blending errors". Some portions of me disappeared (knees of me sitting disappeared and the elbow too, and in other places). Trying to fix these errors in Photoshop was not a good idea. Hence, I've went on and tried to change the blending priority again for several slides and here, I had to do some trade off: when I increase the blending priority for really important slides (mainly those I'm in) I will be ending up with broken lines. I've decided to do it that way since broken lines are, relatively, easy to fix in Photoshop.


The settings for shooting this panorama were critical, mainly the White Balance (WB). In many occasions and many times, whenever I go around my work place shooting under various lights, I always end up with a problem deciding what WB I should use, and henceforth, what color temperature to put when I tone-map my HDR images. This time though, I've decided to go on with a simple test. Since the wall in my office is supposedly called "white" then, why not use it as a Custom WB? Simply, I've took a picture of the wall under the current lighting conditions and configured this image as a custom WB. They say though that it is more accurate to set the WB using a 18% gray card in the location but I think I've made the right decision here, and when it was the time to tone-map the whole thing (after heavy editing in Photoshop) the picture was majorly neutral and natural, and all what was needed is a bit of blue hue to be added (by putting the color temperature in Photomatix down little bit). Although you can set the WB manually later on when you edit a RAW file, but you always see in books some advises about the importance of doing the right WB in place. I think after this experiment I can say it is completely true. Many times when I take pictures from my work place, the WB was hard to be decided for, and usually I would end up with too much bluish images or with purplish ones. Here though, I made use of the Av mode and not the (M)anual mode, since it was so hard to decided for an intermediate shutter speed between highlights and shadows. The difference was vast.
Beside the corrections in Photoshop for the stitching errors, there was also a minor edit to put up the exposure value for the whole scene while putting down the Exposure for the light sources and window. This is my usual way for emphasizing the details in these areas (although the light sources, when blown out, can be attractive as well).
____
After all of this fuss this week, I'm really wondering where am I going? Seems that the more I work with my camera, the more I get isolated, somehow. I still have some ideas to do with my camera but I didn't have time to do them this week, and probably will work on them soon by next week, and until the time comes, my mind will keep being busy with daydreaming, keeping me a dead with open eyes, and imagining how things would evolve around me in a reality that will never happen. I can hear it now going... tick... tock... tick... tock... ... ... tick ... ... ... ... ...


Wednesday, May 20, 2009

Celtic...


Been working on my writings for some days, and doing several things. My mind is kind of scattered, but one thing is assured, I have this weird urge to write poems like.. Lynn. I'm trying to chase after beauty wherever it comes, where it goes.
I've started to stay in the office all the day (I mean all the working day) instead of going back home and then come back here to do a fingerprint. My colleague is not helping when it comes to giving a helping hand with this!
However, I'm getting myself busy with so many things that I know I wouldn't be able to do them when I get back home or just get lazy about it! The only bad thing is that some stuff need a better PC than this laptop which I take with me to work. During working in that manner, I just keep the music rolling on everything Irish. Time passes so fast, specially when you play the same song or music again and again and never get your enough of it! It has been some time since I listened to Celtic music. It helps also to spark some ideas for writing the story of Alexander, and poems as well.

Weird toothache! I can't locate the pain, and even my dentist said everything is OK. I'm on antibiotics for some time now until next Saturday to check back for any changes. The pain comes specially when I have a raise in my blood pressure.

Planning to go to Failaka next weekend but not confirmed yet. Hope to get more and more nice photos from there! And, less seasickness.