Two weeks with barely anything to write about. I was busy with many things, starting from games that I MUST play to lens testing that I MUST work on. I tried to prepare also for writing an Arabic article about lens testing for my other blog, but unfortunately things were not done in time. Thus, all is delayed.
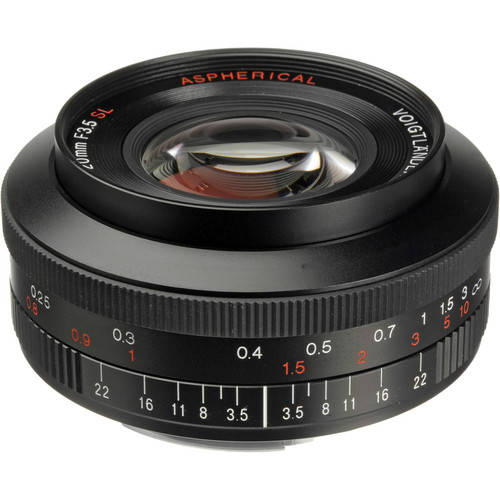
They were stressful 2 weeks in fact, with contests and photos and home issues. I feel drained already and not sure how I'm going on with my everyday life. Anyway, I've finally made a lens test, which I cannot say it is a perfect one but I tried hard at least. My main aim was to test and compare between 2 lenses, the almost-new to my collection, Voigtländer 20mm f/3.5 lens, and my old (trusted for panoramas) Canon EF 15mm f/2.8 fisheye lens. However, I've completed my tests as much as possible with most of the prime lenses I have: 8mm, 50mm, and 100mm. These tests are not the end of the story as I have to do more with the former two to check out further, mainly, the possibility of doing a panorama without doing further calibration for the VR-head (which is calibrated specifically for Canon EOS 7D + Canon EF 15mm f/2.8 fisheye lens).
For the following tests, I've used a simple chart provided in B&H website. However, I'm not sure how to extract more information from these charts but they were enough for my uses right now, like checking for chromatic aberrations and for the "sweet spot" in apertures range, and probably I would check out for any possibilities to measure the amount of distortion and correction needed (using DxO; but I doubt it's possible). Checking for vignetting is also possible as explained in the
main text, but seems all my tests were prone to some error of some kind, and hence testing for vignetting is not assured. Mainly, it was lit from one side (and I preferred working in daytime since the sun beams seep through the door at this time and the exposure times are shortened significantly). According to the text, the chart must be printed on glossy paper (probably for increasing contrast), and that proved problematic with my lighting conditions as there were several harsh reflections off the chart and using speedlites was out of question (would complicate things further). However, the majority of the images taken seem to have proper balanced lighting anyway (with exception to the Rokinon 8mm fisheye lens).
 |
| The chart in use. I've printed it on A0 size, even though according to the text it is printed on a smaller size. Both sizes, however, are smaller than the real image size (when printed as it is that is). |
Voigtländer 20mm f/3.5
The lens is not a fisheye lens, thus it has a rectified perspective (though not absolutely flat). The only wide angle lens I have which gives such a perspective is the very old and out-of-date kit lens, Canon EF-S 18-55mm. The lens is semi-manual, if I can call it so; meaning it is generally manual with no Auto-focus function, but it does apply some communication with the camera. One can simply turn the focusing ring slowly while pressing the shutter button half way and wait for the beep to confirm the focus. However, I've realized that it is a good practice to re-check the LiveView for the sharpness of the lines and fine-tune the focus.
To make things systematic a bit, I've divided my work to two parts: inspecting the center circle for maximum sharpness and best setting chromatic aberrations (mostly it is the same as the aperture of the sharpest image), and the second part is to do the same with the corners. Most of the time, the aperture that provides the sharpest image at the center does so as well to the corners; at least in my case here,
but I don't think this is a general rule. More complicated charts (look for
ISO 12233) would provide more information, specifically on the resolution power of the lens. Not sure this is possible in the chart above. In the following strip, the change in sharpness of the center circle is shown with varying the aperture. The view is supposed to be an original 100% crop, so please allow some time to load. I was mainly interested in the very central point of the circle where all these triangles meet:
Well, now to results! Upon inspecting the center of the chart,
it looks that the range between f/7.1 and f/10 got the sharpest lines (that is, it is the "sweet spot"). Most probably f/8 would be the best, but since the lowest f-number here is f/3.5, I was going in full stops from that point up to f/22, and thus shots were made at f/7.1 and f/10 (instead of the more typical stops of f/8 and f/11). The amount of chromatic aberrations at the center are more or less linked to the same range of apertures.
The chromatic aberrations are there at all apertures, but they "look" lesser at this range of apertures.
As for the corners, the results are around the same in fact. Checking the corners is essential since in optical design, the majority of calculations and considerations are done about the center region of the lens mostly, and hence checking the center of the chart and the corners for comparison is a must. However, with this lens I didn't find much difference in the values of sharpness.
Canon EF 15mm f/2.8 Fisheye
This is my usual and typical lens for panoramas and I rarely do use it in any other situations, for when I need a really wide angle, I would then switch to my humble Rokinon. This said, it doesn't mean I wouldn't pick it for specific situations anyway. This lens is stopped and not issued anymore from Canon which somehow put me in some troubles now and then when I try to find some specific information about it. Anyway it is still the darling which I prefer for panoramas (and the VR-head is calibrated according to its combination with Canon EOS 7D). The lens has a slot at the back for gel filters. Unlike the Voigtländer lens, it does support AF function, even though it has a slow mechanism. Anyway, with a wide angle, why the hurry! Of course as a fisheye lens, the distortion is, normally, not rectified. This of course makes it a challenge to fit the chart into the view, thus portions of the wall were included in the shots. In the same manner like the previous lens, I've focused automatically, then manually to check the sharpness, and then took shots at full stops of aperture (starting from f/2.8 and ending with f/22).
As for this center, I was fluctuating between f/8 and f/11 as the sharpest, but looking further to the center, I see that the center is less condensed with f/8, which I think it signifies that f/8 is the sweet spot for this lens. However, upon inspecting the corners, the story was a bit different, and I'm hoping that this difference is significant and not caused by a human error from my side.
Inspecting one of the corners here, I've realized that f/8 was not the sharpest but it was f/11. This means we have a difference in terms of sharpness in the various parts of the image. I think this might be considered normal since we are speaking of a fisheye lens which exhibits some distortion. But this observation is really significant when I bear in mind that I used to do panoramas all that time without realizing this fact. Could it be that such fact is the reason behind many failures of stitching in the past? Not sure…
In terms of the chromatic aberrations, it is the same all over and specially at the corners and edges, where it doesn't seem to change at all with the change in aperture; the red and cyan bands around the edges of lines are the same. The image can be sharp (visually), yet it does show aberrations.
Conclusions
From my humble observation, and I know I did make some mistakes in shooting the chart, but it seems that each lens has its advantage and disadvantage, specifically when compared having panorama-making in mind. For example, we can see that the
Voigtländer 20mm f/3.5 lens has an almost unified focus from center to the corners when it comes to the sweet spot. On the other hand, the
Canon EF 15mm f/2.8 fisheye lens does change in sharpness from center to corner; Where the center is sharpest at f/8 and the corners are sharpest at f/11.
Probably we are talking here about the focus shift phenomenon, in which the focusing plane is shifted as the aperture changes and that would require a slight change in the focusing distance.
Chromatic aberrations are apparent in both lenses. However, they are typically more at the edges rather than the center. In my observations, I've noticed that despite displaying chromatic aberrations at most apertures, the distance or the width of the aberrational bands are quite thicker in Canon's lens while being thinner in Voigtländer's lens. This would supposedly mean and easy treatment (digitally) for such a problem in the future for the Voigtländer's lens more than it is for the Canon's. For a fisheye lens, though, this is quite normal I believe, as the distortion at the edges of the frame would naturally be accompanied by such aberrations in high contrast situations.
As for vignetting, my test was quite simple: increasing the contrast for the image. However, no significant vignetting occurred in any lens, at any aperture value. This is probably quite normal since my camera (Canon EOS 7D) has a cropped frame. I think vignetting would be more apparent with full-frame cameras.
One main factor (divided into small factors) which I didn't get the chance to study yet at this point, is the capability of Voigtländer's lens to be adapted for panorama work without the need for re-calibration for the VR-head. Meanwhile, the Canon EF 15 fisheye lens, with its slot at the back for gel filters, is capable of carrying my Kodak gel filter of 1000nm threshold. I can fit my other circular IR filter on the Voigtländer's lens (with some step-up ring), but the threshold is only 650nm; meaning some Red spectrum would seep through still. In both cases the art is possible. An extra point for Voigtländer's lens is the fact that I do own also a UV-pass filter which I can fit it to this lens and do panoramas in UV for the first time (and yet I don't have a UV gel filter). All that work with filters is planned to be with my new converted camera of course (also Canon EOS 7D) and not the regular camera anymore. Another advantage for Canon's which must be pinned out, is the fact that it has a "red dot" to define the focus under infrared influence; Something that Voigtländer's lacks. The critical factor here is finding the no-parallax point for the Voigtländer's lens and see if re-calibration is needed or not. If a re-calibration is due, probably it won't be worth it, but I'll try.
Doing this does encourage me somehow to print the more elaborate and complicated
ISO 12233 chart, with which I can do measurement for the resolution power of the lens (in simple terms, it is the power of the lens to differentiate between two closely-spaced lines). But I don't think this idea will be applicable in the near future.
Finale
Even though I'm having my break from the camera yet I'm working still with the camera(s). Ironic, isn't it? I wish if I can even work further with other projects floating around like the the Geltani, but I'm trying hard to concentrate on one thing at a time. Though I was planning for a long break somewhat, yet it seems I'm much obliged to join the group in another "adventure" for shooting theater performances. This made me think as it would be a good chance to put my converted camera into practice and see how it would act in a dark atmosphere like the one usually offered by theater performances.
This busy schedule after all does not provide a protection from harsh mood swings now and then or simply rolling back with flashes of memories with a simple trigger; could be as silly as a sign on the road. Anyway, now I will be busy writing some articles for the group, and also writing an Arabic illustration for how to test lenses for my other blog, and till then, I'm not sure I would be able to post here soon…