Showing posts with label daydreaming. Show all posts

Thursday, July 4, 2013

Peel!

Long and boring technical post. Read at your own risk!

As of writing these words I'm still struggling with my car's AC problem. It works fine one time and not working again; just like that on and off. 
In the meantime, I got some time to do some ideas with my camera back home, and in this post, I'm dedicating my efforts to an old idea that I've long abandoned, for some time, for the sake of other ideas. I've tried to do it before with some specific approach so to say but now it is completely a new door that I'm peeking through!

Peeling Hope!
After many many trials done in very long time ago to do such an effect, I've came about to some kind of a breakthrough; yet it needs more work to be done, I have to say.
The thing I'm talking about here is what I call the Peeing Effect or maybe some people refer to it as the Reverse Panorama or Internal Panorama. The idea is simple: instead of doing a panorama of the space around you, do it in perspective to one object.
The idea is not new in fact. It is used extensively in many websites (specially retailers) to offer a complete view of the object at hand, where the user can click and drag to rotate the object virtually. This is also called Object VR (for Virtual Reality). But my story, somehow related, yet completely different!
What I wanted to do long time ago is to provide a flat 2D view of a 3D object without the need for rendering into a 3D environment with some interaction from the user. A simple image that tells it all. This is all what I wanted to do!
I have to say though, I did indeed try to do an Object VR before using PTGui but I didn't go deeper into that (since I've realized that there is a special type of software to deal with this render) but what got me more interested is the artistic touch of flattening a 3D object; just like planet Earth flattened by Mercator!
My very early trials did involve PTGui but they also failed, and I've done the effect manually using layers in Photoshop. However, now with some change in wisdom and the amount of knowledge I received from previous experiences in (regular) panoramas, I wanted to try it all over again (and for weeks, but only now I got the time!) with PTGui.

Peeling a seashell, done manually by stacking layers in Photoshop (2011).

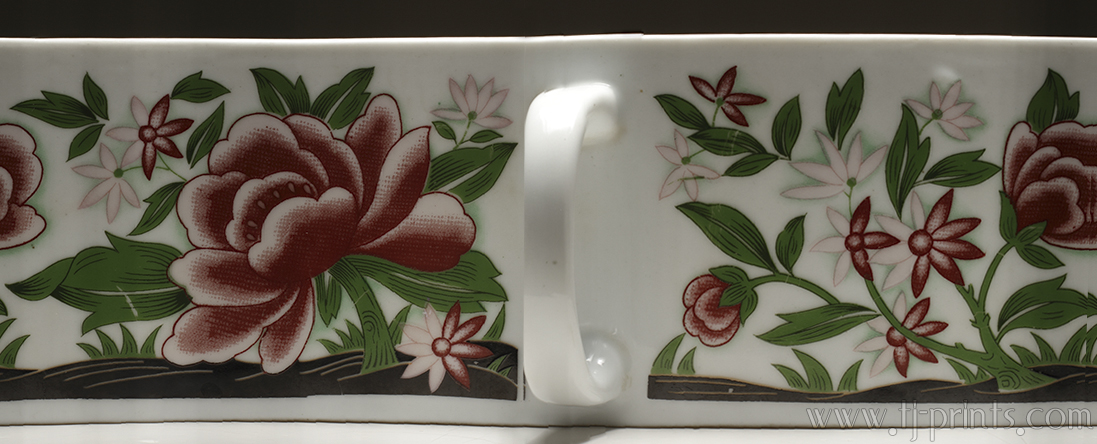
 With such trials, one thing is for sure: The more mistakes you make, the better you get! As simple as that. For the time being, my simple target was one of my favorite mugs at home! Yep, I had this one (and it has a twin!) since I was 17 probably... or 16... some time before 18, I'm sure!
The first thought about capturing this with a smooth movement is to fix the rotating table in 5o segments. Of course this is done with the help of the base of my Manfrotto 303SPH VR-head. Up till that moment, I really had no idea of how am I going to connect images together using PTGui to make out one long connected peeled mug! I just had to do it. Total images: 360o/5o is 72 images. No HDR intended here but simple RAW files.

Manfrotto's rotating base with improvised disk fixed on top by velcro. Pardon the lousy quality. The image was taken in a haste and not by artistic means!

 As I uploaded my first trial, I was searching the web for some tips, but most of the tips are dedicated to Object VR and not for what I'm trying to do here: a peeling effect! However, the idea stroke me like a bullet when I was reading an online book sample (an old book as it seems) about panoramas and tips about camera types and what methods are appropriate in each case (unfortunately, I can't remember the book's name now, it seemed good!). Within the context, there was a discussion about Slit Cameras (also called scanning cameras I think) in which the shutters of such camera do actually move over the sensor providing a thin band of light covering a portion of the sensor, and this band eventually sweeps through the entire sensor (not sure in which direction though no difference I guess!). The word Slit here inspired me to do the same: what if PTGui only picks the control points from a specific region in which movement is recorded? That would be like a reverse scanning! The proper tool to do this is the Crop tab inside PTGui. The Crop tab is dedicated, originally, for those images in which you don't like to include some portions of the scene to be implemented in generating control points for the whole panorama - the exact thing you want to do when dealing with lower level shots showing your tripod's legs and portions of the VR-head (like the bulky Manfrotto 303SPH). It is like, literally, telling PTGui, please be blind in regard of all these regions and just look at this; a technical retinitis pigmentosa.
However, in my first trial, the mistakes were apparent: so much tilt in shots and such a disturbing background. Probably the background won't do much disturbing because of the slit I'm trying to implement, but the tilt can be a problem indeed for the overall image look. Add to the problems is the uneven light around the mug which changes on the surface of the mug while rotating. The critical question, however, was: of what portion should I take the slit? In other words, what should I crop in PTGui? Naturally, the answer would be: the middle portion of the mug. However, this approach still as so much thoughts going on in my head.

Example shot from the first trial. Notice the uneven light across the surface and the tilt, and of course, the disturbing background. I've tried to isolate it as much as possible with shallow depth (low f-number), yet I had to increase it and consequently, sharpened the background more.

Since the rotating base moves in segments of 5o, I thought first that putting the crop lines for +/- 5o around the middle point of frame would suffice. Anyway, more troubles came about. First, PTGui deals with pixels, not degrees! How many pixels are equal to 5o? The answer was not so obvious in the beginning but it was just in front of me and I didn't see it, until the second trial was done! The answer was simply to find out the movement of the edge of the handle (or any point) from one side to the other (that is for 180o) and voila! You got the equation: 1o=ΔPx/180o; where ΔPx is the difference in pixels for the relative location of any point on the mug (I've taken the handle of the mug to check for this) from one side to the other exactly opposite to it. Care must be taken here because pixels are not divisible; pixels must be an integer number! Thus whenever fractions appear (and they will appear of course) it is the approximation that shall be taken.

The width of the rotation in pixels as I've measured it. Measuring in the Crop facility inside PTGui can be better and more accurate rather than Photoshop. Also, it keeps the work all in one place instead of running 2 programs.


In the beginning, I've based my calculations for the crop on the central point of the frame as a whole (i.e. the middle point of the frame which lies at pixel #2592 width-wise of course), but with my second trial to shoot the mug, I've changed this approach (mainly because it was hard to situate the mug exactly in the center of the rotation), and I've decided later to take the edges of the mug (not including the handle) and find the middle point between these two edges and increase the crop to the left and right of that middle point.

(1) The width on which I based the central crop in my first trials. (2) The width I've used later to specify the central crop.

Originally, +/- 5o was not quite a sufficient quantity because it is so small that PTGui can not find matching points between one slide and the next, thus I've increased the crop to +/- 10o, 15o, 20o. I think it did work smoothly up to +/- 30o, but the more you widen the crop, the messy PTGui gets. This is natural because we have a curvy surface that rotates and that means distorted features from one shot to the other, thus making the alignment of the slides a hard task to do and frequently, no good results at the end. So, after all, we have to keep it minimum and sufficient to include details from one slide to the other (but of course this depends on what you are scanning with this method). In many occasions there were hard times with regular panoramas when I had to, ironically, take the seat of the computer and place control points to aid the computer on aligning images. However, in the case here with the peeling effect the matter goes to the extreme somehow with zooming in and trying to find some common features between 2 slides however possible, even if it takes you to the pixels level!

Down to the second trial after few achievements with the first trial with that lousy background and annoying light levels. This time, I've placed the set in front of a plain wall, and using the lateral arm, I've raised the speedlite (with a reflector and a diffuser on) on the top of the set to illuminate the mug and reduce shadows on its side. It is at this moment only that I've realized I can fix the lateral arm with a 1/4" thread instead of the typical 3/4"! With 3/4" I would have to place it on the monopod which, of course, is not a stable fixture, but here I've used the lateral arm with a regular tripod in a 1/4" thread, which was more stable, not completely!
Source: B&H
The next surprise was still waiting for me though! My savior is now indeed my savior! The 33' Vello cable did work as if by magic! I could access the menu of the speedlite from the camera's body and even work in High-Speed mode. I'm not sure what went wrong in the first trials, but now it is working. I was going to work manually already and I was ready to change the settings from the speedlite itself since I can't access the menu from the camera. However, I was saved! Everything was set and ready, even though with some tiny tilt in the mug still but it is far better than in my first trial (you can compare the images above).

Bring Me Your Mug
First stitching trial for the peeling, with the help of Photoshop to fix some stitching errors.

Generally speaking, there is so much to learn, but Bring Me Your Mug (After UB40's song Bring Me Your Cup) sounds promising. Initially, this is not the look that I've intended to stitch as I wanted the handle to show from the side and not in the front. Anyway, some Photoshop tricks were needed to finalize the image and fix some stitching errors, and also to bring the handle to the middle of the image, as it was, originally, on the left side of the image. The experimenting is still going on in fact and the image above is just a sample for this post as I'm still working on a better image, if any!

Mistakes and Thoughts
This experiment specifically sparked many things that I've never thought of before while working with PTGui. For example, the detailed options for Field of View and the Crop were some sorts of a taboo for me to touch. Not that I can't, but I've never felt the need to do so when working with a regular panorama, because these specific options were fixed automatically by PTGui. Now, however, things had changed. I need to know more specific details about the works of these options to guide PTGui to stitch exactly what I want it to stitch - Talk about a LOT of experiments to be done, not on camera, but with the software itself.
Moreover, there were some points that I think I'm still doing wrong. Even though I've tried to get over the mistakes done in my first trial, yet I don't think I'm able to get over all the issues at once. Typical. Probably I can list some issues in the form of points:
  • Center: Probably one of the latest issues that I've noticed. The center of the rotation to me was the center of the base of the mug. Apparently, this is not the case here because we have a handle dangling on the side! Thus, the diameter of the whole shape must be taken into consideration. Unfortunately for me, my eyes were concentrating on the bulky body of the mug and forgetting about the handle issue as if the body was a perfect cylinder.
    Possibly a better rotation center would be closer to the handle somehow.
  • Shape: I think, possibly, every shape is a project by itself. When doing such peeling effect to shapes other than this mug, I really need to pay attention to how things would turn out while this specific shape is turned around. I'm quite sure at the moment that whatever techniques I've used to compose this peel for this mug, won't absolutely work smoothly for other objects. I guess it is my mistake as well to start off with somehow irregular shape to do the peeling effect on; Should've started with a more regular shape.
  • Control: Up till now, I'm still not controlling PTGui as it should be. Mainly, I'm still not aware of a possible way to specify for PTGui what should be the central part of the stitch. It does it all automatically. Also, the way to make the panorama encompass 360o field of view is still not obvious to me. One time it works as if by magic, then once again it can't be done. The demonstration above, Bring Me Your Mug, was wrapped around by Photoshop and originally, it is not a 360o stitch.
  • Dimensions: So far, all the hassle is for a single point of view: horizontal. What if there are more freedom levels, like taking the object with the same rotation pattern at 45o (either by raising the camera up and pointing down or, which is easier, by tilting the object)? How things would go on with this approach? Definitely, a novel of technical talk.
  • Rotation: Is 360o stitch a must? With different objects that I can place, I'm pretty sure that at some point for some objects there are no interesting details at some angles. Take the mug above for example. I could have done it (and will work on it soon) with stitching 180o rotation only, I presume. Yet, I'm not sure how it would look. I have to look further into this. Moreover, what if I divided the stitch for the whole 360o peel into two 180o? Is it possible to stitch the two parts together? Also, more experiments need to be conducted.
  • QTVR: Unlike the typical panorama and the typical Object VR render, what if I try to make a QTVR out of a peeled object? How does it feel to the viewer? Interesting? Not? We shall see!
  • Photoshop: Stitching errors are inevitable even with a regular, well-done panoramas. Here, it is no exception. However, I know my limits in regular panoramas, and when to rely on Photoshop to fix the errors. Yet, I'm not sure what are the conditions here with peeling. I've been mangling a lot with the Blending option in PTGui trying to reduce the stitching errors, but my attempts were unsuccessful. What I've discovered is, for such stitches, the Blending option is so sensitive (probably because of the tight Crop), making a single digit change leading to a drastic change in the blend - That way, making things hard for me to control. Either way, Photoshop is absolutely needed, either to add or to fix features.
These are my thoughts so far about it and I can't tell many things until I work more with this peeling issue. Next time, I need to get me a simple object, with no handles!
I have some ideas cooking in my head as well other than this peeling effect but the excitement about this ruled me over and made me forget about other stuff that I've set my mind to. Hopefully, some stuff will be ready by next week! 

Finale
Source: Amazon
Currently, I've been reading the last book on my list, the Handbook For Classical Research after finishing with the previous Lens Design book. It is a relaxation book if I should say. Yes, it is dedicated for, probably, college students but here I'm reading it in a fast pace without much intelligence needed to digest the contents. However, without much intelligence doesn't mean no sparks of ideas or a dull mind, I presume. The book got some nice discussions, questions and arguments, but majorly it is a resources book if I should say to help the new comers to the field. Even though it is about the Graeco-Roman culture in general, but still, many ideas can be generalized, even into the venue of natural sciences.
Geltani, on the other hand, got some time out of my brain in the past two weeks but I didn't standardize anything yet. This venue is walking slowly I'd say. Probably I will post about it next week, if possible!
Meanwhile, I'm starting to get sick of things around me and specially my car. I'm trying to vent as much as possible through camera work or music. However, I've noticed that to some extent, my daydreaming habit was reduced with the reduction in music consumption. I'm now almost like a quasi-confident that in the Islamic culture and literature, music was frowned upon for some reasons like this one - Daydreaming. Anyway, with the pressure at home, and with my car that persists on giving me headaches, I'm finding myself thrown into a dilemma. I need to vent, to dance, to sing, and simply, to smile. Been a while since I've smiled from the heart, and I've been doing it mostly as a compliment to others. Let me tell you, I'm sick of the others. Closest ones, before the furthest.
In a world where everyone tends to be a philosopher, the classy and the mundane, who has the time for a gazing wretch trying to find a meaning for the word "Happiness," like me?


Thursday, June 28, 2012

Rover...

A quiet week of some sort. I'm adapting the habit of bringing my camera to my work place as much as possible, everyday, whenever possible, because there are chances that might occur at any moment. More to come about this later.
I've finally managed to upload the most recent recordings and the vocalizing work with chapter 6 of Alexander's story is going on again. The problem was simple, and now I feel really dumb for not noticing it in the first place. The Google Sites account I used to upload to was simply full, and I needed to find another place. However, I've made another account and the recordings are up again from 1417 to 2016. There are moments when I just decide to stop recording for one day, simply because I'm so tired to read correctly and the whole process becomes a headache!

The form for the Job Request is ready I guess and now I'm supposed to move on and contact potential customers, specially those who did not reply. It is majorly a marketing campaign.


In the meantime, I'm educating myself more in the fields of exposure control and flash photography. I'm preparing for some new order of books and tools to be ordered soon, I hope. I've already ordered some items and books, but it will take some long time to arrive to me since I didn't use any speed mail options.

IndiPRO portable monitor
Source: B&H
Maybe one of the most important items for me right now is the portable monitor (left) along with this order. Compared to other portable monitors, like Sony's for example, this portable monitor is not much with options. However, it works with LP-E6 batteries; same as those used in Canon 7D. For this reason, I've placed an order for one extra battery as well (since it's not included). It would be beneficial as an extra battery for the camera when needed too!
This monitor will be useful when I need to take shots in critical angles with me having to bend my back severely. Back issues are a reality with a man in my age (yes, 32 is old).
Along with this monitor it occurred to me to check on something, and I'm not sure I would be able to use it, but I won't know till I try myself.

Rosco Polarizing #7300 Filter
Source: B&H
 Searching for some way to polarize the light and reduce reflections with my Canon 15mm fisheye lens, I though I might find some kind of gel filters to be fit into the rear side of the lens, like I previously ordered some ND filters gel sheet to be cut and made ready to be used with the lens. However, Rosco Polarizing Filter seems to be used mainly with light sources, but I'm interested in experimenting with this kind of sheet and whether I can cut it into pieces and fit it in the rear end of the fisheye lens. All of this was sparked by a friend who needed my help to order a specific polarizing disk for one of his own lenses. The sheet is relatively large (17x20" ~ 42.5x50cm) and might be useful in many situations, if it is to be cut into various sizes.

Camera Rover:


It was somehow a status of hiatus and unsettling mind along this week. As I've mentioned before, I'm taking my camera to my work as much as I can, and I try to take it out in regular outings as much as possible. I'm trying to capture an inspiration at the slightest chance or hope in the air. This triggers for more abstractive work.
Maybe one of the first trials to increase my understanding for the light and shadows and how they work together was my trial with the camera's flash in broad daylight.

Botanical Arc
Rokinon 8mm fisheye; DxO-corrected.

As I made few test shots for the arc, I've noticed the hard shadows in the lower part of the arc, so I've simple turned on the on camera flash (which I couldn't control because the lens was completely manual and no support for TTL) and just made the shot. Few adjustments were added then by DxO and the distortion was corrected slightly and the whole image was cropped. It's not much of an art work, as much as it is one experiment I loved to do. However, this little experiment was done without any thought to the light level of the flash or any measurements. The same scene was tried for 3D anaglyph too, but didn't work out well.
Also, around my work place, in those moments when boredom just crashes my mind (and there are a lot of them), the camera, then, would help me out in getting back to reality or at least jump from one dimension in my imagination or daydreaming to another. Some weird ideas can occur in weird places, like the bathroom.

Mönster (Patterns)

Even though this place is visited daily, there are only specific moments when everything stops and your eyes would gaze with gushing thoughts and images of ideas. I liked the geometry that I couldn't resist but to go ahead and take my camera from my office and head to the bathroom again.
Despite its simplicity, the shot was not easily done and I had to shoot many times (handheld). After going back home I've I've sorted the images out and with the help of DxO I've picked the best and enhanced its highlights and its distortion as well to make it as straight as possible. Simple patterns like that and such abstract art got its own people I believe. The least to do is to print it out on A3 paper and frame it with a simple plastic frame and hang it in the office to disturb the routine of the office or cubicles work humdrum. 

It's not all about my work place however. Strolling outside had its own benefits too, even though now it's summer and the beach area is not hospitable for my needs as it is in winter. The temperature would simply reach around 38oC by 6:00 a.m.!
The funny thing is that, I was on a hunt for some scenery that would produce some good 3D effect like the 3D Gazebo that I've done last week. Ironically, none of the shots did work, but on the other hand, I've discovered a place on the beach that I might consider for another visit at night, if possible, and do some long exposures there. Also, I've caught two images, that with some twisting, did produce some abstract (if I can call them so) with a philosophical blend in them.

Einsam (Lonely)

Waiting The World

In Einsam, beside emphasizing the color of the sand, I had to clone the uppermost portion of the image to hide the water line. There was cropping as a consequent for adjusting the horizon line and make it straight. I took the picture from above (something like a watching post) and the umbrella was lying in a diagonal line with respect to my vision.
Waiting for the World, however, was another story (and it was shot first before Einsam). I've cropped the image here to remove the horizon line and give a sense of infinity, and also cropped from the lower edge to let the shore line cut through into the corner. Call it Perfectionism if you like, but I did hate leaving the line of the shore hitting on the right side freely!

The chain of thoughts did not stop here anyway and accompanied me home, with some trials on a burnt out bulb. Taken from my car couple of weeks ago, I've stored this bulb specifically for this experiment. Though I've forgot about it a little, but it just came in time.

Colorful Bulb
Tamron 70-300mm

The bulb had a black patch, and I was thinking already of doing HDR to eliminate this problem. To add some twist, I've decided to do the HDR by bracketing the Flash pulses instead of the Exposure brackets in the camera itself. Placing the bulb in front of a printed paper used for making noise profiles for Noise Ninja added even more glamor to the image I believe.
Maybe it was a mistake to point the flash from the camera directly into the bulb without bouncing it upon some surface, but this might be debatable. The noise level was relatively easy to remove except of some areas that a Median trick would do.
In Photoshop, many, many, adjustment layers were added to increase the contrast and pronounce the bulb more (specially its edges) and fix the color cast little bit. It would have been done more easily if I did take a picture of my Kodak card and simply point the Black eyedropper into the black patch of the card.

QTVR

I've decided to go back to some of the images taken back from Failaka back in March. I've tried my best again with the Ikaros Hotel panorama, and this time with single images and not HDR, yet my trials were a failure again. Seems the critical point which ruined the whole thing is the fact that it was a windy morning and the shades covering the main yard (where I took the panorama) were shaking already and causing much of the fuss and the non-alignment problem in the panorama as a whole.
However, this was not the issue for now. I've remembered one panorama that I've stitched only in one format; which was then called the Planeta Herba.

Planeta Herba

This panorama specifically is semi-full spherical; with exclusion to the zenith and the nadir shots. In fact, and because of the blue sky, the zenith shot is not necessary I believe and could be fabricated easily I presume. The nadir shot was not a big deal too because there is sand only and it is easy to clone out. However, the shadows of the tripod and the camera (ad mine at some points) needed some work to be cloned out.
The panorama was stitched again but in flat format in order to make a QTVR. A simple QTVR.

Θάμνοι του Ίκαρου (Bushes of Ikaros)

The noise level did persist and nothing was all easy to clean, beside some burnt edges. All of these details are apparent of course in the original file, but printing the image itself has the final word when it comes to the noise level and other artifacts.
When it comes to the QTVR, I've been putting some of my Prefectionism, if I should say. It is indeed nice to have a full spherical space to look at in all directions and feel free, but also I'm trying to put down my expectations and also be realistic. In this QTVR, the space is almost fully spherical, with only zenith and nadir missing:


Again, the window was made small for quality reasons. The original file (which sizes up to 130MB) is clearer. Maybe it is a change in my own psychology or something; I just don't know. I think there are lot of things I need to give up in this life just to be going on. I hate it when I'm forced to, but what difference does it make? Annoyance is available in either case: whether you put down your expectations, or not.

The world is becoming a scary, and a silly, place to live...


Thursday, May 19, 2011

Drifted...

Well, it was a busy and a quiet week in the same time. Quiet for my camera work (as I tried to stay away a bit from my camera for the sake of working with my Ayvarith project), but it has been busy for driving here and there doing some chores. With chores, comes responsibility, as I received my shipment finally from DHL after being held for around 5 days in customs! Well, might be 4 days...
The final result is that, I had to work with my camera in order to test my new Vivitar x2 teleconverter (2XMC7), which doubles the focal length of your lens. Hence, I worked less with my Ayvarith project, and to top it all, my daydreaming addiction is drifting me away...

Vivitar Teleconverter for Canon EOS series (2XMC7)

As a test for this new tool, I directly had in mind a shot for the moon, because it is something I did before and I know the capabilities of my lenses with this object. The best image I've created for the moon was done with my Tamron 70-300mm lens. I was lucky now to have the full moon at this time, although I was a bit unlucky on Tuesday when it was exactly a full moon time, because we had some rains and I was not able to go on the roof to shoot. Thus, I had to wait for the next day, Wednesday, to do this.
I was lucky here once again, to have a full moon, that by 8:00 or 9:00 p.m., was not directly above me as it is usually whenever I want to try my luck with it! But instead the moon was above the horizon a bit (and that made me think of another shot for it). As a comparison now, I've combined 2 shots, one with Tamron lens alone at maximum  length (@300mm) and one with Vivitar's teleconverter and Tamron @300mm as well.

Two images taken for the moon at same focal lengths; one without teleconverter (left) and one with it (right). The two images were overlapped and cropped, then size reduced to 16.7% of the original. I had to focus manually here, thus the right image might be a little bit blurred. Blame it on my eyes!
One of the problems here though, is the connection. Vivitar's teleconverter do support AF (autofocus function) but, with Tamron being already slow in AF, expect to have more slow action. Well, with time now with my lenses, I've become sort of less reliant on AF functions, but it is essential after all of course.
After finishing from this shot, some scene captured my eyes specially that the moon is above the horizon and not on zenith (above my head), making a good catch for some composition there. I have to admit though, that the structures in front of me did not really impress me. The houses in a countryside or villages would be more fit for such a scene (to my eyes) rather than the houses of the urban areas here. In case we talk about cities, yes, the moon fits there as well I think to be pictures above NY or LA for example with all these big stuff covering the horizon. However, I was not going to miss this chance anyway and went on trying to "HDR" the scene. But that was not as easy as I thought...

Nox (A Night)
In the beginning, I tested my simple Canon lens of 18-55mm, but I didn't like the portions and ratios even @55mm. The moon was so distant and it won't be easy to show its details here. Thus, I changed to my other Canon lens, 55-200mm. I think I've found the perfect view I want @90mm. But problems are yet to come.
Before attending to this scene and while shooting the moon in its single form in the beginning (for comparison) I was already trying to get a bracketed sequence of (-2,0,2 EV), but that was not easy because the moon moves so fast. The further you zoom away from the moon, the more it looks like a stable object, but in a close up as @600mm or even @300mm, you will notice that an exposure of 30 seconds is enough to blur your shot. I usually shoot for HDR on Av mode (Aperture value priority), where you fix the aperture and the camera takes the rest for the shutter speed fixing. Thus, I had to put the aperture at maximum (i.e. small f-number) to increase the shutter speed reasonably.
Even @90mm though, the moon tends to move faster for the lens. The first bracketed shot at -2,0, and 2, was not enough because they seem to put the moon so bright without any details. Because of this I thought I might combine up to 6 shots for this HDR, and pulled down my EV scale to take another bracketed shot at -62/3, -42/3, -22/3. In case you are asking why I did fix the interval with (2/3) additions, this is mainly to avoid having 2 images with -2 EV, because Photomatix (or any other HDR merging software) will give you a message about this overlap, and probably won't merge (Photomatix gives you the chance to assign the values of EV manually for each image, which is also not an easy task if you ask me). Having some dark images here, I thought I'm ready, but this wasn't the case. Probably the problem could have been resolved with proper training with metering, but with my lack of training about this matter, I really didn't know where it is most proper to meter for the light for such a scene. I think metering for the moon (the brightest object in the scene) would make the rest of the scene dark. However, HDR is there to resolve such problems, presumably.
On PC now. As I started to work with these images to merge them into HDR slide, I figured out that the images are hard to be merged because the moon did indeed change its position significantly even @90mm zooming. I tried the manual ghosting removal provided with Photomatix, but no use as it proved to be worse (giving black spots around the ghosting place). For a moment, I gave up the HDR idea and tried to do something similar to what I did with several tone-mapped images for the sun one day...


Sunset
Several tone-mapped images for the sunset at fixed intervals were combined and blended together automatically by Photoshop, resulting in completely eliminating the sun disk and keeping vivid colors for the sky.

I was hoping for something similar to the image above in the beginning, but no, that did not happen. Finally, I had to resort to one final trick that I didn't want to use really but I had no choice. After merging the first 3 brackets, the result was fine but only the moon disk was so bright with no details. After that I simply layered one of the dark images (with some details of the moon) on top of my tone-mapped slide, and erasing everything, but keeping the moon disk (and blending it with Overlay). The result is what you see above (after some polishing of course) for the intensity of colors. The original image was intense in the reds and yellow, and I had to put it down a bit. One final thing I have to say here about this image and this process, is that the blue-to-red gradient in the sky is not a result of the HDR processing. This gradient was there INDEED in the sky, but the HDR only put on some saturation to it. I had to crop a little bit from the left side with aspect ratio just to remove a shed on the roof of the other house.

Now, beside my Vivitar teleconverter, I got also 3 books that I'm starting to read now (can't wait to post this and head to read one of them now), and a sound trigger from Hiviz. This tool is essential for high speed photography, but unfortunately I couldn't try it so far because I need something called a PC-terminal head to connect it to this circuit and hook it to my flash unit.


PC terminal in Canon EX580 II (the lower circular port).
Source.
Thus, until I find a head to fit this port in the flash, I don't think I'll be able to use it! I have to roam the hardware shops again (did search one already).
A little break to my vow for giving the camera a break (yeah, just a little), I've decided to go on and do some photo shots of myself, but this time with the help of my brother. Some people wanted to see me after the hair cut. Yeah, TJ had a hair cut, can you believe it? The change of the world as we know it. What to expect next? ... TJ is a human being? hmm...
Anyway, with several shots (which my brother screwed up with focusing), I've started to do him several shots, and finally I got to test my Tamron 70-300mm macro lens on his eye.

Stare

First of all, I had to do some of my favorite adjustments to his eye here; like adding pupil lines and brightening the eye little bit and whitening the eyeball (his eye had some hard red lines or veins). After all of that, I've finally converted the whole thing to black and white. Most of the images I've taken for him were converted to black and white in fact because, I find them more expressive that way and put more emphasis on the expressions or the drama that I desire to add to the scene or the look. Here though, despite adding a black and white adjustment layer, I didn't want to leave it like that. I think mainly because the light direction in the first place didn't add much drama to it. To go around it, I thought of adding a "tonality" or a "tint". The tint here was a bluish hue. To my eye, the color fluctuates between silver, gray and light blue. Now depending on your monitor and how you look at it, the pupil can be brighter or darker. Finally, and to give some sharp look, I've used the Liquify tool in Photoshop to pulls the sides of the eye a bit. To my simply experience with the eyes, some eyes give a strong stare when they are sort of half closed and when they are so, usually their sides are pulled little bit, specially the inner side of the eye (closer to the nose). I have to mention at the end that before doing all of these adjustments, there was already a work done to the RAW file originally, specially with Clarity option, to soften the skin and hide some of unwanted features!

With this little tour with my camera, and with me neglecting more of my duties toward my beloved conlang, Ayvarith, I'm trying to force myself to believe I have a beautiful life. Such optimistic trends were never my thing, but trying hard to adjust something, and along with that comes a lot of daydreaming. Hard to resist the temptation here, and hard to settle down. I have what I need, or so I convince myself, I just try to be happy with what I have at hand. As for what I don't have yet.......... ?


Thursday, February 10, 2011

Nemo Audit...

Trying to pour all the jam of anger and despair about the stupidity of this life in some words. I call them, words of wisdom. For this, I've decided to make a document file into WDC, and there, I type all the foolish words in some sarcastic way, just to try to mock my life and have a laughter, at myself. The document will be edited and added to every time I think of something. Since it is about life, it has a bit of "adult" terms, let's say. Thus, I won't recommend reading it for someone under 18 years of age, even though I know, children of today cuss and swear more than I do in my leisure time. But oh well, just to be honest.
I'm trying to squeeze my brain even more to write something new, after all the turmoil at home itself. Sometimes, you do feel that you speak a completely different language that no one understands except of you alone. I think the frustration is on increase and hitting hard on chords of melancholy and daydreaming. Music don't stop. I don't allow it to stop. I want to just rock my world away. Maybe in my daydreams people do understand me a bit? Maybe.... I was almost gone into some accident today as I was driving because I was completely absent. I don't remember my thoughts though. It's dark, in bright daylight. Nemo audit, nemo videt, nemo considerat.

However, finally, my stuff are here! It took around 2 weeks of waiting (and lot of payments) to get these stuff here. I'm still in the process of trying those things, and my progress is slow so far. I want to do it slowly because writing a review for these things is important, for me at least. I'd say, I enjoy being honest!


Some stuff I've ordered (top to bottom): Adapter ring for Cokin filters 52mm, 
Canon backpack, Tamron 70-300mm macro lens, Velbon Panhead.

And beside these, there are the two 8x ND filters from Cokin, and a cap for one of my lenses (in place of the one I lost in Ireland for my 18-55mm). The test for the ND filter will require some work though. I have now 3 of 8x ND filters (each one of them reduces the light by -3EV, totaling then -9EV), and I want to test this in some moon photography, hence, I need some time to think how to do this thing. I do wish for a star trail photography but this needs to be in some isolated place, far far away. The Velbon panhead (or tripod head) is for my monopod mainly but seems I will try to use it on my tripod as well. The head has its topmost piece that attaches itself to the camera, detachable. In other words, it's a click-system, where you can attach the camera to this piece and lock it to the head and whenever you want to remove the camera for a handheld shot, you just need to click a button and there you go. Useful for an old tripod like mine I guess! Besides, they provided also something I was looking for in a long time now; a converting screw, which makes a small screw fit into a larger hole. This head, I believe, will solve much of my problems with tripods. Only thing left here is to try and make the monopod more stable when using its 3 small legs, somehow.
I'm trying also to do more test with the new Tamron macro tele-lens (70-300mm). It is decisive somewhat and I need to get used to the way it works and focuses on objects. Of course, tripods or monopods or anything to make this ting stable is a must here, also a flash. Could be useful to get nice image of the eyes of some sort. Lot of ideas for the time being but I'm not sure I will be able to do them all. However, once I got it, I went on shooting randomly, handheld, like a mobster. One of the shots, so far, was good but maybe not to the level I want it, generally because the image was dark.

My niece

This shot actually was taken while I was standing somehow far from my niece, a toddler, and took it without any flash at around f5.6, and at ISO800. Despite the settings, the image was sort of dark. It was quite a normal and regular shot so I tried to add life to it somehow by doing what you see here; a black and white image with a colored eye (with some effects on it a bit). I wonder though if the distance was closer than it was, would I get an interesting shot for the eye again? I'm not quite sure. The macro lens makes me feel I'm using a regular telephoto lens but with some extended range! I will have to read the specifications paper again there might be some tips I'm missing. There was also another trial to catch my "tartaloza"; my metallic turtle that I keep coins in. This time, and with a monopod again, it was sort of hard to stabilize. The longer the focal length is, the more sensitive your picture will be to any shake.

Tartaloza

I used here f32, which means a longer shutter speed (or time), in a dark room with a desk lamp concentrating the light on tartaloza. I've put the monopod around one meter away from the subject here as it is the optimum distance for doing a macro with this telephoto lens (as mentioned in the specifications paper and on the lens body itself generally). The main part of the face was sharp but the rest was gone under blurring effect like if I was using a larger aperture. I have to check the Hyperfocal distance principle again here.

I have to post this now and, get lost with my music. The only thing I can talk to right now...