Showing posts with label 20mm. Show all posts

Thursday, March 31, 2022

Stroll III (2022)…

So, the weather is getting warmer and warmer here, and honestly, I don't like it, but well, this is life. Meanwhile, I'm trying to keep up with my strolling in the morning as much as possible. The weather is still nice in early mornings with the sun not quite high up in the sky but this would make up for some problems when shooting with special filters, specially UV, while not using any tripod.
On the other hand, I'm trying to do some shooting indoors with new ideas but no success so far at the time of typing this. My mind is blank, and yet my power is quite low. Yes, I do morning walks but they are simple to do compared to working with the camera indoors with all the gear that must be prepared and, depending on the idea, the props that need to be set. Anyway, I'm still trying on that front in hope that I would create something creative.

Stroll III

So for this stroll, and after 2 strolls with infrared filters, I've decided to head out with my ultraviolet-pass filter (which must be accompanied by an infrared-block filter). The stroll took place on February 18ᵗʰ and I didn't go far away from home actually, but to the open space near my house which I headed to when I shot some infrared shots in the first stroll.
My lens choice was Voigtländer 20mm (and of course with my modified Canon EOS 7D since I'm shooting UV here). Now, because of the hardships as it is with viewing the LiveView under the sun, beside shooting UV, I've decided to work with the hyperfocus principle here. However, it wasn't easy as well because the aperture I've decided to use here and which could barely aid me in shooting handheld without raising the ISO so much was about f/4.5. At this aperture, I've fixed the ISO around 500 and it was barely enough to have no shake in "some" of the shots. One would think that a 20mm lens would be forgiving a bit when it comes to hand shake, but the truth is: NOT!

Mercedes (UV)


So, one of my first targets was a construction truck parked in the near-by open space. Nothing special I guess about it except for the Mercedes emblem which was close to my eyes level, so I started to shooting that, several times, in hope to get a stable clear image but most of my trials failed (even the one you see above). I tried to work with the hyperfocus principle here but apparently with such f-stop, this principle wouldn't be quite useful since the "virtual" depth is not quite large anyway as in f/8 and beyond. Also one thing that apparently was absent from my mind back then and that is the fact that focus do shift when shooting in UV or IR!
Processing UV images is perplexing as well and not as easy as IR images, specially that I don't have any good reference for fixing the white balance. Some websites suggest specific materials to aid in calibrating the white balance for UV shots, while some insist that it is an art form after all dealing with unreal colors, so I'm going with the second opinion of course; I won't be walking around with some Teflon just to calibrate my white balance now, would I?
Anyway, one common way to process UV images is to apply a channel shift (i.e. Red to Green, Green to Blue, Blue to Red), or sometimes swapping the Red and Green and canceling the Blue in case of merging a visible color image with a UV image. In Mercedes (UV) I've simply applied the channels shift (and done this all images in fact) and typically the resultant image turns green after this procedure. I find it quite interesting how the emblem at the center turned out to be in the middle of all of the green (which was black I think?). At the final stages of the processing, I've sharpened (and even extra-sharpened) the emblem leaving the whole image almost untouched by any sharpening, just to grab more attention. It looks as if it was shot with quite a shallow depth of field, like f/1.2, as the numbers on the right are quite smudge and apparently out of focus, but the truth is, it was shot at f/4.5. 


Mechanic
Not far away from that Mercedes truck, I've found another vehicle-machine which I really don't know what it is used for, but it has a conveyor belt that was extended high up. I liked the scene here and the details but strangely, I was struck with some sort of a phobia; I couldn't get myself to go under the conveyor belt structure (heavy metallic structure). Thus, I kept my body away from under the belt, even though I really wanted to be there and take some shots. Anyway, my first shot was far off from the vehicle and, for stability purposes, going down to the ground to anchor my hand carrying the camera. Not the best composition I'd say with so much detail-less ground at the bottom of the image but this is the best image I could get with "not much" shake.
In post-processing this image, not much had been done here except for cropping which I've based on the "golden triangle" principle somehow as I was trying to make some interesting lines leading to the edge of the frame (though this is usually not advisable because it is always better to lead the viewer IN the image and not OUT of it).


سَـمـاءْ
(sky)

Still not over with the conveyor vehicle, I've tried this time to stand as close as possible (fighting my phobia still here!) and extended my hand, carrying the camera just under the conveyor and shooting blindly without even looking at the LiveView! Well, some good stuff turned out like Sky here. Of course, I had to crop a big portion of the image to keep the vision I had in mind (which came about AFTER the effect and not during the shoot) but I'm still annoyed for the remnants on the lower half of the image as I wished to leave the minaret top alone (yes, I could've cloned it but time was of the essence). What I really liked here is the flare rings. In processing though, for some reason, I didn't like the general green tint that comes with channel shifting, so I've used the channel swap (red and blue) only as if the image was shot in infrared. I think it adds some sense to the solar flare here unlike the green tint.


Tracks (UV)

At the end of this stroll, I've focused on the wheel of one of the trucks. Honestly, shot a dozen and none of them was sharp enough. However, I've processed the best I could find among this series. The composition is "meh" as well as the image quality, but what I really liked here is the colors that turned out. I think I've corrected the white balance to some region in the tire itself. 

So this is it for this stroll and still more to come, as I've done another stroll with UV filter, but with 50mm lens this time (well, I'd say in some sense, it is catastrophic more than 20mm, but we'll see!).
These strolls with UV filter actually made me think of going back to shoot UV indoors. I do have a blacklight (though it is said it is not good enough for UV photography) and I have a strong UV light for sanitizing, but this one is quite dangerous and I would need to do something to protect myself. All in all, I still need some good subject to shoot indoors! I can't really think of something right now, but if I can only force myself to do it, I think ideas would flow in later as well!

Finale

I had an idea before for posting at least one blog post in my Arabic blog per month, but here comes March and leaves without posting anything there and I'm not sure what topics should I be posting about. I could post things as I do here in my English blog, yet the reason I've established that blog was to be educative as much as possible and probably such posts like the ones here are not "so" educative.
One more idea as well for my morning strolls, if I can get up early in the morning that is, is to do a pinhole shooting at one point, but that of course would require carrying a tripod around which is something I'm not I want to do. Of course, I can raise the ISO like I used with the UV shooting here (and then after) but I'm not sure how much is that useful with f/222! Besides, the images with the pinhole are already noisy as it is with ISO100 (and I'm not sure where do these artifacts come from). I'm not sure if these artifacts are caused by the sensor, the pinhole "lens" or it is simply some flare issues because of the light direction. Anyway, it is worth checking out my options here for a handheld photo shoot under the sun and see. Black and white is a favorite theme when it comes to pinhole photography.
All the tech talk aside, the mood swings had been severe lately, aided with a lot of events at home and flashbacks that made me just sit there staring at nothingness and wonder where am I going or what am I doing? The more I think about it, the worse it gets, and the more disabled with disability I do become. The blaming game between me and I is not going to end any time soon, I believe.

Thursday, December 17, 2020

Spaziergang II…

And we come again to the Spaziergang, or walk, which I've talked about in my last post. Unfortunately, up until the moment of typing these words, my idea for a third walk or "spaziergang" is not yet fulfilled. We had some heavy rains recently (which is good and bad altogether) and the weather would have been good for going out. By my lack of sleep and the totally out-of-sync sleeping pattern made it somewhat hard to cope. Adding to that, I'm still (STILL) not decided on what lens I should be using! This is some story for some other day I guess, whenever I decide that is…

Stroll II

My Neighborhood

Voigtländer skopar 20mm f/3.5
Notice the f-numbers on
the left and right
which help on pinning the hyperfocus.

Just like the previous walk or stroll, I've decided to use one camera and one lens. The camera is, again, my modified or converted Canon EOS 7D, but the lens now is Voigtländer 20mm f/3.5, fitted with H-alpha filter. The previous stroll was done using my favorite Canon EF 50mm f/1.4 USM lens.
This lens, Voigtländer 20mm, imposes a kind of a challenge because it is semi-automatic, and that means few things:
  • I can't use the autofocus (there is none).
  • Depending on LiveView without autofocus (because of the filter on the lens front) and that might give me hard time in pinning the sharpness I need.

Thus, to solve the issue with these major obstacles, I've decided to depend on the principle of hyperfocus. It's kind of a lengthy a story to be explained here but many websites are dedicated to this issue and how to achieve an acceptable sharpness (a concept majorly common in landscape photography). Thus, I've anchored my f-stop at f/8 and rolled the focusing ring in accordance to that, as in the usual methodology of the hyperfocus principle. And first shot, as a test, was for my neighborhood as soon as I left the house. In the shot you see above, I've pointed the camera to the direction I've gone through in my first stroll. This stroll, however, is in the opposite direction to that and going through to reach the main road outside the block.

بَياض
(whiteness)


I have to say, the beginning was not quite "encouraging" or maybe I should say "exciting". The irony is, as I started looking, it seems the targets that I was finding are all fit for the 50mm lens rather than 20mm! Or could that be MY eyes are just adapted to the previous lens and not used to see (visualize) the new perspective of 20mm? I'm not sure really, but anyway I've started to shoot, or try to, starting with a flowerpot near one of the houses. The shot, Whiteness, underwent some cropping and perspective fixes later on in the processing stage as I wanted to make out an image that was divided into three equal bands of objects (just like a banner or a flag). The original color of the blooms was yellow. I did wish to capture some of the dew or droplets on these petals but that requires 50mm (and maybe an extension tube as well). Anyway, after shooting this I've tried to just forget about it and enjoy the ride and not be too technical until I reach home and check the photos up close and personal.

بَهيجْ
(gratifying)

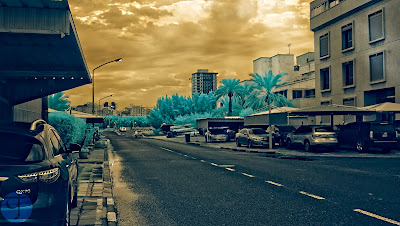
Not far from Whiteness, I've walked along and reached the main 2-way road separating my block and the next block. This road ends with a traffic light that would lead out of the area, and in normal days in the past, this one would cause one heck of a traffic jam at such time I was out in. Luckily though, things were quiet. I really didn't have any aim when I shot Gratifying but I just loved these clouds and thought to myself that I must capture the moment here, thinking that the road itself might work as some sort of a leading line. However, this leading line is definitely NOT leading anywhere! The clouds and the light gaps are somewhat hovering around the beginning or the middle of the road and not in the horizon, where the road is leading to. However, Gratifying is somewhat special to me in some way; As I usually don't use split-toning with shots taken with the H-alpha filter (or any infrared or UV filters for that matter), I've decided to use split-toning with Gratifying and I think the result was astonishing and more "dynamic"; Color-wise. The light rays were done deliberately in edit.

هُيامْ
(ardent love)

Still on that road (pictured above), I've encountered some nice bushes with some blooms, and again, I did wish if I had my 50mm lens with me instead of 20mm! Anyway, there was no use in feeling sorry about that and the whole stroll was to be a challenge to force myself to work with the camera. This time, though, I've decided to break the hyperfocus principle, since I'm shooting up close to the flower (whose original color was yellow, and I think called yellow trumpets). I've rolled back the f-stop down to f/3.5 (the lowest for this lens) to blur the background as much as possible (though still not as awesome as f/1.4), and I had to re-focus. Re-focusing with a semi-automatic (or semi-manual) lens using LiveView is not an easy task, specially without a tripod to rest the camera upon. The hands can get quite busy and shaky! Anyway, to make sure that I don't miss a thing, I've taken several shots with a plan to check them out for sharpness at home. Despite the sharpness, though, I've decided to make the image softer when it processed as I think it adds a dreamy look better. Also, the red colors for the leaves did fit the scene better I guess more than the typical turquoise tint, which is typical for this filter. Of course this was done by swapping the channels (red and blue) and I've found a simple way to do that instead of using the usual Channel Mixer adjustment layer as I used to do with other infrared images:

  1. Add an Invert adjustment layer on top.
  2. Set the blend for the Invert layer to Hue (or Color).

Of course this won't give out a delicate control of the levels for the R, G, and B channels but it is just about enough to do a channel swap between the red and blue channels. I've tested this method with my old way of swapping the channels using the Channel Mixer adjustment layer and the result was a match.
Anyway, the final image of Ardent Love had to go other processes, the major of them being a crop to remove the excess in the background. After shooting this, I've kept walking and reaching to the "boundary" of my area, where the fun was about to begin.

أَطْيافْ
(apparitions)

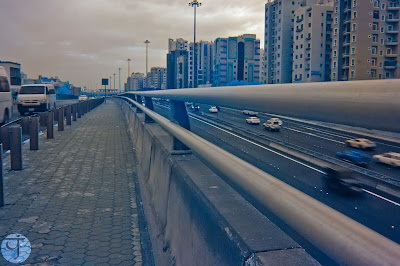
I then started to cross the road (a busy one) to read a junction of a bridge that overlooks a tunnel. The tunnel is an extension to a highway (Kuwait is small so our highways are not like the highways in bigger countries). I have to say though that the scene and even crossing to that location was quite "phobiac"; That is, it kicked my phobias to life. The junction itself is like a U-turn and it was busy at the time of me walking there. Looking at the cars passing under me made my knees go soft just a bit and for some reason I started clutching on my camera fearing that it would fall off down into the tunnel; This is while it is already wrapped around my neck with the strap! Anyway, enough with my phobias. This is not my first time in this corner in fact, but I've been here in this place many years around dusk time (blue hour) with a tripod even! This time though, no tripod, but just a camera and a lens (and no ND filters like the other time). I've started to shoot several shots (all bracketed in case I need them in HDR) and I didn't mind the movement of the cars of course, as this was part of the plan to add some motion blur and make the image "alive". Despite being one of the earliest shots in this stroll, I didn't process this image earlier when we I got back home. Anyway, there was no HDR involved but I've stacked about 5 to 6 images and blended them together, which made the cars look like ghosts (hence the title). Which inspired me for such a title further is the overall bluish streak or tint which occurred unintentionally, but I've increased its impact through vibrance once I've noticed it.

يَوْمِيًّا
(daily)

مِنْ-إِلى
(from-to)

Just before I leave the junction I thought it would be a such a loss if I didn't take some more images in hope to create something. Composition-wise, there are some good chances in that place, but the rest is left to the quality of light, and in that situation I was shooting with a filter and with a not-so-wide lens. However, I still tried to make the best of what I have with Daily where a kind of guide or leading lines are formed but the problem is, there is no real destination or some target in the horizon to point to! The cars in the tunnel kind of helped to add a direction as well but the cars on the left were kind opposing this general direction. Philosophically speaking, it is kind of a reflection of life and its currents I would say. In the same manner, From-To was shot as well but in portrait orientation and stitching 2 (originally 3 but had to discard one) images together. The leading lines here, as I think, have less impact on the viewer because the bar is quite close to the side of the image and causing to be more of a frame rather than being a leading line. In this image, I've swapped the channels, and it is worth noting that since I've realized how to swap the red/blue channels easily using the invert adjustment layer, it became almost like a standard practice to try and swap the channels on any image I work on (even normal ones that are not infrared or taken by any filter). 

خَرَسانَة
(concrete)

Leaving the junction (with some hard movements because of the narrow spaces there), I've headed back to the area away from the busy road and started walking on some asphalt road around some backyards of the houses on the edge of the area. Probably it serves as a walkway for jogging as well, don't know! Anyway, as I've explained before, it was rainy the day before so the place was full of "ponds" (if I can call them so). Unlike other moments when I started this stroll, where I wished to have my 50mm with me, this time I wished if I have my polarizer with me to enhance the reflections off the pond. I have to admit though, the subject matter here is not quite interesting; Not to me at least. But I couldn't let go of a chance to shoot reflections here. I think this shot proves that however digital you go, you would still need filters at some point! I've shot this in brackets (of course) and in fact the photo you see here is tone-mapped from HDR, but I didn't like the idea of going crazy with processing the image. I might try that later (just might!). I was trying to enhance the reflections further by tone-mapping the HDR but nothing can replace the good ol' polarizer.

اِرْتِباكاتْ
(confusions)
غَوْرْ
(depth)

Shooting reflections continued at this point as I kept walking along the fence that separates the area from the main road bordering the area, as I was hoping that I would capture some good reflection. Despite going all the way down almost kneeling on the ground, but that just was not enough. Probably, as well, the composition and the subject matter were not quite interesting, I'd say. Anyway, to make some interest out of these "boring" images like Confusions and Depth, I've sorted out to an old trick: Changing perspective. And this is done mostly by rotating the image for 180<sup><sup>o</sup></sup>. Done it before and it worked, so hopefully it does here, though I didn't get much feed back on these. Currently, my participation and involvement with the social media is ebbing low. In fact, I don't think anyone cares what I post, and I don't care either.

الصاعِد
(the ascendant)

As I walked on, I reached a pedestrian bridge that connects my area with the adjacent one. I've shot a panorama on such a bridge but on another location in the area, back in 2013. Essentially the design is the same, except that near this bridge there is a tree. I liked this tree so much (yes, I'm a tree hugger) specially that it is by the stairs of the bridge. It happens then as I was trying to find a proper angle to shoot this tree, a man passed by. Usually I wouldn't bother with people (street photography is not my thing) but since the man was giving me his back and not looking at the camera, I thought that it would be a good idea to snap the shot. Of course I didn't have my enough with a single shot, but after sorting the images and checking the movement of the legs and the distance of the man, I finally picked what it became The Ascendant (yeah my interest in astrology is getting the best of me here). In the processing phase, I've swapped the channels apparently (in case you couldn't tell so far, everything is reddish in hue instead of blue), and also tried to darken the atmosphere while focusing (dodging) the periphery of the man to grab the focus; Aided with some slight vignetting. At this point, still, the main aim was not achieved! And that is, shooting the tree beside the stairway.

المُسْتَظَل 1
(sought for shadow 1)

I was in dilemma as no specific angle did give the perspective that I really like about this tree, and thus I've decided to go for a hand-held panorama. Such kind of panoramas are always risky at some point in that some angles might be missed and some details won't be there for stitching. Anyway, despite shooting for HDR, I didn't really use the HDR technique here but simply edited the RAW files. At this point I think I got what I was looking for (of course the results were not obvious until I got back home and started to edit the photos). In case you are wondering about the name here, this is just the nature of Arabic where one word can replace a full phrase or expression in English.
المُسْتَظَل 2
(sought for shadow 2)

Of course I had to try out and swap the channels as usual and honestly I was puzzled a bit as to which one is better-looking. I like them both. I sought some opinions from family members and friends and they do prefer the second version (with channels swapped) and on Instagram (yeah, I'm posting back to some extent) the trend seems the same with slightly more likes to version 2 than to version 1. However, the dreamy look that I've worked on in the processing phase, is more pronounced in version 1 as I see it, and that is probably related to the nature of colors, as red might be rendered sharper to our eyes as I believe. Just an opinion. And probably the intriguing part of this image is not the tree itself as much as the small portion of shadow cast on the stairway (and hence the name). I have to say though that it was such an overcast day and the sun was barely visible at that time (almost 8 a.m.), but with some contrast, shadows get pronounced more in the images.

مُضَلَّعاتْ
(polygons)
The fun then just began as I climbed up on the bridge, and I have to say, my retinitis pigmentosa did cast its hideous shadows here. One of the biggest problems for me comes when the environment becomes too much grayish, bright or too dark; In such situations my eyes start to play tricks on me and I don't know the limits of the objects, specially stairs. In such instances, I have to move slowly and sensing my steps with my foot before going up or down. Anyway, upon reaching the "post" after the stairs, I've noticed some interesting octagonal structures, and again, I did wish if I just have something else me here, and this time, my panorama gear altogether! Well, I had to work around this need by doing a hand-held panorama, but this time it was a bit extreme, as I started taking photos and bending my back backward shooting photos are more than 90 degrees. Luckily I didn't get any back pain afterwards! Anyway, the shoot was bracketed of course and this time I DID work with HDR and then tone-mapped from HDR. There were some features in these gaps that I had to clone out. Swapping channels did not change much with the looks and by this I kind of gone depressed because of all the "gray matter" here. Colors would be pronounced more with lively trees with leaves, usually. Anyway, I lie hope in the clouds to make some interest in such images despite the gray looks. Probably even more than I lie hope in the geometrical shapes.

صِراطْ
(straight path)
Then comes the best part from the bridge. Something that reminded me of the old days when I did a panorama on the pedestrian bridge on the other side of the area. Actually, Straight Path, was not a single shot itself, and it is technically a panorama indeed, even though it was not calculated for. The problem here is that the shots are in portrait orientation, and for such geometry, or more precisely, for such a vertical panorama (regardless of its length) one should consider shooting in landscape orientation. Anyway, I was not planning for panorama work at that moment, when I pointed my camera and tried to be at the center as much as possible (and still missed it, sometimes it sucks behind a left-handed). As I got to the processing phase with this set and trying to pick the best candidate to go on with the process, I realized that maybe a combination of two or more would be better in fact, as one shot included too much of the top (the octagons) and another had too much of the ground. Thus, in between the two, it sounded logical to strike a balance by merging the two to form one image. Of course, some cropping was due after all as it can be seen that the top portion is longer than the lower one. Also, I had to work selectively here with layers to sharpen and enhance the details of the bridge in isolation from the rest of the image (the background). After finishing with these shots on the bridge, I've shot the tunnel below again but I guess nothing much to be said about this one except that it was processed with split-toning like Gratifying above. Probably these two from the set are the only ones that had been processed with split-toning, so far. I'll post it below (To-From The Capital). 

صَدَقَةٌ جارِيَة
(perpetual charity)
At this point, I thought it is maybe time to get back home now (I think I've spent less than one hour a bit in this stroll so far). Here, I've encountered what we call here [ماء سبيل: maa' sabeel]. It is a drinkable water outlet (cooler) usually placed near homes for any passerby to drink, as a form of charity. This particular place and object got my interest. I have to admit here again that it might have been better to shoot this with 50mm. Anyway, this is not the main point of this image, but it was the working within HDR. Typically, I would just merge the slides into HDR and then tone-map them (using Photomatix). My typical workflow changed a bit when I noticed that I've captured a lamp post just behind the cooler and the idea got into my head: Let's light up the scene!
I'm not quite the expert with such a task but as I've read about HDR techniques (specifically by Christian Bloch), I've got the idea that working in HDR, is simply Paiting with light. Thus, after merging into a HDR image, I had to first work on some minor issues (but took a load of time!) with the perspective and cropping. The rest then was a matter of trial and error and a LOT of adjustment layers to light up the post AND mimicking its feathering over the surrounding area. Saying it is easy, but keeping it as real as possible is a hard task filled with trial and error. Needless to say here that I needed to change the scene from "morning-like" which is the original, to "evening-like," and some problems later on rendering and tone-mapping the HDR file itself. To be honest, I'm still not quite satisfied with Perpetual Charity but I can say that I did my best here, and I did enjoy working with it more than caring about the final results in fact! I don't often work in HDR images in that manner as I tone-map right away most of the time. 

ما بَعْدَ العاصِفَة
(after the storm)

Just before reaching home, I was passing through a wide space (used to be a playground of some sort for football (soccer) for the kids in the area but now it is merely a… little lake after the rain. When dry, this space serves as a junction and a parking lot. Anyway, as I approached this space, I've noticed some seagulls (yes, seagulls, my area is close to the seaside) and being frustrated myself because of not having a proper lens, I've started to capture the scene in hope that I get a trace of the birds in their low flight (hoping to crop the image later and make it look better). However, I ended up with something better, to me at least!
I've shot After The Storm with bracketed shots (randomly point the camera to the direction of the birds). Anyway, as I processed the image, I realized there is no trace for the birds! Anyway, I didn't process the shot in HDR but I've combined portions from the dark and the bright images manually, in addition to the crop. The light beams in this shot are real and not edited except for some contrast added to the whole scene (unlike Gratifying above where the beams were added in the process). One thing upsets me though about this shot, and that is the car and the boat on the right, taking so much space form the image and kind of "uncroppable"; If this is a word anyway. I wouldn't say it is something to participate with or to print despite the lovely light beams.
At this place there had been other shots as well for some tires and sand but I really couldn't find any interest in the composition (specially that the background was not blurred enough even at f/3.5, the lowest); Thus, I've forgot about these shots and didn't process them at all. I'll keep them just in case, as I usually do!

Finale

مِن-إِلى العاصِمَة
(from-to the capital)
يَتَدَلّى
(dangling)
So this was it with my second strolling out, and up until typing these words things are not clear about my third stroll that I've been planning for for weeks. Meanwhile, my mother is having health issues and it keeps my brain exhausted to even think of holding a camera. I literally don't know how I am typing this blog post (I'm gathering a bits of minutes here and there to type this).
I had plans to post something in my Arabic blog but that also is postponed still since I can't find a good topic to post there. As if this is not enough, I got myself entangled with my brother's studies as I'm trying to help him out (since his English is not good). With all such mess, I think I will be taking some time off from blogging here.
My mood swings had not been the nicest for a while and I have to say that each day is becoming a struggle to have my own peace of mind and to control myself. One way to cope with all of this mess in my life is to read Quran every now and then, specially in daytime under the sun (for sunbathing while reading) or late after midnight when everything is (almost) quiet outside. Sometimes I do even play some Quran from YouTube and wear my headphones to help me go to sleep. Some might say I'm too religious, but with the standards for I live, I am not really so. These interests or curiosities are merely a norm and people here are "supposed" to do or to inspect from time to time, as a way of straightening the soul; And how few of them do right now. I wonder also if traveling would enhance anything with my mental status. I surely need a change in scenery but of course traveling in such circumstances is hard to be done (even before COVID). There is so much mess in my life and I need a good broom to sort things out…


Thursday, December 26, 2019

Mustajdee…

Somewhat a relief from a toothache! Something I was planning to do within the first week of the new year and for that occasion I was planning (and did indeed proceed with) for a one-week leave off work, but now that I've fixed the tooth (hopefully permanently) I guess it is a chance to invest that one-week leave in something else; Well, beside sleeping of course!

Genies
I've talked in my last post about a new panorama which was done in, if I can call it so, semi-infrared environment. The panorama was done completely in the dark with only candles as the light source and with a modified Canon EOS 7D for infrared photography BUT without any infrared filter; Hence, because of the candles and the absence of infrared filter, I might as well call it a "semi-infrared" process.

جِنْ (Djinn) - Original


Anyway, I've stated also that I'm in the process of creating new projections and styles out of it, as I usually do with my panoramas. Let's call these derivations Genies. Working with these genies was no fun as with other panoramas because of the amount of stitching errors that I had to put up with; Meaning, I would need to fix these stitching errors with every production for one of these "Genies". Some of them I did notice and fixed (to the best I can) in the original, but it seems changing the projection styles do exaggerate some curvature and lines that some stitching errors get amplified visually; They are there, but I didn't notice them until I've changed the projection and the perspective.
Generally speaking, my choices were limited in doing some artistic work here mainly because of depicting myself in the panorama in 3 positions, and also having these 3 poses on almost one side of the room and not balanced across the room. I had my vision back then when I was shooting this panorama and of course my thought was all focused on the overall flat, equirectangular (spherical), look. Things change though when you try to make other projection styles. There are some specific points to care for as to the presence and absence of some objects in the scene or the curvature of some lines that might not help the overall look of the image and sometimes even checking for exhaustive or unsolvable situations with the nadir (and the zenith) points. For this reason, I had to give up many ideas here and almost satisfied myself with the 3 main styles: Planet, Tunnel, and Vertical. And just in case you are wondering what's with all these Arabic names, well, I've been naming some of my latest images in Arabic and I'm starting to like it; It's my native tongue after all, right?

Genie #1: Tunnel
Typically, I would go with the planet (or little planet) projection first thing when I do panoramas, but I kept that for later simply because I didn't like it much; Nothing out of the ordinary about it. However, I was reluctant to do the tunnel projection (which is the opposite or reverse of the planet projection).

اسْتِحْضارْ (Conjuring)


The tunnel projection of this panorama, namely استحضار - Conjuring, causes my "base" to be extremely large (ahem, larger than it already is), so I was reluctant about displaying such a distortion. However, the shape of the carpet and its ornament, making some sort of framing around the scene made this projection seductive (specially that I wouldn't have to deal with fixing the nadir point here). Moreover, there was some nice surprise for me there when I started tone-mapping this panorama from HDR (using Photomatix). As you can see here, the ornaments of the carpet got glowing and shining and I'm not sure why is that; It happened only here in this projection of this panorama!

Genie #2: Planet
So, things did not stop at just the tunnel, but also the planet (or little planet) projection which was least favorable for me since it does not have that dramatic look that a tunnel projection gives out. At this level, I've tried to tone-map the HDR panorama using Photoshop instead of Photomatix, which did not even give me any dramatic look either but it was fair I'd say. It almost kept the original look of the HDR panorama at 0EV level. I'm thinking that it is probably attributed to the asymmetry in the scene that such projection for this panorama did not yield pretty much of an interest. At least the nadir point was relatively easy to fix!

حُضورْ - Arrival


Genie #3: Vertical
This one was the least favorite one actually. No symmetry and no organization, just the fact that it is a vertical panorama (using Mercator projection). To do this projection, I had to actually exaggerate the width of the panorama and then crop it out in post-process. I had to tilt and rotate the panorama to make sure that none of my copies gets cropped in the stitching process. Tone-mapped using Photomatix, again, but I keep looking at it and just say "meh." Here, again, I had to work on the nadir point and patch it up.

اسْتِرْفاع - Levitation


Other than these 3 trials with projections with this specific panorama, I've tried to create a wide-view panorama (planet projection with a pitch change to 90 degrees up or down), along with other trials with some other projections, but the trials were not so good actually, lacking organization or symmetry and some point of interest. I think it is probably the flat (equirectangular) format which is the best suited for this panorama because this is how I originally envisioned it as I worked with it. The tunnel version is good as well but its point of interest is the framing and that strange glow in that frame, all made by the carpet, but deep inside that frame, the focus is so-so I'd say.
There could be a chance that I would try to stitch this panorama again but without the additives (the 2 copies of me on the bed and the sofa) and see how things would go. But I need some time to do that, as I'm already struggling with some ideas that I've already packed in my head, yet can't do much about them for the time being! Also, I need to examine this panorama further to see if it is worthy to be converted into a VR.

Beg Your Pardon?
In the realm of ideas, there had been one idea specifically that I wanted to do so much. The problem, as usual, nnot having a proper model and so I have to do it all on my own, which causes a lot of shattering in focus in fact. So, the final image you'll see here did not bring me satisfaction much but at least I worked on it. I'm afraid to be stamped with perfectionism though.
The idea of this image did actually come from an old poem I've composed, titled The Beggar of Nothingville. It was not hard to visualize the final image, sort of, but the hardships come with doing the required physical job (specially moving the gear around to a proper location). I guess I'm getting pretty old here.
المُسْتَجْدي (The Beggar)

Depending on the brightness of your display, some details in the black would show, and might not. As my monitor is calibrated and I work as per the histogram I can assure you that tiny bits of details only should show on the lower part of the image. Of course, المستجدي - The Beggar is not a single shot, but a composite. As I said,  Ididn't have many to help. Also, the place I was shooting in was barely one meter wide and it would be hard for 2 people to be there at the same time!
You may ask, what brought me to such a place? Like, aren't there any other places? Well, since I'm confined to home, I looked for a place that would give a texture for the background; Most of the walls inside the house are blank (and worth noting that I was planning for B&W image from the very beginning), so colors of the walls won't change much, but texture would. Beside that, and since I'm working alone and not bearing the hassles of stands and reflectors, I did need a small space just enough to give a slight bounced light off the walls. I have to say though that this one didn't work quite well because the wall is matte, but it added a tiny bit of reflected light though.

The space of the shoot. The speedlite was placed behind the bars on the upper-left corner. Total width is definitely less than 1.5m.


Voigtländer 20mm Color Skopar
I was planning to shoot with my trusty Voigtländer 20mm lens but then I changed my mind to my seldomly-used-but-awesome lens: Sigma 12-24mm. I thought, if the space is small, it would be better to have some flexibility here in the focal length, which happened indeed as I thought; I did zoom a bit more than 20mm on this lens. If I was to use the Voigtländer 20mm, then I would have to move the tripod instead; Not an optimal choice in such small space.
One more "element of design" here was to tilt the camera downward a bit. Since the topic is about a beggar, supposedly a low-class individual, then it is typical to look downward at such people; I mean, it is something done somewhat subconsciously.

Sigma 12-24mm f/4.5-5.6 EX DG HSM

It took me several shots to get the pose right and working quickly there (fun fact: kept a candy in my mouth under my upper lip to change my features a bit). Too bad I'm not a make-up artist to create more dramatic expressions with make-up, but well, I tried my best. After taking that shot, I've made several shots for my hand pose under the same conditions, as much as possible. I was going to flip the hand gesture horizontally but the lighting conditions here forced me to accept it as it is and just satisfy myself with positioning the gesture correctly and working on cloning out the traces of the fishing line that attached the heart to my hand (which was cut out from black paper by the way and taped to a fishing line and to my hand). One thing I was not sure of though is, whether I was right in adding that bit of halo around the heart to bring attention to it amid the dark tones of the image. Probably, if I am to upload this photo to some contest later on, I would remove this halo and keep it dark as it looks more "natural" despite the editing.

Close up comparison for the heart with and without halo. Might not be quite visible in close-up (click to enlarge) but it would be clear when viewing the whole image. If you focus enough, you can see the halo around the heart in the first image (left) and its absence in the second (right).


Finale
A year is ending here, and there is a plan to spend the first week of it just to my own. In hope that would recharge me up for the upcoming upheavals. News are up and down about the year. Speculations, predictions, and seriously all get on my nerves right now. Moreover, I'm having some hard time about my workplace and its future. If I want to leave, where would I be heading? Many questions play around with my mind and I'm trying my best to keep calm, and watch carefully as things unfold. Things are changing and it sounds as if I don't belong to this world anymore.
Anyway, I better invest a bit of my time in my camera this winter. I should try and push myself out like the old days. Maybe I can do that in my upcoming short leave. No specific ideas but I might raise my ambition a bit to the level of a nocturnal panorama.
Anyway, time is ticking on and on, and a year will be over soon and probably not much would change in my life as usual, but let's hope we all will be gliding smoothly through it. Merry Christmas to those who celebrate it (I'm typing this in Christmas time actually).


Thursday, December 12, 2019

Djinn…

Officially winter! We already got some rains here and I'm trying to enjoy as much as I can out of it because I know in some months from now, it will be so damn dry and "cooking".
Anyway, I didn't post anything here for about 2 weeks (or 3? I didn't count!) for some... legitimate reasons I'd say: A new panorama!

Djinn

Just before I get into the story, I'd like to explain the word Djinn to those who don't know it or never heard of it. Djinn (Arabic: جِن) according to the Islamic literature and belief, are creatures created even before the creation of Adam and Eve and they inhabit and dwell Earth and even space. They are created of fire and unseen by humans (except to few, saying that from experience). So, in some sense they are equivalent to what the Westerners would call Demons. Also, they can be either good or bad, they have different faiths and beliefs, as well as living in tribes and social classes of their own, just like humans.
So, I hope this introduction fascinated you a bit to read on, as I think the technical stuff coming along this post might be a bit boring! Since I didn't touch my panorama gear for quite some time now (mainly because I didn't travel nor I'm part of any group that does activities here and there). Thus, I had to look for alternatives; Ideas, mainly to be done in my periphery: Car, home, work... etc. It took the idea some time to "cook" in my head and I was kind of slow and sluggish in preparing my gear (typical), and the target was one of the rooms in my house where typically guests use, in case we get to have any sleeping over.
Now, the keywords for the work or the general idea revolves around: Magic, black, dark aspect or darkness, and maybe a touch of some horror and fear? Since I don't have models (as usual) I had to think about it thoroughly because the task is not easy here as the idea started to take shape in my head. I will be shooting myself, in various locations within the room, while it is dark and definitely needs a somewhat longer exposure (not good for stable poses!). Anyway, things (unwillingly) went on two trials and for this reason I didn't post last week, because the plan was to have this material ready by then but, unfortunately, the first trial failed drastically and I had to re-do the whole work in a different manner and a different setting.

جِنْ (Djinn)
Click to enlarge


Voigtländer Color Skopar 20mm f/3.5
Lumicon H-Alpha (Night Sky) filter.
Try #1: The first try was done  with my modified Canon EOS 7D and Voigtländer 20mm lens, fitted with the Night Sky filter (i.e. H-alpha filter) which is, partially, an infrared filter actually, allowing a band of Reds. I've tested this filter against my B+W 092 Infrared (threshold: 650nm~690nm) filter and compared the results (in-camera, using Custom WB). Comparing the blue tones specifically, I've decided to go with the Night Sky filter instead, this is beside providing a tiny bit of shorter exposure time. Working with 20mm instead of my usual Canon EF 15mm fisheye lens meant, of course, shooting more slides or angles, and that means forgetting about doing any HDR work here because the load would be simply RIDICULOUS. Now, using 20mm introduced another problem here is the need to change the usual orientation while shooting. So, instead of starting at 0o for the tilt, I've actually used -15o instead. This is just to include the whole stool with my body in the separate shots that I would need to do later to merge with the panorama while stitching (having myself in two shots to be stitched together is next to impossible; It must be one shot including my whole body). Another problem is the misalignment of many slides, and the empty spaces that added to the chaos (the computer was unable to connect these slides nor I was able to do so manually because of the featureless spaces). After 2 weeks, or so, of working on stitching this panorama, I've realized that this thing is beyond repair and I must re-do the whole thing, and probably drop out some of my requirements for this panorama, like using an infrared filter, and just shoot in the usual manner.

Canon EF 15mm f/2.8 fisheye
Try #2: So, after the failed attempt, I've switched back to my 15mm lens and this time I thought of some trick to compensate for these empty spaces; I've simply stuck some electric tape on various sections of the wall just to aid the computer later on to stitch these images - and just to show you my luck, the idea did work really but the tape was some bad quality and almost fell down, so I had to work fast! Anyway, testing the White Balance before the shoot, I've realized that this is almost equivalent to infrared shooting with my modified Canon EOS 7D, because the room is dark and the major light source is to be from the candles (which issue infrared of course). I banged my head at that moment; How come I didn't think of this before instead of all the hassle with my first trial?! Of course there should be remnants of the visible spectrum but that was not a problem specially after calibrating the white balance in-camera. The scene already turned to be an infrared-like. With this, it was like shooting a normal panorama and I had the power to do bracketing for HDR merging and tone-mapping, which I did. *sigh* Just like the old days!

Process: Processing the images was typical: Load the files, run Photomatix to merge the brackets, and then start with the stitch. It was essential here to calibrate the white balace in-camera before the shoot, otherwise the HDR merging and adjusting the colors would have turned to be a "wedding party of wild elephants" - Sorry, the best I could find to express my thoughts here.
However, while merging the bracketed images to create HDR slides as usual, I've made a mistake which I didn't discover until I tried to stitch the panorama for the first time. The mistake was enabling the Remove Ghosting with Detection level set to High. I'm not sure what I was thinking but in a nutshell, the computer created a movement where there were none in fact, and that PRODUCED ghosting! So, the situation was like the old advice of turning off the image stabilization on your lens when your camera is actually stable on a tripod because that would trick the lens and creates a movement. This is exactly what happened, but digitally this time. So, I had to re-merge the bracketed image in Photomatix again and this time putting the detection level on Normal. I've activated this option in the first place just "in case," specially that we have candles here and there might be moving shadows that would make the stitching harder a bit.
That was concerning the merging process but there was still a side work that had to be done and that is preparing those slides of me (specially those involving my reflection in the mirror) but no need to go on with this - it was just a simple masking process. But all had to be done in HDR mode of course with HDR slides.

Effects of using High detection level for ghosting removal on Photomatix.
Click to enlarge


One slide with tape cuts.
Click to enlarge
Stitching: As for the stitching process, it was typical to try to stitch the HDR slides first right away, but as usual, it failed. I remember in old times, this didn't happen much. Anyway, what can I say here; The image was indeed dark and I've intended for it to be so. Thus, I followed the typical procedure of tone-mapping the HDR slides using Photomatix again, and trying to get the best details from each slide. Of course the process is automated; I just pick the darkest slide possible to work with and save the settings then apply that to all. From these tone-mapped images I would create a model, and base the stitching of the HDR slides on this model. Lot of details here, but anyway the thing was not out of troubles, as usual. The tape trick did work to some extent but still needed some help or let's say a "push" from my side so I had to add some manual control points to match between the slides. Actually this problem happens all the time with or without sharp details between the slides for various reasons. All these tapes on the wall would be cloned out of course when the panorama is stitched completely. The final stitched panorama still had some stitching errors which I couldn't fix before stitching so working on that in Photoshop was inevitable. The thing is that I have to do these fixes every single time I create a new projection out of the same panorama; So, it will be such a slow process after all.

Finale

Well, this was the "short" story of this panorama, and I'm still having some more ideas at the back of my head, cooking and waiting to be served when I get the power and time. Beside that though, I'm still working on other projections of this same panorama here. I didn't want to put all the eggs in one basket so I might post about these in 2 weeks time from now; If they are ready though.
Now, it is time to think about some other panorama to do, beside the other ideas at the back of my head of course. The past few weeks were kind of hard, mentally. I was literally waiting for weekends just to sleep as much as I can (and even skipping my socializing with the family around some games like I used to every weekend). I'm trying to re-discover myself here, in some ways, but seems the process is taking longer than I participated. There is a talk about change in the horizon, things going to be better, the hardships years are over... yet I don't really see any of that in the horizon from my side. The travel that I've participated for 4 or 5 years now is still an idea that I could not make a reality. Would it be soon? We'll see. I'm planning for a little vacation by the first week of the new year, but I'm still not sure if I would be able to because I need to make sure that I won't be needed in my workplace. Boy, I'm going to sleep for real, and who knows, I might head out to shoot at night like I used to in the past years…

Thursday, March 21, 2019

Warrior…

Blah. I guess after posting using an external text editor and then pasting it here didn't come out well last time. So, I'm back to typing the blog directly in the page and let's hope no fuss this time!
I've been trying to keep myself busy to some extent here, despite the tiresome body. The weather is getting warmer (some rains and winds though) and insects are showing more frequently than before (and THAT is not a good sign!). On the other hand, I also got a new toy, which I will try to talk about along with its usage in capturing one of the photos last week. But before heading there, let's talk about some News maybe?

Relapse

I think I've stated in my previous post that I'm going to participate (or actually did participate already that time) in Trierenberg's Circuit (or Austria's International Photocontest), and I'm going to list some of the images that I've uploaded for the contest at the end of this post.
On another note, I'm back to YouPic; A social media website for photographers (supposedly) which I've been part of for a short period of time 2 or 3 years ago but deleted my account then. Now, after quitting Instagram for almost a year (will be a year in July) and being chased by Flickr with deletion of more than 1000 images as per their new policy, I felt now the need to get some new outlet. Thus, I've turned back to YouPic.


I'm not sure what was the reason back then for deleting my own account, but I think I was focusing on simplifying my life (and still) and I didn't want to waste so much time moving like a bee from one website to another, and thus I've deleted this account along with my account on 500px back then. Now, 500px might be a destination again but not for the time being really.
Things with YouPic were smooth in the beginning. I've used to upload from two to three images per day, but then suddenly things started to get nasty out of no where, and I have to wait for 11-12 hours after each upload. Yes, half a day! This is, of course, to push people to get the Premium (paid) account, but I'm taking it slow. I'm not ready to pay for such websites yet. I think beside the time period limitation (which is way too exaggerated I think) - I do think that they also control the publicity of the photos you upload to the website; Meaning, if you are a Premium member, then yourr photos are more easily exposed and propagated through the platform, while in case you are not (like me) then you have to rely on luck big time. On the other hand, it also has ventures to see other people's photography and styles, which I will be amusing myself with when bored I guess or when I really need some aspiration to continue with my camera. Let's hope this trend lasts a while with me though.

Retinital Warrior

Well, for a starter, I made this term up myself. There is no such thing as "retinital" in the dictionary. Anyway as the month of February went by, I didn't get the chance to do any shot reflecting on Retinitis Pigmentosa. However, I was still on the trail and had some ideas at the back of my head despite being in March already and after the failure of my very first idea. Like my first idea (no need to explain it here really), this new idea involves working with the blind-cane as well.

Retinital Warrior
Sigma 12-24mm @12mm, f/4.5, 250-1s, ISO100.

I have to admit though that I procrastinated so much with this project, and eventually I've done it in a sleepless night in the middle of the week, waiting to go to work in the morning! Anyway, back to the technical details here.

As you can see above, the lens used here is not a typical portraiture lens, but more like a landscape lens, the same Sigma that I've talked about some weeks ago in doing a one-camera-one-lens challenge with myself, around my workplace. I'm trying to get it into action further here. The thing is, I was forced to use such a lens because of the size of the room I was working in and the limited space. I had some struggles with the angle and the focal length actually but then decided not to waste any time and just do some cleaning later on in Photoshop when required. Focusing on the perspective, you can tell that various body parts are not exactly in the correct proportions, but I think this adds to the drama as well, and it's fine with me.
Oval diffuser for speedlites from Impact.
Since it was a dramatic shot, I've pulled my eagerness back a little for using multiple speedlites here and used only one, on the lane of low-key, so to say. After some struggle with the location of the speedlite, I've placed it on a small bedside table with an oval diffuser (which by now became one of my favorite light modifiers!). Beside using one light, I've kept the power low; Lower than I usually do with my selfies. This is to keep the dark aspect or atmosphere (otherwise, in some sense, the image might point to the concept of power rather than exhaustion). I soaked myself, literally, to give the impression of exhaustion (in fact I was at that time but without the sweat!) and the water spraying bottle which I got specifically to do this shot didn't work quite well. I needed to soak myself heavily, so I did... under the shower. I was really afraid of catching cold after finishing this.
The rest of the job is the usual cleaning and straightening a bit, but the major edit here was to pull out the colors and make the image closer in looks to B&W, while it's not. I've used the Vibrance adjustment layer here which pulled the colors' saturation in the scene perfectly but in the same time kept the vibrant red tone of the cane obvious; Which is perfect! There were also some minor dodge processes for the central part of the image or so.
Now, would I do this again using a conventional portraiture lens (like 50mm, which is equivalent to 80mm on APS-C sensor)? Most probably, I won't think about it even. I like the distortion here with some parts being exaggerated, and I think it ads more emphasis on the hand holding the cane, and my facial expression, while leaving other parts relatively smaller. Some people liked it already, but unfortunately, this image was done AFTER uploading the photos to Trierenberg's contest. Oh well, I might upload it for other (minor) contests if I get the mood to, or simply just wait for next year's contest. This said, I'm not over with RP ideas yet, and I might as well revisit the failed attempt later on.

Wirelessly

It has been a habit in the family here, with every Friday gathering, to play UNO (a card game in case the reader does not know it). With few weeks, I had this idea sparking in my head for taking a photo, a long exposure to be precise, for the game from above. That, of course, would be done without a drone. For some reason, actually, I don't look nicely on drone photography despite the beautiful images and beautiful perspective that is shown from above (bird's eye view as dubbed sometimes). Not sure why though... because it is easy? Limited? Anyhow, I did spend some long time thinking about how would I do this shot.

Case Air
Part of the solution came in as I was watching some YouTube videos and realized that such thing as "wireless tethering" do exist indeed! I really didn't know about it till that moment. All that time I was thinking that such a process would be done using a cable. But here we go! I was so lucky to find this in a local store here in Kuwait (AAB-World stores) which even had a delivery service (took a while to be delivered because the payment was not in cash but by Visa), and the price is not too different from other stores outside. Just connect this to the tethering port in your camera and download the corresponding app to your mobile phone and you are ready to go! They provide various cables to fit various camera models. It took me a short time to get used to it and to surf the app thoroughly, even though I can get stuck sometimes and a bit sluggish (a lag in the image update on the app) but that's not a big deal, when I can view things on my mobile regardless of the camera position and its angle! The Case Air solution works on Wi-Fi signal, so you would need to connect your mobile phone to it via Wi-Fi option (i.e. no internet while connecting it to the camera but that's not a big deal for me). That also means, I suppose, it works fine under the sun, because Wi-Fi signals are radio signals and not infrared (like when I control speedlites by that) and the sun does not issue any problems with that.

Case Air overview,
with a glimpse on its app.
Clamp mount similar
to the one I have.
As I've stated, this was one part of the solution. Yet, I have to come out with a solution that enables me to raise the camera high above while the card players would be situated underneath it. One of the solutions I've thought of, and the easiest (sort of) is to use a clamp with mounting thread (which I've used before to shoot from above). The problem with this solution is, though, that the fixtures in the ceiling are not quite in proper places related to the ground where the group game would take place, usually. Under these circumstances, I had to think of something. I really tried to improvise something but all roads lead me to one solution: Old School → High tripod and a lateral arm. For this purpose, I had to use one of the old tripods I had (which I stopped using because of its shaky status). I was really afraid that it would flip over specially with the lateral arm being extended at full with the hinge of contact between the arm and the tripod being close to the edge of the arm. Gracefully, things went smoothly, without a shake. To help on achieving the long exposure, I had to use my Kenko's ND filter (super ND, 10-stops), which I had no problem attaching while is up high. And since the camera is up high, the Case Air tethering tool helped me fixing the angle and the perspective of the camera to centralize the carpet's design as much as possible. One problem was there though: The tripod's legs show up in the scene, and I had to work on that later in the post-processing phase.

A Circle of UNO
Voigtländer 20mm, f/9, ~17m, ISO100.

Now, in doing this shot, A Circle of UNO, I did discover some disadvantages for Case Air, but I was able to go around them (with some mathematics!) but life would have been much easier if such problems didn't exist in the first place. Here are some problems I've noticed:

  • Case Air app does not simulate the exposure properly (if any in fact) like it is the case on LiveView. This was obvious when I attached the Big Stopper filter and raised the ISO to max to estimate the time required for the long exposure (as I usually do), but once the filter is on, then that's it. No simulation and no histogram estimation possible even on high ISO. Because of this, I had to calculate the exposure from images shot in Av mode, and even with that the final image, A Circle of UNO, was a bit dark and I had to add 1 stop or more in RAW editing.
  • When switched to "Bulb" mode, the Case Air app switches off the view (or LiveView) on the app and you would not be able to check the scene as on LiveView on camera. Thus, everything must be done prior to putting the ND filter and before switching the app to "Bulb" mode (of course Bulb mode must be switched on the camera as well).
  • After capturing an image, in whatever mode I'm on, I can't review the image on the app but I have to do so on the camera itself. I think there is a way to control the camera in such a way that I can view the images saved in the card inside the camera (by displaying what the LCD is viewing as if the HDMI cable is connected to an external monitor, but wirelessly this time). With my case here, the camera being up high would not allow me to check every image after capture.
Other than these (major) points, this product worked well for me in this occasion. The rest was post-processing job of fixing the exposure and the contrast, while emphasizing some aspects of the image (like the UNO card at the center), and then removing the tripod legs (at the bottom of the image). Too bad though, I wanted my nephew, sitting on the top frame of the photo, to show more, but it seems he adjusted his pose before shooting and hence barely his knees show up in the frame.
This tethering tools have some promising stuff that I need to test as well, mainly the "focus stack" mode, which I'm not sure what it does really, but I think it works (or MUST work) with a lens of AF system. Something to try in the near future, I hope.

Finale

As promised in the beginning, here are "some" of the photos that I've uploaded for participation in Trierenberg's contest, and of course they are minimized in size to fit in here.


Now, if there is one thing I'm regretting really is the inability to write some poetry, which started maybe about the beginning of this year. Despite being in abundance, but emotions don't come easily into words. Writer's block I'm guessing? Typical. Same thing happens with me in photography. Meanwhile, I do keep writing some thoughts and save them on Writing.com, as I might reflect on those later on.
Away from all that, there are some ideas related to RP cooking at the back of my head but I'm just waiting for the opportunity to start with them. I've started a fasting cycle already here, for the month of Rajab, and I'm not sure when I will stop; I guess when I'm totally exhausted? We'll see. In fact, at some level, fasting somehow do push me to do some more sometimes despite exhaustion, but the lengthy naps are a must here. Good thing is, even with afternoon naps, I'm able to get some sleep at night (though sometimes late a bit). I think exhaustion works to my advantage here. For the many worries and anxiety issues have kept me sleepless AND exhausted already.
Many things are happening at work, and everyone is talking about moving to the new location which is further away from home (more struggle with the traffic than what it is already), but I'm keeping myself silent and all to myself. Here I am, trying to put my mind off with games and photography and not sure what will happen next. They say I should not worry about what's coming and focus on the moment and live each day to its own; Yet, I really don't know how people are supposed to do this. It never worked for me. I have to get my skin (and mood) prepared for summer here, and I must think of my next travel. Apparently, the only way to capture panoramas for me now is to travel, since nothing seems worth it here. Supposing I can shoot anything I like…