A mystic week of some sort. I've suddenly felt the urge to go on and read about mystics and occult. Well, I did have the urge for some time in my life and such things are really normal to strike in my head now and then, but this time I'm thinking of doing more to it into photography.
Now it is the time of the last week in Ramadhan and sort of the time is clogged (specially with my disturbed sleeping pattern) with many things to do. I'm also planning to register in a photography class for beginners after Ramadhan directly, by September 6th. Yes, for beginners. No matter how or what I did before or what advance level I might be in, it is always good to look back at small things that you did not know before. Despite my work so far, I still think I need to learn more about the basics of the camera and exposure. After that class I might take other levels as well (more expensive of course) but we'll see about that later on.
At work seems more busy days are coming on the way with new phases in our "little" experiment taking place now, thus I have to check that I need to type this blog entries as early as possible to be posted in time! Well, which means, in return, that I might have lesser contents to put in here. That is if... anyone cares anyway :)
Because of the disturbance this week, I couldn't put my mind into reciting the 4th chapter of Alexander's story. Well, I'll be frank. I was lazy and playing a game I like. Hope that doesn't count as a sin! But hopefully the engine will get to work by next week or so and more recordings on the way.
The lack of work on my Ayvarith projects, however, poured something on the other side. Ive finally had the mind (and courage) to write something down. But this time, since staring on the notepad on my monitor was not enough to gush out words, I referred to my old method; a paper and pencil/pen. I had the words for some time now but I didn't pin them down until I faced the pen and paper in my office, after working on that experiment. I called it
No Superman.I've submitted this one to some websites, and in one website actually, some user notified me asking how did I write such a thing! Well, Thanks! I really don't think I'm good at all. It's just a gush of feelings to a certain matter that makes you spill it out.
I. Mysticis:
Seems my night on the roof last week under the full moon made me literally lunatic, or maybe inspired? Call it whatever you want to, it is just a weird feeling of seeking opportunities to take photos of anything in rhyme of Mystics. I will get back to that panorama taken from the roof after a while.
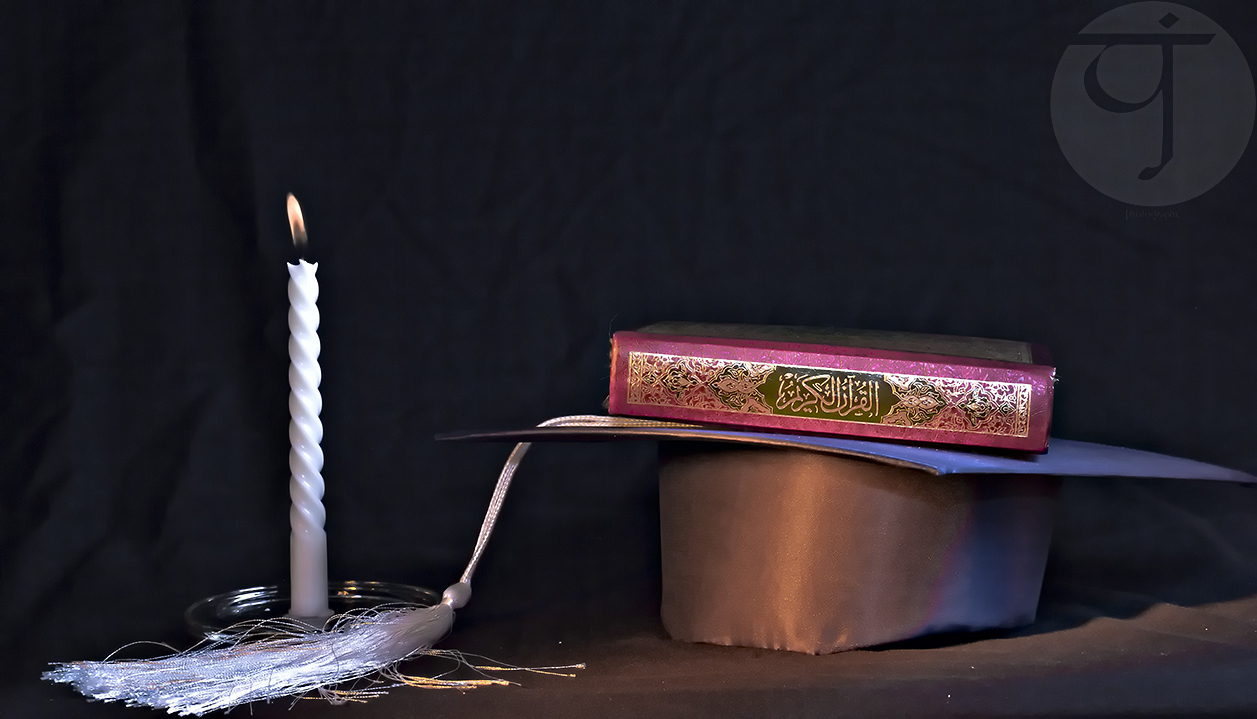
One of the first ideas to do something mystic kicked in when I finished reading the holy book.
 |
| Chapter of Mary (19) |
There is a little story behind every aspect of this image. First of all, it was taken with a fisheye lens and hence, even with a high f-number I realized I might not be able to grab everything into sharp focus; so it was a call for focus stacking. However, I had a problem with the shadows' cast on the book itself thus, I had to turn off the light and use only one source of lighting (the usual old desktop lamp with power-saving light!).
I've fixed the WB value by using the custom K-value in camera. Since the power-saving light is bluish and I wanted to add a sense of antiquity to the book, I had to exaggerate a bit with the color temperature (K-value) and probably pushed it to something lesser a bit than 10,000K! Anyway, while working with these photos (taken with bracketed exposure for HDR merge) there was another story. Because when I was testing the different WBs before the final approach, I've realized that Tungsten makes some interesting hue, by turning the book blue and the red lines in it were glowing hard; so eye-capturing, but later on I had to give up this idea in favor of Daylight WB when I started to merge into HDR (you can change the WB before starting to merge into HDR in Photomatix).
Now, all the HDR slides, after merging, refer to different focus points. In total they were about 5, with each slide bringing a certain area of the open book into focus. I had a little problem merging first because I didn't use the alignment in Photoshop (I thought it's not needed because everything was relatively stable) but then, seems I was wrong and I used to correct for the broken lines. I made 3 versions of the HDR slides changing the WB from Daylight to Fluorescent to Tungsten BEFORE merging into HDR, but seems the desired look in my mind was in Daylight (the other WBs made some weird noise and hot pixels occurring here and there).
Maybe keeping the front portion of the book, where the title of the Surah lies, and blurring the background (the other page) was a nice effect, but because the name of John (first word in first line in second page) sounded a bit important to the whole story of the picture, I've decided to include it into a focus-stacking method as well. Cropping and rotating the image (it was originally in landscape orientation) was done later on after tone-mapping (Photomatix of course) and adjusting in Photoshop.
This was one trend of mystic (and I mean mystic not as mysterious only but also on a spiritual level) and in fact I was doing more work before that with long exposures (since I became a bit obsessed with the idea). Maybe working with clocks is not a mystic thing but the concept of time and using time was always an issue in my life (and probably of many around the world), hence, we can consider it a mystic concept of our lives, as we try hardly to catch upon life. More about it to come later.
Left to say one thing. The image above was rejected by
Bigstockphoto because of some "copyrighted material" issues. Seriously? I'm going to ask God for a permission to take a photo of the holy book? Sorry dudes, that doesn't make sense...
II. A Treasure of Perspectives:
Since having a night with a full moon is not something you be able to catch every day, sorry, every night I mean, I've decided to mangle and go through the panorama again and again trying to extract more perspectives, and in return, more meanings from every picture I could make out of this (spherical) panorama. The first version, however, was a typical little planet form (posted previously):
 |
| The Lonely Planet |
Well, I guess the name tells it all. I liked the effect myself and I went on trying to extract more from this panorama by changing the perspective. One of these changes makes up for almost a landscape orientation (or let's say a full-frame) image but with simple difference: everything is twirled.
 |
| Over There |
It is not a panorama, but it is extracted from a full spherical panorama itself. After setting the stitching projection to "little planet" in PTGui, I started to play around with angles of Pitch and Roll trying to discover more perspectives. Until I've finally arrived to this angle which resembles the full moon at the end, in the horizon, like calling as it is a light at the end of a tunnel. A spark of hope in the middle of the night. I didn't mind the distortion in the surrounding structures, as I was reliant on the moon to grab the sights more than the surrounding structures. However, they do add some surrealism if you are up to that!
Before, I've stated that in long exposures at night, sometimes the stars that do not appear to the naked eye can be recorded, and they are here in this panorama, but they are usually erased with cleaning the noise and doing other techniques to smooth out the sky. Here, however, I decided to pick (some) stars and exaggerate their sparkle by using the regular brush in Photoshop. After all, I added some Photo Filter adjustment layer to put on a reddish wash on the whole scene to break its severe blue shade. Hmm, I think it adds a bit to the mysticity.
A vertical panorama was done as well, naturally (but I didn't think of it first!) and here I needed to move the central point to make some interesting perspective, of two skies, up and down. I didn't experience though how it would look if the skies met in the middle!
 |
| The Underworld |
But I was taken more by the tunnel view for this panorama, which many people liked on
MostPhotos...
 |
| To Another Universe |
This perspective specifically was just an experiment to test how good it is to do a Twirl effect like in those Sci-Fi stuff. The problem with the Twirl effect is that it might smudge too much and not achieving the proper look I'm aiming for, and, you have to work in 8bit format, since it is disabled in Photoshop in 16bit format. In other words, you have to step down a bit with color's resolution.
The original work was stitched with 4000x4000 pixels. Usually I go for 8000x8000, which requires a lot of processing power and time. Since I was thinking it might be a failing experience after all, there is really no need to aim high and 4000x4000 is just enough.
The looks at the time of tone-mapping this tunnel-view was totally different and dull, despite the fact that the HDR slides were merged using ProPhoto color space. However, after tone-mapping and opening the image in Photoshop (which I've fixed on ProPhoto as a default color space) the image appeared as you see it above with cyan patches around the ground. Comparing the two looks, the Adobe 1998 and the ProPhoto, I thought the ProPhoto space is more adequate to the mystic and sci-fi look I'm seeking, and this is what you see above.
The twirl effect was done to the image on a separate layer and I made it carefully in a small amount to add curves but not diffuse the image totally. A twirl alone is not enough as a good effect and this is the reason why I made it on a separate layer, so that I can retain the position of the moon in the horizon back to its place by using layer masks (to erase the twirled moon and put on the original moon back in its position from the lower layer). The name is obvious I presume; did it take you to another universe!?
III. Tick Tocks and Blinks:
As I've stated earlier, I was (and still) obsessed a bit with the idea of long exposures, time, and, clocks. This obsession raises up from my interest to see things, slow things specifically, run fast. How would it be to take a long exposure of a moving snail, or a turtle, of a long night sleep...etc? Maybe my interest in night photography lead me to this point now, but however, it is not something new really. I've already created an image of a little long exposure before (and unfortunately rejected from major stock sites).
 |
| Busy Life |
Maybe the above image was one of the best I've did so far. In fact, and because I used my Tamron lens raised up high above the watch, I didn't use here any ND filters to control the time. I don't have an adapter to fit my Cokins. However, this effect after all was not done by long exposure alone, but I had to take several shots over a period of around 6 minutes and then blend them together in Photoshop in layers (using Soft Light blend).
Same concept was done but with a more time-stretching aspect this time, taking shots at an interval of around 3 minutes and some few seconds for one of my watches. This time I've faced a problem with the proper WB, as I wanted to add some more luster to the golden patches in the watch itself but then there was a problem of being "over-average" with that effect.
 |
| Mixed-Up Schedule |
The WB was fixed as the RAW files were opened in Photoshop and the effects were synchronized with all the slides. The reason for setting the time to 3 minutes AND few seconds is that I didn't want the seconds hand to end up in or around the same place with every shot taken at exactly 3 minutes, so I had to add few seconds (something like 10 or 15 seconds) to the interval between every two shots to give more chances of finding the seconds hand somewhere else, other than the previous position. Each image, in fact, was itself some sort of a long exposure (my room was partially dark) extending from 15 to 30 seconds each.
Still though, I didn't quite achieve the effect that I want, that is recording the seconds hand going over in a full circle around the clock face. Tried this already with my wall clock for which the seconds hand ticks continuously non-stopping in every second, but it goes smoothly all over the clock face. With the help of some ND filters, I've managed to get a long exposure of one hour. Despite the weird reddish shades that occurred in the final image (which might be related to the change in the sun's angle outside, because sun rays still pass with my curtains off, but I'm not sure yet), however it was not a big deal to fix the image and make it look normal, but it was a big issue with the noise. Anyway the image didn't achieve exactly the desired look I'm seeking.
 |
| Hurry Up! |
The Median method was a companion all through the cleaning process (along with cloning to remove the brand mark, otherwise it won't be accepted in stock sites!). However, the small circle inside is formed by the seconds hand, but the seconds hand is larger than this and should, probably, made a bigger trace. Same thing for the minutes hand which appears blurred between 3 and 4. This is natural since the light is introduced (with the help of ND filters) slowly into the camera and to register the final movement just before the close of the shutter, the minutes (and seconds) hand will be in a certain place. The shutter then closes finalizing the image and the hands' movement all the way were not recorded except in a few portion of the clock face. In other words, to record the movement of the minutes hand across the full clock face, then we need an exposure time more than one hour. This will make things harder to do indeed.
The look of the blurry movement and the stable background of the clock face cannot be compensated by taking photos in intervals and layering them with a blend. The blur has its own taste and feel. I'm trying to find any website (official that is) related to the manufacturers of these watches and clocks just to seek my luck in asking for a permission to put an image of their products for sale. It is not possible to clone out the brand mark all the time!
That was the ticking part of this final portion. Comes then the blinking part. Just for fun I was running with my camera in the house taking pictures of my niece playing around (and getting on my nerves as well) when I decided then to take pictures of my brother's eye. This little experiment made me believe more than not ever overexposure is a bad thing and not every "bad" image is really bad. The image got accepted in some sites and rejected from some stock sites (for model release aspects). I have to give credit to my brother though because the poses (or looks) were his ideas in fact.
 |
| Photographer in The Eye |
In case you wonder about the name, it is because my reflection is there, inside the pupil. This is one of my favorites, and it is not a tone-mapped HDR at all. Simply taken with a flash unit mounted on my camera and zooming into the eye with my EF-S 18-55mm Canon lens. Some adjustments were done later on of course in the RAW editor. The thing is, I didn't plan it. I merely took the image to see the details of the iris later on, but the whole image just happened to be awesome for me. More sharpening added a grunge look, which somehow might be not good looking for other images and concepts. See, overexposure is not a bad idea at all, to limits. I've printed this image on a white photo paper, which probably if mounted on a white wall (and erasing a bit of the edges in the image itself) would be an awesome effect on the wall! Surprise your fellows with an eye popping out of the wall!
The other two images were also done with the same lens but without flash, and the pose was also suggested by my brother. They are interesting, but don't beat the one above I believe.
 |
Enlighten
looking at the ceiling. |
The interesting thing about "Enlighten", beside the reflection in the eye, is the sharp eyelash line and eyebrow. I added even more sharpening (with noise cleaning) and also some change in saturation and hue to pop out the eye in between a dark skin (his skin isn't that dark really!).
 |
| Psycho |
"Psycho" on the other hand was a good concept in color, but two reasons made me convert it into Black and White and try to increase the contrast from there to give a tougher feeling. The first reason is simply the idea of a psycho, which I believe is represented better in Black and White instead of color. Remember that Black and White images tend to make the viewer concentrate on the concept and the composition instead of the color gradients in the image. The other reason was that a bluish streak around the eyes that I didn't know exactly how to remove properly, so along with the first reason I thought it is better to have the whole thing in Black and White. Maybe I should have done some skin smoothing (Median method again). Well, it might intensify the effect of a Psycho with such a skin!
Almost, this is what I have been doing this week. I'm still looking forward for more experiments to do but I need some planning. I took some photos for some instruments and devices in my work place, but I don't think I'm allowed to put those here. However, I think they are sort of boring, except for geeks of course!
T.G.I.T. Finally a day when I can't complain about my sleepless night, nor I have to wake up so early....