Showing posts with label thirds. Show all posts

Thursday, July 17, 2014

Extrema…

Well, the matters had officially went into a disaster zone. It official now that I do have a sleeping crisis, which makes my "whole" life is idle. Well, in case I can call it a "life" anyway. Not only I've skipped my eye appointment on 13th, but I had to stop writing my Arabic blog for some time and I'm seriously considering making it on a monthly basis, for the lack of topics so far and the hardship in organizing my thoughts. Needless to say how that affected my other projects as well concerning Languages and Conlangs. All what comes to my mind right now is sleep, sleep, and more sleep.

Extreme

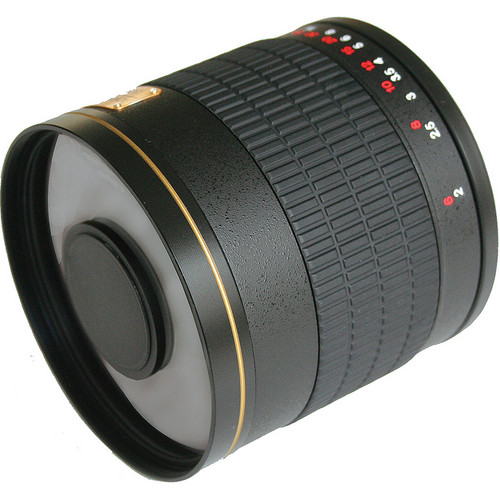
They say we had a "supermoon" this week, specifically on July 12th. It did sound like a good idea to try out my Rokinon mirror lens of 800mm, with two 2x teleconverters (for a total of 3200mm). However, and pardon me, just thinking about working in this weather and heat (even at night) with my cumbersome schedule now, did sound more like a fantasy! And with "fantasy" I mean something to be found in children's book or Hollywood movies.
Rokinon 800mm mirror lens.
Source: B&H
Instead of doing this astro-adventure, I thought for a moment about the possibility of doing an extreme macro experiment with this mirror lens like I used to do with other telephoto lenses before. If we combine 800mm with 2 teleconverters (2x each) then we are assuming that total focal length is 800x2x2 = 3200mm. Now, if we combine a 50mm lens in reverse to this combination, we are supposed to get 64x magnification (3200/50=64). Logically, this is supposed to mean that 1mm dot in reality, should be projected as 64mm on the sensor (or 6.4cm, 2.5in). Despite my trials, the situation was hard to achieve mainly because of the design of the Rokninon mirror lens. This lens resembles the catadioptric telescope in its design and the large difference in the diameter of the objective (the front of the lens) made it hard to combine another lens in reverse. Even though I tried to place the 50mm lens in front of it to some distance and covering the gab with black cloth to block the light. Here, I was working in horizontal manner instead of hanging the camera high up as before and dangling it over the specimen. Anyway, It was hard to work that way and technically nothing was to be gained from such setting. I had to go around it in some way. The answer to the problem then knocked into my brain with Tamron 70-300mm, which is damaged and lying around, and another (useless) lens in my pack; the old Canon EF-S 18-55mm.

The final setting. Teleconverters and not shown here.
Click to Enlarge.

I didn't want to use my Sigma 70-300mm here. It's relatively new and I didn't use it often. It has a better glass quality compared to the cheap Tamron, but I don't want to risk it in such setting. According to calculations, Tamron at 300mm plus two x2 teleconverters should yield a total of 1200mm. When combined with 18-55mm at 18mm in reverse, then the magnification should be (supposedly): 1200/18=66.66x, or approximately 67x. Meaning, 1mm dot would be projected on the sensor as 67mm (6.7cm, 2.6in), which is slightly more than what has been calculated in the previous proposed setting (of 800mm mirror lens and 50mm lens in reverse). This case was easier to be done as you can see from the image above. I had to spend some considerable time trying to improvise a way to hold the sample in this experiment and to provide a strong light source at its back (I tried to cast the light from the front but to no avail). Focusing is pretty delicate so I used the macro rail to move the sample in some way, and I ended up using the Bulb mode and managing the time empirically without doing any calculations. Just trial and error. Maybe with some considerable time, I can enhance this setting.
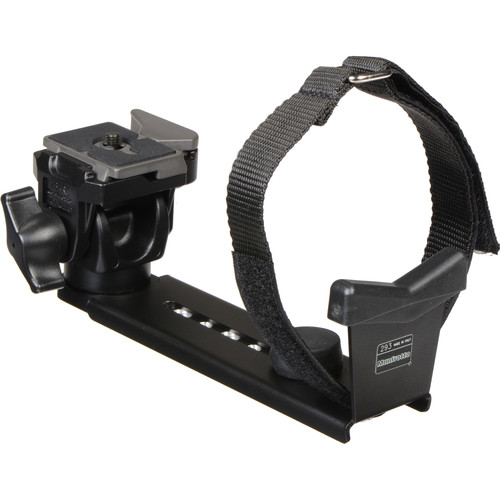
Manfrotto telephoto support
Source: B&H
The good thing about the horizontal position is that the weight and the pulling force on the camera's body (the lenses consequently) is significantly small, while the whole system was carried by Manfrotto's telephoto lens support. Usually it is a problem because in many occasions this support would make moving the focusing ring (or even zooming) cumbersome, but it's not a problem here because everything is set and the lenses are not supposed to be touched. The only thing to change here is the macro rail distance to move the specimen. I had some problems with the rail itself too, since the screw to move the rail was knocking on the lens' front - but the focusing required kept this screw away from the front for some considerable distance. Anyway, that doesn't mean it might not be a problem in the future!

Results

The results were not much of artistic nature nor a clear variety. But it's a beginning. Probably if the lenses' qualities were better the images would have been better? Who knows!

Sun Side
Shade Side

Shooting in RAW is absolutely a must here. Using a remote and a portable monitor is also a must. In using Bulb mode in the camera, the LiveView (which is transmitted to the portable monitor) mimics the light conditions a bit to see through what to focus on, but this is of course in no way the final result to be expected - Bulb mode is about arbitrary timing. This is one of the benefits for working in Bulb mode in such a situation because using other modes like Av would make it hard to mimic the light. ISO-wise, I think it's hard to expect something below ISO400. Long exposure can be done but it's not advisable I'd say - we need to do shots fast relatively to avoid any sudden shake.
It is a common practice in (regular) macro to use a stop around f/8 and more to gain some acceptable depth of field. Here, however, I don't think this rule of thumb holds - in fact I'm not even sure if a higher stop would do any good, but anyway I used the highest f-stop possible. It is recorded as f/72 but this is a false reading because Vivitar's teleconverter doesn't communicate information with the camera's body. Thus, by re-calculating the f-number under the new focal length (1200mm), the value should be around f/128. You can see from the images above that even such depth is not really strong enough which makes me suspicious about the usefulness of raising the f-stop here. If using a low f-stop would yield almost same results, then it might be fit for this experiment to allow more light in and make my life easier!!!

φ

Been some time trying to polish some simple mathematics in my brain. I didn't use my brain in a while! It had been a while now as I was trying to find some relation between the rule of thirds (ROT) and the rule of golden spiral (RGS) in terms of the difference between the two "power point" in both systems.
One of the major difficult points here is that the two systems are adapted for different ratios of frame. Previously, I've worked with a frame of 3:2 ratio, as it is the ratio usually adapted for most cameras nowadays. However, it was a bit cumbersome in terms of some mathematical identities, thus I've decided to work with φ:1 ratio and adapt the results I could get as an approximation. Numerically, the (3:2) ratio is equivalent to 1.5, while (φ:1) ratio is equivalent to 1.618, meaning a difference of around 0.1 unit; I guess something that can be neglected.


In the beginning I had to use an approximation for the power point in RGS, which I've found in this page. As can be seen in the page, the power point or the center of the spiral can approximated by two diagonals: one for the whole frame, and one for the smaller rectangle after rectangle rabatment (marked with the blue line). The ROT is marked with red lines. The segment I'm seeking here is SG and the angle θ. One of the good points about having such ratio for the frame is that the ratios AB:AG, and AG:AB is equal to the golden ratio: φ. This postulate makes it easier to do some mathematics here. Well, not going to list everything done here, but it turns out that:
  • The angle (θ) is equal to -31.72o. The negative sign is to mark it as going under the x-axis. This angle would of course change by changing the location and perspective (in relation to the x-axis); it would be positive if the power point under inspection is the top right one, and it would be 180±31.72o for the left side.
  • The segment under question, SG, is approximately equal to [(φ-1)√(1+φ2)], or it can be marked as [φ-1√(1+φ2)]. This is because (φ) as a numerical value is equal to (1.618), and consequently: (φ-1) and φ-1 are both equal to approximately (0.618). Going further with more decimals seems unnecessary in this occasion.
  • Numerically now, the segment SG is approximately equal to (1.176), or expanded little bit it would be (1.1755).
What I'm hoping for is to use this simple information item in various settings, like in the camera's LiveView for example, or in Photoshop itself, even though I heard that newer versions have several systems implemented for cropping. I'm not sure how I'm going to do this, specially in Photoshop, but it surely needs a lot of experimenting with various photos. Another interesting method would be the diagonal method, which was developed (or discovered) by the Dutch artist Edwin Westhoff. The Diagonal Method specifically is well suited for 3:2 frame. Would be interesting to see this kind of grid available for work in the coming generations of digital cameras.

Finale

Here I am, just waiting for the month of Ramadhan to pass. It's not something weird to happen in fact; I do suffer from insomnia and sleeping problems all year long and it doubles every Ramadhan almost, but the thing is different now with extra annoyances at work, and a tiresome body. I think this is what they mean by "getting older".
When this is all over, there is so much to do as well. Schedule a new appointment if possible, and prepare for my travel. Though I need such a travel to rest my mind a bit and enjoy my photography, I do wish if I was accompanied by someone. Someone special...


Thursday, July 10, 2014

Mono, Duo, Tri, Quad!

One third of Ramadhan is gone by now - and things are tightening on my schedules and life pace. I literally spend most of my time sleeping or trying to catch on my sleep; specifically at work! Even though I used to fast before Ramadhan already, Ramadhan becomes an issue. Always.
For this reason, I didn't have much to do with my camera, but I did some experiments eventually and some of them are still on going.

Duo

In the process of doing more studies with the tone splitting technique, I've re-visited a mode provided in Photoshop, along the RGB and CMYK; the Duotone mode.
This mode in fact provides several modes in it: Mono-, Duo-, Tri-, and Quadtone. Each mode provides a specific number of tones to be implied to the image and in that sense, it is a step further from tone splitting. Further more, for each tone, the control of the "amount" of the tone is a bit decisive.

The Duotone mode window in Photoshop. Here, Quadtone is picked from the menu,
allowing for 4 colors to be mixed.

There are some awkward features for this mode of course, like the fact that to convert the image into it, you have to pass by the Grayscale mode first. Thus, converting directly might hinder the user cuffed with the tone distribution before doing Duotone. Probably it would be better to use the Black and White adjustment layer first to control the tones and THEN convert to Grayscale mode - this is if it was necessary of course. It seems, however, that controlling the tones in this mode is actually a control of the levels of "ink" for printing this image itself. This is what I perceived when I did a little research online about this mode. This makes it harder to control, unlike the easy way to do it in the RAW editor or by laying out layers in a Photoshop process - because in this process or in the RAW Editor, the thing under control mainly is the distribution of the tone to highlights and shadows, and its intensity.

Doppelganger
Duotone: Shamrock Green, Black.
One of the interesting features as well is the Overprint Colors, which is somewhat like a control for how to interpret the merging of two tones together. Of course it's going to be a tedious task in case of Quadtone (4 tones) but it's worth the study to gain more perception of what related colors could do. This is a nice instance for using Colors Schemes, which are groups of related colors that can be found and deduced using many websites like ColorHexa and ColorHexCode. Such groups can be, for example, analogous colors, or tetradic colors. The other awkward feature here is that a file done in Duotone cannot be saved in a proper common format, like JPEG or even TIFF. It must be saved in one of Photoshop's own formats like: PSD, PSB, RAW and EPS. Note here that "RAW" is not the conventional camera RAW, but it's Photoshop's RAW format (which I don't exactly know how it works or what is it). EPS is a vector format, while PSD and PSB are the usual conventional Photoshop Document format. Here, Doppelganger, was done in Duotone using a color named Shamrock Green (Hex: #009E60) with Black. To save the image for displaying it here, I had to roll back the mode to RGB and save the image as JPEG. This, I think, produced some artifacts and banding (specially in the background in the blurred green plant area). Controlling the curves of tones for each tone of those was really a rough job to do with delicate observation to see where there are issues of banding and such. That was only for two tones, so imagine the work for a quad!

Luster

My sole work this week with the camera was to give it a try and do some commercial-like shooting for this piece of jewellery which I got for my niece for her coming birthday on the 23rd. The piece is silver-made and this put on a bit of dilemma on the choice of the white balance to work with.

Right: Flash WB. Left: Fluorescent WB.

Most of the people whom I asked did actually pick the bluish tint. However, one or two persons picked the adjusted or corrected form (i.e. Flash WB) because this shows and emphasizes the blue stone in the middle. They have their point of course. I decided to work with the blue tint but I've found myself working more with the adjusted level because it gives more luster to the metal work and it gives more shine (beside contrasting the blue stone of course).

Close Look
Sigma 70-300mm @180mm,
f/6.3, 250-1sec, ISO200.
In the beginning I was planning to take a picture of the whole earring, but then I realized that this approach would take up the fine details of the craft done to the silver itself. Thus, I moved on to using a telephoto lens, namely Sigma 70-300mm, with the help of extension tubes to allow me to stay close to the piece (closest focusing distance for this lens is around 1.5m, or around 5 ft). I admit, my work was pretty quick and filled with errors, like not cleaning the piece (you can see the blue stone being dusty little bit). The background is a black cloth (which I got back to do some scanography experiments) and from which I hung the earrings. This background is not suitable but I had nothing better to use; the texture was pretty annoying and could not be removed. A black metallic surface would probably be better.
The work of the speedlites (580EXII and 430EXII) was experimental, and at some point I used the on-camera flash as well to give a frontal light to shine on the blue stone specifically. Not bad I believe, but I didn't achieve still what I was aiming for: a gem sparkle. I think I had here a conflict of interests; a wide aperture to blur the background, while I do need a narrow aperture to achieve a sparkle effect. I gave up that idea anyway. Light from 580EXII was concentrated using a mesh on snoot, while 430EXII was reflected off a shiny surface (car windshield shade). When all was set, I decided to add some light from the front (and the position of the 580EXII with the snoot was changed repeatedly), this was done by the on-camera flash with a slight power. All work was done wirelessly; obviously I was lazy to use some wires here and there! After all, there was no need for it really - it would be essential if I wanted to go beyond the sync speed of 1/250 seconds. Only then, a cord to connect the speedlite and the camera is essential.

Silver x Blue

The interesting experiment was still to come. I decided to go extremely macro and placed 50mm lens with 20mm+36mm tubes. The significance here is that I managed to take 3 images in vertical order and then merge them like a panorama (in PTGui). I'm not sure if I can say it is a macro panorama for this though! Since it was just an experiment, I didn't take the whole jewellery piece into consideration but merely some portion mimicking an abstract sense and feel.
For some time, a software, namely PhotoAcute, is used to process several images to produce on high resolution image (beside other uses). Even though it is still a useful software, but in this process of taking several images with some distance and stitching them, the resolution of the overall image was boosted from 18MP (if we assumed the same framing) to around 26MP, and if I managed to take more shots, I believe it would be boosted more. The only problem with this method is the movement of the camera itself; If things are to be done in a proper manner, something should be automated here or systematized: either the camera movement, or the object itself. In my shot for Silver x Blue, the camera was moved slightly up and down with the use of the central column of the tripod; sluggish movement but did the job. If I was to take more precise images at such macro level, I would probably try to do it in a different way. The final image is composed of 3 shots, with 30 seconds each, and because no speedlites were used here, there was actually some slight green tint caused by the surrounding walls as it seems. Some editing reduced this tint and, again, despite adding a slight blue cast but with contrast and other edits and adjustments, the silver turned almost neutral like before. Glamor effect helped on showing some luster as well. All what is left, is to hope this shot is to be considered for addition into some stock websites!

Twirl

I've been trying, for some time, to study the relation between the rule of thirds and the golden spiral concept in terms of the placement of the "power points" in each system. This is to help me with framing with the camera, which doesn't have a spiral system but only a regular grid and a rule of thirds grid (in its LiveView mode). The main point here is to find a basis for the difference between one power point in one system and the other.
I have to say that I've failed here so far, and probably I have to polish my geometrical concepts a bit; didn't use those much since college days! Anyway, there is one key difference between the two and for which I had to rely on some approximations, and that is: the golden spiral rule depends on a rectangle drawn with the golden ratio (given the symbol φ), while the rule of thirds as it is in the camera, based on the ratio of 3:2. I'm not sure yet what kind of results I'm trying to find out but I'm still working on it and hopefully I can share some thoughts about it!

Finale

I have here some appointments that I guess I have to skip. Clinics should really stop giving appointments in Ramadhan - the schedule is just unbelievable. I think I will re-schedule this appointment (supposedly to be on 13th) and I hope it won't clash with my travel to Ireland; otherwise, I have to cancel, again!
My reading process is going slowly as well, and despite this book being small, it surely is rich in information! I'm glad I bought this book really. However, it needs some careful reading still to gain a firm understanding of how optics work. Too bad that I can't do the experiments mentioned practically myself, thus I have to depend solely on my imagination for this matter. There is a book about archaeology still waiting for me and, if I was lucky, might take it with me to Ireland to read at any point.

Everything is going slowly here. Needless to say how my life goes as well anyway. Dying to head to Ireland by every single passing day, where I can have some fresh air, and some clear mind and some more photos and nicer weather. The air is getting heavier to breathe here. I get a wave of panic from time to time but no obvious reason but simply like that. It's annoying. It's a killer.


Thursday, September 20, 2012

10K...

Thank you all regular visitors and passer-by's for 10K views for this blog, and also my Flickr!

Here we go with another hectic week. Despite the fact that I've finished my Techniques (2) workshop, I've been struggling still with its last attachments. A homework and an image for a contest. Since the last week there had been a load of images that I've been working with from various experiments and trying to do some homework, and lately been to some ice hockey training session with the group on some training for panning and motion freeze; the sort of stuff you see sports photographers do. Not my thing, but I did it anyway and tried to have some nice time.


Before going to all these details and images, I might as well mention that I've been almost wrecked with my last order from B&H and Amazon. Since last Thursday, my package has been in my US mailbox, and I couldn't pay for its release for some credit card rejection. Finally, and only on next Sunday, I was able to pay and after contacting my bank. Turned out (seemingly) that they locked my credit card for suspicions, as I placed an order in B&H that's worth around KD160! Pay attention please that I've been dealing with this store in the past 3 years, and I've placed orders as high as KD700 before, and NOW they are suspicious for KD160!!!

Anyway, these are the new toys I'm waiting for and I'm really, really, urging to see them between my hands...

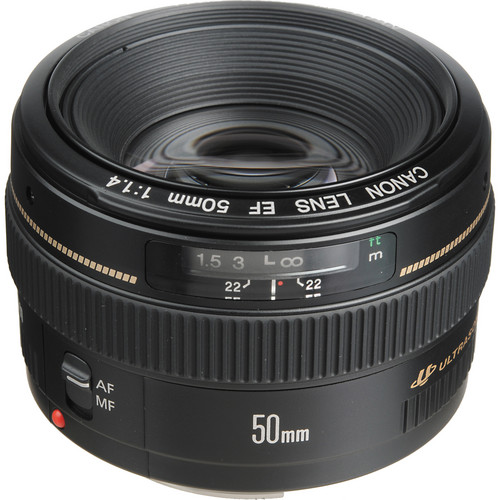
Source: B&H
The first item that I'm dying to see is this babe. Perhaps I do have 50mm covered in the range of some of my lenses but here the case is different. This lens works in USM and with max aperture of 1.4 which makes it perfect for isolation and bokeh effect. I'm not into portraiture as you know by now, but this one could push me on trying, and not necessarily with people; I could even use it for some street photography on the go! That's why I want to have it urgently before my travel on October 10th. I was hesitated in the beginning as I was wishing for Voigtländer 80mm f/2, but keeping in mind that my camera is a APS-C type, then 50mm is better than 80mm in the matter of field of view (wider) and we have the f/1.4 case of course!

Source: B&H
The other item from B&H is the ExpoImage Rogue Master Lighting Kit. A special kit to aid with speedlites usage as it includes gel filters and flags (to block the light against certain areas) or snoots and other stuff. I'm not sure though I would take such kit with me when I travel, as I try to make my pack as light as possible, but in all conditions I'll be taking at least one speedlites just in case I would need it for some scenery, and my Vello cord for off-camera speedlite usage. ND filters are a must of course.
Currently, I'm putting all the speedlites kit along with the filters kit in one case (my old 350D camera bag) but I might have to change this soon as well. A new headache on the way!

And then we have the books. I'm going insane at work for not reading any book. I've tried to read some of the old books but I couldn't even concentrate further (because I get bored easily) and I do have a concentration problem already! I've decided to add two more books to the stack and probably take one of them with me when I travel abroad to pass the time.
With this order I've put some pressure on my budget (and credit card) a bit. However, in my work place they have some weird system when it comes to salaries and leaves; they would give the salary for more than a month ahead of time - I couldn't understand this system even though I've been working here for 7 years now. Anyway, hopefully with the next pay, I'll be reducing some hunch from my credit debt hopefully and would be better prepared for the travel. Let's just hope my bank won't decide to lock the Visa card again!

Splash Splash Splash!

It was about time to try out my 2 speedlites for some high-speed photography, but this time without any sound trigger. In fact, I might as well try it out with sound trigger and see if 580EX II can work as a master even off the camera and connected with the trigger. However, before reaching there, the beginning of the whole story is not a trial for high-speed, but a homework I had to do for my Techniques (2) workshop.

Refreshen
Canon EF 100mm Macro, f/22,
38min, ISO 100
As I've mentioned in the previous post, our teacher assigned to us to take a picture of a glass in any one technique of what we've learned in this workshop. After thinking a bit, I've decided to do 2 main ideas: thawing ice, and dropping water.
As for thawing the ice, it was relatively easy to set-up. I was hesitated to light a candle under the set-up (in a specific setting of course) to fasten the thawing a bit, but then I've realized that the blue floodlight setting on top of the glass and somehow close is producing some heat and might work in fastening the process. With the help of 6 stops and a dark room, I've managed to make Refreshen as you can see. In the beginning, I've tried 20 minutes, but I was not happy with the results so I've increased the time further to 38 minutes and changing the aperture accordingly to yield the same exposure.

Lust of Hell
Tamron 70-300mm @161mm, f/36, 30min, ISO 100
The second idea was to have a long exposure of dropping water. The idea was somehow hard to do because I need tools I don't have; some stuff to hang a bottle or something to drop water slowly into the glass. However, this was somehow solved later with some innovation if I should say, with the help of a pierced plastic bag!

Setting for Lust of Hell
Hope you don't mind the lousy shoot!

Later on though, the plastic bag was out of water in a time of 15 minutes approximately, so the rest of the long exposure ran almost static. At the end, and with some contrast enhancement, the glass retained the red color and yet looked as if it was empty, except for the droplets on the outside. I was hoping to record more movements on the surface of the glass. One of the things that still annoy me is the flare on the edge of the glass because of the floodlight. I couldn't use any polarizer here because of the space and the heat from the floodlight (and I don't have a frame to hang the polarizer).
At that point, the idea sprung up to do some high-speed photography - with the help of an eyedropper. It took me around an hour or even more just to settle down with the positions of the speedlites, and I would say that 3 are even better than 2 in such experiments!

Tröpfchen
Kollision
Aufruhr
Hängend

From the hundreds of trials I guess I got those 4 as the best. In particular, Hängend and Tröpfchen were closer to my first aim in the beginning; to have hanging droplet in the air. However, the droplets were caught closer to the water surface rather than being hung in the air in front of the black background. I've used green gels to change the color with the help of Custom WB and biasing the WB to green (i.e. giving a green tint).
One of the hardest aspects in this shot is to decide on a proper f-number and a focus point. After trial and error, I've decided to focus on the front edge of the glass, and then increase the f-number for one stop (to f/5.6), and try to drop the droplets closer to this edge to ensure they stay in the focus range. It is quite a tiresome trial and error process, specially when done by one man alone. This said, there is a lot to be hoping for: C-stands or something similar, umbrellas, a third speedlite - but I'll keep my dreams for now, and I don't even have the space for all of that!

Architectura

Friday is the family gathering day in my house, and for me, it is a nightmare that I just wait for it to be over all day and night. Last Friday however, I've ran away for lunch in the Marina Mall and keeping my camera bag with me. I didn't take any tripod with me as I was planning for fast session for anything I might see; it is just nice to feel free for once with no heavy tripod dangling over the shoulders!
After lunch however, I didn't know what to snap as taking photos from inside the mall or its surroundings is prohibited (I guess the whole thing is just a private location?). Thus, after lunch I've just started my engine again and went out of the mall, and there on the other side towards the seaside, I've discovered what I call now a secret spot.

Architectural Oasis
Rokinon 8mm, f/11, 250-1sec, ISO 200.
Corrected with DxO

This secret spot is in fact just a tiny portion of a beach with a diameter of around 5 meters only while the surroundings of this spot is majorly made of rocks. It would be dangerous to get down that slope of rocks to reach that spot but it is tempting and I'm planning ahead for some panorama there if possible. Not far away from that spot, with little walk, I reached a place which seems to be a public rest place and a fountain. The design was intriguing so I had a walk around with my fisheye alone and snapped pictures like Architectural Oasis. Even though all my shoots in that location were bracketed, as usual, but only one image after all was picked for processing.

Über
Rokinon 8mm, f/11, 200-1sec, ISO 200.

The place itself is also intriguing for some panorama under the dome in Über. The problem is, in Über I was standing at the edge of the fountain's well (the fountain is not working when I was there), making it a thought-processing task for how to set up the tools over this well, or keep it on the edge of the fountain - and also at what time I would shoot this panorama? Lot of questions and so little time...

Am Zentrum
Rokinon 8mm, f/11, 320-1sec, ISO 200
Unlike Über which was corrected in DxO and the color rendering was fixed to Fuji Velvia, Am Zentrum was fixed for other issues but maybe the colors turned dull as I didn't fix the rendering to Velvia as well. However, I like the composition and the shadows play. Tried to fix the distortion in DxO for more intriguing looks but I didn't get the effect that I was aiming for, so I've decided to keep this one.

Puck Me!

Just as I was waiting for it, the day had come to watch one of the hockey teams we have training on the skating ring, as it was promised by our teacher. My teacher is an expert and an official photographer for the Asian League - and his expertise in such field is superb.
Now, action and sport photography are not my field nor I do have the appetite for such type of photography, but it was something to do after all. It was somehow a relief when my teacher said that in sport photography, it is allowed and accepted to raise the ISO level to some crazy levels!, and flashes were not allowed.

A Trial With Panning
Tamron 70-300mm @148mm, f/5,
60-1sec, ISO 2000
The main aim of training there was to gauge our levels for panning and freezing the motion. It is cool to talk about it or see it in other photos, but to do it, that was one heck of a struggle, specially with the lighting conditions in the arena. I was changing between Tv and Manual modes, and changing the lenses between Tamron and Canon's 100mm macro, but I've settled finally with Manual mode and Tamron 70-300mm.
The key features or the guideline to stick to during such session is to use AI SERVO focusing mode, and High-Speed drive mode. Meanwhile, the ISO is to be fixed accordingly whether you would be using Tv or Manual mode. One of the first advices from our teacher is if you are going manual, meter the shirt of the player and start fixing your options from there. This is mainly because of the way that reflective metering in the camera works, and how white spaces trick such meters into pulling the whole scene into the shades.

Ice Hockey Field
Rokinon 8mm, f/8, 1sec, ISO 500

Frankly, I didn't even know we have a hockey team in the first place, but anyway as I was going there for the first time in my life ever, I've decided to take most of the gear, specially the VR-head in case I would be doing a panorama there. The location, however, as you can see from the image above was not much suitable for such panorama. As I told my teacher, the most proper place for a panorama in this place would be in the middle of the field! Which is unthinkable of course. Anyway, I had to rejoice myself with some fisheye shots like the one done above and I've slowed the shutter down to 1 second to record some movement in the field and make it plain white. These movements however were more apparent when I started to fix the contrast by Curves in Photoshop and the field, originally, was blown out.

Hockey or Fresbie?
Tamron 70-300mm, @168mm,
f/4.5, 1600-1sec,
ISO 6400
Maybe one of the hardest aspects of working here is to hold the camera in portrait and try to do some panning or freezing the motion as well. Needless to say of course it is even hard to expect in which corner the action would be! In a regular game play, you would know that the action is where the play-item is (.e.g ball or puck), but in a training like this, the players were moving randomly to my eyes (not necessarily random to their own order).
Now after all of this, I've came back home with more than 800 images and I have to sort through them, as, of course, not all of them would be good to be published. These images with high ISO are always good to look at when small in size, but I would not think or imagine of one of those images to be in a large print at all!
The astonishing part in this experience, however, was the ability of my Tamron to focus relatively fast under AI SERVO mode. I've always put my Tamron lens behind and I would call it only when desperately needed and usually I'd work with manual focusing (even in this event I did do that for some time). However, when I turned it on Auto-focusing (as I was using Servo), I was expecting the typical delay in response and in focusing, but that didn't happen. The lens coped well in following the players' movements and adjusting the focus accordingly with relative ease. Anyway, I don't completely neglect the "luck" factor, or maybe the focusing distances are close together that the lens had no problem changing between the focal planes.

Thoughts

Some time ago, specifically in last Ramadhan if I remember correctly, I was invited to attend a seminar by a photographer who works for National Geographic. He was Iranian and I beg your pardon because I don't remember his name right now, but his first name was Reza (or Ridha, both transliterations are valid [رضا]). He talked about his experience all over the years and how he went through all of these war zones, like the Soviet-Afghan war, Balkan war and so on, and he did variety of other types of photography. You can check out more about him in his website: www.rezaphotography.org; if you do get an error, please refresh and hopefully you will be there.Now, during the seminar, one of the audience asked about the methodology, or how does he work with his camera and does he try to append to the common rules of art and photography (e.g. law of thirds). His reply sparked something. Reza said (not word to word):
"... we think about these rules as the only way to do art because we studied and brought these concepts from the West. Thus, we tend to think this is the only way to do it. Actually, it is found out that we as orientals, we tend to see things around us in terms of loops and not thirds as artists in the west always suggest. However, I just tend to capture the moment and make an image and I don't think about the rules - it is like second nature..."

These words opened my eyes to two things: First, most of the books I've been reading are from authors in the west, which makes their styles and aesthetics under an oriental perspective, questionable. Not something about right or wrong at all, but about effect and look and am I not supposed to do things differently? Secondly, what are the loops he was talking about, and how come loops can be a guide for composition!?
After questioning my teacher about it, and digging out some information myself, I've introduced myself to the new concept (to me) of the golden spiral. Well, for artists, I believe, this concept is nothing new. To me it is and I was wondering how it works. In fact, checking back on some of my images, probably I've been using this rule unconsciously!

Golden Spiral

So, I've decided to check further of my possibilities with this rule. You see above a typical golden spiral. When composing an artist is supposed to put the point of interest in the center of loop or the spiral. By the way, without going into much details and mathematics, this type of spiral is also connected to the Fibonacci series (for further information check out wikipedia here).
Since the spiral can start from any corner then we do have 4 distinctive positions (just like it is with the law of thirds).

Four spirals combined

Now, what if we combined the points of interests together with the law of thirds and check for a comparison, to see what are the main differences in spaces between the two?

Points of interest in the spiral system (in red dots) against the points of interest of the thirds system (green squares).

It can be a bit of philosophy in work here. As to why both cultures do see things differently, this is something hard to answer. We begin our studies and our comprehension of the space around us in terms of the Cartesian coordinates (i.e. the XYZ system), and boy didn't we have horrific days in physics because of this! Then we upgrade our view of the world around us gradually as we encounter more shapes and more situations when the XYZ doesn't work or doesn't make things simple; thus we came out with ideas for other systems, like the cylindrical and, the more general, spherical coordinates. At least this is what we have learned in schools here and this is how we started to measure the volume and the mass, starting from XYZ up to spheres.
But now imagine, there is a system that gets you directly to a curvatic world without passing through the hassle of the XYZ or the Cartesian coordinates (or rectangular coordinates as it is called sometimes). Can we say that the orients did indeed understand the complexity of life forms in earlier stages before the West did? I'm not sure, but it is worthy to stand still and think about it.
Notice, how the points of interest in the spiral system (red dots) are pushed closer to the corners of the frame. Does that signify a look to life? Spatial freedom? Is it possible that such mental attitude to the arrangement of the surroundings is a direct consequence for the type of living conditions? Europeans usually were packed in cities while in the orient people were more rural even when they lived in cities and in proximity to each other. Or was the whole thing related to the elements available in each culture in the surroundings and nature?
Personally, I've noticed myself being more inclined to nudge things to the corners further thinking of applying the law of thirds, while the law of thirds stays in the vicinity of the center point (i.e. closer to that point). I generally don't see an effect on the arrangement or the composition alone, but also in the shape or the general move in the image. There are certain images when applying the law of thirds is more applicable, probably because the scene is generally arranged in a rectangular way, or rectangular layers, or rectangular shapes. In other instances, the spiral rule might be more applicable mainly because of the pose of the model for example, or the shape of the subject (imagine an image of a rose!). Anyway, I will try hard to enjoy my photos without thinking much about these rules; they got a time of their own in the future, I hope!

Finale

Now, in the coming weeks I'm supposed to prepare for my travel - of course that means buying stuff, and printing stuff and, plan some stuff. It is common for workshops within my photography group to be finalized with some contest for the best photo taken with one of the techniques taught in the workshop.

Untitled
Tamron 70-300mm @300mm
f/36, 90sec, ISO 100
Unfortunately, I was not prepared properly for this contest so I had to work fast the day before sending the image to the group's organizer. Of course my pick of technique for this was the long exposure since I'm already in love with it. I had many ideas but unfortunately most of them require working at night time, and by then it would be too late (and exhaustive). Thus, I've decided to work in the afternoon that day, in the secret spot that I've talked about before. I did some trials for 5 minutes but unfortunately the noise and the water movement made the images taken inappropriate, thus I had to take the least effort and do something about it at least - thus I've zoomed into some rocks in the corner of the spot and recorded an exposure for 90 seconds, with the help of 6 stops (2xND8 filters). Typically, the filters gave out a tint, and it was fixed when RAW editing later. I think I should think of calm water instead of raging one if I want a cotton-candy effect!
I've sent the image already to the organizer and no news so far.

Now, after all the fuss, I'm hoping for a period of tranquility. As my travel time comes near, I'm becoming wary of it. The stupidity in the world doesn't stop to astonish me with new events. Makes me wonder, why do we respect all, but none respect us?
At home, I'm becoming more and more isolated. Sometimes talking to myself is the only break from isolation I could get, beside daydreaming. I've realized keeping your sorrows to yourself is far better than letting them out and get a face-turn - because then you will be shocked to the fact, the none did care...


Thursday, July 22, 2010

Alexander 6, V107.

Just whne I thought Thursday is finally here. The pain with my right wrist is becoming greater after some sudden stretch resulting from my clumsy movement. Went to the doctor to take some paper to do an X-Ray, and I was lucky (yeah really!) to know that the X-Ray is in the same clinic upstairs and I don't have to go to any hospital to this.
The X-Ray showed no signs of injuries to the bones, so the doctor said that it is most probably related to the tendons or muscles (not sure if this is what they call it, tendons?). She said come back in 3 days if the pain did not calm down (or go away?). Anyway, I got a feeling that I'll have to visit her by next Sunday.

As a result of today's "journey" I didn't work in the lab and barely had time to read after coming back. But, I had some time to write something! I named it "Just Like A Hero." It reflects my belief about what or who is the hero in this life: Is it the man with the gun that fights for either good or evil, or is it the the person who spreads the passion and the bless wherever he goes? Despite my haste in writing this, I hope you like reading it. I wrote some of it in the early morning before I leave my office to the clinic, and the rest was when I got back, thus there might be some apparent discontinuity in the chain of thoughts that might be felt in between the lines.

Back to photography, I was lucky now that Canstockphoto did accept my three versions of The Drama Lake (as I called it). Sort of got me back some confidence. I shall try to see other images sitable for black and white conversion.
Yesterday, and instead of working on a new image, I was testing some cropping on The Drama Lake (the BW version). I used to use cropping to eliminate many unwanted stuff in my images but now I'm trying to raise up a step and try to imply this to enhance the composition of my images, when possible.

Named it "Grace"

I can't really say the composition is good, since you are the judge. But I was trying to use the law of thirds in here and place the tree in one of the essential points around the center of the image, but because of other elements around, that was not possible without losing or putting back things. The rays of light are, of course, made up here. Just to make up something and not let it be a boring one. Some people actually didn't like it because of the "noise" as they said made by the clouds. That is, a compositional noise. Well, I do agree to some extent, although the clouds is the thing that made me take this picture in the first place.

Now with this pain in my wrist, photography is more like a challenge rather than something I do because it makes me relax. With this wrapped up hand that I ca barely move, things are going to be hard for me when dealing with the camera, and most importantly, my VR-head!


__________
2545. the food and water they had did not satisfy Alexander
2546. and the day seemed longer than it seems in reality
2547. while their stomaches started to groan loudly
2548. and Alexander felt his body's weakness severely
2549. but his Cadid went on trying to catch something
2550. but the land was so dry and no hopes for survival
2551. then Alexander gazed upon the clear blue sky
2552. and he prayed to God, his savior and the Giver
2553. then Alexander fainted because of the weakness
2554. and he closed his eyes and gave his soul to God's mercy
2555. some time passed which Alexander did not count
2556. and he suddenly felt a cold touch upon his cheek
2557. thus he opened his eyes and gazed into heaven
2558. and he saw the miracle of God in front of his eyes
2559. the sky was raining like it never did in centuries
2560. while the green cover was growing with every drop
2561. thus he knelt down and praised God, Almighty
2562. while his Cadid was running like if he was dancing
2563. it was raining for a short time but all the green came out
2564. and the trees riped again and carried different food
2565. thus Alexander started to gather the food and water
2566. while his Cadid was helping him with a happy face
2567. thus everything was prepared and supplies were taken
2568. and the two had some rest until the arrival of the night