Showing posts with label B&W. Show all posts

Thursday, April 30, 2020

Checkmate…

Strange, weird times are coming through. As much as the time appears to be slow because of the idleness, yet it is kind of pacing fast simultaneously. I feel like I didn't have much time since I finished my last blog post in Arabic, and feels like it was not weeks since I took the following shots that I'm going to talk about here! And guess what? Ramadhan is here already.
I'm actually grateful that Ramadan this year comes by while we are home, supposedly, instead of having to go to work and maybe sign up for a leave during the month to take care of my hysterical sleeping habits that get confused greatly during Ramadan, every year. It's such a bless for me, really.

Marbhsháinn

Well, this is just checkmate in Irish. I've mentioned in my previous post (or posts) a glimpse about my work with the chess set. I got this set specifically for photo shoots; I'm not a chess fan! Anyway been some time since I did something with this set, and so I thought it is time to work a bit. The annoying part though, working with chess can be quite noisy and loud unlike working with the feathers! If you are going to try to do anything like what I do here I hope you don't risk bothering anyone with the noise.

Воздушная Битва (the air battle)

Just as a starter, all my plans were set ahead to make these photos in black and white. Why? Well, let's just say it gives strength to the sense of drama here and also because black and white are strongly attached to the game of chess (in my case, the pieces are made of wood, and reddish and milky in color). In these shots, I've used 6 speedlites: 5 to flash, and 1 master to trigger the rest without shooting. This leaves me with one extra speedlite, the old 420EX which I didn't use here because it is, well, cumbersome to work with. I've checked the manual for this one and seems the only way to control its parameters is to be connected directly to the camera, but I might be wrong here. I got this speedlite for cheap from a friend. Anyway, adding this last one would not add much since I have 430EXII and 580EXII on both sides of the set, and 430EXII on top; Thus things were symmetrical. Why so many speedlites? Well, it was a high-speed session!

The chess set before adding the rest of the speedlites on left and right.
The white boards on right and left are for bouncing the light from the speedlites.

Now, the first shot, Воздушная Битва or the air battle, got me into a tiny trouble, which I had to solve by merging shots instead of doing everything in a single shot as I was planning. Well, several problems in fact:
  • My hand shadow from the top speedlite did cover and obstruct the shadow of the falling knight piece. Specifically the black one because I was holding the remote with my left (I'm a leftie) and dropping the pieces with my right. The problem was minor with the white knight but was a major one with the black knight.
  • As you might have inferred from the first point, I could not drop the two knights together. Working with a timer is not as precise as triggering the remote with my own hand, and holding the two knights in one hand and dropping them made them so close together which is not what I wanted. I really needed them to face each other. Thus, the only solution for this was to drop each piece alone (several times to pick the best shot) and merge them later.
Luckily, I've taken a shot before I work as a reference and that one was the base upon which the knights were merged, so in total, 3 images put together, with some edit to the shadows of the knights. Well, beside the total edit for the whole shot of course. In Воздушная Битва specifically, I like the luster on the flying black knight and in fact I've toned the luminosity of the colors when I converted to black and white specifically to keep this luster on the flying knight piece.

Фантом Кони (Phantom Horses)

Over with a high-speed shot (or composition to be precise, I guess), I moved further to the Multi or the stroboscopic flash. It's funny how this type of flash was unthinkable to me when I work with my speedlites, but now it is a favorable option when I work with such experiments. Again, I tried to throw 2 knights or horses together in one hand while triggering the camera with the other hand, but the results were not fascinating, to say the least. Thus, I needed my brother's help here and voila! It was perfect from the first shot. I had though to use also another shot for the background to merge it because my brother's hands shadows from the top speedlite. I'm not sure how many strikes of flash were there but I'm guessing 5 from the number of "ghosts" in Фантом Кони, and surely the frequency was low, probably 50Hz. In fact, 5 strikes of flash when working with stroboscopic light is now my standard and my starting point. It seems to yield some reasonable results in most cases. One thing I regret though in this shot is that I didn't ask my brother to hold the horses opposing each other face to face, so as you can see they are falling here and both looking left.

Кто Стоит Последним (who stands the last)

Next in order comes a simple shot, yet hard in the same time. At this point, and in order to shoot Кто Стоит Последним, I had to change the lens. In the previous shots I've used my Sigma 12-24mm and that's out of necessity a bit because the perspective needed to be adjusted a bit because of the tripod's stance. However, with Кто Стоит Последним, I had to change the lens and use Voigtländer 20mm lens so that I can use my polarizer. The Sigma lens is 82mm in diameter and I don't have a filter that fits, and converting rings (step-down) would be problematic. Thus, it was safer to just change the lens to Voigtländer 20mm which has a diameter of 52mm. The polarizer was needed here to emphasize the reflections of the pawns or pieces on the board.
The general idea for Кто Стоит Последним here does not involve any speedlites, but simply some dark atmosphere, dark enough to give me a long exposure. Meanwhile, as the exposure is on, I would be changing the placements of the pawns and keeping the kings in the middle without touching them. I was pretending to play a game of chess (don't know much about chess anyway!), so I kept knocking some pieces down and changing the placement of some others. All of this mess of course produced some ghosts, as needed. Good thing though that I didn't knock over the kings or move the board by mistake; With my Retinitis Pigmentosa in dark places thing could go... astray. Total exposure time was around 4m30s; And I guess this is exactly the time needed to defeat me in a game of chess, if not less!

Báisteach na Ridirí
(the knights' rain)

Then I had this idea, which was kind of "crazy" a bit, but I'm sure not as much crazy as other people I've known (nor my life). The trigger for this idea was that: since I've been editing or composing and merging my previous photos (except for the one using long exposure above), then why take a step further (just a bit!) and make a rain out of knights!?
I realized from the beginning that I'm going to need a lot of work done here, and as if it wasn't hard already, I had to struggle with batteries and power resources for my speedlites as I was preparing them to shoot high-speed. A LOT of high-speed shots.

Идет Дождь Коней
(It's raining knights)
My thought for working with this "project" was to divide the work on separate sessions, with each session being dedicated to shoot a specific portion of the image:
  • Shooting the 2 kings at the center of the board (and fixing the focus at that point).
  • Shooting the plain board.
  • Shooting the dropped white knight piece on various locations from the back to the front and sweeping left to right each time.
  • Doing as with the white knight but this time with the black one.
  • Doing as with the white and black knights but this time dropping them both together.
The last point here was actually eliminated later and I didn't touch it because of the crowded image that later became to be when I worked with the white and black sets separately. The plain board shot was kept as usual as a backup; I didn't really use it. All shots were done with the same light, same shutter speed, as much as possible. Because I was dropping the pieces on the board, there had been tiny movements that would be visible only on comparison but they didn't have a great impact on the merging process; Excellent!
I won't go into details here about the way I organized the files and merging them, but I'd just say I've followed a systematic way (and the file size was enormous). Not all images (more than 52 in total) were used; Some of them had to be canceled for various reasons. You might have noticed in the image above that there is a knight blocking the black king and I left it there intentionally to give depth and dimension to the image.

The white and the black sets separately when combined. Of course there is a number of them that were removed in the final image shown above. Merging them alone makes some nice shot it seems so I will try this later!

Unlike the previous high-speed shots, I've slowed down the shutter speed here to 1000-1s, down from 8000-1s (max for Canon EOS 7D). I was hoping to capture some motion blur for the falling pieces, which it did, but not to my desire. The view on the camera's LCD was not good enough to judge, but anyway, I continued working as it is. After finishing the merging of the white and black pieces layers, I've tried to do the same with the doublets (those shots I've made for dropping the white and the black knights together, using one hand) but the image looked crowded already and no need for more. I'm keeping this set though for some editing experiments!

The Falling
One of the "doublet" images that I decided to not include in the final image.
Using the polarizer really paid off.
I had some ideas also to do an experimental light painting on the set before I move on another idea in my work with the camera but I couldn't find a suitable method or idea to apply here, and probably I don't have proper tools to do such delicate painting for small pieces like that. Most of the time, as I've encountered so far, light painting is done on a larger scale a bit and not a delicate one like a pawn and a chessboard.

Finale

Crazy times, and I'm trying to use every minute I could to the max, with my camera. Well, maybe other things as well (gaming for example?) but I'm on the go and trying to try more and more with my camera, in hope of creating something unique still.
Meanwhile, thoughts of leaving my work and do something on my own still roll around my head, as I'm not sure how stable my current job would be still. yet, I'm grateful for the situation now, but nevertheless I cannot guarantee anything in such times. Not sure where I'm heading but I'm trying to take it one step at a time, and enjoy as much as I can. If only I can control the damn mood swings.
Being in lock-down and home quarantine might not be as a catastrophic for an introvert like me, as it would be for an extrovert. Yet, I do have my feelings towards it. In such times, my eagerness for traveling has increased ten-folds than before, even though I didn't know before this crisis whether I can travel or not and probably I wasn't ready for it, but now I really need it to just change the scenery and be away from people. As for me, I don't go out of home much already as it is in normal days so a quarantine or home-stay won't make much difference, but it s the general atmosphere and the people around that would just push your buttons up and down and screw up that peace that I've been trying to work on for quite some time. I need to travel probably to change the people, and not the scenery. It is in such times I just so wish that I have a home of my own, but in a place like this, how would this be possible at all…

Thursday, January 9, 2020

Darling…

I think I was supposed to take a break from blogging for a week or two for the new year? I'm not sure; But I've been into making some photos and I thought maybe it's time to post about them. I'm typing this as I'm on a vacation from work until January 9th. Typical, though and unfortunately, I've been lazy with my camera work as usual with any vacation that I take. But I'm trying!
Some of these trials are simple and my main aim was to go out at night and shoot but it seems I have no chance, specially with this exhausted body of mine. Some incident (not a serious one) happened as I was out with my brother outside close to midnight around the beach area where I used to practice and do many shots long time ago, and I realized there are still nosy people who would just grab any stranger to chat with; Something I really find irritating for my night outgoing and my peace of mind at such hours of the night. This little incident kind of held me back a little and I'm hesitant now. Needless to say, my sleeping pattern is a mess during this little vacation but nevertheless, I'm relaxed because I have no obligations in the early morning hours. Anyway, let's see what was achieved.

Darling

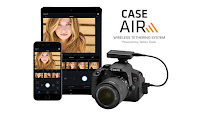
After doing my previous shot, The Beggar of Nothingville, which was inspired by a poem of the same name, I've had another idea at the back of my head, which was already planned in B&W as well. This shot, however, is more like a starter or a dedication for the new year (sort of). Despite its simplicity, shooting it was not as easy as The Beggar of Nothingville (relatively). To make the shot this time I had to use my wireless tethering with Case Air tethering tool which I didn't use for quite a while (not even for The Beggar of Nothingville). Working was a hassle and I was about to cancel the whole thing.

Case Air for wireless tethering


Happy New Year, Darling
First of all, the idea of the shot is about these things that we love, care for, and appreciate, but unfortunately we are forced to leave behind. Despite its title, Happy New Year, Darling, the shot is not really specific to the new year - But the term "new year" is used symbolically to signify these new beginnings; Well, some beginnings that I might be willing or wish to start with (or not). This is the philosophical side of the shoot. Now, back to the technical.
I've proceeded with my 50mm lens, as I thought it is the "norm" for such a shot, but thinking about it now, probably I should have used 20mm to give myself some more space and crop later. However, all worked well in the end but after quite some trials and errors. It was one of these experiments in which I've got a bit upset for not finding someone to help me. Holding the problematic props in one hand and the mobile phone to control the camera via wireless tethering was indeed a great distraction. The props consisted of a little cut branch and a small broken cup (my niece made that and broke it!) and since I didn't find any soft sand around, I've decided to use some Ovaltine instead; After all, the image will be in B&W and the real material of the soil is not important, right?
For those who
don't know what
Ovaltine is!
The shoot was done over the span of 2 or 3 days with many issues. Mainly, the level of my hand and how clear is the broken cup. Despite the somewhat natural gesture in Happy New Year, Darling, the pose was hard to be done for me as I had to twist and stretch my arm and palm. Adding to that, the little branch would fall often and it was not possible to stabilize over the soft Ovaltine. When I created a shot that I like, I've realized after examining the photo on screen that the most important part of the image, the plant, was out of focus. Despite many trials later, nothing really worked as I like.
Source
A book I'm re-reading recently.
However, and thanks to some of my recent reading in Learning to Photograph Vol. 2, I've decided to settle down with the version seen above despite the slight cut in the thumb. Another reason, beside the incomplete thumb, that made me go over this shot in the beginning, is that the little plant was not straight up. All in all, I can't say that I'm absolutely satisfied with this shot but I have to (or had to), because in some way this is a kind of "perfectionism suppression" that I need to practice because otherwise I won't finish a single job or idea I get into my mind. Moreover, as per Learning to Photograph, it turns out that a slight cut like that to any shape (specially circles) works on anchoring the image, or in other words, as if the image is stabilized, or it does start, from this anchor point and forward. This is a somewhat psychological effect to be perceived by most. Bearing these aspects in mind, I've decided to pick this image which was one of the earlier trials to make this shot. I was hoping to shoot in natural light and I've picked a specific room in the house specially just because of the quality of the light coming through the window. However, unfortunately, and because of my laziness, I couldn't be there in the early morning to shoot and use the daytime to perfect the shot with daylight; So, I had to get some help from a speedlite (430EX II) which was not a big deal. Just pointed it to the side wall with its 14mm panel to get a wide-angled beam and bounce it back to somewhat mimic the effect of natural light through the window. This also helped with the shutter speed a bit to make things faster a bit (something essential with my shaky body!). The color cast of the speedlite is not important (not completely) after all since the image is to be converted into B&W.
The Diagonal Method
Probably it is noticeable how the image is sort of elongated a bit and does not go under the conventional or most common ratio of 3:2 (at least for my DSLR). Actually processing this image did require some valor, and some challenge to my perfectionism trend (again). Meanwhile, I recalled that I've installed a special plugin for my old Photoshop which helps on cropping on various systems, such as the golden ratio and the golden spiral. One of these rules is The Diagonal Method, developed by a Dutch photographer, namely Edwin Westhoff, after studying many artworks. Now, the special thing about this method is the claim that important or significant points of interest for the viewer are not single concrete points of intersection, but rather interesting subjects can be placed along diagonals which stem from hypothetical squares within the frame (see the link above). You can see how that works on the side, and instead of keeping the aspect ratio the same, I've cropped freely without keeping the ratio and placed the lower central point on the plant. I had to crop my head a bit to remove any distraction or dominance on that side. Now, the rest of the work is simply toning down the colors in B&W making the Greens as bright as possible along with the contrast, and many, many, many layers of dodge and burn! And… the story is over.

Finale

Well, I really wanted to post another shoot and new venture with mirror lens, though simple but I think I've blabbered a lot here that I guess no need to lengthen this post some more! In fact, this might just give me the time to do one last experiment with this mirror lens which I was planning to do with my brother but I didnt for the lack of time. I was thinking of shooting a selfie of me by this lens with the help of Case Air but that would be even more troublesome than it is already. But, it is still an idea to consider.
Now, my vacation is coming to an end, I need to re-organize my life after living clueless for a while. Going back still feels like a burden though but good thing that my toothache is almost gone, even though I can really bite on that side, but the pain disappeared, thanks to my sister and her knowledge in traditional medicine. The thing that is left for me now, to find a direction…


Thursday, June 13, 2019

Pinholism…

Summer is here, so if you are a person who likes summer, please don't let me encounter you on any platform! It's just the 2nd week of June and temperatures already getting to, if not exceeding, 50oC! I had some pleasant short vacation away from work but going back now, after such a holiday, with such heat (and AC problems from time to time) is just so exhausting. Meanwhile, I'm sort of idle with my camera but I'm busy with other things. Might talk about them later. But as promised in my last post, I will talk about another photo which I've created some weeks ago and I didn't want to jam my previous blog post here about it, so I kept it for this week.

Pray

المُقْرِئْ
The Reciter
Some time ago, months ago in fact, I've made a shot with my pinhole cap (or pinhole lens as some like to call it)  picturing myself reading or reciting Quran, opposite to a shiny window. The image is much of a conceptual fine art work instead of the typical expressive sharp image that we, mostly, would expect. This shot was done in a time when I was really working on enhancing the pinhole imagery and trying my best to get it to be as sharp as possible. However, with time, I realized that this is kind of impossible to be done (scientifically) and it would be rather better to work on using this specific look which is created by the pinhole to express a specific mood, and culture. Since the make of The Reciter (it is also one of the rare occasions in which I do name my photos in Arabic actually, because of its nature), I've thought of doing another shot depicting the praying practice (as a Muslim of course) but for one reason or another I really didn't get the time to do it until Ramadhan (and being off with my little vacation) this year. The main problem, though, was to find a suitable location for the shooting; I needed a place with glass that allows so much light to come in, and must be in some good angle in relation to the sun. I guess I've found that good spot in the guest room at home.

المُصَلّي
The Praying
In this room, I had to shoot in the early morning. I did check the room several times but I thought first about some obstacles (some gypsum board wall ) that might block the view if I want to perform the shot in front of the main entrance door to this room. However, all went well in the end (with some tiny bits of cropping and fixing perspective in post-process). Then, we have the problem of the perspective, which was easily solved with my new L-Bracket, which I've attached to the camera body and it allowed me to place the camera considerably stable in portrait position on the ground. The main issue though was the nature of the shoot itself. Metering and taking test shots revealed that I need about 64 seconds. Doing some math and dividing these seconds over the various parts of the typical movements which one do during the prayer, it was about 12 seconds for each. Anyway, I was counting on my own without a timer or anything and the thing didn't really work as some movements were not recorded clearly on the sensor apparently. Thus, and again, I've found myself forced to use the power of blending to merge all the movements - I did several shots with various movements and gestures, and each in 64 seconds. Blending these shots was not an easy task as well and my typical method of blending using Lighten or Darken did not work here. I simply had to change the opacity for various shots and even canceling some shots as well to get the final look as you see it in The Praying. Another critical post-processing point here is trying to make a difference in tones between the prostrating pose and the kneeling-on-the-ground pose, but keeping both gestures or images reasonably "black". It might be noticeable better when the image is enlarged though.
Now, after finishing this image, I'm thinking, again, of a third images for this series even though in the beginning I was thinking that this would be a two-image sequence only and no more; But my mind is still playing tricks and still thinking what I could add to this series (and it must be related to the Islamic practices of course) - Didn't get an answer myself but we'll see. I've been idle with my camera now (specially after some failures) so it would be a good push to get active again.

Finale

Well, I can't emphasize enough how much I'm sick of summer already and it is still June. Sometimes I'm really hating myself for being born in August. I'm already doing project indoors as it is, and now summer is here, then just the thought of going out to shoot anything, day or night, is a No-No.
Meanwhile, despite stopping the astrophotography trend in my brain, there are some good signs, like finding a relatively-cheap equatorial mount or tracker that I can work with but I'm not ordering this now. This would allow me to take longer spans of exposures and get some proper light to the sensor in order to process them properly and show features of the deep sky objects; As all my trials before were nothing more than some constellations and dots in the sky! On the other hand, working with these images was beneficial despite the failures. I've learned new techniques on "stretching" the data out of my images which I might use any time with other types of images and not necessarily with Astro-shots.
Hanging by the ideas, I'm still looking for inspirations among the Andalusian folk songs and I do indeed have some ideas, but when thinking practically, I just get back to "normal" and abandon the whole thing and start thinking again for and about something new. This is is beside thinking about using the pinhole again for a third image to the sequence of Islamic nature, which includes the two images above.
On the other hand, with all the mental struggle here, there is a struggle inside of me trying to push myself and force myself to travel for real despite the hustle and overthinking. It might be a tiresome thing to do but it is essential to get a break before the engine of my mood and my brain breaks down in this place I'm living in. My fuse is getting shorter and shorter. Meanwhile, I'm trying to get myself busier by adding on to my to-do-list, like learning more languages beside Irish on Duolingo. I've added Turkish, German and Russian - and who knows, I might add a 5th one too! I really wish I can learn many languages with ease; They fascinated me since I was a kid, and now there is some good chances.
Anyway, as I won't be posting in this blog by next week, I'll be busy actually typing a post for my Arabic blog instead about "extracting" gradients from photos and apply them to other photos, and if it is interesting enough I might as well talk about it here. I hear a lot about people selling and others buying such gradients to ease their workflow and such, yet I'm not sure if this is worthy of my time but I'm experimenting and having some artistic fun as well!


Thursday, April 18, 2019

Reflections…

Well, unfortunately, this will be kind of quick here since I was lazy in the past 2 weeks but nevertheless I'm trying to do something, along with the endless sleeping problems! I'm now being optimistic about a venture in astrophotography, but I'm not sure of it yet and I'm still doing experiments on that side of the photography spectrum. I wanted to show some results here but unfortunately that didn't work and many things kept me from working fast (some off them related to the rains and the weather). Anyway, I was able to work on one image, indoors, and I'd like to talk about it here.

Reflections

To begin with, I had this idea for a long time actually and I tried to work with it a bit but stopped because of the "conditions." Now, however, I've persisted little bit and with the help of my new acquired Case Air tethering tool, I was able to work easier and smoother with my camera while not being behind it (this is despite the limitations with Case Air already).

Case Air Tethering Tool
This idea required a mirror, and thus what better place to shoot in would that be other than the bathroom!? My bathroom, unfortunately again, didn't help a lot with this, so I had to move to another bathroom in the house and try my luck there. After changing in between lenses (mainly the Voigtländer 20mm and Canon EF 50mm), I've decided to settle down with the old nifty fifty, because the 20mm would be too wide and showing details I don't really like to add (meaning more cropping later on), plus the need for the wide aperture here to keep things out of focus properly (Voigtländer's 20mm widest is f/3.5 while Canon's 50mm widest is f/1.4).

Reflecting On Reality
Kenko's Big Stopper.
Initially, and at the back of my head, I've envisioned this shot in B&W and not in colors, as I think that monochromatic images show feelings in a drastic way more than colors do (and I'm speaking of human feelings, specially those related to the dark side of the personality). I wanted to really add the two sides (the real and the reflection) in framing the image but switching to 50mm and the lack of space made that impossible, and I could not use any other lens (Sigma 12-24mm was a choice but I have no filter to fit its 82mm diameter). The idea was to take two exposures; A normal one, and a long one and then combine them together in post-processing phase. For this reason, a ND filter was needed, thus I've used Kenko's big stopper (10 stops) for a bit of an "extreme" light stopping, and actually it didn't slow the shutter speed drastically (that is more than one minute so to say) - about 35 seconds were enough for a good exposure, but this is normal I guess since I was using f/1.4, and probably the lighting in the bathroom was quite efficient!
The rest of the job was then a work for Photoshop: Converting to B&W, adjusting the curves and tones and emphasizing the features with the help of dodge and burn. This is all what is it about actually when it comes to B&W; No colors to try to fix and remove casts, but still not an easy job when it comes to a pretty dramatic look, and tones must be delicately changed. In fact, I did have a problem when I merged the two photos and worked with layer masks to hide and add features in between the two; The traces of the layer mask's limits were apparent (i.e. the brush strokes made a turbulence of the exposure or a mismatch in the area surrounding them). To solve this problem I had to soften (blur) the layer mask until it was all ironed out.
Looking at it now, I do have some thoughts about the posture though (like, maybe, I should have done that with my arms extended on the mirror?), and maybe my hair should have been wet a bit? Anyway, no time to think about an image that is done already for the time being as more ideas are cooking and I'm still not doing much about them!

Finale

As you can see, here's only one photo I'm talking about its creation and I wanted to share some more but, as usual, my life has been erratic along with my sleeping pattern and body issues. Getting older I guess.
One of the things that is really getting me excited nowadays is discovering that it is possible to do some astrophotography without a tracker! A tracker is an addition (luxurious somewhat) to enable shooting the sky (specially deep sky objects) without causing star trails. The process a bit a complicated though (typically) and requires taking lot of images and shooting "light" and "dark" frames beside other shots and all that is fed to Deep Sky Stacker (which consumes a LOT of resources from my PC when working with). This is beside the ability to shoot in urban areas using the H-alpha filter to reduce or eliminate the light pollution. All that is good news, but I'm still having some issues here with this work and I'm trying to figure out the ins and outs of it; Needless to say, I'm still having a hard time to focus the lens into a blank sky already (I usually do test shots before doing the actual work of shooting to see how focus the lens is). Let's hope I have something new to write about in this blog (and in my Arabic blog) in the next few days!
On a side note, it seems I've kind of settled down to travel, maybe by September, I'm still not sure really. The thing is, many events are happening and my nerves are in need of "liquid nitrogen" literally to keep them cold and hard. Starting from family issues to moving my workplace further away from its current situation - lot of fuss, lot of paperwork, lot of questions, and lot of self doubt inside of me as whether I can cope with driving that distance everyday with my eyes condition. I already hate it as it is. The transfer or maybe the new location must be in use or active by September already; The time I usually have my vacations in. All I want right now is to be left alone, specially at work. Unfortunately, not many people understand this, or maybe they don't want to?

Thursday, June 21, 2018

Greasing The Engine…

Here we are... Ramadhan is over, and my vacation is over as well and I'm back to work with the usual greasing my engine problem like after every vacation. A number of stuff I've been doing with my camera through this short vacation, and somehow was trying to catch my chances before I get back to the humdrum of the daily life and the tired body. Sleeping was a problem of course, and can't imagine how my life would have been if I didn't take that vacation as well! I'm grateful though for one last miracle, and that is my shipment is finally here after taking a long route and some extra expenses through the sick mailing system we have here. Anyway, I might talk about that later.

Out of The UV

It has been a while now with my thoughts about trying a portraiture or a selfie using my UV filter. I even got myself some CFL-type blacklights to try out and experiment in shooting such portraits (with some plans of painting with sun screen). However, after working a bit and some testing, it turns out that such blacklights are not quite practical and/or useful for portraiture at least (might be useful and practical for static objects for tabletop photography). Anyway, I had my own little experiment with a selfie using these blacklights…

UV Man I
Googling around, I didn't find quite the descriptive article that describes how dangerous are the blacklights, and what is their damage on the long or short terms. Anyway, I worked with them anyway fixing my exposure to one second only and raising my ISO to 640. I was wearing my glasses without really realizing it, but then I thought they would be a good protection for my eyes. I've worked before with these blacklights and I noticed that I get some irritation to my eyes when they are on. All in all, the glasses were a good addition to the shot I believe, as I didn't plan for these reflections off them.

UV Man II
One of the signs of a good UV filter (or a combination of UV filter and a hot mirror) is that glasses appear black or almost opaque when shot with these filters and this is how I exactly realized that the DR-655 filter was a good filter because my glasses got dark when I tried to shoot some selfies under the sun before (when I first got the filter). That worked well here making my glasses like a mirror reflecting off the blacklights under my face (placed into desk lamps).

Transmission chart for
Kenko's DR-655 Hot Mirror.
Click to enlarge.
However, when I tried my speedlite (though I know it's not a good UV source) the opacity of the glasses was gone and my eyes appeared from behind the glasses, proving that speedlites probably fire some infrared BELOW the limit of 700nm (which is the beginning of the blockade by DR-655 hot mirror according to charts). This effect for the speedlite over my glasses persisted even when I covered the speedlite with somewhat thick blue and purple layers of cellophane with the hope of blocking the infrared range; However, no use. I've made several shots (and UV Man II taken before UV Man I actually) and I guess only 2 shots were somewhat the best of them all. I've used excessive sharpening with UV Man II here to compensate for the little motion blur in the image (probably doesn't show clearly when in small size). For this, it seems that there is no escape of doing my future UV portraiture projects under the sun; The summer's sun. Speaking of "escape," I think it is time to move to the next title: Escape.

الهروب - The Escape - Al-Hurúb

Somehow I loved to call the next shot in Arabic rather than, typically, in English or any other languages. Hmm, this has been a trend in my mind lately. Anyway, this is all about a panorama shot which I've been planning to do for a long time; I won't be exaggerating if I say that the idea had been there for 2 years, if not more. Initially, the idea for this panorama was to be shot in "normal" mode, so to say. However, when time arrived for its execution, I decided to do it in infrared (with my modified camera of course) as this would add more drama, contrast and visual impact.

الهروب - The Escape

I did indeed a panorama (a simple one) in this location before and I remember it didn't go well (it was in HDR too). It was so simple, with only doors showing. The idea of adding an element like this hand was the thing that delayed my work. I was thinking of using my bro as a model to show his hand only out of the (bathroom) door, yet I couldn't fix the timing with him and I doubt he has the patience for such work. I went as far as thinking of getting a mannequin (or the hand alone at least), and again, I couldn't get to that. Thus, again, I'm all by myself.  Unfortunately, I didn't take single shots to explain some issues, so I will go explaining some of these issues by points:
  1. First things first: It's an infrared panorama, which means I need a good infrared source. Thus, I had to change the bulb in this small square space from CFL to tungsten bulb (150W!) to ensure my intake of infrared in the place (and I was not disappointed).
  2. It was perplexing to position the tripod in the first place, and it was obvious that it won't be at the center anyway, so I tried to place centered with respect to the bathroom door where the hand shall be exposes.
  3. Naturally, there would be overlapping of images when doing this panorama because of the added element (the hand). So, things has to be unchanged between the shoots as much as possible. For this, I opened the bathroom door and let it swing on its own to its own limit (the vent fan was on so the air sucks up the door a bit in addition to the door's weight). At this point, I've placed a marker on the ground (let's hope Mom didn't notice!). Later on, after shooting the panorama, I've gone inside the bathroom and extended my arm outside and tried my best to align the door with the marked line I did earlier. I took many shots with different poses for the hand and when stitching I really wanted to add them all in some sort of a surreal look, but because of the troublesome errors, I've satisfied myself with only one hand.
  4. Even with one hand, stitching errors prevailed and to be honest, I'm not sure if the final product here has all its stitching errors fixed! 
The working infrared filter here is Kodak's gel filter (#87B) which has a threshold of about 820nm. The tungsten bulb here provided with just what I need of infrared and I started shooting at f/10, 4 seconds each, at ISO 160. Of course, no HDR bracketing here, that would be a far fetch somehow. In fact, even with 4 seconds, my hand was not that stable but it might not show easily in the big picture. Yet, with such a strong infrared filter, 4 seconds of exposure is plausible indeed. To ensure the proper exposure time, I've shot the bathroom door some several shots and checked their histogram to decide for the proper exposure for all of the scene (because this door is the most important in the whole scene as well), and that worked well. The black space under the arch was not dark in reality, but this is the main hall which was lit mainly by LEDs and CFLs, and these two do not emit enough infrared to show up clearly in just 4 seconds of exposure with this filter - It was just perfect! Well, there were some tiny white dots which I needed to clear out. The white-gray space under this black space under the arch is just the sofa covered with some "black" cloth to hide the details of the sofa. But you know what? I'm regretting that and now I wish if I made it ALL black there.
I've made various projections so far and still working on more out of this panorama, so I might leave those for my next posts anyway, but the priority was for creating a QTVR out of this panorama. Unlike my previous posts where I would post a little QTVR here (which requires QuickTime to be installed), now I'm going to depend on 360Cities.net embed my QTVRs here. And this one has been published already as well!


Pinhology

During the last days of my vacation I started to get excited again about my pinhole (lens) and really wanted to do something about it. I was focusing on getting sharper image in the past but now, my focus is mainly surreal in essence. Thus, sharpness was not much of an issue for me this time. All I wanted to do is record some motion, and in B&W. Some of these images as I saw do have a mental effect on me at some level. Something out of this world, or simply psychological. With this though, I've dug deeper and learned further about pinholes and I'm seriously considering making one on my own for my camera (but first I need to clean my mental desk of some hanging tasks and issues).

المقرئ - The Reciter
Pinhole: 2m, ISO100.
My first idea was doing a bit of motion (as I stated already) and the idea was to make a moving silhouette. Easy said than done when the talk is about a pinhole lens. Using ND filters was out of question here (even though I do have some gel NDs and I could have easily stuck them on the pinhole). Originally, I wanted to have a light coming from above, but when I saw the window in this room of the house (specially in the morning) I really loved it. It was perfect for the job and in fact more plausible for a silhouette (even though more work was needed with dodge and burn when processed). The exposure of two minutes (plus 1 minute timer to prepare myself with the black cloth) was just enough to record this motion as I was flipping through the pages of my Quran (Koran). Maybe the background was not well organized but I can't complain. I've already had a problem with the camera to get enough distance in the room to get the framing I wanted (one more reason to think of some way to integrate pinhole work with my regular lenses). Converting to B&W saved the situation further, because I realized that my clothes showed up with all the fanciful colors and designs! 

Escape 2
Pinhole: 39s, ISO100.
The streak of "inspiration" did not stop with that room, as I'm starting to notice the light patterns wherever I go now and truly putting my mind into this pinhole work altogether. The room this time was the guest room and the light was coming through from the door that leads to the outside. Again, it did capture my sight (even though it was getting dusty by that time and got extreme after I've finished, luckily!). Had some go with simple poses like in Escape 2 (thought of it as a sequel to The Escape panorama). Even though my body was not completely stable during the 39 seconds exposure, but the image looked stable enough. During the post-processing phase I did decrease the clarity to give it the dreamy-like (or should I say psychological horror) look. Also, and again, there was some work with the dodge and burn to be done and I made a compromise here between showing little details in the blacks but not quite enough to figure out any shape. To keep things in black here, I had to wear my t-shirt turned around to hide those designs! Anyway, I couldn't stop thinking about keeping myself in motion, because motion in such long exposures, to me, resembles the life of the image and somewhat like resurrecting something within the viewer when he or she looks at it.

Escape 3
Pinhole: 39s, ISO100.
Thus moving to the next idea, with only one hand extending through (not behind the glass door) and this time moving my fingers only, and the result as you can see in Escape 3, it did have that motion effect somehow. However, instead of reducing the clarity when processing this image as in the case of Escape 2, I've increased it. That way the shades of the fingers appeared clearly further. These shades of the fingertips were made by the motion of the fingers actually. By the end, I still had one more shot to take and this time I did have some motion by head and hands but the end result was not much to be noticed, and the whole thing appeared as if some Anonymous person standing behind some glass. 
Anonymous
Pinhole: 39s, ISO100.
The focus on pinhole photography made me expand my thinking a bit; Somewhere behind the pinhole lens that I've purchased and in many occasions I would find myself senselessly digging myself into numbers and calculations trying to figure out or visualize the outcome of various light wavelengths, diameters, and even focal lengths (despite for me it has been fixed at 44mm). I think that shooting with the pinhole for some time would, naturally, push the photographer further to focus on the light and its quality, as was the case in the classical times with films. Of course, it is still digital and one can shoot and check it out later and fix it later, but still, the length of the exposure alone makes it worthy to invest some time in focusing and reflecting on the light available and what to do or how to do the shoot. All that, I believe, would reflect back and add to the experience of the photographer and his eyes and vision when working with regular lenses. Right now, I'm thinking seriously as well of merging speedlites with the work with this pinhole (in terms of a stroboscope). Needs a bit of thinking…

Finale

Neewer Set of Infrared Filters.
IR720, IR760, IR850, IR950.
A bunch of ideas are roaming my mind and with me being back to work doesn't make it any easier for me to work on them, but I shall try. I know it will be some long time. Miraculously, I got the shipment that was wandering the globe before my expectations and in my hands now a set of four infrared filters that need to be tested. I have some curious interest in the IR950, which supposedly has a threshold of 950nm; Such a high value for an infrared filter and I've been clicking around with it using high ISO (12,800) here and there. I might post these results later. But I need to go beyond that as well; I really need some scientific method to get a concrete idea of the capabilities of such filters, specially after being tricked with Tiffen's Hot Mirror before! All I can do so far is just click and test against known sources of IR like the sun and tungsten lights, as well as speedlites.
Seems I've been away from poetry for weeks now (again) but I do have these visits of some words which do not quite settle down in my head. I think I've been running with my pace in life lately specially with the end of my vacation, focusing on my camera work. I need to get back to that. I really don't know how to pass this summer, specially with no solid plans for traveling in the near future. Things are getting so narrow; So narrow that make me chest feel like crashing on its own, but as if nothing to be done. Sometimes, depression would not be clinical nor mere sadness, but simply feeling to be in the wrong time, in the wrong place, simply surrounded by stupidity. All I can do, then, is to keep myself amused, on my own…


Stock photography by Taher AlShemaly at Alamy

Thursday, November 9, 2017

Daruma!

Well, been a week or two (or were they three?) since I've made a blog post in either English or Arabic, but seems life got a new hobby right now, which is to put more stress on my way and laugh. I didn't do much with my projects with the camera, despite the fact that there are some ideas already circling around in my head, but  I just didn't get the chance, the time and the power to do them. On the other hand, my sleep deprivation doesn't help as well; since I try to compensate for all the tiresome time during the week on the weekend, at the time that I'm supposed to be working with my camera. Even that I'm not having enough of, since my weekends are quite noisy and annoying at home and I would spend it thinking of ways to escape it somehow and put my mind out of it.
I've done some "product" shooting for my nephew, but even that was kind of helpless and my inspiration was dim. I was trying to shoot against a black background unlike the previous times when I shot with white background, but working with black is quite challenging (and requires a lot of cleaning). Thus, I had to use excessive Photoshop powers here. But that's a different story for now. I'm going to list some of the few things that I've done so far…

Preaching

This is one idea I've envisioned for a while and in fact I've made these shots long ago. I tried to do it on my own but it was clear that this is not an option and I must do it with someone else, and of course, as usual, I picked my brother for the task to be a model.

Preacher I
Canon EF 50mm + B+W 092 IR, f/1.8,
250-1s, ISO100.
For the task, I thought that using my modified Canon EOS 7D would serve me well, which it did, but not the way I envisioned it. Typically, infrared shots would give out more contrast (depending on the lighting conditions of course). To my surprise later on though, the cloth did not remain black, but turned blue. I guess I didn't learn my lesson yet, as it is NOT the first time that such a thing happen. I should have forgotten about colors when I worked with infrared, because, they simply don't exist in infrared realm and it all depends on how much an object absorbs or reflects infrared. Thus, I guess this black cloth does reflect infrared; lot of it. Might not be a big deal when converting to B&W, but after all, the envisioned contrast can be disturbed and another route in processing the images should be taken.

Preacher II
Canon EF 50mm + B+W 092 IR, f/1.4,
250-1s, ISO100.
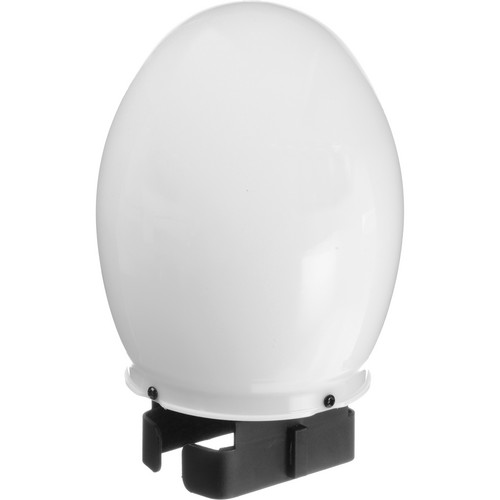
I've made several shots here, and all handheld and using LiveView on camera (not a good combination if you ask me). I needed the flexibility of framing, thus I dropped the tripod away, while the infrared filter (B+W 092) doesn't allow for inspecting through the viewfinder. Thus, I've found myself forced to do it that way. In lighting the scene, I've used a single speedlite (580EX II) with a bulb/oval diffuser which makes it act as a regular bulb somehow. My aim was to give a dramatic (close to low-key) look, thus I've used max shutter speed (sync speed that is, 1/250s). No cables here so moving to HSS mode was not an option.
Globe Diffuser
Source: B&H
In processing, noise always been an issue, even though I've used ISO 100. Some of the shots are out of focus and this is natural with handheld shots and using low f-stop such as f/1.4 and f/1.8. Thus, filtering our the images, my options were limited on which images I could process here. Eventually, I've found at least two of them; Preacher I and Preacher II. The reason for using such a low f-stop is the need to convey deceit and hidden motives, and thus keeping the dagger under the hand blurred and out of focus, while keeping the palm sharp as much as possible. At least, this is the theory I had in my head but applying was no easy task after all!

Selfies, Again

So, I took some time to shoot some selfies again using special filters, like infrared and UV-pass. It all started after a shaving session but then I continued the trend doing 3 main selfies using my main "surreal" filters: Infrared, UV, and H-Alpha. Stating that, H-alpha doesn't differ much from the infrared except that it allows more red. The infrared filter I used here though is the Kodak's gel filter with my fisheye lens (which has a threshold of around 1000nm).

Coconut Selfie!

The trigger to the series was this Coconut Selfie!, which I've decided to shoot right after shaving and dipping my face with coconut oil. I was aiming to find if there is any effect for the coconut oil on taking infrared shot. It was experimental really so there was no need to go hi-tech with it, so I've used the simple in-camera flash just to provide some infrared. The result? Well, not much really. The luster of the oil was barely visible and only with excessive sharpening to the image (and could be mistaken for digital noise as well).

UV Selfie
My second trial was with my UV-pass filter (B+W 403) with hot mirror on top to reduce the IR leak. Working with this filter had always been a hassle because of the nature of UV. I placed my 430EX II speedlite on camera just to provide some lighting but for sure this light source does not provide UV range. Using a wide aperture and a semi-manual lens here (Voigtländer 20mm) did not help that's why the selfie came out out of focus, and this is the best I could do. In this selfie though, I didn't try to dip my face in coconut oil or anything. It was a simple selfie. The good thing here is that my eyes are not glowing bright as it is the case with infrared shots which means, I suppose, that the hot mirror is doing a good job relatively for keeping most of the IR out. It seems brown eyes do reflect IR the most, but I'm not sure about other eyes colors. From simple inspection for portraits made with infrared filters online, it seems that brightly colored eyes like blue eyes do in fact absorb rather than reflect IR, and thus they become blackish in infrared shots. But this is only my suggestion I'm not sure what is going on out there really!

Daruma Selfie!

Daruma Doll
Source
The last selfie, is probably my favorite selfie in this series. I've called it the Daruma Selfie, after the well-known Japanese doll Daruma. This selfie was shot using the H-Alpha filter which actually acts like an infrared filter but with some surplus in the Red range. However, in processing this selfie, I've swapped the blue and green channels of the image, and that made the image greenish (with some white streaks in my hair). The funny looking billy is caused by the fact of using such wide angle lens (Voigtländer 20mm) at a close distance and slightly below my tummy level, and thus dimensions of objects near the lens are exaggerated (quite known trick in architecture interior photography). Again, no oil to be tested here, but still thinking of ways to use that in the future and maybe more creative selfies rather than boring ones like these.

Seachtain

"Seachtain" is the Irish for "Week." Seven days in the week, and seven images. All in Black and White. These were the rules of the little "game" which was posted on Facebook and I was tagged for the challenge. In addition to that, no shots of people, but only "stuff" from my daily life.
Despite the fact that I can hardly keep on such a challenge in a continuous way, but nevertheless, I've made it! I did take 7 images, one each day and to my own surprise, some of them are actually inspiring for me myself.

Day 1

Day 2

Day 3

Day 4

Day 5

Day 6

Day 7

Probably from all the seven, the last one does inspire me the most with its eerie atmosphere somehow. It inspires me to do something similar somehow in the near future, providing that I get a proper idea to work with.
The challenge is unique and despite its simplicity it did put some strain on my brain. I had to think fast (because my day is full of things to do and with a tired body that needs some rest). Also, since all these images were taken with my mobile (Huawei Mate 9) it made the process somehow easier. My phone shoots in RAW but all these shots were done in JPG right away and then were edited on PC or Laptop. Doing all that with a mobile made the process flow easier somehow. I think doing it with a regular DSLR would have put some major block on my way or achieving it. Some of these shots were even taken at my workplace when I had no DSLR available. The quick usage factor is quite essential here and it is the main thing that pushed me to do what I did. Even though the mobile has its own flash, but I've never used it, which is something to think about for a while; One has to think whether or not the ambient light serves well. This was quite obvious doing my product shots for my nephew with black background. At the end, I've found myself using the ambient light and stopping all my speedlites, despite the somewhat flat look.

Finale

Now, there are so much going through my mind but little time and little power to chase after all of that. It's a good thing that winter is here and temperatures are down. This gives me a relief somehow. Sleeping problems though still persist and as days pass by I'm dropping my interests in life further. Not sure where life is going to lead me, but I'm hoping of some stress relief to arrive soon. Wishes of travel must be postponed now despite the urge. I don't know where my destination would be still, but I need to do some passport issues first and then think of something - who knows, maybe Ireland for a 4th time? Who knows… I'll keep dreaming about many places I wish to visit for the time being, till that time comes.

Stock photography by Taher AlShemaly at Alamy