Showing posts with label artistic. Show all posts

Thursday, February 23, 2023

RP 2023…

Well, it's been such a cold weekend, or whole week actually, and I kind of feel something is wasted for not going out to shoot in such weather like in the old days. Alas, I have to accept the reality and satisfy myself with cozy warm room, long sleep as much as I can, and songs from the 1990s when something called "Romance" did exist, at least in songs.
It seems that I've already finished talking about my activities in December 2022, so I'm supposed to hop into what I've been up to lately in 2023, where I've done 3 strolls (sort of). However, since it is February, Retinitis Pigmentosa Awareness Month, I've decided to post about my single experiment (so far) to shoot something for this occasion. I'm not sure if I can shoot something else in this narrow time gap till the end of February but anyway it shouldn't be such a limitation in case any new ideas came about later on.

RP 2023

As usual, the beginning was hard. Ideas simply didn't come about however I tried. I've tried brainstorming using some websites to create random thoughts and hence random ideas in relation to the topic of Retinitis Pigmentosa, but all the trials just failed.
The idea (and only one so far, at the time of typing this) didn't come about till the family here wished to do some grilling outside!

Grilling Night

I shot Grilling Night from the balcony with my Huawei phone. It did take some considerable time to rectify the image as much as possible but I guess there are still some tilted lines in it. Anyway, this shot is not that important (though I really like it!), but it was about the beginning of the inspiration when I saw that sack of coal lying around. 

The black color just triggered many things inside my head, and not just in relation to my Retinitis Pigmentosa. Thus, I've set my aim to do something with that coal. Luckily, I do have an acrylic transparent board which I keep for such "photographic missions" whenever I need it. The initial thought was to take a picture of my eye, looking through the darkness, in a symbolic gesture for coping with the loss of peripheral vision. However, talking about it proved to be WAY easier than doing it. 
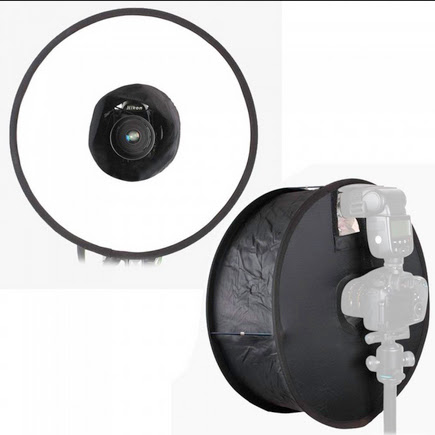
Roundflash Softbox

I decided first to work outside in the yard (the one seen in Grilling Night above) and it was just my luck that rains started to pour down on and off for about 3 days. To add more to my troubles, coal proved to be hard to break and I didn't have proper tools and preparations (gloves and towels and other stuff) to work. The least to say about the situation is that it was a miserable one! All these conditions, beside lacking the means to let the coal really stick to the acrylic board (I'm not ready to sacrifice it and I need to wash it afterward) - all of these issues made me realize that probably I should put "authenticity" aside and just do the whole thing as a graphic design, combining two images; one for the coal, and the other for my eye.

The other issue was with the lighting. In the beginning, I've wanted to use speedlites on the side of the coal to give out some texture but then changed my mind in order to work faster (because I'd need to make a setup for the speedlite on the side) and decided to use the Roundflash softbox which is something I didn't use in ages. It is ironic how it is now publicized as a "softbox"; When I got this item years ago, it was supposed to be a cheap macro photography solution, which proved to be an awkward claim and it was completely impractical for such a field. It is still impractical here in this situation too because of the size and the bulkiness, and using my 50mm lens made it hard to stabilize this whole item on the camera and speedlite (it requires a somewhat longer lens to fit in the middle). Anyway, with all these hurdles, this tool still had its nice effect on the eye when shooting portraiture.

The final coal layer on the acrylic board

Now, there was another problem for using this Roundflash to shoot the coal, and specifically directly from above almost at 90°, which didn't yield much details for the texture. I have to admit though at this moment I was reliant on my capabilities with editing RAW files and doing other tricks in Photoshop; Something that a photographer shouldn't just take for granted when working on projects because bad surprises are, well, abundant in that category of work. Anyhow, I've decided to shoot 10 images (actually didn't count them it was just random) and I was moving the coal pieces around the acrylic board to create some textures with the hope that one image from all of this mess would be the "one". Later on in Photoshop though, I've realized that I could stack all these images and merge them into one smart object and set a specific mode for stacking. After trying several ones, I've settled with median (and mean mode was also good). 

The eye layer

Now I though working with the Roundflash would be an easy task with the camera on the tripod but I was completely wrong; It was even more cumbersome than when the camera is handheld, because of the tripod legs which obstructed the Roundflash which had a somewhat large diameter. Anyway, I've managed to work with it anyhow despite the Roundflash not being completely straight and round. It was hard to shoot my own eye in that manner so I had to use the help of my brother to check the location of my head using the LiveView and also I had to use 12mm extension tube with the 50mm lens to get as close as possible to the lens. In fact, I was going to get even closer and use other tubes but as I got closer, it was hard for the Roundflash to light my eye, so I had to satisfy myself with this and rely, again, on post-processing to focus on the eye. I had also to use larger f-number (I think it was around f/13) to ensure the sharpness (or the depth of field that is).

Through The Darkness

I won't go through the post-processing mess to create Through The Darkness here, but probably you have noticed how the coal layer turned green-ish. It was even greener but I've reduced the saturation and I really wanted to turn it to black and gray, but seeing how the green helped a bit in giving a texture, and also kind of balances the red tones in the eye layer (which of course underwent many post-processing techniques), I've decided then to just let it be green but with lesser saturation (as it is supposed to be the "darkness"). There was some resizing involved as well to let the gap narrower, and to make things a bit "realistic" to some extent, I've decided to add a touch of shadow to the coal layer. 

With this, my work for the main image for RP 2023 had ended and so far, at the time of typing this, I didn't quite think of any more ideas to do regarding this topic. I might use these test images for other projects though; I think they'll be useful somehow in the future. The shot got "relatively" higher number of likes on IG which makes me somehow satisfied about the results even though my perfectionist side is still nagging deep inside of me for not doing things in-camera. 

Finale

Some storms are calming down, and I'm hoping not temporarily. My sleeping schedule had been screwed up again just like the sweet old times, where I stay awake all night and sleep most of the day. I guess it's just my natural defense against the hurdles of life and the way i seek quiet and calm atmosphere in this house.
I've left myself with the question "What's next?" but as usual, I can't find an answer to this question. People talk about traveling here and there but I really don't know how would they think about such a thing under the current crazy situation worldwide. One might say "just travel to near by countries to change scenery"; Easy said than done. This region is just out of question (and order) and I really would need a place to escape my reality, for a bit.

On the other hand, I'm still thinking as well about my next move with the camera and what ideas I might try work with. There are many old stuff crossing my mind at the moment (like finding a way to capture a 3D anaglyph video using DSLRs or phone cameras) but I do feel some kind of pressure for doing something concerning photography in the first place. So far, I've been out strolling and trying to capture images from the neighborhood and surrounding neighborhoods twice, and I might make it for a third and fourth time as well, but all I can do is to hope. In addition to that, I still have the issue of my Arabic blog which I didn't post anything in for months (already breaking my resolution so hard).

As for now, I think I'll just waste some of my days listening to some memories-sparking music from 1990s…


Thursday, October 7, 2021

+5…

Did I pass 2 weeks already without blogging? I guess! I really didn't count the days. I've been under pressure lately which made me unable to do much even with editing my old photos. The largest portion of this stress has passed (somewhat) already, but some deal of it remains still. More about that a bit later.
I don't think I will be posting much in this post except for an announcement, and as I go on, I might think of posting a bit further about some of my latest edits!

Announcement

I think I've mentioned in previous posts about new uploads to Mostphotos. So, here it is, I've uploaded about 3 new panoramas (plus 2, adding to 10 panoramas uploaded months back). So, the total right now is at 15 panoramas at large sizes, suitable for printing as fine art pieces. I think I didn't post much about these extra 5 panoramas, so I'll try to do so here right now. 


Failakan Sunset

Earlier (as in last month or before!) I've added Failakan Sunset  to Mostphotos (exclusively), and it is an old (half-way) panorama shot over a ramp, which is used to slide boats to the water, on Failaka island. It was taken in 2012. I say "half-way" here as it was not a full panorama, but merely 2 rows was shot, and the third one was not shot (probably because at that time it was getting pretty dark on this depopulated island). Originally done in HDR, but this time it is done with singles of RAW files; All edited and stitched. Of course the colors are edited here and in fact they caused me a problem because when merging layers the appearance of the image would change drastically. I had to re-work the colors after merging (and at 100% zoom to ensure the accuracy of the colors). At 300 dpi, the panorama is close to 102cm by 36cm. I think if I was to print this panorama I would print it on a glossy material, preferably metal. Just one must be careful about the reflections from light fixtures. 

Entry
(Slí Isteach)

Then I added Entry, or as I like to call it in Irish: Slí Isteach. This is a panorama shot in 2014 inside a little defensive tower in the remains of Aughnanure castle in Oughterard, Co. Galway. It was my 3rd time in Ireland, and my 2nd time in Aughnanure (the first being in 2009). Generally speaking, this projection is relatively new for this panorama. I did many projections and styles out of this panorama, but this is the first time I do a simple vertical one like this, and centering it at the door. At 300 dpi, this panorama is almost 33cm by 75cm. I had to crop quite a portion to balance the image here and remove unnecessary or incomplete details. I would consider printing this on glossy metal but one has to be careful with the lighting surrounding this; Otherwise it would turn just like a reflective mirror with such dark areas. If one would want to go safe with this one, matte never hurts anyone!

Solar Towers

Then, we have Solar Towers, which took me quite some time to put the keywording for, and I'm not sure why. I think I was passing through some "mind-boggling" phase or something. Anyway, I did the keywording after all and here it is. Of course this is an old panorama and it was done in HDR before but this time, like the rest in this series, it is stitched out of single RAW files. The projection here, though, is the new thing as I didn't do such a projection before out of this panorama specifically. I had some struggles of course with the tripod and its shadows (like in the original) and I had spent quite some time fixing it. At 300 dpi, the size is about 42cm by 76cm. I tend to think that glossy printing of this one would add to the vibrancy of the blue tones and adds more overall contrast.

Beyond Abzu

I rolled back in time and checked some of these winter adventures I did back in 2012, and found some worthy stuff (but with a great deal of post-processing work and fixing), such Beyond Abzu here. Beyond Abzu was one of my first night panoramas and I still remember that cold winter night when my feet got frozen by the cold water. As the processing went on, the general tint of the image got green and that inspired a sense of mystery in me, hence the name Abzu (also Apsu) which is the name of the primitive waters, supposedly, from which the world was created in Sumerian myths. In some way, the whole surrealism in this panorama was pointing to that meaning in my head so I gave it that name. At 300 dpi, the panorama is about 37cm by 85cm, and I would go with a glossy print for this one though I would fear for the level of noise here to be exaggerated. I worked on cleaning the noise moderately because there is a limit, after which details might disappear. However, this panorama still bear some dark aspect and dark areas might work as mirrors in glossy prints,specially metallic ones. But I would imagine it would be so vibrant if printed on metal!

Return to Nammu


Lastly, there is Return to Nammu which I consider like Part-2 of Beyond Abzu. In time, these two panoramas are not far off; Both were shot in the same winter, and both in January of that year. However, with Return to Nammu, the sky was a bit darker than in Beyond Abzu specifically because I shot this facing the sea and the moon and the city lights were relatively further away. This allowed for some star constellations to appear in the sky in the original shots and here I tried to process the panorama and clean the noise without touching the stars. Thus, they appear in the original panorama, despite being shot within the vicinity of the city, but only when zoomed in at 100%. Unlike Beyond Abzu though, this one looks quite colorful, and yet mysterious a bit because of the dark night element and the stars, and that moon that shines like a rising sun (but in the middle of the night!). At 300 dpi, the size is about 85cm by 38cm. Print-wise, I guess it would do good in glossy as well as matte. The green hue here, as I see it, would be a vibrant one on a glossy media, specially a metallic one. 

Well, this is for now 5 new uploads to my Mostphotos, which are exclusive to Mostphotos. The links are up there to visit the profile or the specific images, in case you are reading this and wish to get one of these.
My capabilities right now are not quite aligned to provide such printing services and shipping, so I let these images to be purchased on their own as big original files in JPEG format to be printed on whatever the client would like.

Finale

Well, probably I can't get on so much with this post but I believe the announcement above and the details mentioned are just about enough in length for this post; Let's not make it longer!
I am currently on a leave from work for 2 weeks but not for resting or fun, but rather for stress and tracking. After a long wait, I've finally received my "disability certificate" which took a bit more than 2 weeks actually, and finally I was ready to submit my request for a grant of medical retirement from my workplace. But things weren't easy as I hoped for; Suddenly, solving a problem 2 or 3 more problems would occur and some more responsibilities regarding my work are added to the mix, which made every single passing day count. As I'm typing these words, I've finally submitted my papers by email (after a little adventure in going to the new campus, my future workplace supposedly) and a recent phone call confirmed to me that my papers had been signed and ongoing in the process. I just hope the big part of this is over with just before my two-week leave ends. Bureaucracy is not in a friendly terms with my time.
For this reason, and because of all of that stress, I don't think I would be blogging on a regular basis, but surely I will try as much as I can, at least once every other week. Who knows, maybe by the next blog post here, I would be completely free…


Thursday, September 16, 2021

Linearity…

Well, I'm typing this a little bit late so I hope I can finish this post in time to be posted. Thus, I think I will keep it short.
Been some busy week(s) lately. Last week I was busy preparing an Arabic blog post explaining a technique that I've been using lately to make some linear art out of some of my images, and I think I'll talk about it here. On the other hand, my mood swings been severe lately as well as periods of fatigue. And, of course, work is there which occupied my time for nothing else but frustration as well as exhaustion from driving to and from the workplace.
All that made me postpone creating this post and I was almost going to skip the post for this week actually but I changed my mind then and thought: Well, maybe I can make it short with few samples of what images I've been editing lately.

Editing

I'm still not active much with my camera (ahem, planning to), but on the other side, as usual, I've been editing old photos. Recently, also, I've been using a technique that I've developed myself and I've used it in one of the images uploaded to Mostphotos, but I didn't do much about it back then. Now, though, I'm exploring more about it. This is exactly the same technique which my Arabic post for the last week was about. Anyway, since my Arabic blog is dedicated to beginners, I had to do it in details (with illustrations) there. Here, I guess, it would be enough just to say that the whole technique involves stacking images and changing their blends to Difference and then nudging each layer few pixels in a specific direction. This would create some sort of a colorful line-art. Of course, more editing is required to enhance the image.

The Shining Kisser

The Shining Kisser (Line art)

I'm still experimenting with this technique actually, and apparently not any image can produce such a neat result; So, one has to be picky about what to convert into linear art like this. Along the way, I'm already planning to do a collection of such images and upload it to the stocks and see if they attract something. Apparently my bubbles series which I've uploaded months ago is not doing much lying there *pout*.

One of the images that didn't work out well I guess with this technique

Anyway, beside all this editing, I'm trying to use my phone from time to time though it is limited in choices and techniques but it has some cool features that I would struggle to achieve with a DSLR camera (e.g. long exposures with trails); Thanks to the AI in these phones (and my phone is considered old by now: Huawei Mate 9). Despite that, though, when it comes to shooting RAW images, things can be a bit awkward. 

Birds and Bird
Processed from phone RAW

Shooting RAW on Huawei Mate 9 disables the capability of zooming. I think that proves that in other modes in the camera where zooming is allowed, it is all done digitally. There are apps to edit RAW on phone of course but, as always, I usually prefer editing those on my PC with ACR and then Photoshop. The lens being about 4mm or so in focal length and not changeable of course would require me to crop a lot sometimes. Of course there are accessories for such phones to change the focal length but they are not in my mind right now. I'm still not giving up on my DSLR! Besides, it is better to be creative as much as possible with whatever is available at hand.
Aside from these difficulties, it seems also that the dynamic range for such sensors is still quite low; At least in my case as I worked with Birds and Bird (and few images in the past). When working with the phone's RAW files on ACR, the choice of colors seem to be limited somehow and not vivid enough despite working, as usual, in ProPhoto color space. Anyway, away with the RAW capabilities of the phone, it is a good catch for some crazy ideas to be done in a whim, like the other day when I thought of doing a selfie at work while rotating the phone, and picked the long exposure/water trail option for that task. All editing was done in-camera.


Finale

I'm typing this blog post mostly at work. Despite the "vacuum" in this place, yet it stresses me out. I'm waiting for some official documents to be issued from the Agency of Special Needs here to specify, officially, what is the level of my handicap (i.e. Retinitis Pigmentosa and sight level). It's been 2 weeks already now and no news is coming over. Which means I must be going to check with them again. I need this paper so bad right now to get started with my retirement process. Every second I spend in this place is like a ticking bomb. With my more-experienced colleague out of the place, the load now is pretty heavy on my shoulders and I can't bear with it further. Needless to say, moving to the new campus which is further away from home and in an area which I've never been to before at all (with bad planned roads as I heard) makes my feelings about it even worse. I lay it all in God's hands.

With that, I'm already racing my mind through and thinking about the future and what I could be doing after I get my "rest" from all of this. I think I would have no excuses to work further with my camera! I must! That brings also some thoughts for conlangs that I've forgotten about already. On a side note, I'm getting some reasonable positive feedback from some readers about my own writings and poems on Writing.com, which kind of sparkles some ideas; Some of which have been delayed since 2020 actually. 

It all sounds but like pink-tinted dreams and views of life for the time being, but surely I'll be able to breathe once I'm over with that place. Or so I hope, and pray…

Thursday, September 2, 2021

Backies…

Hello! Here I am, posting again, after some break from blogging. Actually, this post is just a little announcement to tell that I'm still around and didn't forget completely about blogging, despite the lack of content really!

August had been such a busy month for me and still. To add more load to the mix, I'm officially back to work now (with all the rush-hour jams and those nasty stuff). However, I've been taking my first steps in recognizing my disability with Retinitis Pigmentosa; Meaning, I will be given the "special needs" (or "disabled" if you will) status in an official way and in return I'll be given some "small" advantages here and there (like a special permit to park my car in special needs/disability parking lot vacancy). However, the far-fetched goal is to get a "medical retirement" if possible.
The whole story is just still at its beginnings and I'm already having some problems or glitches in the system because of the paperwork and the messy job done by some in such governmental agencies. From my side, I've done all the required tests so far and I'm just waiting for the final decree in my case by some committees (and all that related jargon). I'm living in somewhat strange status, where I feel pressed and relieved at same time. I just hope these people don't make it harder for me to get that certificate and getting my retirement ASAP. Worrying is inevitable here and I just wish that I could blink and all is over with. 

Photo Work

Aside the paperwork that I've just mentioned, not much has been done photo-wise except for editing some old photos. However, I did indeed re-create some new panoramas from old ones as I was planning to be adding them to my Mostphotos exclusively, as large files to be downloaded and printed. As I'm typing this, I've already uploaded 2 more, and 3 more are waiting to be keyworded to be uploaded, but I'm having some hard time in creating keywords for these panoramas, and to focus in general. My brain feels fuzzy and blank. 

Failakan Sunset

Entry
In editing old photos, I've been revisiting old folders, as far back as 2011 (and even 2009) and been trying some new tricks on these old photos, specially those that were never touched because I deemed them useless (and this is one more reason to not delete bad photos). In the process, I've kind of "invented" some technique or style I would say for creating a linear art out of the photo. I'm also considering writing a blog post in Arabic for my Arabic blog about this technique specifically.
I liked the style of these images actually and I'm considering also doing a series of photos (or even taking new photos for this purpose) all to be in such linear art form and upload them to the stocks. Just an idea so far and if I would go ahead with it, I might consider mainly photos of fishes or plants. I think this technique is also suitable to create some of these "coloring book"-styled images.

The Shining Kisser (linear)
A sample of such art

Anyway, all of that is going on at the back of my head at the moment since I'm busy with other things specially with me going back to work right now. My mind is totally blank that I'm out of new ideas to shoot with my camera, and I didn't touch it in months right now. In order to get my fingers cracking with it, I've tried to shoot my 8-month old nephew in the house (it was also some practice for using the back-focus button, but seems this method is not in my favor for the time being).

Finale

So, this is a quick coming-back post. Without much fuss for the time being! I think I need to check previous posts to see where did I stop with photos, or maybe I'll start something completely new away from that series of posts.I'm not sure yet. Meanwhile, I need to prepare for that Arabic post for my Arabic blog, so I'm not sure I will be able to prepare a post for the week after the next. But I will try.
On the other hand, the weather here is miserable (i.e. normal) and I just can't wait for winter to be here, or at least fall (if such thing exists here). In the past few days I had to run errands, coming and going with my sister, under such sun, and such hell. Also most of the days in the past week were humid that it feels like drinking water just by going outside; And it's NOT a cold one.
As my brain is wandering off with ideas and images of what would happen next as I'm going through my plans for retirement, as well as Retinitis Pigmentosa itself, I'm trying hard to keep my feet firm into reality with this mundane day-to-day life. Other matters are also occupying my mind and take space, and it feels like my head will explode any moment now. But all in all, I'm trying my best to keep calm (and that makes me tired all the time really).
So, as for the camera work, I'm waiting for winter as I'm thinking of doing something at night like in the old days. These ideas were ignited when I started looking at some of my old panoramas from the seaside and I noticed how the stars did actually show clearly in the night sky in that panorama despite the high ISO and the noise, but they are there (and I will upload it soon to Mostphotos after keywording). This time, though, my plans involve using the modified camera to capture the seascape at night and not a full panorama. I wish though. We'll see about that when winter comes. For the time being, there are things that are just about enough to keep me worrying… and they are doing such a great job.

Thursday, November 5, 2020

Unconventional II

With the sudden surge of such a busy schedule and load of work, I don't know if I'm going to post this in time, but here I am trying. I'll to make it short as much as possible. Well, kind of. I want to continue a bit about my last blog post and the "unconventional" trend and then move to something that I thought I'd leave for now but curiosity got the best out of me and I think, just think, that I've made a breakthrough!

Unconventional II

After posting my previous post here with the "unconventional" representations of photos, my appetite for collages, or let's say, "unconventional" art was ignited a bit. The field of work, of course, was the yard again where most of my inspirations are drawn. I also prefer to work during the daytime to have a faster shutter speed; The night view of the yard is also awesome but at such time I'm usually lazy and tired. Also, at some point, as I'll go through some images, there would be a need for speedlites (and all are packed and in need to be installed!).

3 Suns 1 Wall

Benro MP-96
My monopod
My first trial was with the wall in the yard (facade) which I think I've posted a panorama of at some time previously in this blog. I'm just so happy that the swimming pool had been removed so I could move easily here! Anyway, to make things systematic as much as possible, I've used here my monopod with 3 tiny legs and at a low level, and of course, with a fisheye lens on camera (my beloved Rokinon 8mm). The shoot went on for HDR, and HDR did I tone-map, and tone-mapped images did I blend together to make 3 Suns 1 Wall. I had to save the main file as PSB since it did exceed 2GB in size.
The shooting ran relatively smooth, but I had to squat a lot to minimize my shadow in the scene and also to drag the monopod on the ground slowly (taking the lines between the tiles as a guide and a measure). The plan was not to make a panorama-like image but a collage. However, I've found myself drifting in that direction for no reason (yes, really), and blending the images that way did help with eliminating my shadows. The image above still has errors because shooting in such a lens do distort the perspective a lot, and it's hard to make ends meet. Anyway, it was a lengthy work and such a worthwhile experiment despite the "stitching" or blending errors. 

إِرْثُ آدَم (Adam's heritage)

However, the real trial was not for that wall, but for the side wall which extends along a narrow corridor leading to the side door into the house and another one into the kitchen. This long wall is the most greenish and it's longer, and it was my target in the first place before shooting the other wall with the window. The narrow place made it hard to move (with delicate movements) to stabilize the camera's direction as much as possible. All in all, squatting and dragging the monopod across the tiled floor in a straight line as much as possible for the two session provided a good exercise (and pain for days!). I remember working for about 2 days or so placing the shots; I tried to do my best to seek balance between systematic and chaotic placement for the shots in their positions together, or if I want to rephrase that, to make the collage random yet reflecting a full wide image. Also, with tone-mapping the HDR slides, I've tried to make the images look sunny, warm, tropical somehow; All that in purpose.
To add somewhat a 3D sense also, I've picked some specific shots and moved them the stack and used the layer effects options to drop shadows. That way some slides are supposed to appear "floating". 

The Grand Mulukhiyyah
I do like how Adam's Heritage turned out. It was saved as PNG of course with transparent background (and it should appear as such here I suppose). Some places like Facebook would still fill the space with white and apparently the image, being PNG, converted to some sort of JPG when posted. Anyway, this was not the end of the story with collages and composite images, as there was something even "bigger". This is what I called The Grand Mulukhiyyah. Well, in case you didn't know, mulukhiyyah [ملوخية] is the Arabic name for Jute (or Mellow jute?).
The shooting of this "stack" was done using 50mm lens this time at f/2.8 and quite randomly (handheld). I was just holding the camera tight to my eye and following the main stem of the plant (from the bottom of the pot) and going along the branches and then back to the main stem and up a little and then along another branch and so on, until reaching the top.
Processing this set of images came on stages, with editing the RAW files (collectively, copying settings from a single image to all). Maybe some images in this set did not appear "correct" per se (e.g. the pot at the base because it's too dark) but nevertheless it was a surreal job to be done.
The next step was to minimize the over all size of the frames or images to something around 1000 pixels in width. However, I had to pull back and restart again when I realized that the final result would not produce a big body of an image. The size is kind of important for me here to have more control over the final result. Also, I've realized that manually placing the pieces like a jigsaw puzzle was NOT a good idea, so I've sought help from Photoshop's Align option, using Relocation method (using the Auto mode did produce distortions that I didn't like). Anyway, it was apparent that I do need to work with the original files with no resizing, so I'm back again to working with PSB files, with a range of sizes between 2-4GB! In order to make some "illusion" of depth or 3D, I've applied white frames on the slides and applied shadows to some (or all?) of them.

The Grand RGB Mulukhiyyah
This did not end here though as my juices were still flowing and I hated to end the adventures just at putting some photos (33 of them) together. I started to divide the stack into 3 groups, and assigning a color from the RGB palette to each group. I've called it The Grand RGB Mulukhiyyah - well, a name fitting the funky looks I guess; And there is more to come by the way. With this method of coloring the slides, it seems there was no need for white frames to visually separate the slides, so I've removed them. Also, the red tones were too saturated (working with ProPhoto color space mainly) so I did a little tweak of Hue/Saturation to the whole image. Looking at this image through the anaglyph glasses almost gave me a headache! Don't do it!
Again, things didn't stop here. I decided to do something I didn't do before "at all". And that is: Working in CMYK instead of RGB.
The Grand CMYK Mulukhiyyah
I don't have much experience with this system (if any) but I do know that it is the common system in use in presses for mass production. Besides, there were many options in Photoshop for such a system to convert to! I picked one which seemed to be the "default" in Photoshop, and I don't know what the heck does that mean or how it is different from the others (the one I picked says US, while there are others related to Europe and Japan). It was a complete dilemma to me. Anyway, I did it.
In this instance, and because CMYK, apparently, is composed of 4 rather than 3 channels, I've had to group the slides into 4 stacks instead of 3, and assign each stack a color from the set of CMYK. Thinking about it, I probably was able to do this within RGB system but it would be a lengthy process somewhat. My method for assigning colors to the whole stack or group is by controlling the channels of the group (via Group Properties) where I turn off all channels save but one.
Now, there is a minor setback and that is, images cannot be saved as PNG when in CMYK system, so a conversion back to RGB must be done. I won't go into details here but there are certain options must be activated to ensure that the looks of the image won't change when the image is converted.
Personally, I do like the CMYK rendering more than the RGB, and who knows, I might do more of such "art" in the future. It is just colorful and more vibrant as I see it more than RGB is. Also, I might try to discover other systems, if possible! But for the time being, I've been busy with many things (work, home, other photo ideas). So, I'm not sure when to try this idea out.

Finale

Well, it seems that the post had gone longer than I anticipated already so I will keep the other part, about panoramas, for a later time. Hopefully in 2 weeks time from now. There had been some images also that had been marked as "inspirational" on YouPic, but I think I will keep them in time (and one of them would be in the next post hopefully). I'm now 3 images short of completing my next set of 10 inspirational images. If that happens at any time now, I will be preparing a special post about these 10.

I've been going through some busy times (though at home) lately and some upheaval combined with mood swings as usual. It is as if I'm hitting a new ebb every few days. On the darker brighter side (as ironic as it sounds), I was able to compose a poem after some long time of dormancy. No need to post the poem here, but in case one is interested in reading it, it can be found here. I've called it Lion's Heart. When I read it, again and again, I do somehow find it hard myself to follow my emotions through it, as if I cannot connect with my emotions with which it had been written. All I'm sure of is that it was written at a time of a severe mood swing that made me otherwise stunned and paralyzed except for writing this poem. Now, how many mood swings do I have to endure to write another poem? God only knows.

As a direction, I don't know where am I heading with my camera, or with my life as a whole anyway. Trying to take each day as it is and trying to think of a new project that I can bear with, with my camera. There is no lack of ideas in fact, but a lack of power and will from my side to just get moving. Probably I'm better just sitting behind a desk and do the ordinary office job? After all, this is how I did make some money to get what I have right now of gear (though it's pretty old right now compared to the new stuff coming to the market).
Thoughts, thoughts, thoughts... and all my mission is, every single day, is to fight back and stop them as much as I can…


Thursday, December 22, 2016

Painterly…

Winter is getting colder, that sort of thing I would call good news! Meanwhile, I'm trying to get involved more into my thoughts and myself, and my experiments; as it seems the only thing I'm good at currently, with the lack of go-outs to snap some pictures, or even working indoors. I guess I can say I'm investing more time into my thoughts rather than my work with the camera. In hope these thoughts will deliver me somewhere.

Escherism

Well, I've been interested in the art of this man long time before I even adapt myself to photography. I've been reading about him recently to see if I can get any clue to get me further with my experiments with the camera, and I was somewhat happy to see that he got his biggest spark of inspiration from the tessellations of the Moorish architecture in Spain. The aspect of tessellations is something I'm considering, specially after some experiments with some of my panoramas.

Which way did they go?

Probably my first successful trial with this trend of surrealism (which I like to call Escherism) was with a panorama from Aughnanure Castle, specifically from inside the small tower; a panorama done in my 2014 visit. Since a panorama is a merge of several images, what about merging several panoramas? Does that it make it a hyperpanorama? Anyway, I had this idea for a long time and my aim was actually to expand on the edges of a regular spherical (equirectangular) panorama, because these edges (zenith and nadir specifically) are usually compressed and so distorted. Thus, my trial was to expand on these edges and fix this distortion to have a normal view WITH a equirectangular panorama of 360x180 view.

Surreal Jabreen


In the beginning, merging was hard to do, since PTGui nor Photoshop were useful in this kind of process. Thus, things had to be done manually. Since it would be a manual work, I had to program myself and my workflow, and in return I've generated a workflow in forming these panorama of various projections. So far, only the spherical (equirectangular) projection is adequate for such a process, but I'm trying to experiment more. I've done experiments already in the field of Mercator projection, which was a lengthy process and a hard task while the end result was quite a shock! But well, some people liked it after all (on instagram); seems surrealism got an audience far more than I thought it would.

Let's talk Dadaism.
Using Mercator projection. The whole scene rendered incomprehensible it seems.


On the list of projection styles is, of course, the planet projection and maybe the circular. Not expecting much out of those, since the distortion is high, but it might be a plausible surreal work. Doing a single surreal work like this would require stitching 7 to 25 panoramas! Thus, my work so far is on a small scale (not exceeding 2000 pixels wide under best conditions), and all are in JPEG format; nothing in HDR like I usually like to do with my regular panoramas. However, for some technical issues, I might have to stitch small HDR slides and tone-map all the set with the same settings before working on merging them in Photoshop.

Methodology

I'll explain here the method (or some of it) which I've used to generate the images above. As I've stated above, I needed from 7 up to 25 panoramas, but I believe 7 is quite enough. To organize my thoughts on the order of the images, I've assigned coordinated points to each panorama and literally name each to its position (using the Cartesian system, i.e. X and Y) in relation to the center (0,0) point, and typically this point is given to the zenith (i.e. the panorama is centered around the zenith point, with 90 as a pitch value). Of course this is just my reference point; any point of view of the panorama could be used as a (0,0) point.

Imaginary points for organizing and setting order to stitched
panorama of different pitches and yaws.


With assigning that point and forward, the yaw value defines the "X" value, while the pitch defines the "Y" value. Of course these values are in degrees, and I thought that the value of 45° is just suitable for the rotations in pitch direction (i.e. vertical or "Y" values). This means, each 45° is a single unit. For example: starting from the (0,0) view (and after stitching the panorama at this view point), raising the pitch to 45°, that means arriving at (0,1), while raising it for another 45°, or going directly from pitch "0" to "90°" right away, thus the point would be (0,2); while doing in the negative direction, like -45° means going down to (0,-1) and so on. Same concept is applied to the yaw value but with the yaw it is the "X" axis which changes: going 45° in yaw would be (1,0), while -45° in yaw is (-1,0).
It is important to track the process and always turn back to the (0,0) point after few changes in yaw or pitch. I've made many wrong stitches at the wrong angles. This is one reason that I prefer to assign the (0,0) or center point to the zenith view since it is easier to recognize. Also, I started saving the stitched panorama with names reflecting their positions on the grid accordingly. Working with few panoramas right now, it seems that not all points are really required; mostly 15 stitched panoramas would be needed, from (X:-2,0,2) and (Y:-2,-1,0,1,2) mostly. Working with other projections, however, would require more, like in Let's Talk Dadaism above, which was rendered with Mercator projection, yet the scene is not pretty clear because of the distortion. Some people liked it that way though!
I've stated before that I blend these panoramas manually, but in fact it's semi-manual process, where I have to place the slides manually and overlap them over each other at specific points, and then use Photoshop's Auto-Blend Layer... command with Panorama and Seamless options on. Thus, the blending process is sort of random but turns fine with panoramas being in spherical projection (since distortion is far less than in other styles).

Kubismus

Been awhile now for me being interested in some of the artistic movements of the past (and which still exist and followed I presume). One of these movements is Cubism without doubt. It is considered one of the cornerstones of arts in the 20th century. I loved the idea and wanted to investigate how that is applicable (if it is) to photography. To my surprise, I've figured that one of the ideas I had in mind (but didn't achieve yet) was actually one form of cubism, namely shooting several shots of the same object at slightly different angles or distances and making a collage of them; some photographers did that already even back on film days! Well, maybe not new idea, but I was still going to try it when I get the time (and subject) to.

Cubic Selfie
Up until finding the good subject and the time, I've decided to edit and retouch some photos for a trial into cubism. I guess my favorite target was my selfie from 2015 (an infrared shot with a regular camera). The process was simple: open the image, copy the image into another window (or file) and make it small, then copy specific details from the large image onto the small image, with some addition of some details later (like shadows). Some people stated that it looks 3D-ish, and this is an important remark, because sometimes, all you need is just add a shadow to your work and you are at the steps of a 3D image!
Generally speaking, cubism is supposed to be about "neglecting" the perspective and considerations for light and shadow and simply capturing the essence of the subject, thus adding a shadow here does not "go under" the umbrella of cubism I suppose! But maybe things are different when it comes to photography and the way that a camera work; hope that point would plead to forgive my shadow addition when editing this.

Cubic Corrib

Things evolved a bit later, specially after discovering a set of photos from my 2009 visit to Ireland (my first) where I've shot several photos at different zooming levels for the lake and the boat. Thus, I've started taking details from the other images and paste them onto the first photo (with least zoom level). In addition, I've started adding more effects to the squares (cubes) like bevel effect, trying to approach some good level of a cube-like shape. Significant details here were scarce somehow, thus I had to tear down the basic image further into few squares to fill empty spaces. To me, Cubic Corrib is still not as much interesting as Cubic Selfie despite the effects put into it.


Cubic Pjazza

It is natural of course to think of panoramas and the cubic art, but instead of following the usual steps with the other regular shots, I've sliced panoramas and fit them into a cube (while making front layers transparent). The Cubic Pjazza cube was just an experiment. The main problem is not being able to show the inside or the back of the cube and lowering the opacity (by 50%) of the front layers (mainly front, right, and top layers) seems not quite a plausible solution since much details are somewhat lost. The next step was, of course, a hypercube!

Kylemore Tesseract

Again, we have a problem of opacity and unclear details, but further more there is a significant problem of filling the space between the two cubes (which are supposed to be planes connecting the two cubes, hence raising the dimension level). In Kylemore Tesseract not all the space is filled, but only the vertical planes connecting the corners of the inner and outer cubes. To add, I'm not sure how (or rather with what) to connect these 2 cubes: what kind of slides I should use? This thing is still in experimenting phase, but I do really think of making the experiment physical somehow by printing or creating models out of these panoramas (in slides), and try to put them together.
A funny coincidence occurred as I was working with these hypercube experiments, which seems to me that I've created my first Impossible Object!

Optika

It occurred to me as I was assembling a cube made out a panorama shot in Sultan Qaboos Grand Mosque in Muscat, Oman, in October last year. The bluish tint in Optika is generally caused by a shift in the color space but I kept it without fixing. Creating this by coincidence makes me consider photographic opportunities in the future. Not only that, but also considering other shapes and trends, like triangles and their properties, and, of course, circles as well.

Finale

It seems my brain is chasing its tail right now, specially with me dipping myself into math by the nose. Deep inside, the need for a vacation is increasing even further. All this indulgence in arts and math seems to be nothing but a trial to neglect myself and whatever tires my mind. In hope of creating something beautiful, though.
There are more ideas and even more sources of inspiration (from Sabah Fakhri as usual and even others - mainly Arabic songs and singers). I don't want to give excuses to myself, but having a quiet home and a good space to work in are now pretty much essential parts of having an easy flow of thoughts and work, yet, I'm lacking these two aspects which makes me reluctant and must think about every movement I do to move my camera gear here and there, beside the accessories. I guess I have to seriously start noting down any ideas that pass my mind, otherwise I will be at loss. Many of these ideas would require having a model as I can't (or rather it's advisable not to) be the model myself and the photographer in the same time. And of course, more props and accessories needed.
My next step in this life, so far, is to take each day as it is and suppressing, hard, my panic attacks and the fear for tomorrow. For in God I trust…


Stock photography by Taher AlShemaly at Alamy

Thursday, March 29, 2012

Mawahb 2...

Phew! What a week! Long and exhaustive but I've made it through finally. Thursday to Sunday, I was attending my booth (with my sister) for our crafts in Photography (me) and in knitting works (hers).
Despite the fact that I didn't sell a thing and I've realized that people look somehow cheap at what I do, but I've made some contacts and socialized a bit, and made some notifications (mental ones) about some printing aspects. It is all about learning.
There were amazing people with amazing talents in many fields. However, my focus was on photography and printing. Moreover, I'm trying to make plans for the future from what I gained and saw in the expo.


My humble booth

Because of the time limits and because of my lack of experience for such events, I didn't really become a match for the beautiful booths in the expo. Anyway, I think my biggest mistake was to choose a booth opened from two sides, which made my place like a tunnel of people coming in and out!

The Booths


In 4 days, I got to know some amazing people in this expo. I picked my camera and roamed the expo and catching snap shots. In fact, it was somehow a good experiment with my snapping skills (i.e. fast-rhyme photography if I can say), and some high-iso shots too. I like to greet them all, and I beg pardon from those whom I didn't get the chance to take a photo of their booths. يعطيكم ألف عافية شباب.
Here are the booths that I had the chance to photograph in alphabetical order:

A Touch
A florist with a gentle touch. I got intoxicated with the fine aroma in this booth!

Abdullah Jery Photography
Pioneering in HDR and printing. I really loved the optical keyboard there!

Al-Arbash Designer
Absolutely magnificent. I simply fell in love with the architectural designs he does.

Antiques
A corner that stole my heart away. Not only because I love antiques too, but also it is all about the history of my dear homeland. Snap shots will follow later!


BOFA
The booth that made all the action in the expo with disguises and make-up. Snap shots will follow later!

BPF - Bahaa Photo Friends
My teacher's booth and his group. My teacher is giving his back to the camera under the arrow (if you can see it!). Some more snap shots later!

Breezes
Amazing action/portrait photographer. She pushed my confidence further when it comes to printing with noise grains. Some of her photos are so nice and you won't notice the ISO1000 noise until you approach the print at 30 cm or less!

Casual IT
I think she didn't take the address of this blog! Oh well, good luck!

CG ARTS
A corner I loved so much too, with all the fantasy characters and sketches in it. I can imagine future games productions!

Creativity Photography and Design
Fancy wallpaper and photos with cool contrast. Good luck guys!

DCStudio
Pioneers in printing methods. I need to check their place often in the near future!

Extended Galaxy
My far neighbor. Amazing work; all done with spray paints only!

Fatma Al-Refaee
Nice photography and cool abstract shots. Opened my eyes with a new printing technique; the acrylic. Some of her photos are printed on a sheet of acrylic and lighted from behind. I'll try to investigate more on this technique!

Fatma Thuwaini
Provided me with lot of information about her techniques with the flashes and printing. Thanks a lot!

Focus
My immediate neighbor and one of the first booths to photograph. Gentle touch and also provided me with printing information. Thanks again!

Gina Arts
Quiet corner with huge artistic talent!

Hanan's Photos
Another gentle touch and some more information on printing methods and some techniques as well. Thanks!

Hawra' Boshehri
My immediate neighbor. She had her share of annoying people! We had some long discussions about arts and the mentality of people in general, and of those visiting the expo!

Hussain Dashti
An organizer and, then I've discovered, an artist too. Thanks for all the efforts!

Jaberna
A volunteering community composed, as I believe, mainly from people of special needs. The group is dedicated to the name of the late Amir of Kuwait, Sheik Jaber Al-Ahmad Al-Subah. They made me write a dedication and sign as well. Good luck guys and always forward!

J&L Photography
Great photos, specially those in Black and White that I thought they were sketches first. The contrast in the images was astonishing!

Khaled Al-Sayegh
Fashion, arts, and energy prospects; all combined in one booth here!

Kuwait Creative Society for Culture & Arts for The Disabled
Pioneering group advocating people of special needs and their arts.

Modern Touch
A fellow student with me in my previous class with Mr Bahaa. The decorations and products are all made within a family circle as it seems. I loved the decoration and did take a simple panorama of the place for stitching (see below).

My World by Nouf Al-Khamees
Quite surprised me with her shells collection and also her unique artistic talent. She did combine photography with a touch of decoration making a 3D effect out of simple shots. Also provided me with some information about new locations of probable inspirations, for the future. Thanks!

Q8 Long Exposure
The name says it all. One of my favorites. I've been fond of long exposures for some time and this is just what I needed to see!

Q8 Old Cars Team
Yes, this car was inside, but the team has a wide set of cars parked outside as well, and gracefully they allowed me to take photographs of them. Snaps will follow later!


Raffaello
Amazing sketches of different styles. Simply, great catch!

Rasha Photo
Another fellow photographer. I did like a collection of some old photography tools in the booth!

Snapshots
Although I didn't meet the owner personally, but had a permission from her relative, yet it looks promising indeed. Some nice saturation and contrasts there!

Sophie
Meet the creator of one of the most devastating piece in the expo! I can say, with all confidence, that every one passing by the booth thought that it is a photograph, but the fact is, it is a painting (and I guess she told me a pastel painting). She did not offer them for sale despite the many offers she received. Excellent job, excellent attitude!

Unique Art
When photography meets fashion, it is not always about a model and cameras around!


Yousef Al-Muhanna Photography and Ali-Media.com
One long booth that combined two dear items to my heart: Nice Photography, and unique Arabic calligraphy!

Zahra Naseeb
Together we share the artistic thoughts and our view of the beauty that lies within destroyed places and devastated atmosphere. Unfortunately, she had to put up with so much stress and pressure from comments coming from people who did not understand her style and didn't give a chance for her to explain, thinking that she is following some Gothic-like thoughts. It is a usual matter for any artist I guess. Also, she is a matron of iPhone photography!
Her booth was a subject for a panorama too (see below).

Snapshots


Around the expo there were some special moments and some special "tasks" that I had to do. Ideas sprung up as I roamed the hall. However, the earliest form of snapshots were taken outside, with the old cars parked and shown in front of the hall entrance. Luckily, the sun served me and my mind, immediately, went on designing how this can serve me with some HDR scenery.

I. Cars:

The HDR tone-mapping done here was extreme. I'm not constrained with limitations of submissions to the websites who require "regular" images, thus it was a chance to let it out and speak in HDR-ish.


As you can see, all the shots were taken with a fisheye lens (Rokinon 8mm), which I think plays well in such atmosphere, and thanks to the sun and the hazy weather that day!
The funny thing is, the team forgot to print out a business card for themselves, like me! However, I've been given lot of information and you can reach them if you like at: www.q8oc.net .

II. Antiques:

As I said before, this Antiques corner was a lovely one, and I couldn't hold myself from capturing more shots from the inside!

General view of the booth with many old stuff, even old Pepsi cans!

Mirwás. I just love the sound it makes.

Old American Kodak camera and... something beside it...

Old German Loewe radio.

III. Stage:

The stage, and continuously for 4 days, was full of activities at the evening shift. However, because I was busy roaming the hall and checking on the booths, I didn't get the chance to take some photos for some of the performers till it was the 3rd day. Compared to the lens that I saw by my teacher's (Mr Bahaa) hands, my lens (tamron 77-300 and x2 teleconveter) was merely a toy. It was an experiment however, and made me shape some ideas about the usage of the flash with relatively high shutter speeds (and also high ISO). 


Another Phil Collins?

The images generally suffered from severe chromatic aberration. Seems that the teleconverter makes the effect severer and even harder to remove. A major problem as well was using the manual focusing all the time since the autofocus function is slow with this lens combination. I think I got extra muscles in my fingers that day!

IV. BOFA:

The life inside the expo was alive with visitors, and also exchanged visits between booth owners, but one main factor for this liveliness comes from BOFA, and her make-up and costumes.

Yeah. That was fun.

I remember he asked if he looked pretty. I answered with... "yes"...

Mario... without his mushrooms. My flash froze his movement.

Who's that?

Many fun times with these guys, even though they had such horrific costumes, but their ideas were revolutionary relative to the typical idea of an expo!

Thanks for all the fun guys!


Panoramas


The atmosphere was a busy one, and even, at times, busy with boredom. However, I guess everyone knows right now my love for the panoramas and the geometrical shapes that can be achieved from panoramas. Thus, I didn't like the idea of passing 4 days in such a place without doing something about it.
My first attack, was my teacher's booth. After gaining permission, I've came to the place as early as possible and started settling down with my tools for shooting.

BPF Booth from inside

The shoot went on with a single bracket (i.e. no HDR attended). I've done some simple metering on some white and black surfaces and then finally settled the exposure manually to about 1 second or more a bit. Before settling down with my tools I trained my eyes a little bit on the surfaces by standing in the middle of the booth and looking around in a circle and also going up and down with my body. I was trying to see how reflective the glossy prints might be. I was aiming at shooting a low-level panorama thinking it would be more interesting in looks, but I realized that at a low angle (less than 1 meter above the ground), the glossy prints will reflect too much light and shine, leaving the original image printed on them incomprehensible. For this reason, I neglected this idea and raised the camera more than one meter above the ground.
Frankly, I was afraid that the after-all look won't be nice and the exposure will be screwed up in some places, but I got away with a simple and well lightened panorama. Later on, Mr Bahaa asked for this panorama in a larger size with my name on it for future brochures or publications, thus I've made him a 20K pixels wide version of the same panorama, in TIFF 16-bit, with a simple QTVR (without zenith and nadir points because I didn't include them originally). The original TIFF file almost measured up to 1 GB.

Another panorama for the same booth was done manually for the outer wall. It was a simple handheld panorama done at around 20mm focal length, and it was done in a haste and at high ISO (400 if I remember correctly)...

BPF booth from outside

The lack of concentration at that moment made me lose the right hand side of the panorama. Unfortunately, I didn't realize this fact until I've came to prepare the images for this blog later. However, it was a panorama done in a haste and fast rhythm. Only 3 shots in landscape orientation, and done handheld.

The other interesting location for me was the first booth, Zahra Naseeb. What attracted me is the solid black wallpaper (with fine lines) and the location itself relative to the whole. Also, the lack of any decorations in the middle of the booth, made it an easy target for such a panorama.

Zahra Naseeb's Booth

The stitch here was made in a haste for this blog. The extra space was cropped showing only the booth itself. However, there is a problem with the central point which made the cropping process uneven. I think it is one of these panoramas where you HAVE to specify a vertical control point to adjust the orientation of the whole panorama properly and straighten the panorama vertically. 
The panorama was done in 3 rows and without zenith and nadir, just like with BPF booth, but I've realized that I might, later on, have a severe problem with the highlights because of the harsh lighting and the small space of the booth itself. Thus, the whole shooting was done in HDR brackets and tone-mapped manually in Photoshop instead of Photomatix, because I wanted to give a natural look as much as possible. The panorama is stitched in Mercator projection because it yielded a better, and not-so-flat, view of the booth itself.

The last of the panoramas was for the Modern Touch booth. This small panorama done in 3 rows but without a wide horizontal range, with around 5 angles only per row.

Modern Touch booth

The idea initially was to shoot the booth from the inside, but with the logo on the floor I've changed my mind and decided to shoot from the outside. This in fact even made it easier for me and less of a work. Metering the walls of the booth and the light areas on the items showed a wide gap, so I decided to resolve the matter with HDR shooting again. Also, the tone-mapping was done manually with some adjustment layers to fix some color casts.
The projection style here is Mercator as well but other projection styles were interesting too, specially the straight or "rectangular" projection which made the booth look flat with great depth, but unfortunately the title on the top would be severely blurred because of the stretches on the edges by this type of projection. I will experiment some more with these panoramas in the near future hopefully.

Contacts


As I said before, I've met lot of people and exchanged contacts with a lot of people. Unfortunately, I didn't a card for my own use, but I've collected some cards. Maybe posting the cards here would be beneficial for other people to connect and sort things together. With all the talents I've seen in the expo, I can say that we can do a lot; more than we have imagined even...

Contacts
Click to enlarge.

As for me now, it is time to have some rest and plan ahead. New ideas came to my mind and probably new ideas for marketing or so. But my mind is still tired for all the work done so far in these 4 days of the expo.
I would like to thank everyone who shared the information they got with me, and everyone reading through this blog at the moment and I hope you enjoyed this ride for the time being, and hope you will enjoy the upcoming rides as well.

يعطيكم العافية شباب وسامحونا على القصور وموفقين دائما إن شاء الله


"Imagination is more important than Knowledge" - Albert Einstein.