Showing posts with label coal. Show all posts

Thursday, February 23, 2023

RP 2023…

Well, it's been such a cold weekend, or whole week actually, and I kind of feel something is wasted for not going out to shoot in such weather like in the old days. Alas, I have to accept the reality and satisfy myself with cozy warm room, long sleep as much as I can, and songs from the 1990s when something called "Romance" did exist, at least in songs.
It seems that I've already finished talking about my activities in December 2022, so I'm supposed to hop into what I've been up to lately in 2023, where I've done 3 strolls (sort of). However, since it is February, Retinitis Pigmentosa Awareness Month, I've decided to post about my single experiment (so far) to shoot something for this occasion. I'm not sure if I can shoot something else in this narrow time gap till the end of February but anyway it shouldn't be such a limitation in case any new ideas came about later on.

RP 2023

As usual, the beginning was hard. Ideas simply didn't come about however I tried. I've tried brainstorming using some websites to create random thoughts and hence random ideas in relation to the topic of Retinitis Pigmentosa, but all the trials just failed.
The idea (and only one so far, at the time of typing this) didn't come about till the family here wished to do some grilling outside!

Grilling Night

I shot Grilling Night from the balcony with my Huawei phone. It did take some considerable time to rectify the image as much as possible but I guess there are still some tilted lines in it. Anyway, this shot is not that important (though I really like it!), but it was about the beginning of the inspiration when I saw that sack of coal lying around. 

The black color just triggered many things inside my head, and not just in relation to my Retinitis Pigmentosa. Thus, I've set my aim to do something with that coal. Luckily, I do have an acrylic transparent board which I keep for such "photographic missions" whenever I need it. The initial thought was to take a picture of my eye, looking through the darkness, in a symbolic gesture for coping with the loss of peripheral vision. However, talking about it proved to be WAY easier than doing it. 
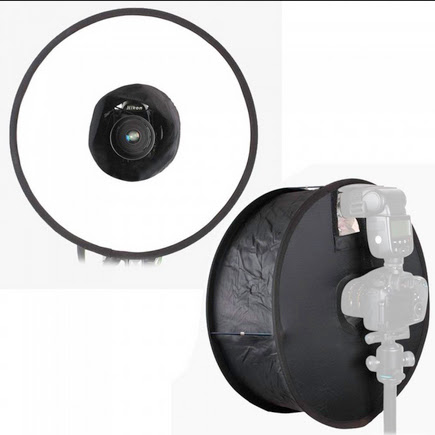
Roundflash Softbox

I decided first to work outside in the yard (the one seen in Grilling Night above) and it was just my luck that rains started to pour down on and off for about 3 days. To add more to my troubles, coal proved to be hard to break and I didn't have proper tools and preparations (gloves and towels and other stuff) to work. The least to say about the situation is that it was a miserable one! All these conditions, beside lacking the means to let the coal really stick to the acrylic board (I'm not ready to sacrifice it and I need to wash it afterward) - all of these issues made me realize that probably I should put "authenticity" aside and just do the whole thing as a graphic design, combining two images; one for the coal, and the other for my eye.

The other issue was with the lighting. In the beginning, I've wanted to use speedlites on the side of the coal to give out some texture but then changed my mind in order to work faster (because I'd need to make a setup for the speedlite on the side) and decided to use the Roundflash softbox which is something I didn't use in ages. It is ironic how it is now publicized as a "softbox"; When I got this item years ago, it was supposed to be a cheap macro photography solution, which proved to be an awkward claim and it was completely impractical for such a field. It is still impractical here in this situation too because of the size and the bulkiness, and using my 50mm lens made it hard to stabilize this whole item on the camera and speedlite (it requires a somewhat longer lens to fit in the middle). Anyway, with all these hurdles, this tool still had its nice effect on the eye when shooting portraiture.

The final coal layer on the acrylic board

Now, there was another problem for using this Roundflash to shoot the coal, and specifically directly from above almost at 90°, which didn't yield much details for the texture. I have to admit though at this moment I was reliant on my capabilities with editing RAW files and doing other tricks in Photoshop; Something that a photographer shouldn't just take for granted when working on projects because bad surprises are, well, abundant in that category of work. Anyhow, I've decided to shoot 10 images (actually didn't count them it was just random) and I was moving the coal pieces around the acrylic board to create some textures with the hope that one image from all of this mess would be the "one". Later on in Photoshop though, I've realized that I could stack all these images and merge them into one smart object and set a specific mode for stacking. After trying several ones, I've settled with median (and mean mode was also good). 

The eye layer

Now I though working with the Roundflash would be an easy task with the camera on the tripod but I was completely wrong; It was even more cumbersome than when the camera is handheld, because of the tripod legs which obstructed the Roundflash which had a somewhat large diameter. Anyway, I've managed to work with it anyhow despite the Roundflash not being completely straight and round. It was hard to shoot my own eye in that manner so I had to use the help of my brother to check the location of my head using the LiveView and also I had to use 12mm extension tube with the 50mm lens to get as close as possible to the lens. In fact, I was going to get even closer and use other tubes but as I got closer, it was hard for the Roundflash to light my eye, so I had to satisfy myself with this and rely, again, on post-processing to focus on the eye. I had also to use larger f-number (I think it was around f/13) to ensure the sharpness (or the depth of field that is).

Through The Darkness

I won't go through the post-processing mess to create Through The Darkness here, but probably you have noticed how the coal layer turned green-ish. It was even greener but I've reduced the saturation and I really wanted to turn it to black and gray, but seeing how the green helped a bit in giving a texture, and also kind of balances the red tones in the eye layer (which of course underwent many post-processing techniques), I've decided then to just let it be green but with lesser saturation (as it is supposed to be the "darkness"). There was some resizing involved as well to let the gap narrower, and to make things a bit "realistic" to some extent, I've decided to add a touch of shadow to the coal layer. 

With this, my work for the main image for RP 2023 had ended and so far, at the time of typing this, I didn't quite think of any more ideas to do regarding this topic. I might use these test images for other projects though; I think they'll be useful somehow in the future. The shot got "relatively" higher number of likes on IG which makes me somehow satisfied about the results even though my perfectionist side is still nagging deep inside of me for not doing things in-camera. 

Finale

Some storms are calming down, and I'm hoping not temporarily. My sleeping schedule had been screwed up again just like the sweet old times, where I stay awake all night and sleep most of the day. I guess it's just my natural defense against the hurdles of life and the way i seek quiet and calm atmosphere in this house.
I've left myself with the question "What's next?" but as usual, I can't find an answer to this question. People talk about traveling here and there but I really don't know how would they think about such a thing under the current crazy situation worldwide. One might say "just travel to near by countries to change scenery"; Easy said than done. This region is just out of question (and order) and I really would need a place to escape my reality, for a bit.

On the other hand, I'm still thinking as well about my next move with the camera and what ideas I might try work with. There are many old stuff crossing my mind at the moment (like finding a way to capture a 3D anaglyph video using DSLRs or phone cameras) but I do feel some kind of pressure for doing something concerning photography in the first place. So far, I've been out strolling and trying to capture images from the neighborhood and surrounding neighborhoods twice, and I might make it for a third and fourth time as well, but all I can do is to hope. In addition to that, I still have the issue of my Arabic blog which I didn't post anything in for months (already breaking my resolution so hard).

As for now, I think I'll just waste some of my days listening to some memories-sparking music from 1990s…


Thursday, September 5, 2013

The InfraWeek...

This week been somehow a busy week with my infrared filter. After some trials that were done last week with the infrared filter, and after learning some new methods to process infrared RAW files, I've been planning for new shots and even visiting old shots for re-processing.
Before I delve deeper into this matter of the infrared venue, I do like to thank all visitors for peaking up my Flickr profile to more than 2000 hits in a single day! This is a first time to be that way. I think my own personal record was something a bit more than 1000 hits in a single day before!

Click to Enlarge

Infra
One of the main problems in processing infrared images (beside working with unconverted camera) is the fact that the white balance is limited when working in ACR, or even in Canon's DPP. Canon's DPP though was somehow a good tool before but currently and with my new acquired shots from last week, it didn't make much difference. Anyway, I've gone through some articles online and I've discovered a free software provided by Adobe, namely the DNG Profile Editor.
I won't get into the details of this tool and how to use it, but in a brief sentence, all I can say is, it makes a profile to be used in ACR, and it would maximize the range of the white balance in some way. This step alone, made me re-think about previous shots and the possibility of shedding them under a new light.

Frozen Coal
Cropped from original.
One of these old shots was a shot taken in the beginning of this year, in winter specifically, when we were still using coal trays or something like that to enjoy some traditional tea! Anyway, the shot that was taken and processed in the traditional way and even back then, swapping the channels (of Red and Blue to give an alien feeling to the image) did not yield or give much sense. Right now, though, the story is completely different and swapping the channels after fixing the white balance in the RAW file can yield a promising result. I say "can" here, so don't take it for granted!

InfraCoal

However, the coal shot was an "indoor" shot and not outside, thus I had to dig in my archive and see if there is anything like that taken with infrared. I've found one shot, for which I needed DxO to deal with its distortion and other criteria and this one, too, did a good job in swapping the channels.

Infraarbeitplatz


Despite this promising result from a previous shot, but it didn't really work out for much of the shots taken back when I just had the filter. Some of them didn't work out as before and some of them were better rather in red shade like the Ciudad en Rojo.

Ciudad en Rojo
Canon EF 18-55mm @35mm, f/8, 3.2sec, ISO100.

Anyway, after looking back at my stock of infrared shots, I've decided to increase the stock a bit more just to work with processing more images of this kind. This is my preferred method of learning (specially in Photoshop), and reading alone won't do me any good!
For this reason I've decided to take my camera to work with me and try to find something just to shoot with my infrared filter.

One of the first trials at work is a little plant which looked like a palm tree (but it's not). I leave the classification of this plant for the professionals! Anyway, it was a shot in a hurry as the background and the distance were not suitable really.

Paulo Palma
Canon EF 50mm, f/2, 1.3sec, ISO100.

Naturally, some infrared shots would turn completely or partially to black and white. I think this is the magic of infrared photography. Somehow, the result can be unpredictable. Anyway, there is a major difficulty with unconverted camera (i.e. camera with modified sensor for IR photography). As I will show later, this was a problem in some shots which required a fast shutter speed in a breezy weather. However, in Paulo Palma, the weather was relatively stable and not much of a breeze in the air, but surely had a problem framing the image while the sun striking on my neck and on the LCD! I've used a wide aperture relatively (and hence the shallow depth) just to ensure a faster shutter. Otherwise, it could have taken up to 3 or 6, or even 10 seconds for this shot.

One of the major hassles while working with IR images is the noise level even when ISO is set to the lowest. Next, comes the soft focus. These two matters makes it uneasy for me to upload such images on the web, and specifically into stock agencies. Thus, imagine when you are forced to increase the ISO under such conditions. The noise are simply "ridiculous". However, the noise can be less pronounced and just get more attention when channel swapping is formed, that is, replacing the places of the Red and the Blue channels in the RGB mode. At this point, the typical noise reduction plugins in Photoshop won't do much good, but the major trick is to play around with Hue/Saturation to twist the colors and make the noise virtually negligible. Then comes the next trick of adjusting the contrast to suppress some grain, and then we have the change in the color space by using the Assign command in Photoshop (not Convert). The Assign command, for some reason, does reduce (or maybe re-distribute?) the noise level, sometimes to a great extent. This is some of what I've learned doing long exposures last summer on the beach!

Infra Columnae
Canon EF 50mm, f/1.4, 6-1sec, ISO200.
InfraDoor
Canon EF 18-55mm @22mm,
f/16, 8sec, ISO200.
Despite the general look of the infrared shots, which tends to be in black and white, but the fact is lot of shots I've done were low saturated and just close to the black and white level. This is done by virtue within the processing of such shots, specially via Hue/Saturation when I try to reduce the noise by such an adjustment layer. The fact is, IR photography got a potential for various aesthetic settings or processes just like, or almost like, the HDR technique. The hard part, might be, to predict the final look of the shot. With HDR and its processes, you can imagine what's the final image is on location (specially if it is some metallic surface). However, this is still not so evident for me when I work with IR. Shots like Infra Columnae and InfraDoor were so various and I didn't know whether they would be colored slightly, or I'll be needing channel swap, or simply turn everything into black and white. The main puzzle is how to settle down the white balance. Usually, I do like to set the white balance from any green surface in the image if there is any but that doesn't mean I would like it. I suppose the green surface is the first choice because the green color is in the middle of the spectrum, not sure about this theory though! InfraDoor specifically is a subject for an HDR shot and it got me back to my old habit of still life and abstracts by geometrical means, like I used to do before around my work place - anyway this might be a subject for another post some other day!

Then one day came a challenge that took me 2 days to perform. It's a small bloom that was barely 1cm (~0.394in) in height. Not only I had to get so low with the tripod, but approaching the bloom and getting closer to it was critical. The first day, I tried to get to it by the end of the day before leaving my work place but the sun was so harsh that, beside my personal troubles, the LCD was barely visible and I had nothing to cover it (things to put on my purchase list as it seems). Thus, I had to come the next day and try to get to it in the early morning time just before the sun strikes that spot specifically.

Truncartis Parvis
Canon EF 100 macro + ET, f/8, 30-1sec, ISO200.

I'm putting Truncartis Parvis here for comparison with shots that were taken with infrared filter later. In Truncartis Parvis there were two main problems: first, the low light level as the sun wasn't shining on the spot (ironic), and secondly, the breeze which required faster shutter speed to stop the motion of the tiny bloom. I didn't bring my speedlite with me that day thus I had to depend on the simple flash on-camera. Because I couldn't get so close to the bloom, I had to use the macro 100mm lens with extension tubes added gradually to it. By using 12, 20, and 36 tubes gradually I was able to make some estimate about the relative size of the bloom within the frame. Truncartis Parvis (which means the small jungle by the way) was taken with all tubes (i.e. 68mm) added to the macro lens. Thus, I was trying to hit some balance between the 3 variables: ISO, speed, and aperture. I didn't like the idea of raising the ISO too high for such a "normal" shot thus I had to put down the aperture to f/8 (after trying f/16). They say in macro photography, it's better not to go below f/8. However, such balance was even harder to achieve and I had to give up with the ISO when I started taking infrared shots with that setting (remember the sun was not striking the place, yet).

Glowing Bloom (Gold)
Canon EF 100mm macro + ET, f/4, 15-1sec, ISO1600.

As you can see above, in Glowing Boom (Gold), the shutter speed was barely acceptable amid the breezes in the weather, and this is only achieved with ISO1600 and  shallow depth of f/4 with maximum flash output. Probably it would have been an easier task if my speedlite was with me but I had to deal with the situation as it is and yet the shot was of a surrealistic approach somehow. The noise level, however, was a novel on its own right.
The shot above was done without channel swapping (and of course with some processing on the side to suppress the background noise). Hence the "(Gold)" part in the name. After Red and Blue channels swapping, it appeared as beautiful as the first as it seems...

Glowing Bloom (Blue)
Canon EF 100mm macro + ET, f/4, 15-1sec, ISO1600.

It is amazing how the infrared filter clears off the differences in tones and colors and makes the petals as if they are made with one color (compare with the one taken without filter above). At the end and just before I take off, I've decided to do one last trial but this time with one less extension tube just to include more background into the frame. Ironically though, I've decided to crop the final image into a square to reduce the background!

Gecenin Çiçek
Canon EF 100mm macro, f/5.6, 10-1sec, ISO1600.

That was "some" of the trials done with the infrared filter for this week, but not the end of it. I need to study the artistic chances and venues behind this filter. It is cumbersome to use it of course with an unconverted camera, yet it does help in long exposures anyway!

Conclusion
Potentially, there is so much to be done in the IR field. Something behind the typical vivid and surreal landscape shots that we usually see under this category of photography.
However, I do find myself debating myself about the aesthetic prospect of such shots. Usually, what I read in articles online about IR photography is that the grains (or noise) and the fuzzy focus is something natural and even characteristic of this type of photography. There are even some Photoshop tutorials that deal with photo manipulation; that is to edit a normal photo and make it look like it is taken under IR, and one critical step in the overall process is to add grain or noise to the whole image (beside reducing the saturation). However, do people accept that, or do agencies? I'm reluctant about uploading such images to stock agencies. I did already upload to some of them but it's just a test and I'm very doubtful about their acceptance for such shots with such high grain level. This, somehow, makes IR photography a highly fine-art branch I believe, and agencies wouldn't love this type of photography much, unless some of them do know what does it mean to take IR shots with all that noise and defocus.
The almost-random aspect of processing IR shots makes it as vivid and wild as HDRs but let's say with different tones. You can do crazy things with the HDR techniques and lot of people hate the halos produced in over-tone-mapping HDR images, and IRs also got the same potential. If you check Infra Columnae back up above again, you'd notice that the image is almost black and white except of a spot that shows clearly as green. I'm pretty sure some people won't like it that way; just a matter of how the human brain works I believe.
In the near future, however, I do need to work more with such filters specially to see how does it change the skin tones. I've done some simple trials on myself but these are not enough and I need more. First though, I have to know what kind of relation there is between studio (or let's say the speedlites) light and this kind of filters.
After all, it is just something to get my mind busy and away from my collapsible life for the time being. I do miss doing lot of things; panoramas specifically. Anyway, got to wait for winter to arrive. This summer I'm literally melting down my body, and mood...