Showing posts with label 100mm. Show all posts

Thursday, October 27, 2016

Mental Diaspora…

Some weeks passed without counting them. I had to stop writing in this blog for a while (and the Arabic one too of course) after some drastic downfall in my mother's health; something almost costed her her life. Even though she is in a better condition somewhat but it is far from being the normal-her, as she is mostly bound to bed here at home and I'm trying, with the rest of the family, to take care of her and most importantly of all, to raise her self-esteem and make her smile despite the painful times.
Meanwhile, I was in fact trying to prepare for some photographic experiments which eventually were put on hold after the events, and trying slowly to get back to the pace and even trying to force myself to work on some projects.
I know, though, that some photographers advise against forcing oneself to work with the camera and leave it to inspiration alone, and initially I'm in that line of thought, but circumstances right now require some special measures, and probably forcing myself might take my mind off from the domestic problems that plague my life for the time being.

Let's Cook!

I've attended (and will in the near future) a workshop with members of the group given by the leader of the group which was about the imagination of the photographer and how to develop it. Our main theme for the practical part of the workshop was "kitchen utensils."
The topic of the workshop was, in some sense, forcing your brain to think differently about ordinary subjects (with a side dish of planning beforehand).

Boring Cold
Canon EF 50mm + B+W 920 IR filter,
f/9, 320-1sec, ISO200.
Before the practical part, I've picked a box of utensils which I didn't really consider what was in it, and thus I had no time to explore or think about what to do until I reached the meeting place. Anyway, the first idea to pop in my mind was to use a friend with 2 ladles as hands and show some boredom, as seen in Boring Cold. To add flavor to this shot specifically, an infrared filter was placed on lens (using my converted camera here and 580EXII speedlite on camera with diffuser). I didn't feel comfortable with this one, and probably my friend here didn't gauge his expression perfectly (trust me, modeling needs skills). I changed to my second idea which was inspired by the Jolly Roger flag (and, let's not talk how I got the inspiration).

Kuwaiti Jack Nickolson
Canon EF 50mm, f/9, 250-1sec, ISO200.

Using the same converted camera but without any filter on the lens, and also a speedlite here, the Kuwaiti Jack Nickolson was supposedly to be looking like the Jolly Roger, but with the facial expressions here and the hardships in holding the ladles in proper positions, the idea drifted away from that. Anyway, I liked the looks here so I worked for some time on enhancing the sharpness and the colors (specially the eyes and the mouth) to make it look more like a maniac's profile shot! The sharpness here was exaggerated on purpose and it was not done with convenient plugins (e.g. NIK or Noise Ninja), but it was done manually using layers in Photoshop (implementing the High Pass command). After these 2 shots, seeing that I don't work well with faces, I decided to concentrate more on the abstract lane of my thoughts and started playing around with the same ladles to come up with something unusual.

Metallic Lane
Canon EF 100mm macro, f/14, 250-1sec, ISO200.

I've finally arrived at that idea when I made a contact between the bottoms of the ladles (and it was hard to stabilize the set). Usually in such situations, I automatically switch my mind to think about macro details and look for abstracts and shapes, just like in this situation with Metallic Lane. A twist to the WB was applied to give it that bluish luster instead of the dull metallic one.
Major problem with these experiments is that the ladles were scratched and not polished in a good way, and however I washed them the stains and scratches remained. The practical part of this workshop was not the final deadline to present some work but it was a practice under the guidance of the founder and the teacher of the group, and we agreed to give results one week later which unfortunately passed without doing anything, since I've been busy with my messy life. However, I got new ladles with good polish and worked on them later on, as I will explain later in Rain-Bubbles section below.

Nailed It…

Before the dramatic events with Mom, I was already working on a little project, related to my previous post, The Fakhroid Muse, which is about getting inspired from a song or songs from the Syrian master, Sabah Fakhry (صباح فخري). Might be a good idea to read that blog post if you didn't.
I've been working on this idea, as I've said, before the dramatic events, and even after Mom being out of the hospital, I couldn't put a mind to it and finish it until just recently. I have to say though that I did a lot, a lot, of testing shots. The main problem was that the set was on ground level and I had to find a way to levitate the camera up to a certain level from the set (beside finding the good lens and the good position for speedlites).

Lovely Pain
Voigtländer 20mm, f/4.5, 4000-1sec, ISO200.

Generally speaking, the idea was inspired from the same song discussed in the Fakhroid Muse post, but a different line:
أثاريك نسيتني مع الأيام
ورضيت تفوتني على الآلام

Just to find you've forgot about me along the days
And you were satisfied to let me through the pains

The second line of this verse is the one that ticked in my mind and decided to implement the idea here. I've spent some time drawing a valentine heart on a cardboard and pinning some nails in it as it can be seen in Lovely Pain. In the beginning, the idea was to use 15mm fisheye lens because its perspective would help on forming the valentine heart more clearly (because of the distortion), but the wide field of view made it problematic to use such a lens, specially with speedlites placed around the set. As it can be seen above, the shutter speed is high, because I wanted to kill the ambient light completely (and of course that requires working in High-Speed mode).
I wanted to work with red food coloring in the beginning too, but apparently that was hard to show on metallic heads and (since I had no model to work with except of myself) it would make a mess for me, thus it was safer to work with red gel filter placed on the main speedlite. One speedlite was actually enough, sort of, but added another one on its side (was planned to light the feet alone), and for this we have here light heads sparkling (and lighter red tone). At the end, I've changed to Voigtländer 20mm lens for it is not as wide as the 15mm fisheye lens. Working with this lens can be tricky somewhat since it is manual completely and I had to re-focus as I adjusted the elevation and the direction of the camera several times (beside changing the spot to be under the focus several times).
The tricky part here is after shooting: on camera's LCD view, everything was alright, but when the file is opened on PC with large monitor, the valentine heart is barely recognizable and would require longer time of concentration to realize that it is a heart. Maybe it was my mistake even to draw it in reverse like that!
I'm still on the lookout for more inspiration and probably from the same song still. I do have some ideas already as I'm typing this, but the vivid glimpse of this idea would require having a model - someone to work with; something I'm not good at, and not available as well for me (of course, unless I pay money for a professional model I believe). I'll keep that for later though.

Rain-Bubbles

As a continuation for the kitchen utensils project which was started with the workshop mentioned in the first section of this post, Let's Cook!, I've tried to work with new ladles I've purchased specially for this project, and they are with good polish (but completely though). Big, small, and some tiny metallic container; I liked how they looked in the store without really thinking what to do with them. It took me some time to wander and to look, and finally got the idea of shooting reflections in some way, since these utensils do look like half spherical mirrors (concave or convex). Anyway, I did reflections, but in some other way. Completely different way!

Qtar 1 (droplets 1)
Canon EF 100mm macro, f/10, 250-1sec, ISO100.

As for the title of the image above, Qtar, I somewhat miss the Maltese language so I decided to use Maltese to name this series of images. After roaming my mind about, I finally sought hanging the ladle on the edge of a table (using clamp) and putting some drops of corn syrup (as a substitute for glycerine); water won't help much here with its low viscosity. Of course a setting as plain as this seem boring, so we have to add some colors to add life to the abstract, and thus I got colored sticks (like those tongue depressors used by doctors) out of my accessories arsenal, and placed them on the top of the ladle making a small window for the lens to peak into the droplets.

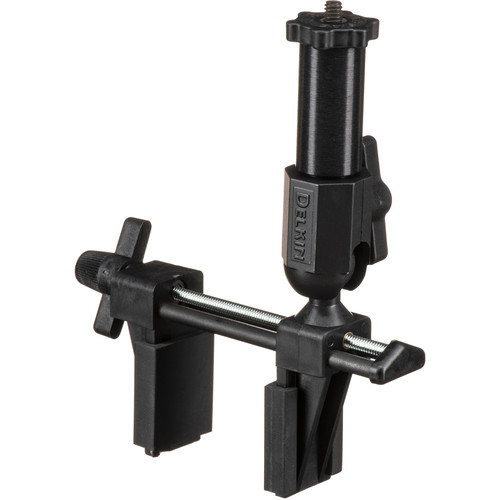
Full setting used with 2 speedlites. As it can be seen, the tripod legs were opened wider to get lower and closer to the ladle. Upon the ladle sit a number of colored sticks. Click to enlarge.

The first problem to encounter is which proper lens to use and I have discovered that sometimes, lot of times, we tend to complicate things instead of going directly to the problem. After trying a lot of lighting methods, and lenses with extension tubes, I reached the decision that I should keep it simple: single lens, no tubes, and even speedlite without any modifiers. The only thing here, as seen in the settings, the speedlites were not pointing directly but almost lighting the edge of the ladle which in turn spread the light all around the droplets.
Qtar 2
Canon EF 100mm macro, f/3.5, 200-1sec, ISO100.

Qtar 3
Canon EF 100mm macro, f/2.8, 200-1sec, ISO100.

Qtar 4
Canon EF 100mm macro, f/10, 250-1sec, ISO100.

As it can be seen here with this series of 4 shots, each change in the aperture (i.e. f-number) or the direction or power of the speedlite can produce interesting results; all that without touching anything in the settings but only changing the parameters in the camera and speedlite. Not to say also, the order of the colored sticks can be changed or the colors themselves (or even use something else other than sticks). Such a simple experiment can have great variety of results and the expectations are limitless!
Probably of the 4 above, Qtar 3 is the most liked one. Processing these images underwent a number of cleaning processes and adding lens blur to remove some of the scratches in the background (except for Qtar 3).

Finale

My mind is scrambled right now after all the dramatic events. Somewhat the world doesn't mean much for me. I don't feel it. But in the middle of all this sway and trying hard to concentrate and to work on something I like, to take my mind off from my personal problems, despite the fact that my work of art would mostly reflect some of the personality side, as in Lovely Pain.
On the other hand, my addiction to games is increasing as well as a way to escape reality (and people), as well as my worries. What does the future hold? Would I be able to see the outside world again? I'm going back to work by next Sunday, just to add more to my mental struggles…

Thursday, November 14, 2013

Goodbye Tamron...

Here I am, after 2 weeks of being almost idle. As much as I hate to admit it, but seems my mood swings were at apex. The material I was trying to prepare for this post wasn't much as I couldn't work much with my camera. I was too lazy to touch it and prepare stuff for more nadir shots. Disasters didn't stop at this level yet, as you will be reading further!
On the other hand, I've started with the beginning of last week to do on some eye checking. From one clinic to another, and then to the eye hospital here (and let's not talk about the procedures and the hordes of people in the queue line). There is a big chance that I do suffer from retinitis pigmentosa just like my eldest brother and one of my sisters, but I'm not sure how dangerous my situation is. It was supposed to be a regular and a routine check up in fact, but oh well... I'm trying to cool myself down and enjoy my time as much as possible, with games and the camera when possible. I'm now waiting for November 25th to do some eye testing and check with the doctor.

Nadirology
There were many struggles to take nadir shots (or shots pointing downward) specially that I don't have much means to handle the camera and make it hanging in a vertical position.
Source: B&H
FAIL!
One of the "toys" that were supposed to help me with this such task is the (crap) Delkin Fat Gecko Gator Camera Mount which caused me a disaster the last (and it was the first) time I used it. I left it unused after that failure but with my limited hopes in such tasks like taking nadirs inside rooms I've tried to work around it somehow, and the result was another failure and the device totally disintegrated, piece by piece. I'm simply amazed how come I'm the only one who made a negative review on this item on B&H website (or so it seems)!

Above Hall
Rokinon 8mm fisheye, f/16, 1.3sec, ISO500.

One of the trials to take such shots, like in Above Hall, I tried to improvise something: a hard paper bag with a hole at its bottom for the camera lens. However, this method didn't work out properly because the body of the camera is not uniform and the result is a tilted camera dangling from the light fixture; a situation that persisted in all situations almost. The camera could hardly be balanced straight. Probably it is time for more of DIY solutions with some metal work - or simply order something! I already had some hard time doing the same procedure in my bathroom. Anyway, I did take a twisted picture but I won't post it here for the time being.

Shots like Above Hall aren't something that I applaud but it did teach me some aspects about taking such shots in terms of composition. Probably a congested place is a good thing for such shots, because in Above Hall, the hall was empty almost and not many features are presented, making the shot somehow boring, unless you appreciate the minimalistic approach!

Geometrical Amuse
Canon EF 50mm, f/16, 8-1sec, ISO800.
Not all shots, however, were for rooms (and I think I presented some 2 weeks ago). This time though I continued my work with the stairs but since shooting was awkward from upstairs to downstairs, this time I decided to put my monopod to some good use. However, using such a method and dangling the camera (with the portable monitor connected in hot-shoe) calls for a higher ISO to fasten the shutter speed ad get a stabilized image as much as possible. Geometrical Amuse is one portion of an image taken this way (with others being shaken and blurred). The crop changed the perspective of the whole image from landscape to portrait. Again it is a combination between abstraction and minimalism I suppose. Still, I didn't get enough amuse from such shots yet. Probably I should consider doing "zenith" shots frequently as much now with the hardships taking such nadir shots. I have to concentrate also on doing nadir shots on objects and other minimal features and not necessarily rooms or landscapes. Landscapes, however, are a good target for a monopod raised up with the camera!

Micro Macro
After such many failures doing nadir shots, I've decided to move my point of interest into another field: Macro photography. Or maybe I should say, Extra Macro Photography.
Source: Amazon
R.I.P.
Tamron 70-300mm
Source: B&H
This change of interest in fact resulted in a disaster in the beginning. My Tamron 70-300mm lens got broken as it was connected in reverse with the Canon EF 50mm. I'm not sure what went wrong but seems I've used some power where it shouldn't be, specially that the body of the lens is plastic. What has been broken is the mechanics for zooming in and out. Thus, with any connected material to the front of the lens, it might make the lens front be dragged forward. However, I can still pull in and out the lens and the focusing mechanism is still working (manual focusing that is, I didn't try the AF!). It did some nice job for some time, but anyway, for the time being, it seems it is time to get a real telephoto lens other than this cheap choice. It was a matter of time. Anyway, with Tamron broken, I do get some choices now and maybe I have a bit more guts to manipulate this lens further somehow (and maybe try to disintegrate it and see what's in!).

Cutter Edge
Canon EF 50mm (R), Canon EF 100mm macro + 36mm extension tubes,
f/32, 60sec, ISO400.

As you can see from Cutter Edge, I really didn't have much of good targets. In such trials I just picked the paper cutter to shoot at some of the corrosion on its surface. I made several trials here with Tamron and Canon EF 100mm macro lenses, but this is my first time to use extension tubes in such macro shots, and I'm not quite sure if this is really effective in increasing the zooming power. I need to do a comparison between the two cases and see if extension tubes do really help. Extension tubes are normally used for macro photography but with the purpose of reducing the minimum frontal distance between subject and the lens. The situation here though when reversing two lenses is different though. Just to note, with direct measurements the distance between the 2 grooves in the image above is about 0.5cm (~0.2 in), and when the image was taken the distance on the image was around 22.6cm (~8.9 in). By finding the ratio between the two, the result is 45.2. Does that mean that the magnification factor for the whole system is x45? I'm really not sure how this is calculated. Anyway, we can still get awesome results!

Fibers
Canon EF 50mm (R), Canon EF 100mm macro, 36mm extension tubes,
f/32, 60sec, ISO400.
Portion of my blanket!

In the meantime, I'm trying to understand the processes behind reversing the lenses and seems I got the general image:
  1. Seems the first portion of the system is supposed to enlarge the subject with the reverse method. In my system this is done with the Canon EF 50mm lens. There are adapters, however, used to adapt a lens directly to the camera body in reversed position and they are efficient as well.
  2. The second part of the system is to enlarge the image taken from the reversed lens in step No.1, at least this is how I understand it. This was evident when I changed the lenses from the Canon EF 100mm macro, to Tamron 70-300mm and trying the lens at 300mm. The blade of the cutter in the first trial above was magnified further with the increase in the focal length of this portion of the system.
  3. Two problems, however, occur when trying out greater focal length, and/or trying to add teleconverters to duplicate the focal lengths: a) shake, and b) dispersion or chromatic aberrations. The shake of the system is so sensitive that I had to use the intervalometer (plus the timer in the camera itself for 10 seconds) to delay the shoot for around 30 seconds to give time to myself to step away from the (shaky) system. The system is so sensitive even to the steps on the ground nearby. As for the dispersion, this was magnified in Tamron, and this is natural because of the low quality (hence it was cheap lens). Also, teleconverters are made of low quality glass relatively, usually, and they do add to such distortion. So far, the best result is as seen above in Cutter Edge by using the Canon EF 100mm lens directly with reversed Canon EF 50mm lens without any teleconverters.
After these trials, I'm thinking now of building something like a glass table that would help me further with my macro experiments. Some methods and tips are mentioned in Cyril's book (cover above) which I've read some weeks ago. I need to go over the book again quickly to get some ideas and inspirations; not only for the macro shooting, but also for the nadir project!

Finale
Source: Amazon
There are stuff that are on hold for the time being. After finishing the books in my arsenal, I've been almost idle at work and too lazy to do "work" itself. I didn't even write any reviews concerning the books (left and above) that I've purchased some weeks ago, or any reviews concerning some of the gear that I've got some time ago from B&H, like the RoundFlash. The RoundFlash specifically needs some time to be tried out and have some thoughts as it can be used for portrait and macro - two fields that I'm not quite friendly with (portrait even more). I thought of using the RoundFlash for my (extra) macro projects in the near future but seems to me that the length of the system of lenses attached together would hinder such addition useless.
Source: B&H
For this reason, right now, I'm thinking of building a small glass table which be lighted from below. Of course, it would be useful for transparent or translucent objects and not opaque ones but that's not a big deal. I'm sure there are ways to light opaque objects from the side or above without using the RoundFlash.
Further more, I've read an interview with Jonathan Boakes, one of my favorite game developers, and in my process trying to seek inspiration whenever and wherever I can, I think Jonathan sparked (again) the fire of photographing old deserted places (which are abundant on Failaka island). On the agenda as well, a trial for the new IR gel filter to make a panorama, but of course it would be a panorama at broad daylight, when possible!
I've been stuffing my schedule with games in the past 2 weeks (and writing reviews about them) and I think the trend is still going on. I'm not sure what is still going on in my mind but there was something that felt severe. Something I just needed to vent through games. Now with the probability of developing Retinitis Pigmentosa, it seems I have to push myself to do more photography before it's too late.


Thursday, September 5, 2013

The InfraWeek...

This week been somehow a busy week with my infrared filter. After some trials that were done last week with the infrared filter, and after learning some new methods to process infrared RAW files, I've been planning for new shots and even visiting old shots for re-processing.
Before I delve deeper into this matter of the infrared venue, I do like to thank all visitors for peaking up my Flickr profile to more than 2000 hits in a single day! This is a first time to be that way. I think my own personal record was something a bit more than 1000 hits in a single day before!

Click to Enlarge

Infra
One of the main problems in processing infrared images (beside working with unconverted camera) is the fact that the white balance is limited when working in ACR, or even in Canon's DPP. Canon's DPP though was somehow a good tool before but currently and with my new acquired shots from last week, it didn't make much difference. Anyway, I've gone through some articles online and I've discovered a free software provided by Adobe, namely the DNG Profile Editor.
I won't get into the details of this tool and how to use it, but in a brief sentence, all I can say is, it makes a profile to be used in ACR, and it would maximize the range of the white balance in some way. This step alone, made me re-think about previous shots and the possibility of shedding them under a new light.

Frozen Coal
Cropped from original.
One of these old shots was a shot taken in the beginning of this year, in winter specifically, when we were still using coal trays or something like that to enjoy some traditional tea! Anyway, the shot that was taken and processed in the traditional way and even back then, swapping the channels (of Red and Blue to give an alien feeling to the image) did not yield or give much sense. Right now, though, the story is completely different and swapping the channels after fixing the white balance in the RAW file can yield a promising result. I say "can" here, so don't take it for granted!

InfraCoal

However, the coal shot was an "indoor" shot and not outside, thus I had to dig in my archive and see if there is anything like that taken with infrared. I've found one shot, for which I needed DxO to deal with its distortion and other criteria and this one, too, did a good job in swapping the channels.

Infraarbeitplatz


Despite this promising result from a previous shot, but it didn't really work out for much of the shots taken back when I just had the filter. Some of them didn't work out as before and some of them were better rather in red shade like the Ciudad en Rojo.

Ciudad en Rojo
Canon EF 18-55mm @35mm, f/8, 3.2sec, ISO100.

Anyway, after looking back at my stock of infrared shots, I've decided to increase the stock a bit more just to work with processing more images of this kind. This is my preferred method of learning (specially in Photoshop), and reading alone won't do me any good!
For this reason I've decided to take my camera to work with me and try to find something just to shoot with my infrared filter.

One of the first trials at work is a little plant which looked like a palm tree (but it's not). I leave the classification of this plant for the professionals! Anyway, it was a shot in a hurry as the background and the distance were not suitable really.

Paulo Palma
Canon EF 50mm, f/2, 1.3sec, ISO100.

Naturally, some infrared shots would turn completely or partially to black and white. I think this is the magic of infrared photography. Somehow, the result can be unpredictable. Anyway, there is a major difficulty with unconverted camera (i.e. camera with modified sensor for IR photography). As I will show later, this was a problem in some shots which required a fast shutter speed in a breezy weather. However, in Paulo Palma, the weather was relatively stable and not much of a breeze in the air, but surely had a problem framing the image while the sun striking on my neck and on the LCD! I've used a wide aperture relatively (and hence the shallow depth) just to ensure a faster shutter. Otherwise, it could have taken up to 3 or 6, or even 10 seconds for this shot.

One of the major hassles while working with IR images is the noise level even when ISO is set to the lowest. Next, comes the soft focus. These two matters makes it uneasy for me to upload such images on the web, and specifically into stock agencies. Thus, imagine when you are forced to increase the ISO under such conditions. The noise are simply "ridiculous". However, the noise can be less pronounced and just get more attention when channel swapping is formed, that is, replacing the places of the Red and the Blue channels in the RGB mode. At this point, the typical noise reduction plugins in Photoshop won't do much good, but the major trick is to play around with Hue/Saturation to twist the colors and make the noise virtually negligible. Then comes the next trick of adjusting the contrast to suppress some grain, and then we have the change in the color space by using the Assign command in Photoshop (not Convert). The Assign command, for some reason, does reduce (or maybe re-distribute?) the noise level, sometimes to a great extent. This is some of what I've learned doing long exposures last summer on the beach!

Infra Columnae
Canon EF 50mm, f/1.4, 6-1sec, ISO200.
InfraDoor
Canon EF 18-55mm @22mm,
f/16, 8sec, ISO200.
Despite the general look of the infrared shots, which tends to be in black and white, but the fact is lot of shots I've done were low saturated and just close to the black and white level. This is done by virtue within the processing of such shots, specially via Hue/Saturation when I try to reduce the noise by such an adjustment layer. The fact is, IR photography got a potential for various aesthetic settings or processes just like, or almost like, the HDR technique. The hard part, might be, to predict the final look of the shot. With HDR and its processes, you can imagine what's the final image is on location (specially if it is some metallic surface). However, this is still not so evident for me when I work with IR. Shots like Infra Columnae and InfraDoor were so various and I didn't know whether they would be colored slightly, or I'll be needing channel swap, or simply turn everything into black and white. The main puzzle is how to settle down the white balance. Usually, I do like to set the white balance from any green surface in the image if there is any but that doesn't mean I would like it. I suppose the green surface is the first choice because the green color is in the middle of the spectrum, not sure about this theory though! InfraDoor specifically is a subject for an HDR shot and it got me back to my old habit of still life and abstracts by geometrical means, like I used to do before around my work place - anyway this might be a subject for another post some other day!

Then one day came a challenge that took me 2 days to perform. It's a small bloom that was barely 1cm (~0.394in) in height. Not only I had to get so low with the tripod, but approaching the bloom and getting closer to it was critical. The first day, I tried to get to it by the end of the day before leaving my work place but the sun was so harsh that, beside my personal troubles, the LCD was barely visible and I had nothing to cover it (things to put on my purchase list as it seems). Thus, I had to come the next day and try to get to it in the early morning time just before the sun strikes that spot specifically.

Truncartis Parvis
Canon EF 100 macro + ET, f/8, 30-1sec, ISO200.

I'm putting Truncartis Parvis here for comparison with shots that were taken with infrared filter later. In Truncartis Parvis there were two main problems: first, the low light level as the sun wasn't shining on the spot (ironic), and secondly, the breeze which required faster shutter speed to stop the motion of the tiny bloom. I didn't bring my speedlite with me that day thus I had to depend on the simple flash on-camera. Because I couldn't get so close to the bloom, I had to use the macro 100mm lens with extension tubes added gradually to it. By using 12, 20, and 36 tubes gradually I was able to make some estimate about the relative size of the bloom within the frame. Truncartis Parvis (which means the small jungle by the way) was taken with all tubes (i.e. 68mm) added to the macro lens. Thus, I was trying to hit some balance between the 3 variables: ISO, speed, and aperture. I didn't like the idea of raising the ISO too high for such a "normal" shot thus I had to put down the aperture to f/8 (after trying f/16). They say in macro photography, it's better not to go below f/8. However, such balance was even harder to achieve and I had to give up with the ISO when I started taking infrared shots with that setting (remember the sun was not striking the place, yet).

Glowing Bloom (Gold)
Canon EF 100mm macro + ET, f/4, 15-1sec, ISO1600.

As you can see above, in Glowing Boom (Gold), the shutter speed was barely acceptable amid the breezes in the weather, and this is only achieved with ISO1600 and  shallow depth of f/4 with maximum flash output. Probably it would have been an easier task if my speedlite was with me but I had to deal with the situation as it is and yet the shot was of a surrealistic approach somehow. The noise level, however, was a novel on its own right.
The shot above was done without channel swapping (and of course with some processing on the side to suppress the background noise). Hence the "(Gold)" part in the name. After Red and Blue channels swapping, it appeared as beautiful as the first as it seems...

Glowing Bloom (Blue)
Canon EF 100mm macro + ET, f/4, 15-1sec, ISO1600.

It is amazing how the infrared filter clears off the differences in tones and colors and makes the petals as if they are made with one color (compare with the one taken without filter above). At the end and just before I take off, I've decided to do one last trial but this time with one less extension tube just to include more background into the frame. Ironically though, I've decided to crop the final image into a square to reduce the background!

Gecenin Çiçek
Canon EF 100mm macro, f/5.6, 10-1sec, ISO1600.

That was "some" of the trials done with the infrared filter for this week, but not the end of it. I need to study the artistic chances and venues behind this filter. It is cumbersome to use it of course with an unconverted camera, yet it does help in long exposures anyway!

Conclusion
Potentially, there is so much to be done in the IR field. Something behind the typical vivid and surreal landscape shots that we usually see under this category of photography.
However, I do find myself debating myself about the aesthetic prospect of such shots. Usually, what I read in articles online about IR photography is that the grains (or noise) and the fuzzy focus is something natural and even characteristic of this type of photography. There are even some Photoshop tutorials that deal with photo manipulation; that is to edit a normal photo and make it look like it is taken under IR, and one critical step in the overall process is to add grain or noise to the whole image (beside reducing the saturation). However, do people accept that, or do agencies? I'm reluctant about uploading such images to stock agencies. I did already upload to some of them but it's just a test and I'm very doubtful about their acceptance for such shots with such high grain level. This, somehow, makes IR photography a highly fine-art branch I believe, and agencies wouldn't love this type of photography much, unless some of them do know what does it mean to take IR shots with all that noise and defocus.
The almost-random aspect of processing IR shots makes it as vivid and wild as HDRs but let's say with different tones. You can do crazy things with the HDR techniques and lot of people hate the halos produced in over-tone-mapping HDR images, and IRs also got the same potential. If you check Infra Columnae back up above again, you'd notice that the image is almost black and white except of a spot that shows clearly as green. I'm pretty sure some people won't like it that way; just a matter of how the human brain works I believe.
In the near future, however, I do need to work more with such filters specially to see how does it change the skin tones. I've done some simple trials on myself but these are not enough and I need more. First though, I have to know what kind of relation there is between studio (or let's say the speedlites) light and this kind of filters.
After all, it is just something to get my mind busy and away from my collapsible life for the time being. I do miss doing lot of things; panoramas specifically. Anyway, got to wait for winter to arrive. This summer I'm literally melting down my body, and mood...


Thursday, May 24, 2012

Fertig!

A very busy and quick week to pass (but filled with bad luck ad bad events as well). However, much relief for now. I've finally managed to finish the report that I was helping my friend with. Now, I can get some space free in my mind to do other things, specially those regarding my photography projects.
Also, I'm taking this time and the free space in my mind as an opportunity to go on and complete the last part of my Alexander project: Chapter 6 vocalization. Chapter 6, however, is a long one and for sure this is going to be a long process, and if I was lucky to work on it daily, I might be over with it in about 40 days (but this won't happen for sure!).
However, I've recorded the first 5 verses of the chapter, and I've corrected some spelling mistakes as well. You can check the Ayvarith version with vocalization here. The English translation is here.

My activity with my camera had been minor, but I took the chance to further work with my new Macro lens (Canon 100mm f/2.8). This time I've connected the camera to the TV and I had to sit near by because the wire was short, and then tried to click some shots for my eye.

Auge (Eye)

Auge BW

Eclipse

Farbenfrohe Furcht (Colorful Fear)

The trend with me had been to name some of the images in German. I believe it gives some strength to the feelings. Of course, there was no chance to do HDR processing to the images, but the exposure for the images after all was fine with more or less editing for the RAW file. I think the Black and White theme fitted me well in this small series. In Eclipse, specifically, there was no need to do any manipulation to extract the lines of the eye; editing the Black and White levels was enough. Farbenfrohe Furcht on the other hand required some of the typical work I do with the eyes when I work with other people's pictures.
And yes, the eyeball veins and lines are true. Not edited.

On the other hand, I've printed the Failaka Folio, which for the time being I plan to make it a simple folio to show my work in a series form, and hopefully will start working soon with the other folio: Good Morning Kuwait. After printing the folio, I've laminated the prints for more of a glossy look, and for protection as well.

Failaka Folio

Now, I have to keep this folio for showing in some container or album. I have further plans with this folio but they are on hold for now. I better do some other things until I figure out the means to do this particular project with this folio.

I've started to fast now with the first day of Rajab (7th month of the lunar year) and in hope that I would continue this fast for the next month and attach it to Ramadhan later, making a 3 months of fasting. Sounds like torture in the beginning, but I think my body will benefit from this reduction in food and drinks consumption. It is a matter of adapting to the new condition and weather for the time being and I'm pretty sure that it will all sound normal later on.

Geltani is a name I shouldn't forget as well. I have to work with this along with Ayvarith projects. My powers are getting scattered I believe but this is mainly, as I believe, for my lack of time-management skills and the ability to stick to programs. Work, on the other hand, is another burden which sounds, sometimes, like a waste of my time...


Thursday, May 17, 2012

Loaded...

A busy and idle week in the same time. Currently, I've been busy working on a report for a friend, and I do it mainly when I get back from work, at home; while at work digging for material for this report as much as possible. On the other hand, being idle with my own projects.
This said, I've finished the Failaka Folio and I've received some commentary and notes about some aspects that hopefully I will follow on with when I create my second folio, to be entitled "Good Morning Kuwait". I had some hard time converting this folio into a PDF, but it was done after all. However, I'm still considering printing this folio, and probably in the future, make it into a marketable item with a music CD if possible. My plans are on hold in this venue so far (like my Ayvarith and Geltani projects).

On the other hand, I've been trying out some aspect about my new lens: Canon Telephoto EF 100mm f/2.8 USM Macro Autofocus Lens:

Source: B&H

In the first instance of using the lens it was somehow hard to adapt myself to it. I'm not used to a prime (fixed focal length) telephoto lens. The only primes I had were fisheye (wide-angle) lenses, and hence moving forward or backward was not much of a big deal in most of the cases, but here, I think I will need some time to program my brain on the distances I need to stand at before catching. However, the closest distance as noted on the lens (for a macro shot) is around 0.3 ~ 0.4 meter away from the subject (i.e. 1~2 ft).  It is also adaptable to my Vivitar 2x extension but this needs more experimenting.
With simple testing, seems this lens is good in dealing with chromatic aberrations. I've taken a shot for the window frame with a strong backlight from the outside and examining the image closely I almost saw no infringes.

Source: Amazon
Seems, however, that my latest reading on The Practice of Contemplative Photography started to, somehow, affect my mind. With me roaming with wide open eyes, I'm trying to catch details. Even though one of the instructions in the book is not to work hard on "finding" something but to let it all come by meditation, I still think I have to keep my eyes (and mind) wide open for any chances. I do believe this book benefits specifically abstract lovers, but of course it is not only for them. Yet the topic of meditation and enlightening the mind combined with photography is usually linked with the abstract style in arts in general.
The first yield of all of this thought came about one day, when I prepared my daily coffee after coming back from work, when I noticed the cluster of bubbles accumulating on the surface. However, till I made my camera ready, the bubbles were pushed to the edges of the top surface.


Caffeine Art

After some shots, some were dark and some were bright, I've decided to settle with one and work on from that point. There was some cropping as well, and by the end, a load of some adjustment layers to enhance the colors. The joy of working in ProPhoto is the ability to create vivid colors in a slide that you might have deemed dead already!
This simple "experiment" made me now think of possible venues like doing long exposure with this lens, and also with coffee, but I have to make the setting ready for the mess that will come out by then!

Source: Amazon
Now with the other book that is left in my collection from the last order I've made: Ideologies in Archaeology.
The book is actually "heavy"; meaning hard to digest with my brain when it talks all about sociology and Marxists theories... etc. Personally, at school and college I hardly made any sense of that. I think this is because my brain is mainly physically-educated, and without examples, I wouldn't comprehend what, to me, seems like a vague space of words. Add to that I'm more inclined to visual learning. This is the same feeling when I run over advanced mathematics, and to me, mathematics is meaningless without something like Physics say, or Chemistry.
I'm not finished with this book yet of course but, reading it surely gives my brain some hard time (specially with lack of some pictures or diagrams of any type!). I'll just hope that my brain does its best with it.


Some thoughts are racing in my mind now regarding some aspects of my social life... but I'll keep them for myself right now and cook them more into the pot. I'm not sure these ideas will lead to anything serious but, after all, I can't get rid of them...