Showing posts with label globe. Show all posts

Thursday, September 7, 2017

Light Me!

It has been a quick holiday, and I really need some more of it; to sleep, and to work with my camera a bit. Nonetheless, I managed to work a bit with my camera and specifically fixing an image that I've posted in my previous post, after getting some notes from my brother about it. As for the rest of the time, I've been either dozing off or working with selfies and filters, but with a twist!

Re-Make

As I've mentioned, I had to try out and fix an image that I've posted here previously since I got some notes about it. Without going into details, but the main aspect of change in the shoot is to change the light source, using the candle alone instead of speedlites as was previously done.

وفوق كل ذي علم عليم (1)
"and over every lord of knowledge He is knowing" (12:76)
Done with speedlites in HSS.
وفوق كل ذي علم عليم (2)
"and over every lord of knowledge He is knowing" (12:76) - II
Change in perspective and using candle light alone.

I have to say that I really like the second version; Not only for its dramatic appearance and the play of light, but the perspective (as per my brother's suggestion) did add to the difference, which I think is quite interesting. In fact, in my chase after landscapes and architecture I've realized the importance of shooting with non-ordinary angles of view to keep the image being interesting (somewhat excluding panoramas since it doesn't work all the time with this art). However, it seems I've totally forgot about this concept when it came down to still life images like this. I'll try to remember that next time (and I'll try to remember to remember next time); go figure! Being satisfied about this shot did not stop me from doing some other experiments with the same set as well.

وفوق كل ذي علم عليم (3)
"and over every lord of knowledge He is knowing" (12:76) - III
B+W 403 UV filter with hot mirror.

Since I didn't use the Ultraviolet 403 filter in a long time now, I've decided to put it in action here despite the fact that, after checking the typical spectra for candles, it seems that candles do not issue much of UV radiation (if any at all), but anyway, I've decided to try. To add some charisma here, I've decided to do some HDR bracketing which required me to raise the ISO a bit (to 400). Focusing the set was a tricky business since the filter was opaque. Anyway, I've managed to make the third shot above by bracketing 3 shots and merging them into HDR. The flare was quite hideous and even controlling the parameters in tone-mapping the HDR couldn't help in suppressing these artifacts. However, there are these blue lines which emerge from the candle (not really emerging here), and that is an artifact I've noticed its presence when using UV or H-Alpha filters, with or without hot mirror, when working in LiveView mode specifically. They disappear when I work in a regular way. Not sure what is the mechanism that works behind such artifact but in this instance it was quite desirable to add a bit of magic to the scene. The high ISO played a great role in increasing the noise which was hard to clean (but reduced a bit).


وفوق كل ذي علم عليم (4)
"and over every lord of knowledge He is knowing" (12:76) - IV.
B+W 403 UV filter with hot mirror.

In the third shot, the white balance was not calibrated in-camera but was left on Auto. In the fourth shot, however, I've managed to calibrate the white balance with such hard filter (even though I'm working with a fully converted camera here), and also put down the ISO back to 100. To eliminate those lines emerging above the candle, I had to work in a regular way without LiveView. With that sprung the idea of doing HDR bracketing but using long exposures like I used to do some years back during my regular visit to the seaside through winter nights. So I did, and started at around 8 minutes and halving the value with each exposure until reaching 30 seconds. The more exposures, the merrier, since that will provide a smoother "histogram" of data for the light levels. The result in the 4th seems more pleasing than the 3rd with the absence of these distraction lines above the candle, but nevertheless, I still had to crop a big portion out to remove the flare. The matter of flares was there in all attempts, but having a filter and a hot mirror on top of it increased the internal reflection which made the matter worse. Let's hope I would not have to shoot directly at a light source again!

Candle Selfies

It all started with testing the H-Alpha filter, and the easiest subject to think of when testing is, actually, my face. Things, however, evolved later on.

Hl-Alpha filter + hot mirror.
430EX II speedlite on camera left with oval diffuser.
Voigtländer 20mm.

Ovel (Globe) diffuser from Impact.
Source: B&H
My first experiment with the speedlite was fruitful if I can call it so, because it provided some insight into this simple light modifier, the oval diffuser from Impact. Anyway, this is not the core of this text right now, but shooting a selfie with speedlite is surely an easy task, because I got to speed up the shutter speed and kill the ambient light significantly (and hide the messy background effectively!). I think I just needed a reflector to the left of my face to bounce back some light and light the shadows a bit, but well, this is dramatic enough as it is and nicely sharp (later, while processing, I've sharpened the front eye specifically in Photoshop). But since I was going on with ِAugust project about books (which for I've taken the shots posted above), I've decided here to try and use the candle light only to light my face and check the general outlook. I have to say, I'm quite impressed despite the simplicity and the technical limitations for such light.

Candle Selfie 1
H-Alpha filter + Hot mirror.
Through out these selfies, I've always used Voigtländer 20mm lens, which is my favorite right now for many tasks, be it macro (on reverse) or other styles, even selfies. Despite being a wide-angle lens and, usually, such lenses are not used for proper portraiture shots. But the fact that I was so close to the settings and its capability of focusing at minimum distance of 20cm made it a plausible option; adding to that the fact that my camera is a cropped-frame camera and it eliminates much of the periphery (20mm on 1.6x cropped frame is equivalent to 32mm). However, my first trial was with the Night Sky filter, H-Alpha, and a hot mirror (Tiffen's) placed on top.
Using an external LCD monitor connected via the HD input of the camera, I was able to manage the focusing issue pretty easily with this filter. Needless to say, I had to do a white balance calibration before shooting the selfie (and it should be calibrated with a candle in front of the lens because this is the variety of light I will be using to shoot). The result? Mesmerizing. I really loved the looks. The candle light, despite being simple and kind of hard to deal with somehow (I had to work in completely dark room and find my way through the mess), but the light itself is not "pointed," that is, it is not concentrated into a beam as it is the case with speedlites, thus it can be considered as a diffused light on its own, even though it is a weak source. Placing the candle typically under my chin level produced the so-called "horror light" but in some diffused manner which it made it, let's say, less horrific.

Candle Selfie 2
B+W 092 infrared filter.
One observation about the usage of H-Alpha filter with a hot mirror is that images are slightly like infrared when processed but with darker tones and I've found out later, from checking various transmission charts for such filter, that using a hot mirror on top of it is actually not a good practice because this filter operates around the range of Reds and above (in sense of wavelengths) which extends to the infrared range. Anyway, The first shot inspired me to use the infrared filter, namely the B+W 092 infrared filter.
I picked this filter specifically because it has a low threshold (at around 650nm) which gives some colorful results at times, unlike the Kodak infrared filter which has a high threshold (about 1000nm); The higher the threshold, the closer the image to B&W it would look. In Candle Selfie 2, I had to get even closer to the lens and with some cropping I was able to hide the flame. Probably this selfie is the best, but this was not the end of the story.

Top Row: H-Alpha + hot mirror.
Low Row: B+W 092 infrared.
Left column: originals.
Right column: Red-Blue channel swaps.

I couldn't pass the chance of all this work with these filters without trying at least one swap; the most common being Red-Blue channel swap. That produced some interesting results as well as seen above. All images here (and those before) were processed to reduce some of the flare. As I've stated before, flares are quite common and natural when the light source is in front of the lens, and that's why my beard specifically in the infrared shot looks colored; this actually had been caused by a light spot which I've tried to reduce its presence in the process (it was more saturated and lighter). I've tried to take some selfies using the B+W 403 Ultraviolet filter plus hot mirror but this is another story, maybe for another post.
Conclusion: despite its weakness as a light source, candle light is a pretty interesting and a dramatic source of light. It provides a somewhat diffused light look, but not necessarily light shadows as it is with properly diffused light (from flash or others). I'm definitely going to consider candles in other projects when I get the chance to. One set back though, it would mostly need a dark room (unless the photo idea is not about using the candle light and its dramatic look).

Finale

My experiments are going on still and there is a lot going on at the back of my head. I'm keeping some material for the next posts in the weeks to come as I don't want to put all eggs in one basket here.
I think old age is creeping to me indeed as my body is not what it used to be and I'm getting tired easily; The light time I can find to work with my camera would be a hard time resisting a nap! Is it a lack of motivation or it is indeed my body which is hitting a low. Anyway, I'll have some quiet to myself in the next 3 days with the family going out to some resort, and hopefully I can manage to work more with my camera.
All this work with my camera, which is really some experimenting after all and not a trial to make a fine art, seems to be my way to escape my anxiety and my panic attacks. It doesn't work all the time but it is after all some productive. Things at work, despite being quiet at the moment, it is yet loathsome and sometimes I get a darkened vision about the future of this place, and again I try to get my mind back to the tracks and avoid believing in things that did not happen yet. I'm clinging more, as days pass by, to the past and the sweet memories of the old times. The present, and future, are quite repulsive to me right now. Many people I like and love are disappearing or simply leaving and I can't do much about it, except to watch it. It is the law of life, I know, but these things were, and are, the only lovely things as I remember.  I miss me, so much…

Stock photography by Taher AlShemaly at Alamy

Thursday, June 12, 2014

Zu Teilen...

A week marked with laziness and blown mind because of the heat. I'm seriously having issues regarding my workplace; I started to reduce my "respect" to it, as if there is any already anyway. I'm skipping some days to do what I consider a more important job for me, regarding this blog, photography, and do some studies regarding my conlangs and phonology. Not sure how long this status would last, but in such summer and heat, and such disrespect for the admins who barely know what is science, which for, I spent 6 years of my life in this college - it is hard to tell if I can regain any respect back.
In the meantime, I'm on the path of doing some new set of experiments with my camera but yet I'm not ready to put on the pictures here; till the moment of typing this there are no shots yet! But hopefully something would be ready for the next week. However, I did a little tutorial for tone splitting which you can read below under Split It!, if you like this technique!

Crescent Beach

It was back in April when I worked with this panorama on the beach at night, in a place that I commonly call The Secret Spot. This panorama, which was majorly done by continuous long exposures ranging from 2 to 4 minutes, and took around 2 hours to be done - it was done in several formats and projections. Except of one which I suddenly remembered!

Mare Lunare

The forgotten projection was the Globe or Circular projection of the same panorama. I seldom use this projection to show panoramas because of the limited view, and hence, the limited creativity aspect that can be controlled with such projection. The projection is circular mainly and the background is transparent (if saved in a file format that supports it). Because of this circular shape, some features might look cut instead of being highly distorted. However, I decided to take a chance at it, specially that this is one of the last panoramas done before the advent of summer. Sorry, I mean hell.

Crescent Beach

Once achieved, it was really hard to pick up a suitable angle. Moreover, it was apparent that a crescent shape would form but there was a dilemma should it be made out by the sand or the sky. After changing the aspect (in terms of rotations) I've finally decided that I should make it with the sand portion of the panorama. In editing the panorama later, I've worked with many layers to remove color casts, increase contrast, and most importantly, brighten the sand portion of the image and suppress the luster of the sky just a bit to pronounce the crescent more. The formation of the crescent though wasn't quite good enough because of the connection between its ends on the far right. I think I've made a mistake in making the sand crescent here look directly to the right (i.e. in a right angle). Probably something twisted and tilted a bit would give more dynamic view and interaction with the eyes. Anyway, it is an experience, and hopefully the impression and knowledge shall be memorized for future work!

Split It!

As you may now know (if you are a follower), I've been working on converting some images to B&W and also using Tone Splitting specifically. Tone splitting provides a new taste and flavor to the B&W; Maybe I can call it the next level of tinting a B&W image.
For those who know nothing about it already, Split Tones, or Tone Splitting, is a technique to divide the highlights and the shadows to two different colors. Even though the technique, theoretically, can be applied to any images, but it is more apparent and more resilient in the arena of B&W images rather than colored ones.
Usually this is done in RAW editing phase, but sometimes we do need to edit a JPG file, thus I had to work out some way to split the tones "manually" if so to say. This method might not be as accurate as editing directly in RAW, but it accomplishes the look somewhat. I'll describe it below.

I. Open the image file (in Photoshop of course). Here, I will presume it is a colored image already. I'll be dealing with one of my old images: Harmonie.
Harmonie

II. You can duplicate the background layer to feel safe (Ctrl+J) or you can work directly on this layer. The choice is yours. However, we add then a Black and White adjustment layer by clicking button (1) and picking (2) from the menu. The tones are then adjusted to taste (3), but pay attention to the details and how the highlights and shadows are connected!
Click to Enlarge

III. Then we add a Threshold layer to split the highlights and shadows of the image. Click the button again (4), and pick (5) for the list, and adjust the tones to taste (6). Again, pay attention to the highlights and shadows here. I suppose there should be a balance between the two at this stage but it is after all a matter of taste.
Click to Enlarge
 
 IV. As the layer Threshold 1 is highlighted, press Ctrl+Alt+Shift+E (altogether!). This will merge all the layers in a new layer on the top (7), then turn off Threshold 1 (8) by clicking the eye icon beside it.
Click to Enlarge

V. While the new layer is still highlighted (i.e. selected), Press Ctrl+A (Select All), then Ctrl+C (Copy), and then Ctrl+D (Remove Selection). Now, the new merged layer should be stored in the memory (to paste it in the next step).

VI. We, again, add and adjustment layer (9), and this time we pick the Photo Filter adjustment layer (10). After the layer is placed on top as usual, turn off the previous layer (11). While holding Alt, click on the layer mask of the Photo Filter layer (12) and the page turns white. Press Ctrl+V to paste the image we copied earlier in step 5. After pasting make sure you press Ctrl+D to remove the selection. Now pick a color in any way you wish and tone it as you like (13) - this should be controlling the highlights. It might be a good idea to keep Preserve Luminosity option checked.
Click to Enlarge

VII. After finishing setting the color and its level in the previous step, directly duplicate this layer by pressing Ctrl+J (14), and then directly press Ctrl+I (15) to reverse the colors of the layer mask. This is, now, the shadows controller. Now set a new color and its tone (16). If the dialog didn't appear, just double click the icon of the layer (i.e. the one beside the eye icon).
Click to Enlarge

At this point, the main process is over. The rest is experimenting with the colors chosen for highlights and shadows, and their strengths. Some extra stuff can be done are:
1. Adding Vibrance adjustment layer to increase the vibrancy of the colors.
2. Adding Contrast adjustment layer to increase (or decrease contrast).
3. Do a slight Gaussian Blur to the layer masks of the Photo Filter adjustment layers; and the amount is dependent on the image size of course. This is to soften the edges where the two tones of highlights and shadows make a contact. The blur is better be of the same magnitude for both layer masks.

Just another halfie.
Tones split between blue
(highlights) and
yellow (shadows).
The balance here is shifted
to the shadows more, making
the blue tint of the image in the
highlights not directly visible.
These are just some suggestions. Generally, I've been using the concept of "complimentary colors" in doing split toning jobs to my images; that is use one color for highlight and use its complimentary color for the shadows (e.g. yellow-blue). However, this is, of course, not a rule. But a good and logical way to start. It would be useful to know (and memorize) the circle of colors!
All in all, even with split tones, it might look like a work of tinting a B&W image sometimes, specially when the weight of tinting shifts to one side (i.e. to highlights more than shadows or vice versa) in an obvious way. For example, Just another halfie on the left was split-toned (in RAW format) between Blue/Yellow*. Yet, to achieve the look that I really liked, the balance was shifted towards shadows more than highlights making the image look generally yellow, but with a slight tint of blue on the skin which can be hard to notice for some eyes; this is noticeable only when the blue is removed and the skin becomes "white" - only then, the difference to the eyes would be clear. When I did this experiment, it was obvious how important is to add a highlight tint (specially a tint from the complimentary color) even if it was hard to notice easily by the eyes. Even a slight amount of complimentary color into the image, whether in shadows or highlights, can produce a pleasant contrast that gives some more strength to the image. I had the advantage here to suppress the green background by toning the Green tones down; I think I was lucky for not wearing green that day!
Beside using complimentary colors in split toning, sometimes I do get the idea of the major colors in the image itself; this is if it was majorly ruled by two major colors.

Orbis Fidei
Original Panorama.
Majorly dominatedby yellow and blue.

Orbis Fidei
After splitting tones using Yellows for highlights,
and blues (cyan) for shadows.

Here comes another reason why manual tone splitting can be useful. Panoramas are not RAW files to be edited in RAW and their tones can't be split there. Thus, manual work is due (whether with high resolution TIFFs or regular JPGs). I'm still digging in the past panoramas to find those which are suitable for such technique.

*It is a convention, to myself, when mentioning colors of tone splitting, to mention the color of the highlights first, then of the shadows.

Finale

Time is ticking, and I've finally finished the bulk of the work with the Irish Visa. What is left now is the other half of the bulk! That is a proper photo for the application, and a 6-month record from my bank (to prove I can support myself there). I'm planning on leaving around the end of September. Though 3 months are ahead, but I have to hurry up with these tasks and send my documents (I think to the embassy in Abu Dhabi now) because such procedures might take 8 weeks as they stated; i.e. 2 months!

I have recently received a surprising phone call from an interior designer which quite swept me through in surprise - could this really be a start of a business trend? I'm not quite sure what is the next step, as the other side asked to arrange a meeting, which would probably fall within Ramadhan. The mention of panoramas, as he stated, gave him more ideas than he was thinking of. Anyway, I've left organizing a meeting for him to schedule and I just have to sit and wait I guess. If this could happen for real, I might have some sort of condolences regarding the despicable workplace I'm dipped in.
As for now, I'll just sit and watch my life, and work with my camera as much as possible. My dreams, myself, and I... with my camera... is all what is left for me here...


Thursday, June 20, 2013

Let's Play!

I'm not sure what kind of week is this, as I'm typing this in the middle of the week to be posted on Thursday. However, one problem with the car and the whole week seems to be like a disaster.
I didn't post a thing last week despite the simple material that was available just because I did need some vacation from writing here, and because of the hectic life pace and with such heat that already exceeds 40oC at just 10:00 a.m. sometimes, my mind and brain were completely out of words and order and all what I was thinking of was sleep, sleep and sleep.
The material, however, was not much more than simply some floral shots that were taken around my work place just because I felt the need to work with my camera. I've done as I've done the 50mm challenge  before, when I would pick up my camera and the 50mm lens only and try to train my eyes to find something; the only difference here though is the fact that I've picked up my extension tubes with me.

New Born
Canon EF 50mm + tube, f/11, 30-1sec, ISO400.

Working out without a tripod and extension tubes is certainly not a work for the faint heart! One particular scene that really got my interest and surprise is some tiny blooms in a bud beside my work place, just like the one in New Born. These tiny blooms were actually almost 1 cm in diameter when fully open; and when I saw them first day I was without tubes, and when I visited them next day with the tubes, they were all gone. Most of them died because of the heat and probably the petals flew away with the hot wind. I was lucky to find this one in New Born and I had to dangle my body and holding the camera with one hand while balancing myself with the other against some rail and with the help of the on-camera flash, I've barely managed to get some stability (but not completely stable) at 30-1sec.

Floral Abstract
Canon EF 50mm + tube, f/22, 80-1sec, ISO400.

Generally speaking, one should not try to do macro without a tripod, either using a macro lens or extension tubes. Kids, don't try this at home!
However, sometimes it just happens that you need to try. After all, we do photography for fun here and not for a serious paid job to do, and yet we get somehow extra happy to find one or two shots that went out OK despite the instability of the situation. The situation becomes harder when you have to use high f-number (smaller aperture). Maybe you've noticed that New Born was taken with f/11, and Floral Abstract with f/22 and both were taken at ISO400. This is one of the reasons that I had to use the on-camera flash even though it is not a good source of light specially in macro shots but playing around can do some achievements anyway. The core purpose of the whole thing is to go light and take whatever comes your way, thus no speedlites were taken along. The shutter can be increased a bit though if the object is under the sun as in Floral Abstract which was half lit by the sun. If I'm to take this shot again I would have done it differently, with more close-up approach, and, of course, a tripod!

3D Seeds

One of the interesting findings, if I should call it so, is when I've discovered two images for the core of a sunflower that are close to each other with some change in perspective, which ignited in me directly the desire to make an anaglyph, or a 3D image. The different thing about 3D Seeds is the fact that the two shots were not exactly different in point of view, but they are different little bit in focusing distance. However, some points did coincide (not completely), mainly those in the center of the focus region of course. I'm not sure if this is a good 3D effect in fact but with red-cyan viewing glasses, the composition looks fine and almost no ghosting appears! Maybe a trend for some new studies for 3D composing? Who knows!

Revolving
It had been some time since I did a brainstorming session but some times you don't really need it when some items are available at hand to give you some kind of an idea to do and work with. This is exactly what happened when I've found a small plastic globe that my older sister brought to teach my nephews (from another sister and my brother) about geography for some of their tests.
I thought tabletop photography is, relatively, something easy to do indoors but believe me if I say it is lot harder (and even harder when you have to move your equipments out of home!). Moving stuff from my room to the guest room where I usually shoot is not any easier task, and while there is a table that is good to use for such projects, yet I can't use it because it is in a small place and I can't move it often here and there to do my projects. Thus, all I got is one small place in one corner of the guest room.

Test Shot

My plan was to record the movement of the globe with somewhat a spot light effect from the side or from top, while having a background of some old map (I do have this already on size A2 from previous project, and yet not a good size!). Lot of technical problems were in play here, mainly the question of how to rotate the globe and have a long exposure - and in the same time how to make a coherent exposure with my speedlite. In the beginning, the speedlite has to be set on 2nd shutter sync so that after the blur of the movement is recorded with the long exposure, the speedlite would freeze the motion to get a concrete image of the globe and its map at the END of the exposure. However, long exposure with an extra speedlite light meant possible overexposure, thus many test shots with varying exposure times were taken to make sure that the background is dark but not invisible while the globe is lit with the correct power from the speedlite (with honeycomb grid attached to it); a very delicate matter, and I was going to use some ND filters as well (as in the Test Shot above) but I've abandoned this idea later as the exposure was long enough just by switching off most of the lights in the room, and a double ND would tint the image magenta.

Welt im Wandel
Tamron 70-300mm @109mm, f/4, 4sec, ISO100.

However, despite the test shots, the whole game changed when the question of the motion came into play; mainly, how to do so?
After looking here and there, I've finally arrived to the idea to use my own vacuum cleaner which can be used to jet air from the other end as well as the regular vacuuming. It did achieve something in the beginning but I've realized that pointing the hose is not an easy task and the pointer should be precisely set (as I kept holding the hose with my own hand while putting the camera on timer to take the shot). However, this step rose many other problems, like the movement of the globe itself because of the power of the air (and to solve it I had to use lot of duct-taping skills!), and also, even though there was some blur movement but the freezing motion of the speedlite was dominant and the image appeared stable and not moving, thus probably requiring more exposure time and doing that I might screw the whole mathematics of the experiment! I think it was better to use one dominant light, like a desk lamp, instead of a speedlite here. Anyway, I had to satisfy myself with Welt im Wandel and few other experimental shots.

Revolving Australia
Tamron 70-300mm @109mm, f/4, 4sec, ISO100.

In one of the trial shots I was lucky to get something close to what I had in my mind, but it wasn't created with the effect of a spotlight from a speedlite, but rather by the sluggish movement of the globe as the air flow from the hose was not precise enough, but rotating the globe for a little then it would stop. The movement blur here is not quite strong and it might need more time, but with a speedlite I believe it would all stop completely and no motion blur would be obvious as well.

One point I'd like to mention here is a website that helped me now on keywording my images and I'd love to share it with you. I've mentioned some previous website in some previous post but this one now works better for me with its functionality. It belongs to Microstock, which is another photo stock website (but I didn't make up an account there yet).

It was such a long experimenting but the main part was to set and configure the gear around which consumed most of the time (and power). One of the major problems here as well even before working with the light and motion is the fact that the cable or cord from the camera to the speedlite was quite short and bulky to be dealt with - for this reason I had to keep close to the globe and bear with the reflections on the surface (but I've managed to clone some of it in Welt im Wandel). However, this problem will hopefully vanish soon with a new set of toys!

Let's Play!
What I didn't mention last week is the fact that I've placed a new order for some new stuff. Mainly light gear but one major bulky device that I've been waiting to have (and my hands got all itchy!).
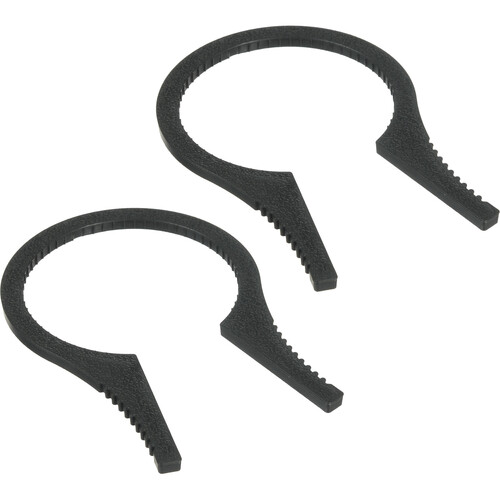
Source: B&H
First item is the Sensei 48-58mm Filter Wrench which should be very useful when I deal with my IR filter and polarizer along with, probably, other attachments. It is probably more useful when attaching the IR filter and the polarizer together, since I had problems with these two before, specially in winter. I think in winter almost everything tends to jam a bit. These two wrenches will be useful in the near future.
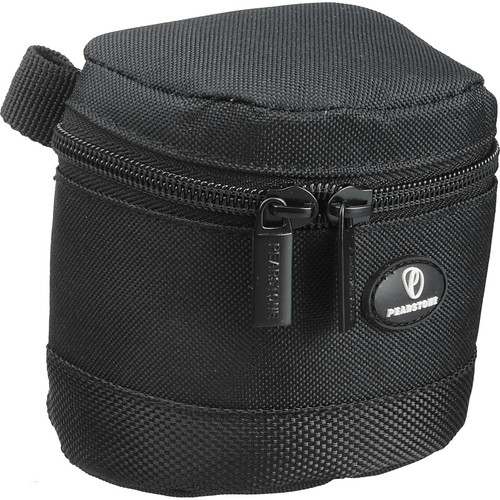
Source: B&H
Next item is the Pearstone Onyx 30 Lens Case and this one is mainly to carry my dear Canon EF 15mm fisheye lens; my one and only lens that I usually use when creating panoramas (haven't done those in some long time now!). The cover or cap of this lens is easily removed and it doesn't click over the lens' front, thus I thought such a pocket is a better protection for it.

Source: B&H
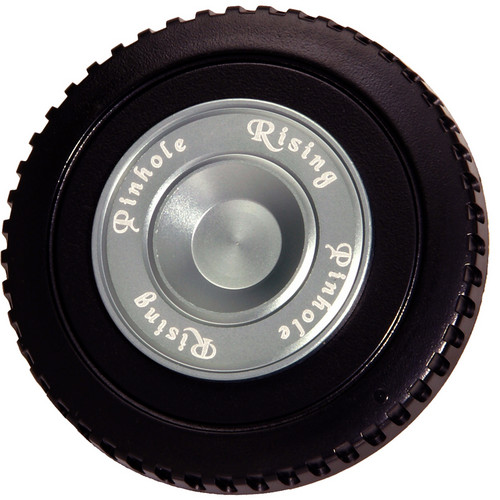
Then we come to the fun part with the Rising Standard Pinhole; yes, pinhole. Just like in the old times. This one is specifically made for Canon mounts and I believe you can find it for other type of mounts. From what I gather, the larger the sensor/film, the better for the total sharpness of the image. The f-number for this pinhole is f/222 (but in the instructions manual it's f/223 for APS-C type cameras), so just imagine the depth of field (and the length of the exposure!). I'm still interested in the mathematics involved here though and who knows, I might be able to do my own pinhole measuring to something higher than f/222. Remember that Diameter (of aperture) = focal length / N; and from there we can start on manipulating stuff.

Source: B&H
And then comes the savior! The Vello Universal Duo TTL Off-Camera Flash Cord (33'), and by "(33')" it is meant to be 33 feet, approximately about 10 meters! Unfortunately, I've done the globe experiment above before the arrival of this cable (and till the moment of writing this, I didn't test the cable). This cable would and should push the limits of my speedlites significantly. One question hovers in my mind though: what would be the situation with High-Speed photography? I'm pretty sure there would be some time delay to transfer the signal (we are talking about microseconds here). In High-Speed photography, each single micro- or even nanosecond counts. We shall see about this matter in time.

Source: B&H
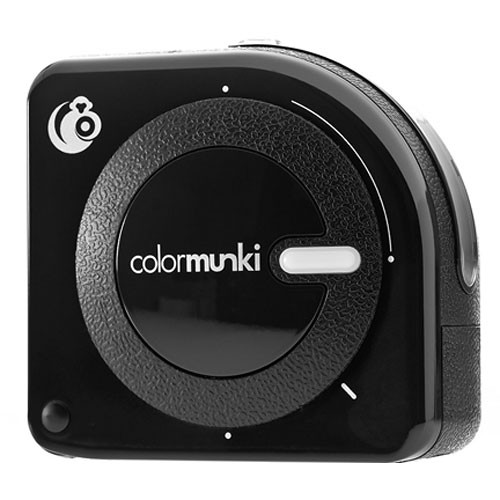
Finally, comes the one big toy that I should spend more and more time with. The X-Rite ColorMunki Photo Color Management Solution. Even though I do already have a ColorMunki device to calibrate my monitors (laptops and desktop), yet this device is here is far beyond calibrating monitors only (hence it costs more!). With this, I will be able, hopefully, to calibrate monitors, and make profiles from prints and analyze ambient light or even calibrate a projector! The perfect tool, I would say, for creating showrooms and proper digital darkrooms when needed. I'm thinking of installing this into my (old) desktop and my (new) laptop to make them ready for any task in the future. Just a point here about analyzing the ambient light; it is something important but unfortunately I don't see many people care about this tiny detail, at least in expos here in Kuwait. If you are a photographer and you really care about displaying your photos in printed form in a proper way as you envision them, it is not enough to calibrate your monitor to get the right colors. You have to get profiles for the printing but this is a matter that might be skipped for good in many cases (yet it is good to have profiles for various media). Then we arrive at the ambient light criteria. It is a good thing to know what kind of light and what color temperature the ambient light would be in the place where the photos are to be shown, because with this information, you would be able to examine the effect of such light on the colors of your photos on your (calibrated) monitor before even printing. Thus, you might think of making your photos more yellow-like to balance the extreme blue-colored light in a showroom or vice versa. It is all about taking care of the balance of colors and soft-proofing on your monitor before printing and displaying the photos.

Now with all these loads of new stuff, I think I do need an extra case to keep lot of these stuff and abandon that old small case (which was used for my old Canon 350D!). I'm thinking of getting one of those small traveling cases with wheels to keep my speedlites and related stuff in them. It is about time to organize some stuff (but not my room!).

Bücher
Source: Amazon
In the matter of books, I've finished my Lens Design book but in a fast rhythm. I've realized that such a book can't be read and completely digested without a tutor and without a practical workout. The many mathematical concepts involved are not so weird for me even though they include a high order of complexity, but in most times, many terms there within are familiar to me. However, in mathematics, at least with me, it never works without a practical workout and some tutor to walk step by step along the process. You'd think lot of the concepts here are relatively new but the fact is, most of such mathematical endeavor was developed long in the 18th and 19th centuries! Anyway, after passing through the pages quickly and read some articles, I've decided to look at some of my old books or even look into some books about optics in the library near by. That might help to achieve a better basic understanding for this topic.

Source: Amazon
I've started now reading the last book in the queue line, Handbook For Classical Research, in hope to flavor my mind with some archaeological spice. From the first few pages that I've read (and I didn't delve deep yet!) it seems that the whole book is about the Greco-Roman studies and culture. I was hoping for further expansion but anyway I still do think it is an interesting topic. The good thing about this book is that it is written by a single person, single author, and not scattered among various authors with an article or two for each. Such books with many authors involved are kind of scattered in thoughts and it's hard to keep a chain of thought going through the whole reading session. In linguistics and humanities, I've faced numerous books done in that manner and I have to say, it is kind of a waste of time to read but probably better be kept as a reference material when needed. I'm hoping this new book would give some amusement into my dull brain!

Unsettled Geltani
Maybe I didn't write much thoughts in my notebook about Geltani lately but nevertheless I was active in my mind. Yeah, I'm wondering why do I have a notebook anyway! However, I'm still planning slowly on assigning phonetic values and on the other hand I think I will abandon the newly-created system of possession articles. I think my problem was to create everything in idle and concise manner, but I think a language is more random than concise or systematic. Thus, I've decided to work on another method which might work as: pronoun-subject-suffix. For example, My Cat, would appear as: I-Cat-(suffix here). Development is slow naturally because of my stuffed schedule, and problems!

Finale
Scandinavian Eyes - Frida
Troubles on the home front keeps me busy and alert. I do say "front," yes. Because it seems that way; a game of dominance and reliance. There are moments that I do wish, and do imagine, how my life would be with another form of a family. They say you can't choose your family, but you can pick up your friends. However, under the current circumstances, it seems that I don't have the former, nor the latter. It feels like I'm floating with no support; not physically, nor emotionally. Mom is doing her best to keep me happy and I know it. I can see it in her eyes and actions. However, I'm the one who's supposed to keep her happy. I have a family that I can barely relate to.
Here and there, I'm keeping myself amused with some brush-up jobs with some photos from instagram users. It is something that I used to enjoy doing long before I take photography as a hobby. It might be just the desire to make something beautiful but trust me, if the original photo/person is not beautiful in the first place I would really have hard time creating the "uncreated". I think I do get satisfaction from the gratitude and happiness that those people show when I create some art with their pictures. I'm not a psychologist, but probably I'm projecting my needs outward - something that I've lost in my inner circle is satisfied with deeds to the outer world.
There had been some thoughts about resigning and chasing my own career but such thoughts are still cooking. It bears great responsibilities as well and even stepping into such realm should be done carefully without leaving the main job at once. However, with the current circumstances at work and the great disrespect that I face from the admins who think that my work place is something vain, I'm seriously getting sick of everyone around here and do wish to break free from all these master-slave relations. How, I don't know; but every good meal, needs a proper cooking...