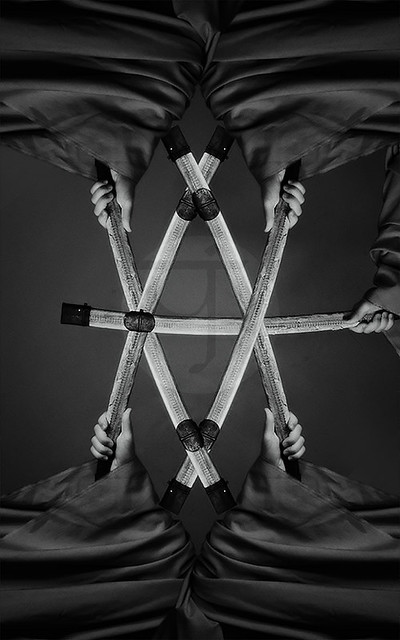
Showing posts with label tone-mapping. Show all posts

Thursday, December 21, 2017

Escoba…

Things with my Scopa project are going slow but steady, even though in many occasions I find myself baffled on how to create the design of the assumed card under question, specially when it comes to numbers higher than 5. So far, as I'm typing these words, I've been well into cards of six. Depending on what I have at hand, sometimes the card design can be somewhat awkward compared to the original design on the Scopa card, Napoletane design, like the one I did for Five of Clubs!

Cinque di Bastoni
Cinque di Bastoni

In some other instances, the design would need a completely new shot to add some more elements which I can use in the future, like the Five of Cups cards. Even though I could have used the Ace of Cups card which was previously shot (first one in the series in fact) but I thought that the Asso (or Ace) card should have its own special look, and the Cup used in that card should not appear in regular cards then after. There is an idea though to use that for more advanced cards like the Donna (or Fante), Cavallo and Re cards. Those would include a model, some human figure, which is the hardest part that might take quite a time to be done.
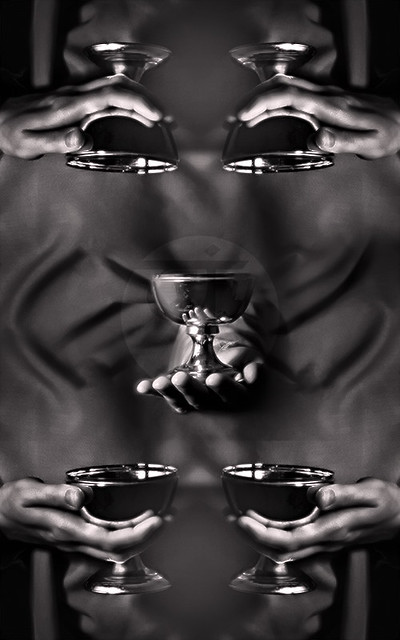
Cinque di Coppe
Cinque di Coppe
The central portion of the card was shot anew,
while the rest are elements from older shots.

As the series is going on, I'm planning to do a special design for the Settebello (i.e. seven of Coins) which is a special card in Scopa (worth a point on its own right). The design would be without any hands appearing like the rest, and with more saturated golden tint. I make some shots already for this design but did not work on it yet, as I have to finish the sixes first; Just to be organized rather than working in a sporadic manner. This in fact kind of puts on a crossing thoughts: Should I do the same for all cards of Seven for all suits, or should I do this alone for the Settebello card? I doubt I can ask the opinion of anyone else around…

Scopa Project
Album of completed cards.

Now, going back to the court cards or cards that need a model (from 8 to 10), I've been thinking thoroughly and I think I will try to use some members in the family, even though I'm usually the type that does not get encouraged in that venue, since I had my own bad experiment when dealing with photography with family members (not taken seriously as I do it). However, I'll try. Next problem to think of is the problem of the clothing and props; What should I use and how should it look? Medieval or Renaissance? Or maybe something completely different, and simple? I had some plans already for the poses (well, somewhat) but I think I will cut these plans and stick to shots down to the torso level instead of taking a shot for the whole body. However, in that case we might have a problem to be solved with the Cavallo; The Horseman. Many ideas coming in and out and I wouldn't know how to solve them probably until I get my hands on my camera and work! 


Junk

Probably I've talked about my intention to do apply some idea of a panorama in a narrow space just to experiment and see how it would look. I did, and twice in fact. As my first trial seemed to have failed, with me using a speedlite in a dark room, I guess it is final that any trials for a panorama with speedlites is destined to fail anyway for some reasons!

The storage room shot with speedlite (fit with a diffuser).


The speedlite was handheld (with its battery-pack in my pocket) and tried my best to place it behind the camera in every shot (in the darkness) with a globe (oval) diffuser on its head. Good news: with a speedlite, the exposure can be limited to 1/250s. Bad news? Everything; almost. Because of the change in the relative position of the speedlite with every shot, the shadows tend to change positions as well, and that would increase the factors for stitching errors. I have to say, I've never thought about it despite its simplicity! It just slipped through my mind. After all, even the spooky look was not achieved much. You can notice the reflections of the speedlite reflected mainly off the wooden door of the cupboard. That called for another trial, and this time working with HDR, as I usually do. 

Same Location done in HDR and tone-mapped.


Working with HDR bracketing now, I used the single light in the ceiling of this small room, and the technique proved to be efficient in achieving the dark and mysterious I was aiming for, beside other looks; That with some additions in Photoshop later on of course. From that point on, other projections were generated using this stitch only. Maybe the only awkward thing here is, the lengthy working time (one hour or a bit more), and in this place specifically I've avoided shooting the zenith and the nadir points. Stitching errors were there and it was hard to eliminate them, so since it was an experiment I didn't bother much about fixing them. However, this might be caused by the proximity of the place or maybe my panorama head needs some check-up. All in all, my Canon EF 15mm fisheye lens which I usually use for panorama shooting doesn't have a unique entrance pupil which eliminates the parallax error completely; My last check for it some years back proved that it can be reduced, but not eliminated.

Planet projection of the panorama.


My dreams of doing a panorama out of the ordinary using a speedlite or any type of portable light source must end up here I guess and look over to other methods, if any, to do panoramas. The field of infrared and UV are still waiting of course. In fact, I've been planning for one panorama of that kind even before thinking about this panorama in this small room, but the problem is, having someone to aid me with it, and since I have no one to help with this delicate business, I've been seriously thinking of getting a mannequin (just the hand at least) of some sort to what I have in my mind. We'll see…


Finale

 Well, seems things are going somehow slow but steady. Which is fine, but I won't be satisfied until I finish them one by one. Ideas of travel seem to be putting a lesser burden on my mind but they are there after all. And more over, some serious thought but living here as a whole - it's not about the quality of life after all but sometimes you just need the right people to be with, to surround yourself with, and achieve something with. That doesn't seem to be happening in this place on Earth where I am right now. My only soulful joy for the time being, as it seems, is to enjoy every bit of winter, before it all runs out and we are again into the hell of summer. I can't wait to get some long weekend by next week…
 

Stock photography by Taher AlShemaly at Alamy

Thursday, January 1, 2015

Hektisch II…

I'll try to wrap this quick. Well, happy new year first, and wish you all who read this (ONLY THOSE READING THIS!), ahem, a creative new year. A year that washes whatever pains that were there in 2014.
Currently, I've been celebrating my own triumph against one of the hardest panoramas that ruined my appetite for panoramas for some time, but now the appetite is all back of course! However, there remains the part where I MUST do the fixes for these newly generated panoramas, including the HDR tone-mapping which proved to be tricky - and we end the show with noise cleaning which proved to be an arduous task.

Casadh an tSúgáin
(twisting of the rope)

In fact, Casadh an tSúgáin is an Irish song title which I was listening to as I was doing the processing for this image, and seems it fits exactly the image's geometry! When I explored the variety of projections I've totally forgot about the usual flat panorama as it looked very regular and mundane. Hence, I've continued to explore the other styles. However, in Casadh an tSúgáin tone-mapping was troublesome and consequently it made for a hard time with the noise cleaning later. The leader of the photography group liked the small version of this panorama, and asked me to include it in the next set of images to be sorted out for future uses by the group (a usual procedure); however, I'm not sure how would the large version sustain the critique with such noise and spots that would need another round of cleaning. In this projection, I've noticed how the close pillars (to my left and right on location) could have formed a straight line. Originally this panorama was 90o counterclockwise but I decided to put it as seen above making the symmetry line horizontal and adjacent to the major pillars - while keeping the corridor up and down to form some sense of ground at least, specially with some of the buildings.

Herculis Cuniculum
(tunnel of Hercules)

Next on the list was the tunnel projection, Herculis Cuniculum. This one had even harder work done to it and yet it is suffering still, in the original large version at least. The main problem here was to cropping and distort to ensure some degree of symmetry. Anyway, it seems I did achieve some degree of symmetry along the central vertical axis but not the horizontal one unfortunately; and this is what you get when you screw things up on location with symmetry and centralizing the tripod in the middle of location! The noise level here was significant but not troublesome as much as it was in the previous projection with Casadh an tSúgáin, which is something I don't understand so far, but probably it is related to the degree of distortion that each projection bears. The main nuisance in this panorama specifically comes from the night sky and the buildings of the city; those are the main sources for the high noise level.

Planeta Laternis
(planet of lanterns)

At the end we have the typical planet projection, Planeta Laternis. Originally, this panorama was 90o clockwise. However, it did seem to be more balanced with keeping the buildings of the city up, while the corridor would spread left and right. Anyway, the rotation process was done later, after all the fixes and the trials to "gain the symmetry" back with a lot of distorting processes. Since I didn't shoot the nadir, I had to fill the space of that block with a solid color and seems it fits perfectly (after adjusting the hue and saturation to match its surrounding tiles). All of these adjustments of course were in HDR mode and before tone-mapping, but the hardest part was to distort such a large file in HDR mode and make it fit specific proportions and perfectly centered. For this reason I mostly do large stitches because I know I will crop them a lot later on, and the good thing about Planeta Laternis is that the edges (where the roof of the corridor itself lies in this projection) contains not many interesting details beside some stitching errors; Thus, cropping this area out was a big relief and a solution which shortened the processing time significantly.

How my Photoshop looks when working with these panoramas.
Notice the guidelines all over the place to ensure a symmetrical distortion and cropping.
click to enlarge

Finale

One year is over now and a new one coming even though I don't care much about it. After all, generally speaking, I'm not supposed to celebrate it! However, I do wish all readers a happy new year with all the best wishes to be fulfilled within.
My plans for now is to use the winter to my advantage as much as possible and go out at night often. I know when summer comes, it's all but a dead season. I just hope my body would cope a bit further with this, specially with the hectic life style and responsibilities thrown on my way.
As for my plans for the new coming year, all what I want for the time being is, to be more careless actually, and have further fun. Lot of fun…

Thursday, September 22, 2011

360...

A fast paced week somehow. Nothing new on my camera level except of visiting a mall with my class to do some practice, but otherwise, no new panoramas, except of working with old ones. I keep looking at my Ayvarith papers and my microphone connected to the PC and ask myself when I'm going to work with it. Hope soon. For the time being, there are games on my list I need to finish. Games, are important to me. For the time being I'm trying to finish a game called Gray Matter. A nice one with sci-fi theme and magic stuff; oh, combined with some psychology as well! After that, I'll be in hunt for Jonathan Boakes' games Bracken Tor, and TLC3. These corners of the UK that really need a visit one day. Mystery, is what keeps the mind alight. But I might not be able to play all those until the time of Hajj comes, by mid October. I'm busy, somehow, sorting my schedule and my leaves to do the pilgrimage. My work place is somehow giving me a headasche for the time being with their stupid laws and regulations.

I. Failaka Re-Visited:
Under the light of considering further possibilities with panoramas and changing the viewing angle, I've re-visited older panoramas, and specially the one for the "Ghost Bank" taken for a deserted bank building in Failaka island back in November 2010 (after my return from Ireland).


Ghosts Bank

This time the twist was for other projections as well, which I've never thought of back then. Anyway, the tone-mapping is quite different of course. I knew beforehand that Photomatix will give me a headache with some errors related to the size of the final image, but after all I didn't make it smaller and went on with it. For some weird reason, when Photomatix v4.0 encounters HDR images as large as 8000x9000 pixels, it would give an error for memory issues. Doing a "batch single files," which does not require a visual examination, would still not work. Photomatix v3.0 on the other hand, it might show some errors related to memory limitations, but batching single files would work fine (and of course takes a long time). For this reason, the planet projection of this Ghost Bank panorama was tone-mapped in Photomatix v4.0 in the beginning, and the tone-mapping parameters were saved, then loaded into Photomatix v3.0 and the HDR image was tone-mapped accordingly in "batch single files" process. I don't know what's the deal, but it might be a time-consuming process.

Dark Aspect

One of the aspects of this panorama is the fact that I was working with the monopod. Shaky, but with cloning out the remnants at the end, not much of a headache. If the monopod was raised to a low level (to the level of my chest almost) that approximately raises the VR-head and the camera to my chin level. At this level the shake might not be so apparent (but there is some of course). I had to use back then because I didn't have the appropriate tripod.
The second venture after this was a vertical panorama. I made a mistake here but might be considered a surrealistic look after all.

الحلم الكئيب
The Gloomy Dream

For some reason I just named it in Arabic. However, the viewing angle was tilted and hence the tilt on the top part of the panorama is apparent, and that, caused me to name it a "dream" because it has some surrealistic look.
This vertical view was cropped (typically) from the sides and the edges to remove the remnants of the VR-head and the colors were altered a bit by adding a Photo Filter adjustment layer before tone-mapping the HDR. The Photo Filter was Deep Emerald, to give a creepy look. Also there was Exposure adjustment layer to pull back the exposure values accordingly to the whitest spot in the place (the entryway at the bottom).
Maybe the most beloved aspect (point of view) for me was the WV or the Wide View angle. I had to work a bit with adjustment layers a bit before tone-mapping in Photomatix.

Cold Alone


I had to crop little bit in the beginning just to bring things to the center a bit. In this image, and instead of fighting back against the purplish hue (because WB was set to Fluorescent back then) and make out the whole thing in vibrant yellow and red, I've decided to move to the next neighbor of purple; Blue (remember the rainbow? ROY G BIV rule?). In my work with HDR slides in Photoshop so far, I've rarely used the Hue/Saturation adjustment layers. Most of the color adjustments were done actually by Photo Filter adjustment layer. I find it giving more realistic looks and adds to the color instead of shifting the color. That does not mean I don't use Hue/Saturation layers, it is just I don't find them useful all the time.
In Cold Alone, and after fixing the Exposure as usual, I needed two Photo Filter adjustment layers. The first one is to add the general bluish cold look to the whole scene. In this layer, I used a layer mask to remove this effect from the yellow-reddish ceiling here. The second Photo Filter layer was added to increase the vibrant color of the ceiling (by using one of the "warm" presets) and also using a layer mask with it, but of course it is the inverse of the previous layer mask used before (just a copy paste of the layer masks). Weirdly though, in HDR mode in Photoshop, you can't use the inverse command (not from menus nor with the short cut "Ctrl+I"). To do the inverse of blacks and whites, I would use the Levels command (Ctrl+L) and flip the black and white arrows at the very bottom of the dialog box. To avoid any fuss, I would remove the black arrow to the middle first then the white to the other end, then push the black to the place of the white arrow. Sometimes it becomes so hard to know what to click when the two arrows overlapping each other.
Just imagine the blue ink you will be losing for printing such an image!
For the time being, I'm considering visiting Failaka again, specially that summer is on its way out, but I can't decide which time. Since I'm preparing for Hajj journey, I might not have the needed time yet to go there. It would be nice to take a tour with my camera on video inside the car like I used to do on the mainland. We'll wait and see...

II. 360:
Last Sunday it was another workout session with my Photography class. This time we headed to a mall here called 360. As you might have inferred from the name already, the mall is circular in shape. I spent around one hour and 30 minutes trying to find that place, moving from one jam to another.
Architecturally speaking, I didn't find much of interesting in fact. Although we had the freedom to go into shops to take shots from there but as it is with me always, I hate to contact people or ask for permission, so I got stuck to my ground; roaming around the mall trying to find some interesting angles. We had around 2 hours of time but personally I spent only one hour or so and decided to head back home before the darkness hovers over. However, it was a spark for an abstractive mind. I had to bear little bit with annoying people as usual, but the main point in the whole practice, as I think, is to learn how to concentrate in the middle of a fuss (quite the point if you are a journal photographer).
Although most shots were taken in bracketed exposures for HDR later on (except of few ones taken in long exposure), but a lot of those were uploaded after some processing in RAW then converted to JPG.


These are some abstracts, and there were plenty of others that I just need some time to reflect upon. As I said most of the images were uploaded directly after processing the RAW file, but there was a trial at least once for a HDR. But tone-mapping the HDR (in Photoshop) didn't spare me from using extra adjustment layers.

Wooden Arches - Processed RAW

Wooden Arches - Manual Tone-mapping (Photoshop)

Wooden Arches II - Photomatix


The contrast was a bit enhanced when tone-mapping but the major blue shade on the top was added by a Photo Filter adjustment layer after tone-mapping, and then adding a layer mask to avoid touching the lower portion of the image. I tried in tone-mapping to do the best to lighten the wooden pillars a bit but I guess it didn't work out well. I still have Photomatix which, as usual, proved to be superb to Photoshop and my manual tone-mapping. My main concern, in fact, to do the HDR slide was my hopes in eliminating some movements on the ground from people going around (yeah, so annoying, no one would even try to respect you *sigh*. OK, I'm kidding...). However, after merging into HDR it turned out that procedure didn't help much and I had to clone out the movement myself.
We are left then with some long exposures. Long exposures here is something longer than 2 seconds for me. Accordingly, depending on the lighting inside the mall, a single exposure at around 0EV takes around 8 seconds. Enough time to make a water line look silky with its flow. For this reason, my first target was the fountain. I took several shots in fact, but maybe the best angle was from the top.

Vortex

The vertical line in the center is a matter of the fountain itself and helped me much to achieve a sci-fi look. I tried to calculate the time it takes for the fountain to spur the water vertically high up, but seems the process was completely random! I had to depend on luck little bit here (isn't photography, majorly, a matter of luck after all?). I had to crop the image little bit because I didn't realize that originally, I didn't include all the fountain, and the edge was cut from the right side, so just to go around it I've cropped more to concentrate the body of the fountain on the lower right corner. Hope this visual trick helps.

General view of one side of the mall and the fountain.

In the image above, it is more like documenting in fact rather than being an abstract itself, but it was taken in a long exposure as well (around 13 seconds). The long exposure here, specifically, helped on removing the excessive movements going down there on the ground. You would think the mall is empty, but no, it wasn't. This is one of the benefits of long exposures in such situations (beside the night photography thing). Sometimes, people might occur like ghosts passing by, however, this is a nice effect too in my opinion. The fisheye distortion was fixed to straighten the wooden pillars (and that makes the image smaller in looks).
Now, for all these pictures you see... I've forgot my flash memory at home when I went to my class to discuss the images and finding my errors. Now, doesn't that suck? Yes, big time. My memory sucks, and I suck...

Been days now since I wrote something, and been weeks since I worked with my Ayvarith recordings. Seems my fatigue is slipping me the chance to do anything (well, except of using my camera maybe). I'm not sure when I will start recording again. I've arrived at chapter 4 so far. Chapter 6, will be the great burden on my back. As for now, I just wish if the Hajj season comes like a blink...


Thursday, December 2, 2010

Dear Ol' sRGB?

A week now after the training course which I was part of, and still feel tired, mostly of everything. Just today, I woke up later than my usual time, plagued with congested nose. It is a slow and somehow boring week, despite my work on my photos, which was so-so actually, but the core of the problem, who or how, would bring my heart back from New York?

I've been working now and then in order to finish my second album of pictures from Ireland - Co. Tipperary, and somehow I'm almost done. Only one is left and the album is ready to be spread all over, and hopefully I can do this one picture today. Meanwhile, I'm having now a hard time with the Dining Room panorama, after fixing the Lounge panorama with lot of stepping down and compromises.

The Lounge of Thornbrook House.

In this final panorama stitching, I had to give up many hopes I had for this room, but at least I got the general shape in the picture without much loss of "interesting" details around the room. The following steps were stepped down:

  • Panorama stitched from JPEG files (not even 16bit TIFFs), because stitching HDR slides produced some artifacts caused by blending extremely dark with extremely bright areas.
  • Because of the above, I lost the chance to tone-map the HDR image as I like. Instead I had to tone-map everything in the beginning then stitch.
  • To reduce stitching errors radically, I had to give up the zenith and nadir completely. The zenith specifically was important for me because it had a crystalline light chandelier that I wanted to show its sparkles.
  • Henceforth, because of the above, I had to give up with creating a QTVR.

It is obvious now, from The Lounge panorama, and The Dining Room panorama, or even from old panoramas I've worked with, that my everlasting nemesis is generally, long straight lines. Such lines do not have much distinctive features making them hard to overlap accordingly by PTGui, my preferred tool for stitching as always. The Dining Room seems to be going on the same steps of the Lounge now, but I'm having a break from this panorama trying to do more single slides and images, not only from my recent visit to Ireland but also, for one image, from my previous visit in 2009.

The weirdest thing I've encountered so far is, tone-mapping HDR images in sRGB color space proved to be more attractive and sharper than tone-mapping HDR in ProPhoto color space! For those who do not know the difference, ProPhoto color space is wider and usually gives vivid colors for display rather than the regular and simple sRGB space. Everything goes back to Mostphotos website actually, when I noticed that images I'm submitting, whether tone-mapped HDR or simply RAW fix, are changing colors significantly on Mostphotos website.

 One of the images where the blue color was "killed" by change of space. 
It is apparently dark here but originally it is brighter in Photoshop. 
Photobucket, after a system upgrade, seem to gauge their acceptance for color 
spaces more than before as such change in colors was not noticed before from my side!

Of course, the first suspecion in such cases goes around the color space. Thus I decided to make a try out and submit my images in sRGB space and see and notice any changes in colors.
After that, I adapted for myself a new approach creating the HDR images, but it is lengthy. Despite the saying that merging HDR from original RAW files is better to include as much as possible of the dynamic range, I converted my files here to 16bit TIFFs and cleaned them a bit from the noise with slight sharpening by NeatImage, then saved those files. Note here in the process of converting the files from RAW to TIFFs by the Raw Converter (ACR), I've assigned the color space as sRGB and worked a bit on each slide of image to avoid out-of-histogram regions for each slide.
Next thing was using Photomatix to merge them to HDR, as I don't trust the capabilities of Photoshop in aligning images when I use the "merge to HDR" command there. I saved the HDR image as EXR for reference, and the surprise was when  I tried to tone-map. The image kept relatively sharp, nd gave out interesting vivacity of colors more than a ProPhoto tone-mapping would give out! Not only that, but the noise is significantly less and the image is relatively sharper than when I do it with ProPhoto. Since I care about the looks and not merely putting out with technical details for the sake of being technical, I'm considering now for real, going back to the rare ol' sRGB!

Image that went under experimentation.
The entrance of Inchagoil church ruins on Inchagoil island, Co. Galway.

I think right now it is the time to put my ego aside and work on the more humble sRGB just to get such significant colors and clarity from my HDR images. The first step was to try it again for real... on another image.

Cahir castle, yard entrance gate.
Don't pass under those dents!

This image proves again that sRGB in HDR merging is better, but I've noticed something now concerning the saturation of some colors. It was hard to make a vivid aspect of the grays and the blues by simply tone-mapping in Photomatix. This problem, however, could be solved using Photoshop's hue/saturation layers. My aim next step now is to try to merge directly the RAW files using sRGB space in Photomatix and see if this will work significantly in the same way. That way, I'll be shortening one step out, that is converting to TIFFs (although I do some noise cleaning in this step usually, but it is nice to try out how much noise will be added in my HDR directly from the RAW under sRGB).

Not all my HDR images, after all, are tone-mapped automatically and given vivid colors. I think this is an important aspect when dealing with HDR images; you have to know what you are dealing with and what are you trying to do. HDR technique isn't really all about "eye-catching" images, but it is just a tool. I try to keep this in my mind all the time.
One of the images that I experienced this aspect with was the picture of the field of corn, taken from over the bridge at the edges of Cashel town back in October;

Corn field in Cashel.

When I saw this picture again, I remembered the famous song, Fields of Gold, and hence I decided to work on it to give some resemblance to the title of that song, Fields of Gold! The main problem as you can see here, the day was foggy, heavily, and the colors aren't saturated much specially in yellows. Sure thing was to seek HDR solution here, but since we have a "picky" approach here to turn the day from foggy to sunny somehow, we can't really rely on automatic tone-mapping by Photomatix or any other software. We have to use the manual tone-mapping with adjustment layers and hue/saturation adjustments, in abundance.

Fields of Gold!

My skill in manual tone-mapping didn't progress much; I still have problems getting used to the tone-mapping curve in Photoshop. The "radius" and "threshold" parameters, although it is advised to not touch them at all, I can't get the hang of it to make a sharper image from my HDR slide. However, with exposure and saturation fixing manually, there was not much "curving" needed further.Just minor touch to increase the contrast between different regions. The artifacts, however, like halos around bodies is more pronounced in the original image when zoomed to 100%.

Also related to the talk about the HDR imaging, I've been looking for a reliable freeware for tone-mapping HDR images, and found some substitute, but none, so far, can really be a match for Photomatix, not in terms of quality only, but in term of easiness to use as well. The thing that really sparked this search is the memory issues and the weird squares showing on my Photomatix window (regardless of the memory issues) from time to time, preventing me from seeing the full picture and make good judgement or even move the sliders with easiness. Hence, I thought I might try some other programs and who knows, there could be really nice options out there undiscovered yet, and most importantly, free! I've encountered some programs, free- and shareware, but all in all, I couldn't depend on them completely to be a substitute for Photomatix. But some of them are good one way or another and kept them installed just in case. Some of these were:

  • Picturenaut: A freeware made by Marc Mehl and co-authorized by Christian Bloch (Blochi). They claim it is really memory-efficient (and designed specifically aiming at HDR panoramas). I've downloaded it (from here) and tried it, and I think it is indeed as they say! Memory-efficient! The main issue here is, from my perspective, is that Picturenaut is the good-boy type of tone-mapper. It has many controls and many different aspects of the tone-mapping, but generally it doesn't provide the potential to give those fancy looks or the grunge look to your HDR images. I didn't frankly test much of its other aspects like aligning images, but I do trust Blochi did take care such an issue. If you have an HDR image or panorama, and you want to be the old good-boy type with it and fix the issues with highlights and shades, and just give it the brilliant "normal" look, then this is yours. Of course, if you have memory issues, this could be the best for you. And it's free!!! (Don't hesitate to donate though, they are doing great job there!).
  • Qtfsgui (a.k.a. Luminance HDR): Another freeware. Frankly, I don't know what QTFS stands for, but the GUI is surely for "Graphical User Interface". This software has the potential of giving you the weird looking tone-mapped HDR images, but it is still under development and would need a really steep curve of learning, for me, to know what I'm doing. To tone-map an image, you would need to pick up an operator from the list of operators and work on the sliders to adjust the values as you like, to give the image the look you like. In case you don't know what are operators, let's say they are the type of algorithms or approach of tone-mapping your HDR image, and there are local ones (adjusting group of pixels or certain areas in your image) and there are the global ones (applying the algorithm to the whole image at once). When you choose an operator it gives a little description, but all in all it is not sufficient to know what you are doing with the operator. Every time you change a value of some factor, you need to click "apply" and a new window will be pop-up each time to see the latest changes to your image (and sometimes it gave an error and the program closed). It is the work and effort of one person, thus I can't say this is bad at all. The guy deserves some donations at least! You can get it from here.
  • DP HDR (Dynamic Photo-HDR): A shareware by Mediachance, and hence, you can expect it is advanced. The main feature of this tone-mapper it offers variety of operators and categorize them accordingly to local and global, and under each category there are sub-categories that are direct to the point; like "eye-catching" option for example. It extends further in controls giving you the ability to control the alpha channel itself, or the layer inside HDR which controls the luminance; you can blur it more, invert it and some other stuff, to give your image the drama needed. I can't describe all the options provided in this software but one way or another it is similar to Photomatix but with different names sometimes or more specific sliders. When merging into HDR, it gives you the option to do your OWN aligning (Cool! somehow!). It has also a built-in Noise Reduction tool (while Photomatix does that automatically) and gives you the chance to control it as you like and even brush off areas that you don't want it to be affected. So far though, I don't remember it supported OpenEXR format (.exr) but only the Radiance format (.hdr). One weird concidence though, I tone-mapped one image and saved it as 16bit TIFF, but in Photoshop it appeared completely different than what I saw in the software's window! Weird, but promising.
There had been other trials on some other programs but I didn't experience them enough to write something about them here, like FDR Tools (basic version is free while the advanced version is shareware), and easyHDR (shareware). The latter is a promising software and bears resemblance to Photomatix, but the question now is all about the memory issues in between all of the mentioned above. So far, I'll be using Photomatix, and I still feel I didn't grab it all in my mind yet.

After all of the mess above, you might be thinking I was busy with something for real, well, I was trying to. Pushing myself hard to do something out of nothing and forget some thoughts that invade my mind from time to time about life. My life, that is. I've been in the process of grasping some phrases or words in my mind and really want to write them down, yet, I can't really glue them together. My mind is scattered apart. Since my return from Ireland, I've become more isolated around myself and not able to interact much with people specially at work. The new lunar year is on the gates and the month of Muharram will start soon, announcing days of mourning and black clothing. It will be a period of silence for me, and I have to stop listening to the songs that I do listen to usually everyday. It's going to be hard and to be frank, my conservative education is against what I'm doing, but the turmoil around me wherever I go left me no choice but to let off the steam via music-listening. I just hope and wish I will be pardoned in this life and the one after...
All I hope for now, is to get rid of this annoying nose congestion.

Alayhá, šá ayná ðánúħ kay ayná yaħavt? Limaz má tixmaŧ ayná élaká yi xawant ayná e-ąasiy?


Wednesday, March 10, 2010

Alexander 6, V13.

I woke up late, and that was not great. So, I felt tired already, and to work I was not ready.
Since I didn't go to work, there was no work in tranlisteration for today (plus, my papers are already in the office!). The weather is nice, and seems it is nice every time you skip work in a working day or something. Well, with the beginning of this new year I have 4 casual days in my account so I'm just going to use one. Nothing is like sleeping for extra 6 hours in the early morning! But wish if I know why did I wake up late like that... my sleeping time was the usual!

Anyway, started to work on the previously made panorama of our living room. There were many problems in the image that I tried to solve some of them by cloning out. Beside that, with some spots in the image, I really do need to hurry up and look for some cleaning kit even if I have to order it from the US or so. The problem is with liquids as usual and hence I have to look for what is usually called "the static brush" which grabs the dust by electrostatic force.
I think the main problem that caused all the fuss in the stitching process is mainly not being able to rotate the camera around its no-parallax point. Unofortunately, you'd a special head for the tripod to do so and they aren't any cheap stuff. Still, I did previously some nice panoramas with this simple tripod of mine which I inherited (sorta) from my father.
Another problem that I think it affected the process is that I probably was not rotating the camera in a fixed amount of degrees in a circle (because I was depending on my eye sight in the viewfinder of the camera and aligning the AF points in the viewfinder). I think next time I should consider using the scale engraved on the head of the tripod itself and rotate accordingly for a fixed amount of 30 or 60 degrees around the axis.
been thinking seriously of finding some shop to do me a favor and create my own lens ring or what is sometimes called a "Q-ring" (it looks like a Q). I was inspired for this by some German photographer (which unfortuantely I can't find his webpage again) who put a photo of his gear and below that he clearly stated "my self-made Q-ring". I think if you have some specifications for it you can go to any metal-works shop to do something similar. This ring is to be fixed on the top of the tripod and it holds the lens of the camera in a specific point, i.e. the no-parallax point. Sounds a simple solution instead of buying those complicated and expensive tools, but yet I'm thinking of the body weight after all and is it really safe to use it that way (even if the German photographer did so already with his Nikkor lens).

However, I keep working on some versions of the living room. Until Now I made several versions and 3 of them are similar in projection type but different in the tone-mapping process:

1. Tone-mapped then stitched:

I did this version mainly when I was trying to find a way to stitch my panorama with a lesser memory requirement that it would take for an HDR panorama. The tone-mapping was done in a batch process in Photomatix over all the smaller HDR (smaller relatively not in size!) images. These images were stitched later. I didn't like this one really, because my aim was to produce an HDR panorama and being able to tone-map it manually in Photoshop, or even more, fixing it before tone-mapping it, and suck a task can only be done in Photoshop (to me, I know there are other softwares out there). However, I gained something after all in return. I saved the template (or the order of the control points and their settings) and I used it later on for the HDR panorama stitching. A process that I might be using it a lot in the future. The advantage of this, you can fix everything in a low resolution JPG panorama and save your work and then just apply it as a mold on the BIG work of HDR later on and directly. Without worrying to optimizing it in the PTGui itself (I did not run optimization for the panorama after applying the template taken from this one).

2. Manually Tone-mapped:

After taking the control points "mold" from the previous model, I applied it into the HDR panorama here. I made several adjustments on colors and saturations and saved it directly on top of the original HDR (unfortunately) but anyway, the greater deal was with the errors of stitching and the occurence of broken lines or features. After all these adjustments, I went on and manually tone-mapped it by using the usual "local adaptation" and the usual toning curve. This was my aim in the first place, because I can manually control the illumination of the light sources themselves here and drag it down to make the light bulbs just like a glowing stick by itself.
Notice however, that in all these versions of panoramas, there was a hole in the ceiling that I could not clone out perfectly nor I could use the healing tool in Photoshop in 32-bit mode, thus it was necessary to fix that only after tone-mapping. This is a result of removing 3 images from the sequence because of troubles in finding control points suitable for them.

3. Photomatix after stitching:

This is the reverse of method #1. But the main thing that affected it is that the original HDR file was actually saved from the previously non-tone-mapped version when I did some work in Photoshop with it before. Maybe it's not different much in general hue, but it is brighter and, well, might look a bit artificial. I based it on Grundge style and re-worked the values accordingly. This is how I mostly use the Photomatix; pick up a style and adjust it. I noticed however, later on, when I zoomed into the image, there was strong banding in colors around the light bulbs in the ceiling. I kept a larger version of this image for later work. I'm thinking of submitting this one to the stocks. I need to do some work with it after all to remove the portraits on the walls and see what else I can fix in it. I'm not so optimistic about accepting it though, since it has lot of erratic stuff going around with it. I will minimize it before submitting in hope some of such errors disappear or just go unnoticed when zoomed in. (Thinking) this is not cheating, is it?

Time to head now and do some work for "work"! I leave you now with Verse 13 of Alexander 6.
__________
289. and the swords met in a fierce battle
290. someone is seeking revenge
291. while the other is seeking joy and blood
292. you could hear the roars echo
293. in every valley and over the mountains
294. it was a day of terror over the lands
295. when you could see the rocks spark with fire
296. and with every hit from the Charnagút
297. and with every hit from the Balíkhah
298. the ground would shake with every sound
299. the sounds of the swords were like fierce thunders
300. made by the mad Heavens and Earth
301. one hit by the other with no rest
302. they exchanged the force mercilessly
303. and and the hero had many injuries
304. fighting was hard for him now
305. and the shepherds were watching and surprised
306. if Kadmún was a god how come he is weak
307. if he was god why he did not kill Alexander before
308. thus they started to rage like Fulkan Muttere itself
309. and starts throwing stones on Kadmún
310. amid the rage Kadmún shouted at them
311. "verily I shall kill you all with your sheep,
312. useless creatures deserve not the air they get!"


Tuesday, March 9, 2010

Alexander 6, V12.

Despite the sleeping time that was relatively good (7 hours instead of typical 4 hours or 5 hours in generous times), I still feel tired. Well, not as tired as yesterday however. I barely woke up this morning even though I slept earlier last night, after putting on the stitching process ON.
I don't remember I've read this before in the panorama book by Harald Woeste (Wöste?), but it was a thought that occured to me by coincidence and I always see it in PTGUI software for stitching, but I never realized what does it do. It is something called "apply template." It's there all the time and could even spared me the fuss in some other occasions, but anyway, I still need to try it out more.
The idea is simple, you stitch some panorama, save the control points and the other settings of the stitch, and then apply what you have saved of settings on another panorama. This will save much time mangling with and trying to fix the HDR images with their large file size. I produced already a list of images with Exposure Fusion and stitched them together and made out a JPG file out of it and this stitching was saved (merely as a safety procedure in case I need it again some other time but it came in handy just now!).

 
The EF version of the Living Room panorama in Little Planet projection (not finished).

After loading the HDR images into the software for many times and mangling with it, I had after all to cancel 3 images of the list (reducing the number from 55 images to 52) just because they made a problem with control points (they have no distinguishing features as they were taken for a blank space in the ceiling). This step resolved the issue of the blurry background that I faced the day before, because the software thought these images were for the floor and fixed them there with no control points however.
However, in my trial to do the HDR stitching and because of the problems related to alignment of lines, I tried another approach which was not very liked by me, but it was a trial and I saved the control points file. The approach was to tone-map all the HDRs according to some fixed parameters (in a batch process) and then nail them down with PTGUI. I noticed that here, most of the problems with the lines vanished (but few remain as well which aren't so obvious as I was working with the HDR version);

 
Tone-mapped then stitched (based on painterly style), flat spherical projection (not finished).

The 2 images above had been adjusted a bit in Photoshop for contrast by the way. Anyway, after all of this fuss I decided to "apply template" of this tone-mapped version of the HDR (which sounded good enough and without much fuss in the lines) to my HDR stitching list. There is one option that is always recommended to be run whenever a stitch is to be done, that is the "Optimizer". It helps on fine-tuning the control points over the images and also to fix the shear and other stuff in the images depending on data taken from the camera or entered manually. The thing is, this option did screw me big time indeed! After applying the template of the tone-mapped version to my HDR list, I just forgot about optimizing, because I did once and all it did was to screw the panorama more. It is purely a mathematical approach, I understand that, and hence it cannot substitute completely the sense of the human eye. Moving along now, I made already a flat 360 panorama of the living room in HDR format (but with reduced size and not in maximum output, since I don't want to play games with my CPU) and also I left the house letting the software stitch a "fullframe" version of the panorama, which made it look like peeking into a keyhole somehow. I need this panorama in HDR in the first place to fix the errors and to remove the tripod remains in the image and then manually tone-map it since I like to control some aspects of the picture, specially the light sources in it (light bulbs in the ceiling). Otherwise, I would settle down with the tone-mapped version of Photomatix.
 
The work load in my work place seems to be on the verge of increasing somehow with many missions given to me between my hands. I already neglected an invitation for a workshop to Ukraine for 5 days since I don't feel like it is worthy. My mind has completely changed from what it was 5 years ago when I just graduated. I think problems of life do change the scales of aspects of the life greatly, so much that I don't even care about science like I used to do before. All what I have in my mind now is pleasure and photography which brings me pleasure as well.  I have a list of fish samples to work with currently and just now I've been asked to prepare a layout for the poster that we intend to do for some of our results in a simple research we did. Moreover, there is an intention to work with some people (from the ministry of health, the radiation department) on some aspects of non-ionizing radiation (mobile signals ..etc) as a friendly gesture without something official  in order to have some experience with the work in such field. I'm even reluctant now to go and ask about the available scholarships and the ability to study Archaeology as I wished before. I still love Archaeology really, but who knows what's in the job market for this field, otherwise, it is such a magnificent field of mystery and living in the past. I'm no treasure hunter with childish dreams of some adventures, but traveling for such a job or such a field and get to know "friendly" cultures and live the past again away from these busy times, is surely something that always kept my imagination vivid.
We have, adding to the load, some guests that are expected to come tomorrow and they are some expert in the field of radiation and hence, I do really hate to be there. I'm thinking seriously of making something up just to avoid going to work.

__________
265. Alexander controlled his anger severely
266. he almost wanted to kill the demon
267. and the demon was laughing with no feelings
268. then the hero said to the demon slowly
269. "have you not done enough evil to the world?
270. to come here and trick the minds of people,
271. verily your end is near by my hands"
272. the demon laughed out loud and said,
273. "what people? nothing shall live on this Earth,
274. except of us, who are made of fire,
275. if your God loves those, He shall give them the mind,
276. and since no mind on them is set, I am their lord"
277. and since that moment Alexander could not stand
278. but got his sword out and attacked Kadmún
279. with a direct hit on the head
280. but the demon was fast and not a fool
281. and Kadmún then raised his fire sword
282. known in the legends of the ancient days
283. the sword of Balíkhah
284. the one made by the father of demons
285. whose name was Marjí Shadúm
286. who used it to cut the mount of Fototuus
287. and made it the Fulkan Muttere as today
288. to be his home and for his children


Wednesday, February 10, 2010

Alexander 4, V5.

Another day, after experimenting again with my censer and the flash. Well, I learned it the hard way, that putting my flash on "manual external metering" does not allow for auto-bracketing of the exposure in the camera itself. I think what we need here is, a coherent light source, like a spot light. In fact, we might need two. One on left and the other on right and both pointing at the censer in a dark room.
You might ask, why I'm taking all that pain just take a picture in the darkness while I have a beautiful green big room with many lights in its ceiling. Well, mainly, there are 2 reasons:
1. I want to work more with my flash and get used to it.
2. I want to emphasize the contrast between the flames inside the censer and the surrounding atmosphere. Taking the picture in a bright room will make the candle flame not so unique and not "flamboyant" if I should say. There must be some contrast... and if possible, a strong one.

However, the experiments didn't go all with no results at all. Despite the darkness of the images taken (even with a flash), I combined some of the images (3 of them) by Photomatix which allowed me to change a bit in the EV values of the images, and hence, in the HDR historgram I got a wide range of EVs (but it's fake since I entered the values myself!). After all, the tone-mapping was not so bad I guess. I saved the file as an EXR and worked on tone-mapping in Photoshop and Photomatix.


Censer (manual tone-mapping in Photoshop)

Photoshop manual tone-mapping


Censer (tone-mapped with photomatix)

Photomatix tone-mapping

I do prefer the second one though for the high contrast, but this façade is only in a small thumbnail. In the real sized image, the situation is completely different with the noise level (mainly because of the long exposures times).
Moreover, I combined another 3 images, but this time they are not different in exposure value, but in ISO value. Two of them were taken in ISO100 (but they were different in EV) and one of them was in ISO200. The result was somehow OK when the HDR histogram is examined, but yet, the noise was so hard to clear off (after the tone-mapping of course).


Censer (Manual tone-mapping)

ISO100 and ISO200 combined with manual tone-mapping

In a conclusion, I think that we can try other ways to make out a HDR image. Yes, the best method is, I would say, either by auto-bracketing or by using different shutter speeds, but I guess the main idea is to get different light levels of the same object and make the computer do its own algorithms and logical comparisons to build up a unique "data sheet" with values corresponding to the light level of the object.
Today, I think I'm going to experiment again, and this time I'm going to use my flash again with my filters, and change them gradually.

Away from HDR and its fuss, I was doing some experiment the day before with my flash in "stroboscopic mode." That is, the continuous pulses of lights. These are useful to catch up a moving object.One experiment I still remember from high school time, when we used a stroboscopic source against the fan up in the ceiling to determine its frequency (that is, how many times does it turn around in one second), and as you may know already, frequencies are measured in Hertz (Hz). When the target object looks like if it was still in its place, then you can say that you got the right frequency value. Why? Think of it: a light source gives a pulse in the same amount of time in which the fan does one complete circle, hence, whenever there is light available, the fan is always in the same position ready for a new cycle and so on. Thus, with time, you will see as if the fan is still and not moving.
Anyway, taking a photograph of a still object is not so funny, is it? What's the problem with that? I can turn off the fan and snap a picture of it and post it and say "hey, this IS rotating fan, but got paralyzed by my flash." Well, no. Our lives must have a problem; and yes, I'm a pessimist.
The thing about snapping such an image is to produce some pattern; a beautiful one. Hence, we have to use the stroboscopic source, either in a frequency lesser than the one of the fan, or more. Lesser frequencies are not fun, I tell you. All what your camera would get is a plain white disk. Thus, we must use higher frequencies. Notice that we are using these high frequencies in connection with a long exposure (relative long exposure, I don't mean here the 30 seconds and above). Well, maximum of 5 seconds I'd say it's enough. One more thing to note is that it is better to have a dark space as well. Otherwise, what's the use of the stroboscopic flash?
Anyway, here you go with some results, which unfortunately, I've forgot the frequencies for each!


Vent fan 1


Vent fan 3


Vent fan 2


However, the "faster" the fan looks, the higher the frequency is. Why? Well, to think about it, if you use a high frequency (more than that of the fan), you will be able to catch the fan in moments before completing a full circle. Thus, the higher the frequency, the closer the fan's wings will appear because they just moved a little before the last pulse of light, and building up those several shots, you will have a faster looking fan. On the other hand, if you happen to use a high frequency for the light, but "just" high above the fan's, then the wings of the fan will move a bit further until the occurence of the next pulse, and so on. Building up the snaps together, you will have a slow-looking rotating fan.
The electricity in Kuwait runs at 240V-50Hz, thus it is natural to guess that the fan frequency is at 50Hz, and I tried it and it worked and the fan was like stable in its place. I changed the frequencies many times when I snapped the previous images, but I would say the best results (to me) were those taken at 70Hz to 80Hz (or 90Hz).

I think I will continue my trials with the censer as usual for today, and this time, I will try to fix the flash to some amount (maybe full power), and then I will fix the the shutter speed and the aperture, and after all, change only the filters. I think by that you should have different exposures already, but the problem is with the flash being close and will give a reflection off from the body of the censer as usual. I do need a remote trigger!

I wrote another poem today, and I called it "Zvinkle and Danim" (or Daneem). Don't ask me about the meaning of the title because I don't know, but if you are interested in the meaning of the whole thing, then you might have to read it yourself and judge what I'm talking about. In fact, I think it was more like a nonsense in the first place but anyway my thoughts played the trick here while my fingers obeyed the orders. Again, it is for you to judge what is going on here...

__________
97. the men gathered around Alexander
98. and he ordered the pikemen to advance
99. and then raise the pikes like thorns
100. while the archers pointed to te sky and shot
101. and the swordsmen prepared for intruders
102. and the circles of fighters twirled
103. and Alexander in the middle slaughtering
104. his sword was the Charnagút of the three points
105. amid the mutants he was clearing them with no shield
106. while the beasts ate the bodies of soldiers
107. and few villagers remained in their place
108. and the shouts of agony started in the camp
109. and the loyals before left Alexander in his trouble
110. while Alexander was thickened with injuries
111. and thus with the anger in his heart
112. for all the trickery he faced in his camp
113. Alexander made a scream of wrath
114. when men faces turned yellow and red
115. and the beasts of Zimúrá ran away
116. just then the camp started marching behind them
117. picking them and slaughering them like insects
118. and Alexander was swimming in his blood
119. coping to stand up amid his victorious men
120. and looking at the massacre and the red trees