Showing posts with label صباح فخري. Show all posts

Thursday, December 2, 2021

+10…

So, a month now since my official request for retirement and until the moment of typing these words, things aren't over yet. On a positive note, I don't have to go to work daily right now as I'm officially off, but I'm still not completely detached from work because I didn't finish the paperwork related to my "leaving certificate". Thus, the month of November just passed me by without a salary in bank account. To add pepper and salt to the wounds, everyone is just working slowly, barely answering phone calls, and what would take a day to be done or even less, takes up to 2+ days to do, if not a week or weeks.

Anyway, away from my ranting, I've decided for this week's post to talk about 10 of my images that had been marked as "Inspirational" by YouPic. This comes after finally having my 20th image marked as inspirational. I've made a post long time ago about my first 10 images, and so this post will be about my second 10 inspirational image, as noted by YouPic

+10

So, here is the list and in the order of picking them up as "inspirational". I'll try to be brief as much as possible in describing each image.

1.

_MG_7671

 The first image in the list as you can see bears no title, because, well, I didn't really care much about it and I didn't think of it as something special. It is one shot from a series, when I shot the fireworks during the "Constitution Day" celebrations back in 2012. I was on the roof of Soug Sharg Mall and the location was not special or anything; It didn't provide any good perspective or foreground. Yet, I kept shooting that night and got an arsenal of fireworks shots.

2.

_MG_7773

 As you can see, #2 is like its predecessor and from the same location but with a different focal length, thus more buildings and lights are included. Again, I didn't think of a title for this shot because, come to think of it, it's a series with loads and loads of firework images! I can barely remember my own passwords at this age now (yes, 41 is old). Just to add some "dynamism" to the image, I've decided to crop it at 16:9 as if it was some wide-screen movie scene. Unlike its predecessor, I didn't work quite much on the blacks here to make it lighter. I think the tones weren't helping anyway.

3.

_MG_7751


Another one (and a favorite) from the series of the fireworks which was also marked as "inspirational" by YouPic. I like this one in particular because of the 3D-ish look that happens to be here. I was able to lighten the pitch black sky a bit and like its predecessor, it was cropped to 16:9. At that time I was experimenting with the cinematic looks, so I used this ratio quite often to mimic a movie scene or something. Well, I still do sometimes. One weird thing about this image is that the recorded f-number is f/36, while I'm sure that the max f-number for all of my lenses is f/32!

4.

Peekaboo Building

Peekaboo Building was just a random shot that I've taken in Dubai in 2013, when I was there for some ceremony I was invited to. I've stayed for 3 days but, literally, didn't find much to shoot there during my stay. This place is just not my thing really. Anyway, this is one of the random shots that I've taken as I was walking aimlessly on the roads not from my hotel. Of course, this shot was cropped and adjusted (specially to make the vertical and horizontal lines as straight and divergent as possible). It was uploaded in the abstract section on YouPic even and not in the architecture section. To me, it looks quite random!

5.

Herr Fengus


Then, we have here my little friend which showed up one morning during COVID-19 lock up in 2020, and then disappeared the next day. Well, in our garden some fungi like this show and disappear regularly (I guess they don't stay because of the water force over them). Anyway, shooting Herr Fengus was quite a challenge, because it was taken handheld and getting low. Even the focus here is not quite pinned correctly and I had to do some compromise with the f-number to let in more light. Originally, it was white-yellowish in color, but with post-processing, things flourished!

6.

Abhainn na gCuimhní Binne
(river of the sweet memories)

The next one came to me as a complete surprise. An old shot from Oughterard, Co. Galway, Ireland, which was shot with my old Canon 350D (my first Canon camera ever), back in 2009, during my first visit to Ireland ever. The scene here is quite random but I tried to make something out of it by color grading and dodging and burning here and there. Seems all that work (which I wasn't quite satisfied with) did pay off with being picked for the "Inspirational" section by YouPic. I remember some of these white spaces (the sky) needed some fixes and I'm guessing I've sorted this out by some patching work.

7.

In The Grace of The Cormac


In The Grace of The Cormac is an old panorama shot in my second visit to Ireland, in 2010, and this panorama was the beginning of a series of re-stitched panoramas done from RAW files without resorting to HDR techniques. Also, in this re-stitch of this panorama, I've included a human factor in the middle which I used to remove in the original (and I was lucky to have this lady photographer at the center). Using only RAW in stitching is not quite easy as I thought! The panorama is shot inside McCormac cathedral which forms a compound with Cashel Rock castle.
[Worth noting that this panorama particularly is available in large size for download and printing as a fine art piece from my MostPhotos profile].

8.

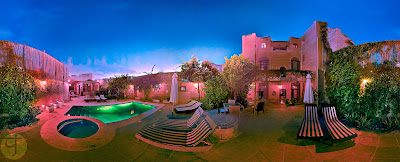
Il-Pixxina
(The Swimming Pool)

The next one in the series of re-stitched panoramas (from RAW) comes from the swimming pool of the place where I stayed in Qala, Malta. This panorama was shot twice back in 2015. My first trial wasn't successful and problematic because the light was changing quickly, so I tried to fix that the next day with another shoot with somewhat proper timing. This re-stitch, however, which is made from RAWs, was made from RAW files of the first trial (which I didn't delete). One element is missing from the original (2nd trial stitch done first) and that is the cat which posed for me in the scene!

9.

بَـهْـجَـةُ الـعـاصـِيْ
(Sinner's Delight)

As for #9, we have another re-stitched panorama from the old days when I was "able" somehow to go out on those cold winter nights to the seaside and do stuff with my camera. Like its original predecessor, the RAW-only re-stitched panorama was a challenge in terms of noise and details, as well as exposure. The title of this panorama can be understood in two ways depending on the perspective of the viewer; Looking at the city, this place can be the delight that the sinner is looking for, or considering the isolation from the city, this place can be the delight of repentance that the sinner is looking for.
[Worth noting that this panorama particularly is available in large size for download and printing as a fine art piece from my MostPhotos profile].

10.

يَـحْـمـورْ
(Redness)

The last one, came about as a surprise to me for various reasons. First, it had been a really long time since any of my images was marked as "inspirational" on YouPic. Secondly, the image is actually some neglected test shot done in the summer of 2012. I don't find anything special in this image, and here was the challenge in fact (for me) to create some interest by color-grading and other editing techniques. I'm still thinking, how come I didn't point my camera to the city on the left and take a shot there showing the reflection on water? To add more "strength" to the image (so to say) I've cropped it into a square and made sure that the horizon line is around the center of the image. 

Finale

Now, this is the post for this week. I'm not sure if I will post in 2 weeks time, but I do have some ideas cooking in my head which I hope that they would produce something to post about then.

One of the ideas that cook in my head is to pay tribute to the great Arab tenor whose songs I'm in love with: Sabah Fakhri صباح فخري. This great iconic marvel passed away from our mundane world on November 2nd; An event that poured melancholy into my life further, but c'est la vie. I've did few images back in 2016 probably trying to get some inspiration from the classical he sang on various occasions, but I think those weren't enough. More work need to be done in this aspect and I hope that my willpower is up to it.

By the time this is posted, I'm praying that my status with my workplace is finalized. I've spent the whole month of November without a salary because of that and I'm praying that it won't be another month without it. A question keeps popping up in my head now and then: What now after retirement, TJ? However, I'm trying to suppress my thoughts for the time being and just focus on the rubbish on my full plate with all these stuff related to the workplace and the papers here and there. But if I'm to be honest with myself, I really don't know what is my next step after retirement, except that I need to enjoy my life just a bit. Just a bit…


Thursday, May 30, 2019

Mowaššaħiration!

Woah! What a relief! After passing more than half of Ramadhan going to work everyday, I am now relieved as I did start my little vacation for the last 10 days of the month of Ramadhan, which will be followed of course by Eid Al-Fitr (i.e. the feast). So we have here some good 2 weeks or a bit more even which I'm trying to fill it with everything I can grab; Sleeping, camera work, sleeping, gaming, sleeping, and of course typing something for this blog - Too bad I can't find any room for my conlanging activities though. Yet, I'm still posting weekly on my Ayvarith's Instagram page (every Friday), but honestly, I do miss working with the rest of the conlangs and scripts that I've used to create. I think though that it is a good thing to focus on one conlang for some time to develop it further. Anyway, as the time goes by, I'm slowly setting up my camera and working with the sky (no results so far) as well as doing some of the projects that I've been planning to do for a long time now.

Mowaššaħ-ired

Well, a fancy subtitle, parallel to "inspired." If the reader is not familiar with what "Mowaššaħ" is, well it is just a form of singing that developed and made popular in Andalusia during the Islamic/Arabian rule over the Iberian peninsula. I'm a fan of this folk art in general, specially when such songs are performed by Sabah Fakhri [صباح فخري].
One of these songs (or Mowaššaħát) sparked in me the idea of some photo that I wanted to perform for some time now (months in fact), and it took me a while to get that mood to work with it and even to decide about the look that I wanted. To be honest, I didn't decide about the look that I wanted UNTIL I've started setting up the lights and camera! But first, let me get you into the mood with me in this, with the Mowaššaħ itself:


I hope the recording is good enough though. Most of these recordings date back to the 90s and before. I think it is also proper to put the lyrics down so it would reflect on the image later on as I go through its details:

I Yearn with eagerness to some lands - Where in I've seen the beauty of Salma
I've drank therein intoxicated water - From the hand of the cold drink bearer

The inspiration here comes from the first verse of the first line only. Even though, personally, listening to this music time after time gets me somewhat in an intoxicated mood. As I've mentioned before, I didn't really realize how would go about preparing or shooting this one, but I had 2 major images in my head: a globe, and a face (my face of course since I have no one to help and because it reflects something in me).

أحن شوقاً
Yearn with Eagerness

As I started putting the gear in another room to try and figure out what to do, I realized then that I would be sitting looking at this globe miniature. However, I wanted movement, and that yields that I must use a slow shutter, and a slow shutter yields the fact that I drag the shutter (or use the 2nd-curtain sync mode). Ridiculously, this option cannot be activated with my speedlites UNLESS the speedlite is connected to the camera AND no wireless option is turned on. Unlike the HSS mode (i.e. high-speed mode), where I can connect a speedlite to the camera and control another speedlite via wireless to shoot in HSS, this is not the case with 2nd-curtain sync. For those who do not really know what is 2nd-curtain sync: If you take a regular shot using a speedlite for a moving object with a relatively slow shutter speed, the movement would appear backward, and hence the 2nd-curtain option would be required to trigger the flash JUST before closing the shutter at the end of the exposure (of course we are talking here in terms of milli- and microseconds). Why would I need it for the globe? Well, I was turning this by hand and if the speedlite was triggered at the beginning of the exposure, my hand could be there obscuring the view (because the speedlite light would freeze the motion at the moment it strikes the body while the shutter is open). However, trying hard to make it all in a single shot, my trials were in vain. The globe itself didn't even budge with an air blower! I could move it by hand, but it was hard to move it with air, however strong it was (almost flipped the miniature itself but the globe itself didn't move!). So, it was time to break it down to chunks, and collect them together in post-processing.
The first chunk was to record the globe as it rotates separately, and then shoot myself for another chunk and merge the two. That also didn't work because the motion blur of the globe was not so obvious; I was using the ambient and flash light together here (and even used ND filter but then removed it) to fix the situation, but probably the shutter speed should have been a bit faster? slower? I really couldn't say. So, I ended up shooting several shots for the globe on various positions and then simply blending them together in post-process, in hope that that would give out a motion sense! Looking at it now, I don't think it is so though, except, maybe, for some apparent shake on the edges of the sphere (in the full size image) which mark some motion is there. This shake, I believe, is not a real motion shake, but merely an artifact from overlapping various frames; I believe.

100% Crop for one side of the globe in the original image.
Click to enlarge.
Left to say, I've tried to add some "dreamy" look to the whole image in post-processing (using specific techniques in editing). I would be using the Clarity slider if it was one image only, but with such a blend, it would be hard kind of balance all together across the frames. I did in fact use the Clarity slider for one frame, and that's the one including me, to reduce the rigidness of my face! After finishing the whole blend, I've added a golden tint to the whole image; Something which I've tried to introduce using the white balance in-camera but it didn't work quite well (the effect was hard to notice so to say).

Finale

Here we go; One project down and some few others left! And I need to work around them ASAP before my vacation is over and be back to the daily routine the fatigue. In fact, I wanted to talk about another image which I've created this week in this blog post, but I've preferred to keep it for another post (otherwise this thing would be way too long here!).
Meanwhile, I'm trying to have the time with myself, isolating myself from the rest of the world because apparently I'm not on the same page as the world is. It's hard to explain or maybe it is hard for ME to explain but it is like the feeling how you feel when you think about something being a complete waste of time and effort, and no use in trying to fix it. This is close to what I feel in the current days. The thought of resigning and just get some time for myself is a frequent visitor to my mind, but yet I do realize the serious consequences of such decision. And this is what keeps me walking; Just walking…
Well, for the time being, let me just get rid of those ideas that I'm bound to work with my camera for the time being, and let's hope I do catch something interesting in the sky other than the simple stars that I usually catch now... now that would be such a great breakthrough!

Another boring "deep sky" shot (stack of shots in fact) with lot of artifacts.
Shot on May 28th, using Hα filter (converted to B&W).


Thursday, December 27, 2018

An tSiúlóid…

As I'm typing this, there were some trials (and errors of course) on some little project which really consumed my time at home recently. Anyway, I'm still working on this and let's hope that I get something useful out of it! Frankly, I'm not sure what I'm doing or have done already, but we'll see. I'll explain things later when it is time to talk about this little idea in future posts, hopefully. Meanwhile, I'm actually living from one weekend to another and now waiting for the New Year's holiday here (which will be only one day). Not just to sleep more as much as I can, but to ease my mind a bit (specially about driving the damn car to and from work). Anyway, who's not sick of driving cars right now in this place with traffic jams taking up the roads for more than 12 hours a day?

Budgie

Since I was not doing much with my camera and as I was trying to kick myself a bit to move and do something, I've found some new target for me here: Our parakeet (a.k.a Budgie). We had this bird for a while and I truly hate to see birds in cages but, well, as usual, I don't have a say in this in this home of mine. I have to say though, he kind of have a weird character. I can feel it.

Nostralia
So, what I did, I just placed the cage on a table (as usual) and placed a speedlite beside it on another table and started to shoot a bit randomly; Why randomly? Well, it is an animal and I can't control its pulses, specially being inside a cage! Thus, my mind was set to do a lot of cropping work later on when examine the shots. To overcome the bars or the cage, I've used my 100mm macro lens (at f/8) in hope that the bars would not be too obvious; However, they helped me at some point as we will see! And for some reason, I've used my converted Canon EOS 7D here without any filters (no IR, nor Hot Mirror), and guess what? I was able to retain the original colors back with the adjustment of the white balance while processing the photos quite easily. Just as a remark: The main source of lighting here is the speedlite and not the ambient light, which means there is an abundant amount of infrared issued through, but without using any filtration system, I was good to go and I got the colors back (well, to be honest, I was hoping I would get something vivid or strange in terms of colors).

3D-Keet


Parastrakt
Taking many pictures on burst (successive) mode did help me as well to inspect the shots for some chances to make anaglyphs. They were not many in fact and apparently f/8 was not enough with this macro endeavor (the shallow depth changed as the bird moved and I was trying to follow him up!). Anyway, my main aim was to create abstracts actually and not anaglyphs, and this is why I was thinking of the crops from the very beginning of this random shooting, as you might have seen already up with Nostralia. I didn't name the pictures even prior to this post; I'm just putting the names now for easy reading and pointing!
Looking at some of these images, I've remembered some of the photos I've seen from some photographers here where they did use telephoto lenses with close objects like birds and horses and that really gives me an idea that I might try one day with my Sigma 70-300mm lens one day with this bird, as apparently this macro lens didn't block out much spaces, as can be seen in Parastrakt in the lower right corner (this image was flipped and rotated to be in that form by the way). The irony is, the first image I've shot in this series, was the latest to be processed and yet, probably so far, the most beloved to me! Behind Bars.

Behind Bars

Behind Bars was one of the first shots I've made in this series but for some reason, I didn't check it out till later after processing few images. I loved the lines formed by the ribs of the cage, with some of them being in focus and some blurred. Originally, I tried to work in color but then I realized that this image is more dramatic and more eye-catching in B&W and probably the emotions do show better in that way. I can see fear in his face (what about you?) probably because of what was happening around him with flash pulses striking his face. What I really like about this image, too, is the way that blurred lines of the ribs blend on the head of the bird like bands of inverse colors; This is definitely a trick I need to think of using in some of my future shots if possible. So far, there had been few images I need to check, and some I need to re-check in this series to see if there is any potential left in them.

The Stroll

With the "somewhat" lack of activities, and after watching some photography videos on Youtube, I got some passionate kindle going on inside of me to do some shooting outside (specially with the winter season right now). I do miss going out at night but anyway this is not the case here. I'm starting simple: A stroll around my workplace.
The thing was like a challenge and I used to do some challenges of that sort often and specifically around my workplace, where I would pick my camera with one lens only and go around my workplace trying to shoot something and come out with something unique. This time, though, I packed a camera with a lens (50mm), plus few items (2 mini-tripods which I didn't use anyway and intervalometer, beside a pinhole cap). As I started to work, an idea sparked inside of me to do some Anaglyph-dedicated shooting, which I did (despite the annoying flies!).

The strolling kit packed in a little camcorder bag.

In order to quicken my work a bit and also to get as much as possible out of the scene in order to be merged as an anaglyph later on, I put the camera on burst mode. It was partially cloudy day, but nevertheless, I could work in the range of 1/1000s of a second for the shutter's speed, and that made my work easier as all I had to do is just press the button and move gently to get a set of images with slightly different perspective. Working with 50mm lens here did not give me the choice to get closer (I didn't bring with me any extension tubes for macro jobs), and there were some instances where I wished I did bring those with me. However, the killing mistake was to use a very shallow depth of field (f/1.4, the lowest f-number for this lens). This aperture proved to be so sensitive to the movement that two successive shots can be so different in terms of the depth of field (and the location of the depth or the sharpness of the image). Anyway, I did escape with some useful images after all and some of them were good to be merged anyway!
 Some shots, I think, are better off to be in B&W as well because of the drastic and quite eye-attraction they cause away from their normal colored looks. I've discovered this by chance as I was trying to remove the color distraction from some images before converting them into anaglyphs. Sometimes, and for some images, the original colors can be quite an obstacle for a proper 3D Anaglyph viewing.

The Negative Bloom
Despite being like a negative or invert in colors, it is a direction conversion into B&W with a play in the tones.
One of my favorites.

But anyway, back to the main purpose of the stroll, which is regular shots, with some abstracts if possible. Escaping from the flies outside, I came back in into my office and started figuring out a way to use the pinhole cap this time (0.22mm) and shoot something towards the window. Actually, the idea for this shot was the reason I thought of bringing my camera to my work, because when the lights are switched off, the window becomes the main source of light; A majestic scene in winter time and the cold weather! Maybe because of the warmth that it provides? Seriously, I'm in this job for about 13 years now and I don't feel this, with such sun rays coming through the window, but only in winter alone. Well, it might have to do with the direction of the sun as well and how the rays enter the room, who knows?! In anyway, it was something to think of for a shoot!

My Dreams Window
The challenge, though, was how to I'm going to shoot this without a tripod? Even though the sun rays were strong enough to shorten the exposure, yet the exposure was in terms of seconds (ranged from 4 to 30 seconds depending on the angle). I almost gave up on that actually, but then I thought while use this relatively-long exposure to my advantage and create the abstract by moving the camera vertically in a line (as much as possible). Which I did, but then I did also add some motion blur when editing the photo later on. I wonder if such images are welcome in stock websites!

Doppel
Even though I was aiming to do a long exposure originally with this pinhole cap and through the window for the people who would usually walk outside, but the circumstances were unlike it. Not many people out there, and no tripod. Thus, I had to satisfy myself with this for now. However, I thought of one last exposure to make with the help of the whiteboard which is hanging in my office. So, I just stuck the camera by hand onto the whiteboard (pressing not too hard for stabilization) and took the exposure like that pointing to the same window, and hence we can see the reflection of the window in Doppel. To tell the truth, I was really thinking that I shot the two windows in my office for a moment! But then I remembered that the second window is covered in curtains still. Dementia at its best.
This was the end of the stroll and in fact up till this moment of typing this, I'm still checking and processing of these images. There is a plan to do it again and that time would be with my Voigtländer 20mm lens. This would be challenging somewhat because it is a wide angle and so many elements might be involved. The good part about this lens is that closest focusing distance is about 20cm which allows for some intimate moments with objects! This said, I'm already planning to upload some of these photos into my accounts on stocks websites and writing the info and keywording is surely a time-consuming task that must be done anyway, and pretty soon.

Finale

Well, because of the scrambled mind here I was not so fortunate to write down a new poem. I really wished to post one here to be my last poem for this year, but alas, my core couldn't stand it with imagination. I'm, though, mainly focusing on pinning down my thoughts about life and recording them for future reflections on my thoughts. It is all recorded in this open document, which I might produce another similar version of it for the year 2019 specifically.
I've been feeling some rage inside of me lately. It's not weird to be enraged, but this time it is a bit weird in a way I can't explain. I mean, a rage to the limit of despising the very thing about the human nature or let's say of those around me. Arrogance? I don't quite think so. Probably just tired. So tired. I'm missing the time when I would just sleep any time I want without worrying about anything. Anyway, let me hit this post button for now and go ahead and work with those images… in hope that I get something ready for the next post in 2 weeks. I leave you now with one of my favorite Muwashshahat by one of my favorite tenors, Sabah Fakhri...


Thursday, November 23, 2017

I Progetti…

Weather getting colder here, with some rains; A time to rejoice. The only thing I'm hating about this is the traffic jams. They are there all the time in this place of course, but with a tiny spit of rain and the whole scene turns like if it is a snowstorm in Siberia. I quite realize the need to drive safely but no need to create a "soap opera" about it. Such conditions, specially at night, tend to put more pressure on my vision as it seems. Let's see if we are able to go out and shoot at late nights as in the old days during this winter. Though, thinking about it, I really can't think of a proper place that would deserve my attention right now. Most of my projects and inspirations are done indoors, and specifically my home, and with my body being split between work, traffic jams, and home, I really started to hate the idea of driving just to do a shoot. Unless it's for money of course. Meanwhile, I'll keep trying to do my thing with my own head and my own ideas with little projects…

Let's Play

I've done a session about 2 or 3 weeks ago with my brother doing the preacher gesture. Out of 8 or 9 shots, I've settled with 2 shots mainly that were relatively good. I've discussed these in the previous post anyway if you like to read about it. However, I've decided to take this one step further with a little edit.


Due del Predicatore

Due del Predicatore (Two of Preacher) is formed by one of these shots done previously, with duplicating the image and rotating it. Some delicate masking work was involved here as well. It was an experiment just to see how it would look like, but this experiment did trigger something else. An idea.
This idea is still waiting to be completed, but I've managed to put a plan or a general view for it by writing them down, and all I need now is some props, and a model. As usual, I might need the services of my poor brother again!
The idea is about creating a set of Scopa game cards, but in images; Real ones. Thus, I will need some disks or coins for real, swords or knives, for real, and many other things that I'm still not sure how I will be getting those.

Notes and plans for the next project.
In a nutshell, I'm supposed to end up with 40 images, one for each type of cards in the Scopa game. Sounds too much work, and I think it is indeed, but I think simplifying things further would help on quickening the process. For example, I'm set on using a single speedlite for all images and probably I would be using the globe diffuser on it for most of the shots. I've decided also that all shots should be with my modified camera and using the infrared filter (B+W 092), but later on, the images would be converted to B&W completely, and maybe with some reduced contrast like in the case of Due del Predicatore. I think the lighting should be dramatic, but with some sense of mystery, and I believe nothing mimics the feeling of mystery better than the gray tones. In Scopa, the "faces" cards, or cards with human figures are three: Donna, Cavallo, and Re (queen, horse, and king respectively). I'm planning to keep the shooting for these cards to the end since they require a full body shot, and it would be nice to have various figures instead of working, again, with my brother alone. Thus, for the time being, I might get on working with the "normal" cards. There is a problem with the Donna though, as I don't think I will be able to get a female figure to help me here (not ready to pay for a model, pardon me), so a little research here revealed that in some Italian versions of the game, the Donna is called "Fante" instead; soldier, or foot soldier, and sometimes this would be translated into English as "The Knave." So, there are other routes around this problem I guess; we'll see.
Lens-wise, there will not be a single lens to work as I might range my shots from macro to normal, but I believe the work won't be out of 3 main lenses I have: 20mm Voigtländer, 50mm Canon, and 100mm Macro Canon. The last one though seems to be acting weird lately so I might use extension tubes if I have to with my 50mm lens. For a beginning, I'm already planning on setting the aperture to f/11, always. Talk about more flash power! There is some thought ahead about how to represent this set (and how to upload it to stock if it is feasible to be sold like that) but such thoughts are kept for later in the meantime, and it's important to get it done first. Till the time to complete this comes, I need to get busy with another simple project that I've decided to do and might post about it later!

An Taobh Níos Dorcha

"The Darker Side," this is what the title is about. However, to be honest, this idea was not the core of this shooting session with myself, but rather the idea was completely stemming from a technical aspect, and a desire to create something that would be suitable with the Swipe property on Instagram. In other words, an image made specifically for Instagram in the first place. There was nothing to think of, naturally, except of my face. Beside the fact that selfies on Instagram seldom appear as slides to swipe through; it's either regular shots in a slideshow or a panorama (which I post regularly on Instagram). Thus, a selfie sounded the perfect idea!

The set (and mess) for this little project.
The idea of "the darker side" of the personality sounded cliché to me. I think the idea had been used since early sci-fi times, but thinking about it, I really couldn't think of anything better to put to proper use with this shoot. However, I was already planning to do this using some Photoshop editing, since I can't make myself look like a wolf or something on location, specially with such sensitive shooting!
As can be seen here with the set, I've placed 2 white paper boards or sheets of cardboard behind the camera with one speedlite pointing to one of them. The idea was to give an effect of two speedlites with the power of one higher than the other, all that using just a single speedlite (which kind of worked here after a struggle with the settings, and the power supply!). The shoot is pretty sensitive because I have to stay still in front of the lens without moving a muscle, except of changing my facial expressions from angelic, to demonic! Of course, my old portable monitor had been put to some good use here. Since I wanted some "dramatic" look and unusual ones, it was natural to think of shooting infrared again. I didn't want to deprive the image of colors this time, since I believe colors here, the slight addition of them, makes greater impact on the viewer. I'll save the B&W when it comes to absolute facial expressions and skin wrinkles!

The Joker Side of The TJ

The work is to take 2 shots, as stable as possible, in the same position as much as possible. Thus, it requires high shutter speed, but indoors, however, the sync speed (1/250s) is just enough to dim the surrounding. You can see or imagine part of the mess that my room is if you checked the set above, thus it was important to dim my surroundings, or in other words, kill the ambient light. I mentioned above that I used a single speedlite reflecting it off 2 boards in V-shape to mimic the effect of 2 speedlites, one more powerful than the other. After mingling with some settings I've created the effect needed but it appeared in reverse order: left of the picture is darker. I have to admit though, the monitor kind of tricked me into believing that the test shots were properly lit (I didn't check the histogram) and when it was the time to process the RAW files, I had to pump the Exposure drastically. There was a trial also to use a second speedlite (430EX II) to add light to the hair somehow, but I've neglected the idea and I'm glad I did so!
Because of the way that Instagram slides work (swiping to the left) and I want to show the "angelic" side first, I had to reverse the image and go on with my work. The rest was some Liquify tool job with some masks to complete the demonic figure on the right. There is some tiny work that had to be done to the size of the image as well since I need to divide it to two equal parts, and hence The Joker Side of The TJ appears in somewhat panoramic ratio.

A post shared by TJ.Photography (@tj_q8) on


On Instagram, it seems that many people liked the idea and considered it something new. This is encouraging to think of something similar, to be going around the various options that Instagram offers like the Swipe option here. It is an open door to surrealism. Nevertheless, I do wish if Instagram enables or do something about 360 images which might make my life a bit easier. However, this swipe display on Instagram does indeed spark for me some ideas about displaying the images in a special way physically, when the time allows for that. Anyway, the idea is still not concrete and I'm trying to focus on other projects right now.

Saved By PS

I've talked before about doingsome product photo shoot for my nephew and his Rubik cubes (though cubes is not a precise term for that anymore). Since I do not own a dedicated product photography gear (e.g. a tent or light cube), I usually try to improvise, and discover as well.


On two occasions, I've used a white themed set, something close to high-key environment to shoot such products, specially that most of them are contained in white. In all these occasions though, the plastic or acrylic piece underneath was the main problem. It did provide some reflections nicely, but it showed a seam line behind the products. Though I used this seam to fix the horizon tilt, but that doesn't work all the time and not necessarily correct. Quite a considerable time was spent to eliminate and do a surgery to remove this line in Photoshop. What came after, made this a child's play.


On the third occasion, I tried to change my approach and headed to use black themed set; Not close to low-key though as I'm supposed to use more than one speedlite here in various directions. I tried to keep it simple as well, but that didn't work out unfortunately, and I had to go for the plastic sheet for reflections again, as the look was flat and quite simple (in looks that is). Despite moving the speedlite off-center and away from the camera but it did make the image look flat (and I used a bit of on-camera flash to fill the front). Generally speaking, something was missing and I was working in a haste. Anyway, I had other things to finish, so I uploaded these images and showed them to my nephew who was pleased about them but he is no artist - I told him that I was in a haste as I didn't want to keep him waiting for more than week but he said it's fine to wait. Thus, I went through another trial and this time using the plastic sheet underneath for some reflections, but again, problems happened!


To begin with, I had to change the viewing angle (or camera angle that is) and lower it further. I think that way is more interesting to look at than a typical view from the top. After shooting few trials, it was obvious that speedlites are not doing any good for me here in this situation with much flare and unwanted stray lights and even shadows. Thus, I've decided to go ambient and it proved to be quicker in terms of the workflow, and reliable. I think I fell a victim to what Syl Arena described in one of his books as: the eagerness to create light and forgetting the available possibilities. Meaning, the ambient light can be good enough, but still you might try hard (and waste time) to create an interesting light thinking that a good look is only achievable by external lighting, or modified lighting that is. This is wrong, and probably I should have considered the ambient light from the very beginning of the whole thing.
Another problem prevailed though, and it is a lesson for me to learn: Black is quite sensitive to dirt. While shooting on white, dust particles can get overwhelmed by light and eventually disappear from the scene, or almost. However, with black set, the situation was drastic (specially that I didn't wipe the plastic sheet before the work) and that pushed me to work my fingers around with Photoshop again to save the situation and this time using Lens Blur for the lower part of the set, i.e. the reflections. This created a diffused reflection, almost close to reality as if some "matte" material was been used for reflections, and eliminating the dust particles that were spread all over the place. It was then a work for Layer Masks with a delicate brush to specify the areas where it should prevail and where it should be hidden. Gaussian Blur on the other hand would have made quite a mess, so it is better to avoid it in such situations.


I was lucky though with some shots that the dust was not quite spread over the place so a tiny work of cloning or spot healing was just enough to clean the image. However, since the whole process here was shot using my 100mm macro lens (from a distance), I did notice some weird softness in the images despite using high f-number (f/16 here). I'm not quite sure here, is it something has to do with the nature of the lens or indeed my lens is malfunctioning. If it is malfunctioning, then why? Is it fixable? I'm not sure. But sure thing that I have to think of my 100mm lens as my last resort when it comes to normal shooting that is. As for the images, the softness do not have a great impact since they will be used on Instagram in a small size after all, and that will suffice anyway. Now, is it the time to get proper product photography gear? Maybe... specially with this acrylic or plastic piece causing a problematic seam sometimes. I need to finish some stuff first…

Finale

Well, at the moment my mind is racing through to go through some of these projects I've described above and I'm already tired of looking for props. I've at least shot a single shot for the "Scopa" project at the time of typing this. However, I need to be faster, and I must get some proper props ASAP!
On the other hand, I was hoping of getting one image done at least from another project in my mind, inspired by another (folk) Arabic song of Sabah Fakhri [صباح فخري] which involves a globe miniature. All I need to do is shoot just a single picture, but it requires some work with the lighting I presume which would make the process long. Anyhow, I didn't find the proper place I need to shoot it so the whole thing is postponed till I can think of something or some place to do it. That's why I switched to the Scopa project instead and done at least one image from whatever prop I have available at hand.
Meanwhile, I'll keep dreaming about being outside enjoying my time away from the fuss in this mess of a country. I'm getting to the point of being cold, senseless, and careless; careless to the point of not judging my actions or what I say sometimes. We have a bit longer weekend coming by next week, let's see if I can put that to some good use... doubt it.


Stock photography by Taher AlShemaly at Alamy

Thursday, August 10, 2017

Mí Lúnasa…

August is in, and the heat is in surplus combined with humidity. Well, the good part is, my birthday is coming and I'm planning ahead for this day to... sleep some more. If I'm lucky enough I might as well get the chance to have free lunch with friends! Let's pray…
I've been busy the past few weeks doing many things (and skipping many things), but mainly finished a whole post/article for my Arabic blog explaining how I shoot through my old microscope, in hope someone out there find it beneficial anyway. I was also busy working on July's project: motion and splashes. But since I've done splashes before (and they require a messy set-up) I've decided to confine myself to do motion images as much as possible. I think I've posted some trials in the previous post, and some of them were a great fail.

Waiting


As I've mentioned before that the lines from songs of Sabah Fakhri [صباح فخري] are still inspiring me for these shots. My first trials with stroboscopic function didn't go well majorly because of the nature of the clocks or watches I've been using as it seems, so it was inevitable to do some Photoshop work out of the context of photography a bit as in Waiting. However, because of the depth of field, which was not shallow enough, and the irregular gaps between the ghosts of the minutes hands, all that made me think of re-doing the shot again with some fixes.

Waiting II


As shown here in Waiting II, I've pulled the rose closer to the table edge toward the camera to increase the distance and hence enhance the look of the shallow depth of field. However, it seems that I've done it with a bit of extra spices since I doubt that movement of the clock's hands are obvious at this level, but I'll leave that to the viewers. This is not the end of the story as I will be back to this project in a bit.
In my trials to depict motion I arrived at an idea which I've encountered some time ago in fact. A method of merging various channels of various similar-looking images (mainly those containing a sort of motion in them). The method was described by Yuga Kurita, a Japanese photographer. Though his method is a bit different but the final result is essentially the same almost. It's about merging one channel from each shot, in a series. I was set to go and try this new method with some spin-tops!

Chromamotion
Voigtländer 20mm, f/11, 1s, ISO100

Unfortunately, I didn't take a shot for the set, but it was a simple set with camera dangling vertically over the set with a lateral arm. I used my Voigtländer 20mm lens here for its sharpness and quality, and to have more freedom in the field of view as I was planning to crop later on. I've set my Speedlite (580EX II) on second-sync on the camera and directed it to a white cardboard on the side of the set. With some angle it was possible to make elongated shadows for the spinners. All these measures later on, however, proved to be kind of useless! Anyway, the main task was to have a proper image for the motion and that was kind of possible at 1 second exposure. After spinning and shooting several shots, it was time to combine some of them. In Chromamotion, three images were merged by channels. Later on, I've decided to merge all of the shots in sets of threes (made about 6 groups).

Quarks
The sprinkling colors across the white space here reminded me of the quarks so I named it after them. However, despite the colorful look, the motion blur in the original shots is not quite obvious here so I was doubting about the ability of such work to deliver the idea of motion to the viewer; any viewer. Things, however, got into perspective with my next move when I thought about the first shots I've made for Waiting above. Why didn't I think of that before? I can merge those in the same way instead of stacking them together in a regular manner!

Waiting III

I think in Waiting III, the allusion of motion is better and more obvious than Waiting I and Waiting II because of the colors on an almost-black-and-white image in general. This beings me to a conclusion as to why Waiting III is depicting motion better than Quarks or Chromamotion, and I think this is mainly because the image itself has mixed elements of stable objects and those in motion, and in fact those stable objects are, somehow, more general than those in motion. In Waiting III, also, we have a center (the clock's center), something which the motion is going about or around - since it's hard to depict the motion blur in this method it would be better to have the moving object in some periodic motion (visually at least) or attached to a static object (e.g. waves and beach, or moving branches in the wind). This is just my observation for now, and we'll see what to do about it later!

Finale

Well, there had been so much on my table lately, whether it's photography-related or domestic. I've been learning new stuff about Anaglyph making and 3D illusions, specifically for videos. I've posted a video last time which was not very concrete in terms of its 3D effect, but it was a trial and now after learning new things, I might try to record a new video; However, it does require some work on prepping my gear first just a bit.

Source: Amazon
I've stopped my ongoing reading list to read and finish my 2 new books from Amazon, and I've already finished one by Syl Arena (which I've read books of his before) This book is quite easy to digest and the beginning bulk of this book is for beginners, but nevertheless what comes then is quite useful, specially when it comes to discussions about his projects and situations. He describes exactly the mental process as needed to follow on with creating the needed light (even though some professionals might disagree with his methods).

Source: Amazon
Now I've started reading the second book, Schaum's Outlines: Optics, which is supposedly and introductory to the world of optics. However, the book kind of looking weird, because I feel as if it is in fact an answering-model for another major book (or let's say a solution manual). Nevertheless, it gives good information still with some good explanations in paragraphs before giving questions and their solutions. It is in fact a good refresher for me so far because what I've been reading so far is what I've studied long ago in my physics classes and completely forgot about right now!

There are other stuff I need to test and examine too, but waiting for the right time as I'm pressed (and can barely type this blog even!). I have the focusing pyramid (to calibrate the focusing system for lenses) as well as the H-alpha Night Sky filter which I didn't examine properly for the night sky yet, except lately for shooting the lunar eclipse (image at the end of the post). It is a regular job (and imaging) with such a filter and when I ordered it, I was really aiming at using it to shoot at the sun, but seems I have to wait till summer is over or I will simply be a fried egg! As for now, I need to get myself involved in August project with the group, which is about "Books." So far, I have no idea what I'm supposed to do, but only glimpses and visions in my head waiting to get out to reality.
When it comes to travel, it seems that I have to delay my plans a bit further and probably skip this year as well. I guess things are going crazy in this world, too much that a travel itself is a stress that needs a stress-relief. Needless to say, I don't quite have any idea as where I should be going. Sometimes though I wish if I can meet some of those amazing people I knew online… Well, till that time comes, I better get back to my Irish lessons and learning, and maybe add another language to the list.

Lunar Chain


Stock photography by Taher AlShemaly at Alamy

Thursday, March 23, 2017

Pearology…

Standing there at the end of a stress period, trying to have some breath to myself. Yet some more ideas and work is waiting for me to go through and test. Anyway, I've been working in the past weeks on March project, which is about shooting geometric concepts for fruit, fish or birds. I had to neglect some ideas for now, like working with fish skulls as it proved harder to get than I thought! Thus, I've been satisfying myself with pears and feathers so far!

Pear-ing

From the very beginning I was looking for some lines. And since regular lines might seem a bit boring, I've decided to look for curvy lines, and naturally my thought lead me to use pears! I've tried many settings and the start was pretty simple.

Linear Pear
Canon EF 100mm macro, f/16, 100-1sec, ISO100.

It seems in the beginning I was affected a bit with my previous work about tessellations, and fitting parts together. This is exactly what I prepared with 3 pears putting them side to side as in Linear Pear. Using f/16 to ensure enough depth drove consequently to use two 580EXII speedlites at full power. My preferred method in lighting had been mostly bouncing the light, thus I needed a free hand (and to rest my back a bit!), thus I've used the lateral arm over my tripod to hang the camera pointing down directly; this also assured that the camera is perfectly (almost) at 90o down. While putting the camera on timer, I've held a white cardboard over the set to bounce the flash from. I still needed to add some Fill Light when processing the RAW file and did some cropping as well. Can't say though I like it a lot, specially with curves not being, well, curvy! But I've tried.

Left Hand
Canon EF 50mm+B+W 920 IR, f/22,
200-1sec, ISO100.
After the first experiment in a while a bit of philosophy got twirling in, and I was back to the set and with pears again (but I could have used any fruit really). We can say the idea was about casting different opinions than the others, or simply being a left-handed person in a right-handed world. So, I needed to cast shadows in different directions and with a bit of precision. Using speedlites simply like that did not work of course and only two totally different snoots are available with different shapes. It was a time to improvise, and there is indeed an old method that I've tried before, back in time when I was a beginner with speedlites (and had only one). This idea requires: Pringles!
Pringles Snoots!
This is what I call a "light with flavor."
I'm glad that I've created these right now, as I come to think about it, there are a number of uses that might prove beneficial in the near future! The old method I've done this was by cutting the plastic lid to place the flash head, and remove the metallic bottom of the canister. However, I think this method was useless and it would be better to cut open the bottom and the place the head there, while using the plastic cover as a diffuser of some sort. We can add, for example, a white piece of paper to the back of this cover to increase the diffusion, or maybe add a black material or paper with a tiny hole to drastically decrease the radial dispersion of the outgoing light. There is quite a potential for this simple improvised tool, I think. However, I had some problems fitting the 580EXII heads and I had to tear some sides to enable the circular cross area to expand in an oval curvature.
Back now to Left Hand, I've decided to use my converted EOS 7D and my B+W 920 infrared filter to add a bit of mystery and move away from the traditional. The snoots worked fine, despite some gray areas in between the pears but I don't think it is disadvantage. Now, whether this shot is geometric in its means or not, this is something left to the critique to decide.

Zwischen
Canon EF 100mm macro + UV 403 + IR-Cut, f/22, 1sec, ISO100.

Then, there was a visit back to the first idea of using the negative space but by other means. Instead of using 3 pears, I've used 2 only placed side to side within some distance. To add to the atmosphere, I've used UV-pass filter (B+W 403) and adding Tiffen's IR-Cut filter on top (B+W's filter leaks a major band of IR at 700nm), and this of course needed great flash power, and I ended up using all my 3 speedlites, bouncing them off a white board placed on the top of the set. It seems with Zwischen I've become closer to the main idea of creating a negative space but there was something about the direction of the curves that somehow probably made it easily obvious for the viewer to know that there is a space between two objects; regardless of their recognition. It occurred to me that I might as well rotate the image; a common trick I usually tend to use to make an interesting outcome out of a regular/boring image. Quite useful for abstracts.

Zwischen II

It seems, to me at least, that rotating the image is the right choice when this image is to be displayed. I've also swabbed the Red and Blue channels in Zwischen II. Now in between the Red version and the Blue version, there is also a change of moods and feelings when looking at this. I think the Red version sparks with mystery, while the Blue version points to a calm atmosphere. This is my own sensing about it though and I can't generalize these feelings. Adding to that, I've start to develop my own ideology or chain of thoughts and style if I can call it so, but I will put these thoughts down in the Finale.

I moved then to work with feathers for a short while and I have to say it was sort of hard to work with them and create something geometric (despite the fact that they are linear in nature!), but I was aiming for something more than some macro shots like before. It was hard to think of something, but first thing to occur to my mind was order. I tried to arrange the feathers in sets on play-doh but didn't work in a good way, thus I've moved to using paper clips to hold the feathers stems firmly. Moving in between ideas, I've come out with shots, and some of them were discarded for being washed-out and over-exposed, and some few good ones needed great cropping.


Well, I won't go through the details of these shots, but all were taken with change of angles and such (and even after cropping, some image rotation was involved). Now, the critical "shot" was kept till the end. Despite using f/22, there was still some gaps in the depth of field and there was a call for a focus stack. However, I was so lazy to put the rail head, thus I relied on moving the focal plane manually by the lens back and forth.

Green Red

The final result, Green Red, suffered some errors nevertheless. Though might not be quite visible in this smaller version but it definitely is in the original size. The major setback is the fact that there are gaps in the stack and some areas remained blurred after the merge of these 3 shots. There was also a portion of a yellow feather which I was not paying attention to, which made quite a disturbance in the scene in the middle (between first red and second green feathers, from left). Worked it out with Healing Brush and Cloning but it doesn't seem quite right when viewed in the original. Anyway, it was an experiment to gain experience and I don't think this image would be any good for stock sites or for expos. If I get the chance to re-do it, I might do so with a bit of careful picking and placements with those feathers, with respect to their colors.
Finally, I've worked out some shots with maple (or vine?) leaves but I'll keep that for another post, as I didn't process much of these images and I still need to shoot further!

Finale

Coming to this project, March's project that is, I think I'm starting to become more conscious on how to work with ideas. This came to me as I was inspecting Zwischen all over again, and realized that working with negative space (or trying to at least) seems to be an unconscious reflect on a feminine body (pardon a single man's thought). However, if we change or switch the mindset to "conscious" instead of "unconscious" we might happen to arrive at some methodology to work in the future with still life and abstract projects, as in some kind of a translation machine for feelings into objects, and probably not necessarily objects of related topic. Sounds something psychologic in nature, but it is sparking ideas already.
Meanwhile, I'm sitting here waiting for summer with its scorching heat to come over and destroy the peace of mind (momentary peace of mind) that was there. Traveling is indeed a dream with one full year without any travel but I'm not sure yet what will happen within this house, and where I'm supposed to head to. Stress is stacking. All along, I'm keeping my ears amused by the voice of Sabah Fakhri and try to draw inspiration as much as possible from there… I was supposed to work with other projects with conlangs, wasn't I?

Stock photography by Taher AlShemaly at Alamy