Showing posts with label syl arena. Show all posts

Thursday, August 10, 2017

Mí Lúnasa…

August is in, and the heat is in surplus combined with humidity. Well, the good part is, my birthday is coming and I'm planning ahead for this day to... sleep some more. If I'm lucky enough I might as well get the chance to have free lunch with friends! Let's pray…
I've been busy the past few weeks doing many things (and skipping many things), but mainly finished a whole post/article for my Arabic blog explaining how I shoot through my old microscope, in hope someone out there find it beneficial anyway. I was also busy working on July's project: motion and splashes. But since I've done splashes before (and they require a messy set-up) I've decided to confine myself to do motion images as much as possible. I think I've posted some trials in the previous post, and some of them were a great fail.

Waiting


As I've mentioned before that the lines from songs of Sabah Fakhri [صباح فخري] are still inspiring me for these shots. My first trials with stroboscopic function didn't go well majorly because of the nature of the clocks or watches I've been using as it seems, so it was inevitable to do some Photoshop work out of the context of photography a bit as in Waiting. However, because of the depth of field, which was not shallow enough, and the irregular gaps between the ghosts of the minutes hands, all that made me think of re-doing the shot again with some fixes.

Waiting II


As shown here in Waiting II, I've pulled the rose closer to the table edge toward the camera to increase the distance and hence enhance the look of the shallow depth of field. However, it seems that I've done it with a bit of extra spices since I doubt that movement of the clock's hands are obvious at this level, but I'll leave that to the viewers. This is not the end of the story as I will be back to this project in a bit.
In my trials to depict motion I arrived at an idea which I've encountered some time ago in fact. A method of merging various channels of various similar-looking images (mainly those containing a sort of motion in them). The method was described by Yuga Kurita, a Japanese photographer. Though his method is a bit different but the final result is essentially the same almost. It's about merging one channel from each shot, in a series. I was set to go and try this new method with some spin-tops!

Chromamotion
Voigtländer 20mm, f/11, 1s, ISO100

Unfortunately, I didn't take a shot for the set, but it was a simple set with camera dangling vertically over the set with a lateral arm. I used my Voigtländer 20mm lens here for its sharpness and quality, and to have more freedom in the field of view as I was planning to crop later on. I've set my Speedlite (580EX II) on second-sync on the camera and directed it to a white cardboard on the side of the set. With some angle it was possible to make elongated shadows for the spinners. All these measures later on, however, proved to be kind of useless! Anyway, the main task was to have a proper image for the motion and that was kind of possible at 1 second exposure. After spinning and shooting several shots, it was time to combine some of them. In Chromamotion, three images were merged by channels. Later on, I've decided to merge all of the shots in sets of threes (made about 6 groups).

Quarks
The sprinkling colors across the white space here reminded me of the quarks so I named it after them. However, despite the colorful look, the motion blur in the original shots is not quite obvious here so I was doubting about the ability of such work to deliver the idea of motion to the viewer; any viewer. Things, however, got into perspective with my next move when I thought about the first shots I've made for Waiting above. Why didn't I think of that before? I can merge those in the same way instead of stacking them together in a regular manner!

Waiting III

I think in Waiting III, the allusion of motion is better and more obvious than Waiting I and Waiting II because of the colors on an almost-black-and-white image in general. This beings me to a conclusion as to why Waiting III is depicting motion better than Quarks or Chromamotion, and I think this is mainly because the image itself has mixed elements of stable objects and those in motion, and in fact those stable objects are, somehow, more general than those in motion. In Waiting III, also, we have a center (the clock's center), something which the motion is going about or around - since it's hard to depict the motion blur in this method it would be better to have the moving object in some periodic motion (visually at least) or attached to a static object (e.g. waves and beach, or moving branches in the wind). This is just my observation for now, and we'll see what to do about it later!

Finale

Well, there had been so much on my table lately, whether it's photography-related or domestic. I've been learning new stuff about Anaglyph making and 3D illusions, specifically for videos. I've posted a video last time which was not very concrete in terms of its 3D effect, but it was a trial and now after learning new things, I might try to record a new video; However, it does require some work on prepping my gear first just a bit.

Source: Amazon
I've stopped my ongoing reading list to read and finish my 2 new books from Amazon, and I've already finished one by Syl Arena (which I've read books of his before) This book is quite easy to digest and the beginning bulk of this book is for beginners, but nevertheless what comes then is quite useful, specially when it comes to discussions about his projects and situations. He describes exactly the mental process as needed to follow on with creating the needed light (even though some professionals might disagree with his methods).

Source: Amazon
Now I've started reading the second book, Schaum's Outlines: Optics, which is supposedly and introductory to the world of optics. However, the book kind of looking weird, because I feel as if it is in fact an answering-model for another major book (or let's say a solution manual). Nevertheless, it gives good information still with some good explanations in paragraphs before giving questions and their solutions. It is in fact a good refresher for me so far because what I've been reading so far is what I've studied long ago in my physics classes and completely forgot about right now!

There are other stuff I need to test and examine too, but waiting for the right time as I'm pressed (and can barely type this blog even!). I have the focusing pyramid (to calibrate the focusing system for lenses) as well as the H-alpha Night Sky filter which I didn't examine properly for the night sky yet, except lately for shooting the lunar eclipse (image at the end of the post). It is a regular job (and imaging) with such a filter and when I ordered it, I was really aiming at using it to shoot at the sun, but seems I have to wait till summer is over or I will simply be a fried egg! As for now, I need to get myself involved in August project with the group, which is about "Books." So far, I have no idea what I'm supposed to do, but only glimpses and visions in my head waiting to get out to reality.
When it comes to travel, it seems that I have to delay my plans a bit further and probably skip this year as well. I guess things are going crazy in this world, too much that a travel itself is a stress that needs a stress-relief. Needless to say, I don't quite have any idea as where I should be going. Sometimes though I wish if I can meet some of those amazing people I knew online… Well, till that time comes, I better get back to my Irish lessons and learning, and maybe add another language to the list.

Lunar Chain


Stock photography by Taher AlShemaly at Alamy

Thursday, September 4, 2014

Selfies Galore...

My vacation date is getting closer now. It seems some relief in the air. Next week, however, schools are supposed to be starting, which means we are back to the daily congestion. I have to deal with this for one week at least before I start my leave from work on the 14th, and with the start of this leave, I have to keep on preparing myself for the flight on the 29th. Meantime, I've been reckless with work a bit, specially in days when humidity was striking. If my workplace doesn't care about my well-being, I have to take care of myself somewhat I guess? Got to say though, I'm spending most of this time in sleeping more instead of doing something with some of my projects!

Good Galore

Some good news have been visiting me lately. Well, kind of needed such news in some long time ago. I even did notice a change in my general attitude just by "some" good news. I wonder what would happen with lot of news of that type, how my life in general would be?
Anyway, the first item of news is about the struggle going on in Iraq - yes, I have nothing directly involved about it, but I'm so sick of these groups who push nations back to block zero again and again. This time accompanied with atrocities as well. Iraq is full of history, and for someone with passion for Archaeology, these events and the destruction of many religious and historical places by barbarians like those did give me a shock as well as melancholy. Now the tide is turning as it seems, with the break of Amerli siege, and things look promising despite the political turmoil that still go on. In fact, it is one more reason to make me believe that in the Middle East, a so-called democratic system never works - people always believe in the leadership of one man. Parliaments are always a place for struggles and paralysis.
Anyway, with the second item of good news. One day I've received a surprising email from the Trierenberg Circuit, the committee responsible for Austria's International Photocontest, to inform me about picking one of my images (and another image for another member in the group as well) - picking it for the luxurious edition of a coffee table book, with limited number (500 copies worldwide). The winning image for this honor was the surreal panorama Ludendorffs Wirklichkeit.

Screen Shot from the email sent to me.
Click to Enlarge

Ludendorffs Wirklichkeit

Seems I made a mistake originally by placing an apostrophe as I can tell from their email to me! Anyway, as far as I remember, genitive case in German doesn't use ('s) as in English. Ah well. Who cares by now!
Now to get a copy of this edition I have to pay and so I did, and I asked to change the delivery to my UK mailbox (which is a first time for me actually, mostly I deal with the US one). This is in hope that I will get it faster that the regular mail as we didn't get the catalogs made for Austria's contest itself until now (after news that it will be here by July or August). The post services here suck big time and might even destroy the shipment without informing. Praise the service. Thus, the only guarantee for me to track it is using an external mailbox (and pay extra).

More Selfies

As I didn't have much to do lately, all I could think of is do more selfies (self portraits). In fact, my room is still a mess as I'm typing this and I'm way too lazy to recollect the gear. I'm thinking that I might get some idea to do at any moment.

Source: B&H
Anyway, I've been mainly trying to use some of the Impact Syl Arena light modifiers just to accustom myself with the way light is formed. I have to say it was hard to work and imagine  - probably because I don't have background in portrait anyway! - but I've found myself mostly using the Bulb diffuser. Most the images taken were kind of useless, but I tried to manipulate some of them anyway with the RAW editor, by fixing the exposure. Well, some of them turned interesting!
One of the things that really frustrated me is the inability to work on specific spots (like doing dodge and burn) in the RAW editor. I'm wondering why didn't they put that option? Or, is my RAW editor that old? I can't even remember its version...
Anyway, in a spur of some "madness" I decided to hit the Exposure value to the max and the result as you can see on the right, and seems like I like it that way! It has some "sketchy" quality to it, as if it was done by colored pencils I'd say. I can't remember which modifier was used here but most probably it was the beauty dish.
Source: B&H
As I've mentioned before, I've used mostly the bulb diffuser. I like this particular diffuser because of its resemblance to a real bulb, and it also provides the feathering that I need. However, when I think of it, I always think of it as a secondary light and rarely as a prime one (i.e. aiding and not key). The image on the left here is not a high-key attempt at all (it's wrong anyway!); it was simply using the bulb from the top with another light from below (or bounced). It was dark, till I manipulated it in the RAW editor. Now in conclusion, it seems that Syl Arena modifiers do indeed work best when ON camera, or at least this is how it felt for me. When I compare those with Expoimaging Rogue modifiers, I would say that Expoimaging set offers more flexibility when it comes to moving the light around and providing diffusion, Meanwhile, Syl Arena's kind of require a direct impact, face to face, and sometimes extra power (with distance and specifically with beauty dish). Right now, though, I do like using the Bulb diffuser in the Syl Arena set to light the hair.

Source: B&H
Just before I finish experimenting I decided to try the RoundFlash modifier. This is the first time to try it out with a long lens like Sigma 70-300mm here. In combination with the bulb diffuser it proved to be good somehow for softening shadows in general, but still I did need some work in the RAW editor (despite the high ISO, like the other images too). Seems that the RoundFlash is the best to add some light to the eyes somehow but I would need more work to get the light done properly. It seems that another speedlite is due at such situations, but I'm not thinking about it right now. If there is a real need for it, it would be using it for High-Speed shots, which for me, is more important than doing portraits! If only I can get some help, I would be using snoots properly directed to the eyes. In case you wonder why I concentrate much on it - well, for me, the eyes are all what portraits are about.

Agony
Since nothing worked perfectly as I wanted it to be, I decided to have some fun with one of the shots that didn't work out well. This is, of course, by some Photoshop manipulations. Agony didn't work out because of the bad light ratio (and position) between highlights and shadows. However, since I've been playing with the others, I've decided to play with this one and this time extend it further to Photoshop. In Photoshop, the usual fangs edit was done and some work then with Liquify command to enlarge the mouth and re-shape it and dislocate the nose and eyes a bit. Not quite satisfied with the fangs though and wish they were more "fierce" and standing out further.

Finale

Tick Tock. I'm counting every tick in the clock waiting for the 14th to start my vacation. My growing sickness of work is becoming unbearable and I'm throwing everything behind my back, despite the sensitive situation I've been placed in at work. Once I start it, I have to get on with preparations for my travel.
Meanwhile, the domestic front doesn't seem quite well, as always. Sometimes I can't help it but to stop and think "why am I alive?" It's like my purpose is just to help others (and how I wished to get some help back at times). I'm thinking and measuring the consequences to enroll in some M.Sc. program (again) after abandoning the idea for some years since my graduation. This time I'm thinking of something else other than Physics and Archaeology (which I tried to pursue outside). This is just to "do" something about my life and nothing else. Probably that way I can forget loneliness...


Thursday, December 19, 2013

Zu Studieren...

Let's see. A week that started with a semi-disaster, after the escape of the maid from the house. Now, we (or me) have to do much of the house work as much as possible to keep Mom rested as much as possible. It is hard as it is WITH the presence of a maid, as Mom tries to keep active and simply denies her ailments.
On the other hand, I've done all the paperwork and payments to get the new car. I think I will take a shot for it and maybe even a panorama from the inside. It's too early for this talk anyway!
Because of this busy schedule either in daytime or after working hours I didn't even have much time to do anything with my camera except for a simple study and a simple shot. Even that simple shot is not worthy (so far) for publishing, specially after discovering that my leg is in the image by mistake!! (common mistake in fisheye shots!).


Comparison and Study
As I've mentioned last week that I've done some experiment to check and make an idea of the effects of some light modifiers after receiving my new shipment of Impact Syl Arena Strobros On-Camera Flash Light-Modifier Kit.

Source: B&H
Initially, I've done the test with my 580EXII Speedlite against my green wall. After checking the results of such test, I've decided to do the test again, and this time against my wooden door because it has a clear texture and it is better to judge the effect that way. I've also added the RoundFlash modifier to the list for a general comparison. But first, I'll post an original image with plain 580EXII in use. It's worthy to mention that the distance from the front of the lens to the door was kept at around 1 meter (~3.3ft) and f/8. The shutter speed and the power of the speedlite were subjects to change to adjust the level of the light. To ensure a neutral white balance with natural colors as much as possible I've used the Vello Universal White Balance Handheld Disc and shot with the speedlite naturally and used that image in Custom WB settings. In the following set of images, it would be better to click and enlarge the picture to have a better view.

Plain 580EXII
Canon EF 50mm, f/8, 320-1sec, ISO100.

Notice how the center of the light strike is closer to the top edge with flare and gradually fading in all directions. I don't know though why it is not exactly at the center of the top edge!

RoundFlash
RoundFlash shot

Source: B&H
In the RoundFlash shot here, I've used the High-Speed mode for the 580EXII to kill the ambient light and also to decrease the flare on the wood. Strangely, and probably it is a property in the High-Speed mode, the light became more bluish despite fixing the WB by Custom WB settings.
As you can notice, the light accumulated in the center of the shot and gradually spread to the corner, but the graduation is short and blends to darkness like it's vignetting. One of the main problems with the RoundFlash modifier is that the lens should have some length to fit properly in the center. My Canon EF 50mm f/1.4 USM lens was not long enough and initially had problems to fit it in between the strings in the middle of the modifier.
At such level, and 1 meter away from the target, the spotlight of the Speedlite falls almost perfectly in the center (even though in the plain shot it was not!). A good point to consider when shooting portraiture and macro; in fact, RoundFlash was made as a cheap substitution for the expensive ring flash used in typical macro shot. One bad point about it though, it is bulky and I wonder how fit it is for macro shots. You must have some long lenses to keep away from the target (if it was a sensitive one as an insect for example) and to have the lens fit firmly in the center of the modifier. Concentrating the light in the center, and in such amount, would somehow mean harsh shadows for the subject if it was used for portraiture shots I believe.

Beauty Dish, Golden Plate, and Diffuser
Beauty Dish + Golden Plate + Diffuser

Source: B&H
Source: B&H
Then comes the beauty dish, which is a well-known modifier in the fashion world and fashion photography. Technically though, I've never (so far) used it for portraiture or anything else but this test as you can see here. Along with the kit, some specific diffusers and grids to fit the beauty dish are available, thus I've decided to check the effect of the diffuser (the white disc in the image), as the other discs are simply colored diffusers and probably wouldn't help me if it casts a color on the reddish-brown wood. I also didn't check the effect of the grids because their effect is known - simply to concentrate the light into a narrower angle.
Back to the light show now.As it is noticed, the flare of the shot is on the top level above the center and closer to the edge but the size of the flare is relatively small (compared to the RoundFlash and the plain shot). The color of course is changed a bit because of the golden plate inside the beauty dish which made it a bit of greenish hue more than bluish hue. The graduation of the flare is faint (and appears first as if it is cut abruptly). This light attitude makes me think of the usage of the beauty dish; it must be used with some angle even though it is (here with this kit) considered an "on-camera" speedlite modifier. Otherwise, if it was used directly to hit the subject, it would cast a harsh shadow on the spot where it falls. Well, unless a dark background was in use which would hide such shadow maybe!

Beauty Dish, and Golden Plate
Beauty Dish + Golden Plate

I see that when the diffuser is removed there is, virtually, not a big deal of difference in the location of the falling light according to the frame, or to the graduation in the light level. Probably the diffuser provided a greater expansion in the periphery of the falling light, and probably this difference would be more apparent if the power of the light was increased (by the speedlite, by the aperture, or by slowing down the shutter). Could be a subject for further testing.

Beauty Dish, and Silver Plate
Beauty Dish + Silver Plate

Source: B&H
The next plate in the queue was the silver plate to be fixed in the center of the beauty dish. As it's predecessor, the silver plate doesn't seem to change much except for the color of course where it accentuates the blue tint of the speedlite. Usually, with gel filters fitted upon the speedlite, a balance between the ambient light temperature (or color) and the speedlite temperature is sought in that way, and consequently, the white balance is controlled more properly. Here, however, the story is a bit different when using the plates and a speedlite which emits a tinted blue light. Makes me wonder now about the possibilities (and the creative process) of blending gel filters on the speedlite with those colored plates in the beauty dish. The results got to be crazy!

Beauty Dish, and Mirror Plate
Beauty Dish + Mirror Plate

It might appear as completely black frame, but in fact there is a faint light. This result, however, was a complete surprise for me as I was expecting more reflectance from the mirror plate. The mirror plate (which comes in a concave shape) has two sides: polished (convex) and unpolished (concave) surfaces. Other plates don't have polished surface like a mirror. Anyway, according to the settings I've noticed, the concave part must be facing the speedlite. The light here was very faint. I would increase power to make a clear note of how the graduation or feathering of the light goes, but it's enough for me now to see and compare with other settings of other plates. Seems that the mirror plate feathers and scatters the light emitted from the speedlite so much that it only makes a faint tracing of light in the frame. Leaves me with the question: How would that appear in a wide-angle lens?

Bulb Diffuser
Source: B&H
The next modifier is one that I've seen photographers use it a lot, either directly or indirectly. However, the usage of the Bulb Diffuser might be known to many but that didn't keep me still without testing it here. It is a diffuser after all and dedicated for smoothing and feathering the light in a pleasant way. Anyway, because the bulb shape emits lights in all directions almost, and because the typical setting as shown in the guide that the speedlite must be pointed up, I've decided to do my own testing with various tilting angles of the speedlite.

Bulb Diffuser, speedlite pointing up.

On the first trial here with the typical setting: Speedlite pointing up. As it can be seen above, the feathering is nice and smooth going all the way down from the top with little flare on the top edge. Remember that we are using the Canon EF 50mm lens here, meaning that with a little extension in the focal length, more than 50mm, we can be left with the feathering alone without the flare on the top edge of the frame. A good point to memorize I suppose!

Bulb Diffuser, speedlite at 45o.

After trying the typical position, I've tilted the speedlite head down by 45o. This position looks good despite the relatively large flare on the top of the frame (which as I stated above would be avoidable by using a longer focal length). The graduation or feathering is slow making the luminance almost (not completely) homogenous across the frame. Probably this would be a favorite position when doing portraiture (with a little raise in the speedlite level or longer focal length).

Bulb Diffuser, speedlite at 90o.

Finally, we have the 90o position which in fact almost replicates the plain shot of the speedlite without any modifier. Yet, however, in the plain shot above you can notice the black edges like vignetting effect, but here with the bulb diffuser, the edges are also illuminated and almost no vignetting can be found. This makes me think of using the speedlite with other modifiers from Rogue collection which I got before in order to maximize the spread of the light circle and yet give an act as if the speedlite is unmodified originally! Needs a bit more of trial and error.

There are a number of other modifiers along with the kit but I didn't test them because, simply, their effect is known; like the snoot (with grids) and grids for the beauty dish. In addition, a new set of gel filters and a velcro band arrived with the kit but I didn't use them yet, as they are similar to other sets I had already. I need to practice my "speedliting" as much as possible now.

Finale
It feels like my life has been monotonous right now. The only way to break out the routine and the duties of the everyday living seems to be paying close attention to details around me in a trial to amuse my brain in things that usually I don't think of. There are books still on the queue but they are not photography or archaeology books, so my progress in digesting these books is slow. I'm praying for some vacation again, but a real one, out of this country. I'm feeling sick of my (unappreciative) work place, as well as of the majority of people around me. Such a dream seems far a bit for now.
Now, I'm waiting for every weekend like a treasure seeker, and hoping that I can do some night photography in each weekend. Is it worthy to try to be unique already?


Thursday, December 5, 2013

Es Ist Winter...

What am I? A question that persisted all this week. I'm not sure how to answer it, but to answer this, I have to do some photography. Some more photography, as much as possible. It's winter, with fresh air that would help me clear my mind.
I've been running some errands and will schedule for ERG (Electroretinography) examination. It makes me awry and worrisome. I've read a bit about the test and how it is done and I do feel scared a bit of the way it is done, and annoyed. However, it is something that must be done in addition to the previously-done OCT and Visual Field tests.
I've gave up hope about my (old) car and seems it won't be fixed any time soon. After fixing the computer or chip was fixed, the mechanic said that the car would turn on, but can't be moved as the car doesn't response to the accelertion paddle. I've decided now to get a new car and even if my car gets fixed, probably I would give it up. It will be another drop of money and budget but for something very critical. I didn't decide yet what make of car yet, but it's not a big deal for now.
The nights of winter are lovely and chilling. Fresh air, quiet atmosphere, and sparkles of light. It's a shame though that I can't go out to do some photography every night (and this is one more reason to think of a vacation in winter only), but there is a beginning for everything...

Linien des Lichts
I've talked last week about my desire to go out and shoot, specially at night. This is a must for me in winter time. Winter, is the best season to shoot for many reasons, and for me, it's enough to talk about the temperature. Being cold and out alone in solitude is far better for me than being boiled at night when the soil gives the heat back after a hellish day, like those in summer!

My first trials here were not good but they are a start and I did spend some time reflecting on the results. I was wishing for a cloudy night to do some clouds' movement with long exposures. The target was the dock at Soog Sharg.

Nox Infinita
Rokinon 8mm fisheye, f/8, 4m20s, ISO100.

At the moment I've stepped out of home, I've realized that there are no clouds in the sky to help me. However, it happens that clouds can accumulate on the shores, or specific shores rather than others. I had to try after all. When I reached the place (and it was after 3 A.M.), I've found it busy with some fishermen or just "picnic" takers. I hesitated because I was (and always am) not ready for interference and annoyances, specially from security guys. Thank God, none of that happened. Back to the image now.
I've realized later that the location wasn't good. The fisheye lens did a good job in eliminating the presence of people far from my location, but the light sources made a harsh flare. Such flare might even be hard or impossible to avoid because the sources lie in front of the camera directly I suppose. The f/8 made the effect drastic as well. That, however, didn't stop me from making some few adjustments to Nox Infinita later on, at least to make the color blend nicely with some good contrast. One thing though I wish I've done back then; is to raise the level of the camera which was less than one meter high above the ground (< 3ft).

Unendlicher Nacht
Rokinon 8mm fisheye, f/8, 4m20s, ISO100.

While working with Nox Infinita back home after that night, I suddenly got the urge to transfer the image to B&W. I had some feelings that it would be a nice and a mysterious scene when in B&W (and probably more communicative than the color version); and thus, Unendlicher Nacht was born.
The work with Unendlicher Nacht was harder than I thought in fact. The matter was not a simple matter of adding Black and White layer in Photoshop, or simply changing to Grayscale. Not even as simple as desaturating the image. I had to spend some time changing the tones to reach my own satisfaction with this image. Amazingly, the lines of the stars (or planets) in the sky in the B&W version are clearer and more visible than they are in the colored version. These lines I will talk about later.

Back to the location, I've thought that since there are no clouds to record, the situation and the image was boring already. Since I've brought my LED light with me, I've decided to try and do an experiment with light painting.

Comparison
Left to right: Normal, writing "Allah" in Arabic, then writing TJ.
Click to Enlarge

My trials are awkward of course because light painting requires special arrangements first. I should have wore black clothes to avoid reflecting light back to the camera. I didn't flip the images when post-processing because they are not serious shooting trials. Another lesson I've learned in these trials, is the importance to time the writing with switching off the light. As you can see from the two examples above, the writing looks more like doodling because the LED was not switched off in between letters.
Back now to the lines in the sky formed by the stars or planets at that location. I have to say it was all discovered by a coincidence, because in fact, I've never thought that such place with relative abundance of light resources would allow the camera to capture any glimpse of the skylines. Let's take a closer look...

Click to Enlarge
Original image: Rokinon 8mm fisheye, f/8, 80sec, ISO400.

In the previous shot I've increased the ISO just to reduce the time to around 80sec, but in comparison, the histogram between those taken at ISO100 and those taken at ISO400 are almost the same; probably the only difference in this case is the length of the lines formed at ISO100 (because it takes 4 minutes and 20 seconds to perform the exposure then). At this point, I do see some hope in this location despite the (usually) inadequate conditions like those light sources and the fear of flare in the image. Add to that, of course, the movement of the active people in this place at 3 A.M.! This tiny discovery about this location, and finding out that B&W rendering do somehow help on accentuating the lines in the sky, makes me eager to do some experiments in the coming days if possible - but this time deeper inside.

Scattered Mind

Source: Amazon
We had the annual book fair last week and I barely had a chance to go there and get some books. I didn't roam the place and barely visited three corridors of the fair with composed (I guess) most of the Lebanese sector. Most the books I bought this year were from Lebanese publishers. However, I was somehow disappointed because not much innovation is involved. The books are mostly in Arabic, but most of them are translations from foreign books. One would say this is good for people who are not good in English (or French, or even Russian for example) but with me, it doesn't matter. One of the books I'm reading now is How to Think like Leonardo Da Vinci in Arabic (originally by Michael Gelb). However, it is important to read with some critical thinking present. I have to say a lot of the methods and notes written in this book are already done by me naturally (and some of them for unknown reason); Just consider this blog for example where I jot down my thoughts about some stuff in my life (but not much about my emotions like the book states). Moreover, the book seems to give a sense that the western methodology and culture is the base for the rising of a community and its "wake". This is some point that I critically don't agree with, not because I'm from the opposite side of the world, but because I follow up with history and many arousals did exist before the European renaissance. In fact, the European renaissance is the last in the chain so far (and to seal this arousal in culture and science, we had the two world wars with all their push to technology and industrialization) and as life progresses, we are surely to see another link to its chain (as the Chinese are already on the rise). This fact makes me consider Leonardo as a tool rather than an example. Yes, there are many things to be learned in his methodology, but not everything in his methodology should be learned, specially that Leonardo did work under the framework of the European culture back then with all its consequences and shadows over many fields like architecture and music. It seems, to me, the book is mainly dedicated to European audience more than to a universal audience, and this is one negative point in the translation movement. Arab translators seem to be translating without really knowing or understanding the contents of the context in between their hands - it is merely a process to milk money in any possible way. I did even find out many orthographical mistakes in the Arabic context and I didn't reach half of the book yet!

Source: B&H
Anyway, away with Leonardo for now and let's bring more toys into play. In fact, I was hesitating and asking myself if I should do this order now or not. After all, I guess we all have our crazy "momentos". Thus, I had to place a new order at B&H for some stuff that I'm going to list here. The first, and the most important item too, is the Sigma lens of 70-300mm which should replace my broken Tamron. It costs a bit more than the cheap Tamron, but it has an OS system, or Image Stabilizer (IS). It has some good reviews so let's see how it will act. Let's hope I fight the urge to do extreme macro tricks with this one! Good thing that the filter thread is like Tamron's; Ø=62mm. Meaning I can use Cokin's adapter ring already with it for filters. Unlike Tamron though, this telephoto lens, doesn't have a macro mode, which I deem not necessary by now actually.

Source: B&H
Then, I've decided to add a macro rail after the many failures I had while doing extreme macro shots lately and I though this item is a must by now. Compared to other items of the same category, this one rail from Manfrotto is considered cheap! It says that it can be up to 8kg (17.7lb)! Quite good! Ironically though, I should get a new tripod to my collection as well since I do feel my old-by-now heavy tripod is getting chipped and awkward to control by time. However, a tripod can be probably taken from shops around here instead of ordering from outside with the rest even though I'm sure the quality won't be a match.

Source: B&H
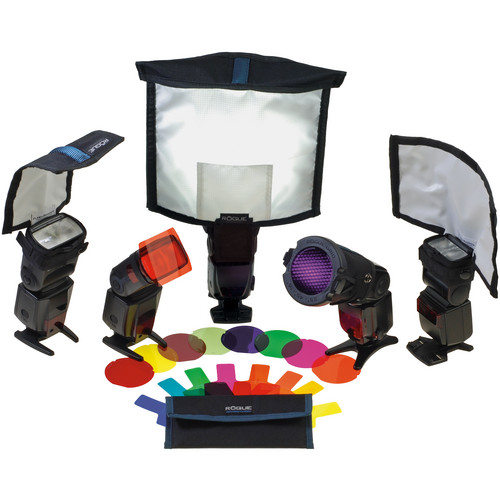
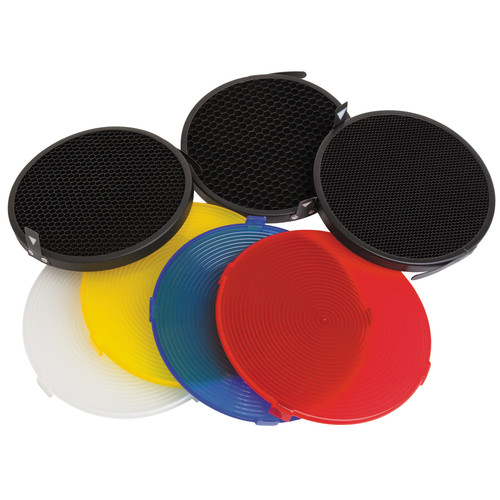
Next on the list is another kit for light modifiers. The Impact Syl Arena Strobros On-Camera Flash Light-Modifier Kit is named after one of my favorite authors about Speedlites, Syl Arena. I'm not sure what's the difference between this Impact kit and the other "original" kit, but bearing the name of Syl Arena sounded like it is a recommendation from the author himself! Anyway, I've been struggling for some time with a single set of modifiers and I've realized that I need more modifiers when I work with 2 speedlites. My Rogue kit which I already have, bear a single entity of each modifiers. Thus, in case I decided to use 2 snoots on the two speedlites, for example, then that would be a problem and I have to work around it. Now, it should be no problem I guess!

Source: B&H
One of the ironic thing here is that I've ordered a new camera mount to replace the (crap) Delkin camera vice mount which became dismantled piece by piece with the first or second use. The ironic thing is, once I've placed this order, my brother managed to fix the Delkin vice. Anyway, I'm not sure how good the Delkin vice mount would be after the fixes, so two mounts are better than one. I didn't try the Delkin after the repair until now as I'm typing these words. The Pedco Ultra Clamp Assembly with 1/4"-20 Screw here has a high rating from users on B&H, but I came not to consider much of that. Delkin has a high profile as well and I AM the only one who wrote a negative review about it! Let's wait for its arrival and see how it will manage heavy weights.

Source: B&H
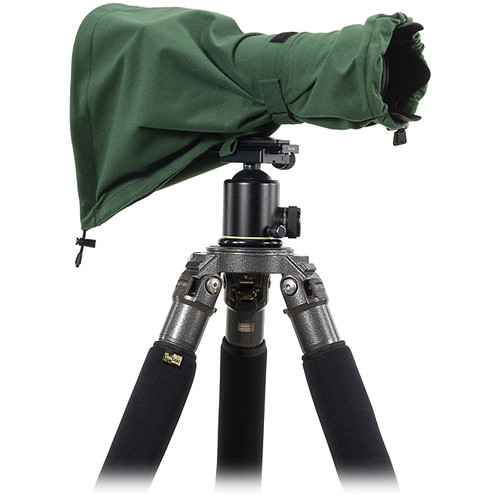
 I've always thought of doing shots in strange weather conditions. Well, not strange, but I mean under conditions that usually people try to avoid. For this reason I've longed for having one of those coats for camera systems. The LensCoat RainCoat RS (Rain Sleeve) (Medium, Green) would help me with this from now on, hopefully. I remember one time I had to spend few minutes in the rain waiting for my long exposure to finish. Ordering this sleeve, though, doesn't mean I'm looking for troubles specifically! But it is just something useful and good to have with you in winter specifically.


Source: B&H
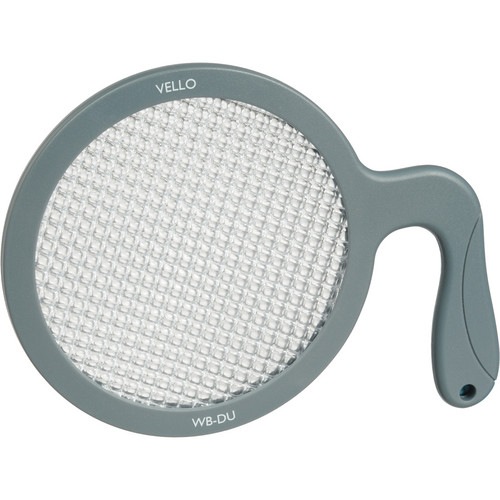
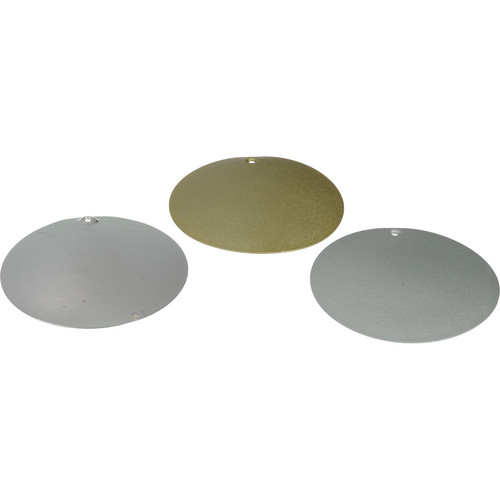
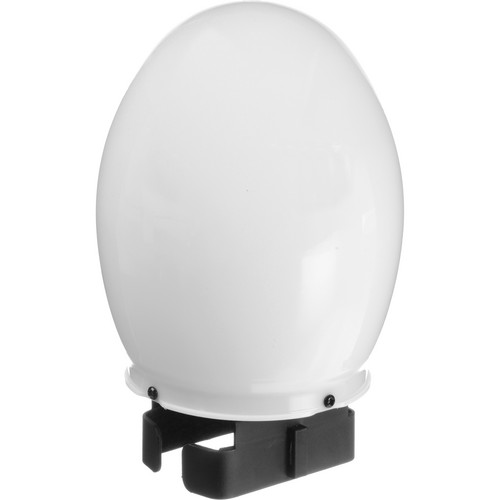
Finally on the list, I've placed an order for Vello Universal White Balance Handheld Disc. I've felt that I need such a tool specifically when working at night time in locations that bear lot of lights of different types. It does indeed make a difference when trying to fix all that in post-processing. The disc here is handheld and I think it is what I need - it doesn't screw to the lens like other WB tools available and it is up to 95mm in diameter. Thus, I can use it with many lenses now and in the future without worrying about the filter thread on the lens itself. The thing I'm not sure of yet though is whether I should take a shot of the disc with the same ISO as my original exposure or not. In my camera (EOS 7D) all I need is to take a shot of the body that I want it to be a reference for the WB, and then use it by Custom WB function. Does the ISO make a difference? Theoretically, it should not. We'll see!

Finale
Books, tools, camera, lenses and even artificial languages... where am I and what I'm doing? It's a weird feeling inside me; it's like hope and despair entwined together. There are lot of things I want to do, yet, something is stopping me. Well, beside the physical condition that is. At work now, more issues are awaiting and I must tend to them, beside doing my own business with the eye-checkups and Mom dialysis schedule. As much as I want to keep feeling strong, yet I can't neglect that feeling inside me; a feeling of betrayal somehow. Like someone had been left all alone by life, despite all the good things that I've been trying to achieve to others. I wonder if this is what they call midlife crisis.

Now, with my ideas for getting new toys, and new car as well, I do hope that my mind is taken off a bit from such melancholic thoughts for some time and get busy with other creative projects. With my new car (if I get to purchase it any time soon), I would be free to go to Failaka island some time, at least for few hours if possible. On the other hand, and because of the retinitis pigmentosa possibilities, I've decided to dig out for solutions for my brother, sister and me personally. I'm so sick of life right now in fact that I'm challenging it not because I like living it - there is nothing much for me here, but merely because I hate it, and if it was a man I would have strangled it to death. Thus, I want to do everything I can and RP won't stop me right now. I want to keep looking and doing everything I can do and reach with my ideas. One step at a time... and all alone.


Thursday, August 23, 2012

Grease The Engine...

Here we go; back to the old life pace, and old fashions, and the old life style. Ramadhan is over, and now I have to work again on forcing myself to keep being awake in the afternoons after a period of a month of hibernating after work, everyday.
Many events took place here: My Birthday, Eid, and (most importantly) Speedlite experimenting. I'll show those slowly now!

I. Enlighten Me!

First things first. Still experimenting with my Speedlites, and I guess I didn't include some images that were done already before the last post. I think working with flashes or Speedlites is sort of an addiction-drag; once you start, you want to get more and more. This is said from someone who used to hate working with the flash (even though I had one already back then). Of course, I'm not saying all situations would require flashes, but, having 2 Speedlites at least is something awesome!

Pasión Pasando
Canon EF-S 18-55mm @46mm, f/5.6, 1/250 sec.
ISO 100

Pasión Pasando II
Canon EF-S 18-55mm @46mm, f/5.6, 1/250 sec.
ISO 100

Even though in both of these experiments I've gelled the Speedlites with blue and red gels, but the blue hue was weak (problably because of the WB, which I've set to Flash). The experiment was done in High-Speed mode, but the shutter speed in fact didn't exceed the sync speed (1/250 sec). I had some trials trying to adjust the power ratio (as I was working in Manual mode for the Speedlites and not E-TTL). Well, can't remember exactly what are the ratios, but seems I've set the 430EX II (on the left) to some power level higher than the 580EX II (on the right).
In the first image, I had to edit a bit and fix the colors as the blue gel didn't give a strong effect, while the second version was directly out of camera without any editing in the RAW file. I do like the second one though, not because it was not edited, but because of the smoke's shape. My aim was to have a smoke in the air going upward, but the ambient air didn't help (Central AC) and the smoke, any smoke, would automatically point downward because of the air movement in the room!

Explosive Candle
Canon EF-S 18-55mm @55mm, f/16, 10min
ISO 100
In a different day I've decided to work with the candle again (well, another one), and this time do some long exposure. An experiment I've done before, before I get the knowledge about the timings as I do now. This time, the atmosphere must be dark and I've configured the flash on second curtain sync just to give a pulse at the end of the exposure to emphasize the candle's body at the end. Here, unlike working with High-Speed, I have to turn off the lights and turn on the candle a bit to take some metering reading and do the calculations.
The meter was done to the area adjacent to the initial flame. Of course it was fluctuating and the metering reading was changing constantly, but of course an average or a value in the middle of the range would do. Now, I don't remember how much was that, but I needed 4 stops to lengthen the exposure to 10 minutes, so I'm expecting the value was somewhere around 30 seconds.
If you ask why the metering was done beside the flame and why not ON the flame itself or even on the body of the candle, well, I needed something with a medium luminance between the two areas; not so bright like the flame, and not too dark like the body of the candle. Simple logic from my side that I'm not sure it is quite correct, but it did work out in the final result (with some editing of course).
Editing was aimed at lightening some areas and darkening some, and emphasizing the edges of the flame by darkening or burning those areas, with some contrast addition of course. At the end, noise reduction, as usual.

II. Don't Cool Me Down!

Unfortunately, still till this very moment, my trials to cool down the sensor are not going well as planned. But, however, it gives me some further ideas that I might consider working on. All what I need now is someone who got some expertise in electronics! Anyway, no need to unfold this by now.
Just before the Eid (feast), or the end of Ramadhan, I've headed to the beach for one more trial in a long exposure on the beach, as usual.

Shooting Stars
Rokinon 8mm, f/16, 53min.
ISO 160
Because of the moon's disappearance the exposure was quite a long one - REALLY long one. Initially, the estimated time was to be more than one hour, and I had to do many adjustments and re-calculations to come around one hour exposure. However, just before I start opening the shutter, I've decided to increase the ISO for 2/3 stop, that is from 100, to 160. This is just to increase the chances for recording more highlights than shadows. I've wrapped the cool pad at the back of the camera sticking it to the LCD by rubber bands, but after 30 minutes only, I've realized that the cooling pad was already warming up. I think big portion of this freezing point was lost due to the fact that I needed 30 to 45 minutes just to adjust the camera. I've expected at this point that the chromatic noise will be peaking.
I've ended the exposure 6 minutes short from one hour, at 53 minutes, and as I've expected when I've uploaded the image - it was full of chromatic noise.

Working with RawTherapee, I've managed to eliminate a big portion of the chromatic noise and again cleaning a bit of noise when editing the file in ACR. I've tried many methods around as well with DxO, but after all, maybe the best result was the first one I've made. However, it is not something to be made into a large print! A4 size is enough I'd say to have a normal-looking image! Lot of features and sharpness got smudged out because of the noise filtering - luminance and chromatic noise altogether. This said, I need to have a serious step to reduce the heat. Winter is coming, so in hope that I will try more long exposures for comparisons.

III. Digging...

For the many activities on Flickr, and the new capabilities with DxO, I've been digging back at old shots and been investigating new capabilities, if possible. But as a beginning, I have to begin with a shot that I've done 2 weeks ago almost from the Free Zone.

Lines, Blocks, and Colors
Canon EF 100mm Macro, f/8, 1/160 sec.
ISO 400

Despite the excessive cloning, it is still an image that could rejected from some stock sites for some trade mark signs (I think the red label on the red container). Anyway, it is a close shot to my heart despite all the hardships, like the ISO 400 which added to the noise level - beside the problem with the perspective point on which I've spent a significant time trying to fix. Well, this is not a deep dig out from the past, it is just something I had to share from the last post!
Most of my dig out were from Ireland's archives, from 2009 and 2010.

Bleak
Canon EF 55-200mm @140mm, f/5.6, 1/160 sec.
ISO 250

Digging out images from the past is not necessarily something I've done to check on new capabilities of those programs and software, but there was a great push forward to do this by the fact that I have a Flickr account now and I want to give some feed to that account.
Images like Bleak for example, was done into HDR and tone-mapped. Back then I did like that version but now when I look at it again, I don't feel a thing; I do even hate it!

Endearing
The HDR version

Thinking about it, I really don't know how did I like the HDR version, or why I did it that way. A simple explanation is, my feelings were just like that! However, in the new version, Bleak, and after editing the colors in DxO, I've decided to do the reverse of the color splash technique, where everything is black and white and only the subject matter is colored. In Bleak I've made the subject matter black and white while the rest of the scene is colored. I'm not that happy about it because of the distractions in the background, but it was some happy experimenting to break down the typical rules of editing and doing effects, like color splashing (or as I like to call it sometimes, selective coloring). It is all a matter of feelings and how your mood relates to the image at hand. At the end I've added just a glamor effect (one of the old tricks in my bag) to add a contrast between something angelic in looks and yet bleak. How would you relate to such contrast? I'm regretting now that I didn't color the pot and keep the flowers in black and white. I might work again on it when I get the mood to work further on this image.

Gothicum

But maybe one of the most intriguing dig-outs is a panorama that I've totally forgot about since 2010. Generally speaking, this panorama had a lot of problems that made me just forget about processing it. Taken with 15mm fisheye lens on 4 vertical levels (4 shots that is), this panorama had a strong chromatic aberration, and perspective problems. Chromatic aberrations specifically were exaggerated because of the HDR tone-mapping. However, looking back at the slides, I've realized there is a potential in the sky. Many ideas raced through, and all lead to one answer at the end: Black and White.
First of all, the first problem to fix is the perspective. In PTGui it was a struggle somehow, and in fact I didn't even imagine that I could align the base line of the church in that way. To make a dramatic effect, we need a dramatic light, and here comes the HDR tone-mapping. The rest was a play of adjustment layers then and converting to black and white. The noise specifically was hard and with the help of layer masks, I've managed to blur the sky slightly, while sharpening the structure of the church itself (by NIK plugin) to extract more details. However, I'm not sure this would make up for a good large print; I'm not quite sure of how this would look. I have to add that the Gothic architecture here did help tremendously in the process and adds to the feeling of mystery and being ghostly if I should say.

As Caisleán

Now, after the comments I've received for Gothicum, I got encouraged to check on more of those forgotten shots and try to do something about them. One of these shots was a shot taken from one of the rooms in Cahir castle. In this shot, I was specifically aiming for HDR in the first place back then because, naturally, outdoor light and indoor light do not usually mix and to get details from both, HDR usually comes here for the help (or doing a manual blend). I thought of converting to black and white as well but I thought it might not be as dramatic as Gothicum after all, so I just kept it in colors.
The problem with As Caisleán (Out of Castle) is the fact that I've raised the ISO to 250 to compensate for my handshake, and also there is a not-so-negligible movement in between the frames and aligning those in Photomatix in the beginning was not so successful because with a fisheye lens, a slight nudge would make a big difference, specially on the edges. However, DxO came in for the rescue again, specially with the fact that Canon 15mm fisheye lens has a profile already installed in DxO, so technically, I didn't do anything other than load the images and then save them again as DNG files (to keep the RAW data within the files).
OK, aligning was not so perfect as well but better this time and with Photomatix v4.0 and the Ghosting manual tool I could tell Photomatix what areas did show ghosting and it worked like magic; but resulting in a skewed image little bit - easily fixed later in Photoshop.
Now goes the long story:
  • To bring details out of the window, I've used Curves and dragged down the highlights, and with its layer mask, I've applied it only to the window and the small squarish portion at the exit door (where the light comes in through the niche).
  • Gaussian blur is applied to the layer mask to make transition in between areas smoother.
  • With Noise Ninja, some noise was removed but not all to keep some details.
  • With NIK sharpener, the whole image was sharpened to pronounce the details of the walls more.
  • Curves again to adjust the contrast.

Well, it might not be good with a large print as well. I'm not sure if such level of noise is acceptable in large prints, but I think in small size like this here, it is OK to look at, even though the noise level on the wooden door is annoying!
There were lot of other images that I've been checking out but, maybe these 3 are enough for the time being!

IV. Fiesta...

It all came along together, being 32 on August 17th (and how ironic that I will be 33 in a day from this post according to my lunar birthday), then the Eid (feast) after Ramadhan - and also a shoulder pain that almost got me to commit suicide! All in all, they were occasions to do some photography, just so to try those social gatherings and how would it feel to shoot an event (but in a careless manner).

A cake for my sister, my nephew and myself.
All of us were born on August 17th. Bleh.

The Eid, however, was a greater opportunity than my birthday to do snap shots and to try out my Speedlites. The challenge was not in the lighting after all, but it was to carry the bulk of the camera and the Speedlites altogether with a pain in the shoulder and neck!

My Canon EOS 7D,
and 580EX II with 430EX II,
all attached to Vello bracket.
Ironically, no one was there to take a picture of me so I thought of shooting a picture of myself in front of the mirror. I think the weight of the whole set was something around 3kg (more than 6lb). In the beginning, as family members started to come in by early morning, I've tried to use only my 580EX II with a cable. With the fast focusing of Canon's 100mm macro lens, and holding the camera in one hand and the Speedlite in the other hand, I was able to catch some moment with some nice and soft light (mostly bounced off the ceiling). High ISO (mostly at 500) was a must as well.

My niece. She was running as I was shooting this!

I did many shots carrying my Speedlite in one hand, but then I realized I need both hands on the camera for more stability, and also for changing lenses, and that's when I've decided to put on the bracket. Initially I was thinking of just keeping the 580EX II off-camera, but then I've remembered that I do indeed have another Speedlite, the 430EX II! Why not use them both!?
As you can see from the picture above, I've mounted them both and I've kept the cord just to avoid the direct contact between the shoe of the flash and the bracket (which was metallic as well) to avoid firing the flash by mistake - which happened a lot!
Then, and only then, I've discovered for real, why did Syl Arena discuss and dedicated a chapter or a full section in his book about batteries. Batteries were indeed a problem and Energizer was not such a good brand; well, it is good power-wise, but not durable. Only then I did consider having rechargeable Energizer batteries with their specific charger. I've checked some Power Packs; those specific batteries made specially for Speedlites, and ironically, their prices were higher than the Speedlite itself!

V. The End...

Now, after a period of tranquility if I should say, it is time to grease the engine as I am preparing already for my travel on October. I got myself a new laptop with no operating system in order to twitch things as I like instead of having everything ready (and mostly in ways I don't like). There are plans to have a new PC with upgraded specifications, and that means of course a lot of headache (and maybe a period of unblogging). Anyway, such plans for the new PC is not for now or the near future; but most probably I will do it after coming back from my travel in November.
There are some meetings and some projects that roam my head and just don't know where to begin. I need some guidance and a push; a push in merits, but lately I've been doing all of that all by myself, which left me exhausted.
Where am I going for God's sake?