Showing posts with label colors. Show all posts

Thursday, January 20, 2022

Quickie Note…

Well, this is a quick post and I wasn't sure about typing it really but I thought maybe I should so I won't stay another week without a post.
Things had been a bit busy in my life lately, and with fatigue that leaves napping often, and let's not forget the turbulent sleeping schedule (now that I don't have any work to go to!). Anyway, I thought maybe I should post something now as I might not be able to post for 2 weeks ahead from now, since I'm planning to work a bit on a new Arabic blog post; and such posts require more time than the English ones because I usually include tutorials on how to do things and many pictures and explanations are involved.

Not much has been going on on the camera-front really but I'm trying. I've been mostly busy editing old photos merely for the sake of keeping a strike on YouPic. However, I've been also trying techniques here and there and experimenting with "artistic" ventures in Photoshop. I've also started applying some color-grading techniques to copy colors from one image to another and the results are amazing so far.

Cóipeáil

So, I've learned an old technique in copying or applying the colors of one image onto another, and it involved applying Curve adjustment layer and reversing the curve, and it's a long story. I've made an Arabic blog post about this technique. Now, however, I've learned a new method which, presumably, is easier and quicker to be done and somewhat more accurate. I won't go on with the details here, since Google or any other search engine are full of such tutorials for "copying" colors or applying colors from one image to another. Anyway, here are some results:


In the two examples above, grading was done manually by picking specific colors from one image as I deemed them bright enough to be a "highlight" or dark enough to be a "shadow" beside of course the mid-tone. The results were fine here but it was not always possible to do the manual job, depending on the complexity of the image and other factors. Anyway, I needed something more "systematic" and I've found what I need here by exploring the "Save for web" option in Photoshop, as I've learned from some tutorials online. I won't be going into details here and I'm just posting this here to show what I've been doing lately! Anyway, as for this second method, here are some results:


So, these 2 examples above were done using the "Save for Web" feature in Photoshop. I thought of doing a blog post in Arabic for this technique and for this I'm going to need some time to do things. 
 
Camera-Wise
 
Camera-wise, I've been trying to work a bit on minor things, and I also have some ideas that I want to work on for February, Retinitis Pigmentosa Awareness month. Winter is passing by already and I didn't get the chance to do any shooting outside like I did back in 2021 in November, mainly because of the fatigue and the turbulent sleep.
Anyway, I've been working with a little macro project which I'm not finished from yet and still trying here and there, but here is an example:
 

 So, in case you didn't realize what the image above is about, it is just a combination of 2 macro shots of the same screw. The left one is at about 3.2X and the left one is at about 6.5X. I've gone extreme here and the images surely needed lot of sharpening. It seems that even at 6.5X, and for such a slender object like this screw, one would need to do focus-stacking. Anyway this is something for the future. I'm still working on this.

Finale

So, this is a quick post just to list what I've been doing lately and to announce that I'll be away for 2 weeks at least to finish my Arabic blog post, hopefully. As of typing this, I didn't even start it!
A lot is cooking in my head right now, and specially for February and my RP project as usual for every year, yet my body is just not cooperating. Now that I'm retired, my mind is more active at night, as if I'm back to my origins as a nocturnal creature. Bad news is, I do have some stuff to do now and then during the day. In addition to that, I'm not driving my car much now (naturally) because of my eyes condition, which kind of leaves me deprived of many things, and I'm reluctant to break the rules of RP right now.

Thursday, July 8, 2021

Kika XI…

Honestly, I was too tired to even start typing this blog post. Thus, probably this one would be somewhat a short post. I think there is nothing weird with being tired, recalling my usual back pain sometimes, and my hectic life or routines everyday. There had been days that I wouldn't eat any lunch or dinner even. Anyway, it is time now for Kika's photo challenge, and this time with Week 11.

Kika XI

At this level of the photo-challenge, I got very busy with my brother and his studies and I barely had the capability or that piece of mind (pun intended) to work with the camera or to think of something new, or even to just edit. Well, editing is what I did but after some long time of searching and reflecting. The theme for the 11th week challenge was "Weather." And of course, you can't speak about weather, in Kuwait, without speaking about the sun and summer. Because, well, this IS the weather of Kuwait! What else do you expect here?

Sunny


For this photo-challenge, as I've stated before, I didn't take any new shots, but I've referred back to some old shots, specifically some of those that I've shot in the shining morning sun of May of 2020, during a total lock down back then. I remember I was testing all my infrared filters back then and this particular shot was probably made with Neewer IR950 filter (and of course using my modified Canon EOS 7D). To be honest even, it seems, for some good reason, the shot was taken with B+W 043 black filter (UV-pass filter).
If I remember correctly, this image was processed differently back when it was taken in May, but for this particular photo-challenge, I've processed it again with a huge crop to the image to let the focus go to the eyes specifically. Not sure what type of processing I used here but I'm sure it is not the typical IR processing that I would usually follow which typically turns the image into almost a monochromatic one. Adding also some more emphasis on the luster of the eyes.
With this, the photo-challenge almost comes to an end with only one week left. Actually I could've done week 12 here as well but I'll leave it for another week. The last image posted for Week 12 is, again, an old one.

Bubbly

At this point, I come to the bubbles project which I've postponed previously. It's a photo shoot that spanned several days; Trying a new method or technique every now and then. The final result was more than 90 images (which have been processed and published).

Final setting

In the process, I've tried several ways to light the bubbles and also worked with 2 lenses (50mm and 100mm macro). I'd say though that the 100mm macro did fit most of the shots. Those shot with the 50mm needed a great deal of crop. Now, I don't want to go on with the story in length, but the goal initially was to shoot a bubble at the bursting moment. Though I succeeded only with 2 shots but nevertheless, the collection of these colorful bubbles was worth the lengthy work. 

Bubblosphere LXVIII
(one of the bursting bubbles shots)

It would have been better if the bursting shot was done in midair but unfortunately, as usual, I had to work alone. So, most of the work was done on a stable ground (used an oil burner as a base for the bubbles) and I've been moving around, blowing the bubbles and taking the shots.
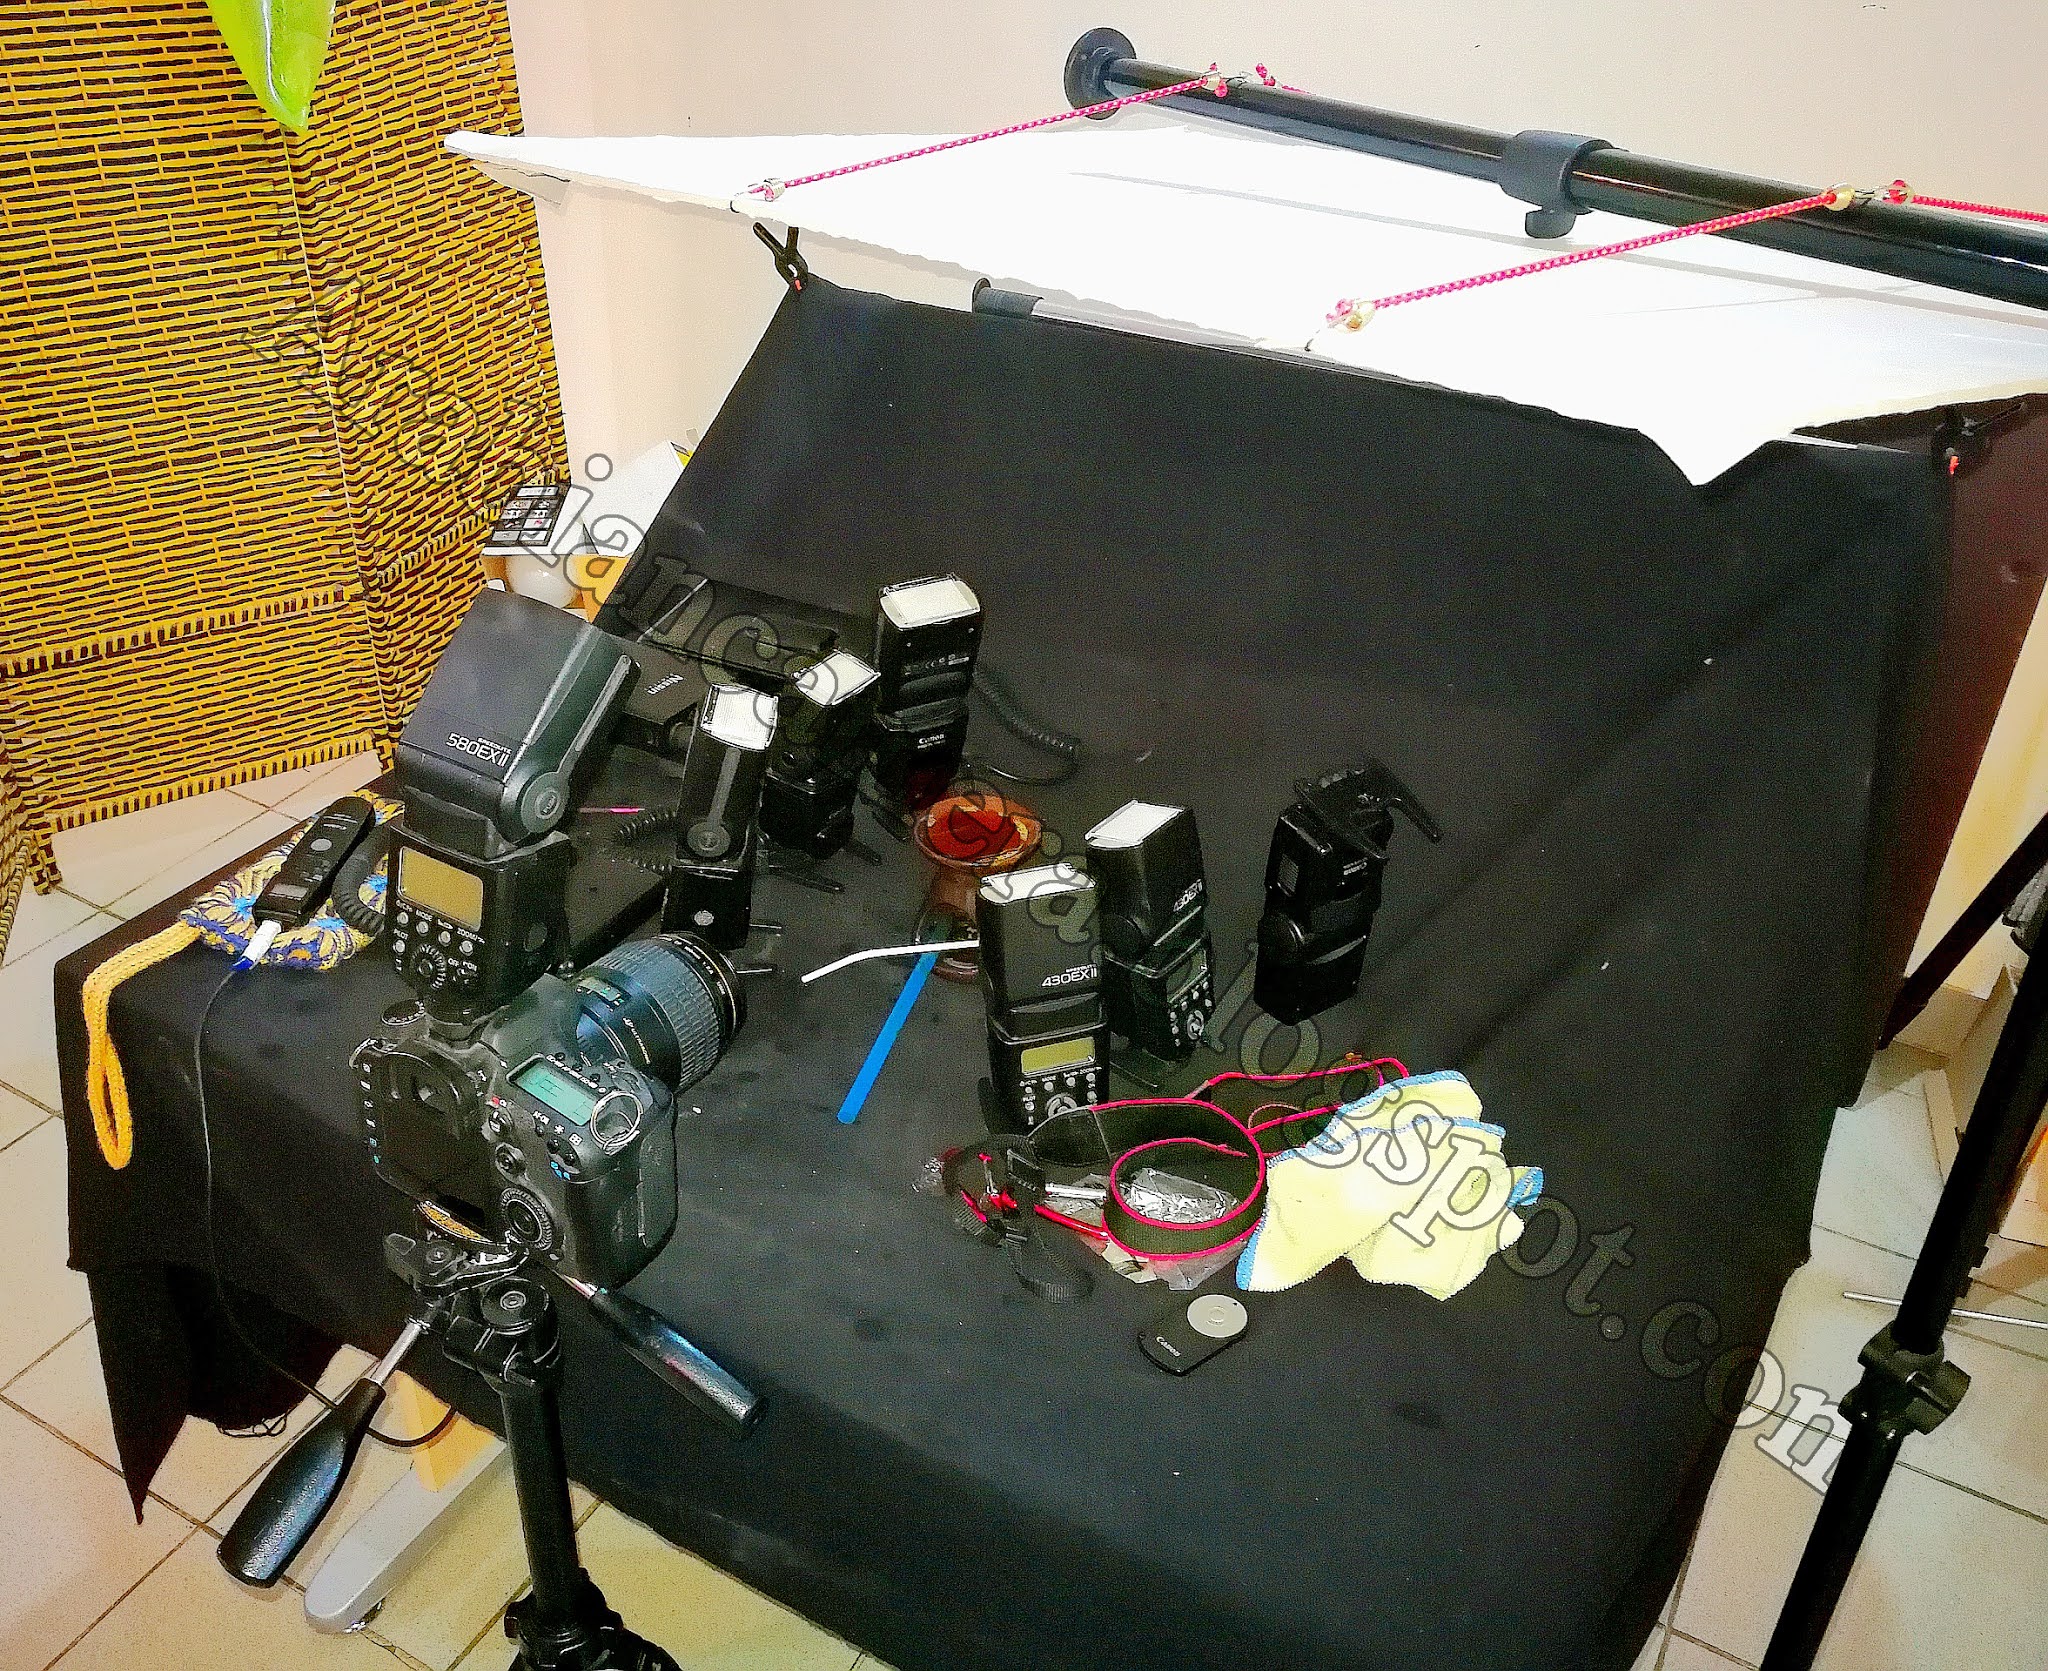
Speaking of bursting, that calls, of course, to the usage of high-speed. However, that was not done right away. I was actually having some trial-and-errors with the lights and I've been using several lighting methods, and even a handheld beauty-dish to light the bubbles. Anyway, turns out that the perfect lighting angle for the bubbles is to be (as seen in many videos on Youtube) from above. The  final setting can be seen in the image above, where I used a white board hung over the work area to bounce the light from all my speedlites below. I had to do it that way since I don't have a softbox.

Bubblosphere XX
(shot with handheld beauty-dish)

Worth noting that despite this number of speedlites (and the supplies of batteries!), I still needed to raise the ISO a bit to get a proper lighting level in the images. Normal I'd say, since bouncing the light or even diffusing it would cause such loss of power anyway. Though at such moment I would appreciate some light source with AC input instead of DC batteries! Ah well…

Worth noting also that I've been doing some stroboscopic experiments before all of this work as well but the results were not quite to my liking but I've merged several images into a single ones (and I've posted about them few posts ago in Kika's photo-challenge about Colors).
Anyway, to summarize it all, I've made a video containing all these images. If you are reading this and wish to get any of these, you can find the full collection on my Canstockphoto profile (you can also click the signature at the end of this post) and some of them had been accepted as well on 123RF


Finale

As I've stated in the introduction of this post, I've quite lazy (or tired) to type down this post. This makes me think of having a break after doing the last post about Kika's photo-challenge in two-week time from now. Not sure how long this break would be but I think I just need it not only for physical reasons, but also to build up some content as I'm actually too tired to hold my camera or even to think of anything new.
As time is ticking, it seems that I will be back to work around the end of July or the beginning of August. I don't want to start talking about the stress that I'm already living in since I heard the news. I'll be back to the rush hours, and even more, more stress at work because of the events that took place there during our days off (around one year and a half). I'm all alone there and surely ugly things will be hitting the fan. Meanwhile, I'm still waiting for sparkles of hope to shine as I'm looking forward to get my medical retirement if possible for retinitis pigmentosa, specially before moving to the new location which further away from my home, and it will surely cause me hectic time in driving to there. So many ideas, so many thoughts, and all cramps my brain rendering me paralyzed. All I can do is pray, and send my heart with hopes across Heavens…


Thursday, June 10, 2021

Kika IX…


Kika IX

And on with the 9th Week in Kika's challenge, which bore the topic of "color". This theme kind of coincided with a separate work that I was planning for and working on away from the Kika series, and just happened that the photos I've shot were full of colors; Though in abstract sense. And that is my work with the bubbles. However, the work with the bubbles, then, was still in its beginnings and I didn't quite find a valid or perfect way to capture these bubbles, and yet was doing some stroboscopic and macro experiments. Anyway, I think I will keep the majority of these posts for later, but for the time being, I'm just going to post those that I've dedicated specifically to Kika's photo-challenge with "color" as a theme.

Bubbly
Some abstracts shot with a macro lens.


The first problem with the bubbles was not being able to blow a proper bubble, so instead of having one big bubble, there was a cluster of small bubbles, Not wanting to lose the chance, I've decided to shoot those anyway. With a bit of processing, colors popped out more. Not sure why, but these images brings me nostalgia for rainy winter days, specially in my old home.

Set A

Then, there are the trials with stroboscopic flash. As for Kika's photo challenge, I've posted only one set, and that is Set A. Now, the reason for this name is that this image is made up of various images and not a single one, all shot in stroboscopic flash. Because of the empty spaces in each image of those, I thought it might be a good idea to combine them altogether and fill the gaps with other photos in the series. Then there is another series, and that was dubbed as "Set B" but I didn't post it for this theme of Kika's photo challenge. I'll keep that set when it's due when I'll be talking about the bubbles project.
Anyway aside from bubbles, I still had one last try here, and posted it on Instagram on the last day for Week 9 challenge.

Pantone Eye


The idea in the beginning was far from the photo challenge really, as taking a macro shot of my eye was something I wanted to do in a long time. I did it before but usually with 50mm or 50mm plus extension tubes (which provides moderate magnification of 1x or a bit more). This time I was aiming for a bit more but with me failing to get any good perspective, I reduced my ambition down to 2x magnification.
It's not the first time I do take a shot of my eye but with such magnification it was so hard; harder than before even. I had to use a hand mirror and hold it behind the camera to see the LiveView in order to frame correctly. Barely made it there actually with few shots with proper lighting. As the lighting goes, I had to hold two 430EX II near my face (and feel the heat of the pulse!).

Pantone Eye (details)


As the title goes, I thought of coloring the iris to pantone's color of the year (2021) which had a hex value of #F5DF4D. I thought this would also be suitable for the theme of Kika's photo challenge for Week 9. Anyway, coloring was not an easy process; It's not as simple as picking a brush and go over the iris. But I wanted the iris itself to adapt this color to have a more natural look. Thus, I've color-picked somewhere in the brightest region of the iris and started twitching colors to arrive at the proper CMYK equivalent for #F5DF4D (I think that was 8,7,78,0 in CMYK). This might initially resemble the pantone color but of course these digital values would change as I downgrade the file from 16-bit, change the color space and save the file as 8bit JPG. But the visual outlook should be the same since I use conversion of color space and not assigning  the color space. In the end, for the love of details, I've created another image from the first one (a crop) to show more details from the iris. I just can't remember was that my right or left eye!

Oxeneye

Usually, when shooting macro outside, I wouldn't go beyond 1x or 1.5x magnification. Even with such magnification, it is quite a hurdle to get a stable shot. Anyway, I've decided to take this further up, using my Voigländer 20mm lens (in reverse) and reaching up to 4.2X, and shooting outside. It was March, so many blooming plants were still available, in contrast to the situation now in May, as the temperatures already started to reach beyond 40°C here. So, my work begins with the oxeye bloom, or in fact it could be something of that family but not exactly the oxeye daisy itself, as the petals for the bloom here are yellow instead of white.

عَيْنُ الأُقْحُوانِ
(oxeye eye)

I have to admit, despite the hurdles and difficulties (and the back pain) for setting up the tripod and the camera (with or without a rail), the view at 4.2X for such small parts of the flower is simply amazing! I used to work afternoon when the sun is almost gone and not shining on the yard; This way it would be easier for the camera to communicate with my handheld 430EX II speedlite via infrared. Otherwise, it would be impossible to shoot using a speedlite unless I use a cable or a radio transmitter, which I don't have at the moment. Holding the speedlite freely at hand also enabled me to change the light direction and experiment with the looks by changing the light direction and distance even. 

عَيْنُ الأُقْحُوانِ 2
(oxeye eye 2)


As I've stated already, changing the light direction can make quite a difference in looks, as can be seen here in Oxeye Eye and Oxeye Eye 2. In the former, the dark background wasn't quite to my liking (hence cropping to get closer to the stamen), while in the latter, the background was harmonious to some extent in terms of color (keeping the foreground darker a bit). All that change was done by changing the direction of the speedlite and/or its distance from the flower. And it's not only the background here in fact, but also the texture of the stamen's surface popped out clearly (well, in the former version it is clearer because of the crop). Probably with a lesser than 4.2X, such texture won't be visible much.

Cornered


Probably the awkward part of shooting at such high magnification and shooting such a subject, is fixing the composition. In fact, as I was working behind the camera keeping an eye on the LiveView, I would have snapped any clear details I could get there. Images like Cornered and Last were originally aimless without concrete composition, but I've tried to fix things by cropping, sometimes to some severe measures here. I'm not sure if this is normal or not, but I'm guessing that more professional photographers in the world of extreme macro photography do have their own techniques to pinpoint the composition properly. As for me, it was a mere trial-and-error and a game of chance!

Last


Finale

Something is going on with my mind and body lately, and I just can't figure what it is exactly. I've been lethargic most of the time and taking a nap after a nap, after a sleep. I'm starting to wonder if this is a normal thing to have at 40? Or should I say 42, if I want to count my age according to the lunar years. Is this part of what they call the "mid-life crisis"? Or it's just a fleeting influence or transit from the planets upon my life and would soon go away? Or maybe it's just escapism at its best? I'm hoping, as I really need to get going and work with my camera more.
I'm still going on with the process (and the bureaucracy) of attaining my "special needs" papers. And who knows, I might work on getting a medical retirement afterward, but the long from here is long and hard to speculate. I'm not sure I'm going to attain the retirement yet. It sounds inevitable though, specially with the move of my workplace to a new location which is double the distance from home almost; I can't imagine myself driving that much on a daily basis, twice a day. My body is not what it was in my 30s and 20s. Trying hard not to think ahead about it but my brain can't stop flipping the channels.
As days pass by here, I just realize how awesome it would have been if I had my own home, and yet how hard it is to gain one. Even my trials years back to settle down and get my own place were never fulfilled, and interrupted with my mother falling sick for kidney failure. I was the main carer for her for 3 years then and I've totally forgot about myself then. More chances came in later, and never worked out, and now here I am… at 40, not knowing where am I heading, nor what I'm supposed to do, or what to be…


Thursday, December 13, 2018

Chaotic Life…

Busy week, and busy health issues as well. I did not feel like typing this blog post really but I'm pushing myself just to get myself out of the circle. Car issues (not over yet with those) occupied my mind (and still) for the past few days and I was not able to work with my camera and incense sticks to apply some ideas that occurred to me.
My new Canon EF 50mm f/1.4 USM
Moreover, there was a bit of news I was lazy to post about last time, and that is my nifty-fifty lens (Canon EF 50mm f/1.4 USM) had gone dead with the focusing ring not responding; Not in manual, nor in Autofocus mode. This is one of the critical lenses I have, and having it ready is a must. Thus, I was anticipating in my mind to order a new one and this time it would a 50mm lens but from Canon's L-Series (higher quality and, well, pricey). Unfortunately, though I had to ignore this option when I discovered that the diameter of this lens is 72mm and not 58mm as its cheaper counterpart.
Canon EF 50mm f/1.2L USM
This difference will make lot of troubles with my arsenal of filters which I usually purchase based on the 58mm standard, as most of my lenses do have this diameter and some do have step-down or step-up rings for them to attach these filters. Using a step-down ring for 72mm to 58mm is, as far as I know, does not exist and most probably I would need 2 step-down rings (72 to 62 and 62 to 58) and such a setting is not advised for because it might cause more vignetting and probably more flares because the body of the filter would be separated more than usual from the surface of the lens front. Thus, after checking it out, I've finally ordered the same lens I have from a local store (AABWorld) which Ironically offered the lens for $4 less than its price on B&H! I got it delivered on the same day. Man, I'm spending lot of money in this month...

Smoking Smoke

I've posted in my last post here about working with incense sticks and some plans about it but I didn't post any results from that experiment. In fact, my aim in the first place was to do a long exposure with periodic flash bursts from my speedlites and thus making a multi-exposure-like image within one frame and one single exposure (by working in a dark room). However, we are talking here about exposures that might extend to 30 minutes, and the stroboscopic feature in speedlites won't handle this situation properly. Therefore, I was looking for another solution to this. Meanwhile, I was busy the past week in writing a blog post in Arabic for my Arabic blog specifically about this experiment and how I did what I did. See, I was busy!

The set for shooting incense sticks.

Thus, since I couldn't work out my way with such idea, I had to do things digitally, by using the intervalometer and take shots automatically every 30 seconds (I worked with 1 minute as well) just like if I was doing a time-lapse, and then work hard digitally to compose and overlap the images and convey a sense of movement. Well, the end result was actually more surreal and far from being about movement! Yet, I still like it. For fun (probably posted this before?), I've created a reverse time-lapse out of the 80+ shots that I took of the burning incense sticks. I didn't bother to add sound or anything.


My first step in processing this amount of images (more than 80 shots) was to use the Blend technique, in which I would change blend for each layer to merge it in a somewhat similar look to the multi-exposure option in some cameras. Mainly, the Blend option to fit the usage here was the Lighten option.
Emerging Smoke
I have to admit though that the general look might be messy with Emerging Smoke, yet I do like such a mess with its abstract sense and randomness. Notice that the final image was rotated as well to add a bit of mystery to it. The coloring was done digitally of course and I used a simple gradient here close to baby-pink and baby-blue, but I think I should have made the grading softer some more as it appears as if the change was sudden from pink to blue. The smoke here also does have some metallic sense to it, and I think it would be good as a background of some sort. It is already accepted by some stock websites already with its counterpart coming next. One thing to notice here though, the Lighten blend does not work with all kinds of images; Sometimes, if the images are generally bright, the Darken blend would work better, or maybe at times a mix of the two blends would do!
Smokey Carnival
The next play or trick required some special sorting for the images: Only those with longitudinal smoke shapes would be picked for the process. And the process was simply assigning a channel from the RGB spectrum to each layer (consecutively), in addition to some tweaking in contrast, and at a later stage tweaking the colors with Hue/Saturation adjustment layer and voila! We have a Smokey Carnival. I'm not sure how many layers I've used here but it was somewhere between 70 and 80 shots. This combination of images, too, is now available on the stock, and I think it does make another background or backdrop image, or even a wallpaper. Things won't stop at these two, as there are single layers which produced some interesting shapes of smokes that I'm willing to experiment with and add some digital colors to keep things interesting (probably combination of gradations made of complimentary colors). Yet, because of the hectic life issues I'm having currently, I had to stop editing those images and even stop doing some plans with my camera. Let's hope this weekend gives me some breath of life to stand up again.
As I've mentioned earlier, I was thinking of some method to time the speedlite to shoot in specific periods of time with a long exposure (extending to around 30 minutes maybe!), and seems the solution is here finally but I didn't get the chance to try it out yet. Without delving much into the details, it seems that I need to dig out my multi-gate trigger (which works with infrared, laser and sound) and hook it with the system for this experiment. Let's hope I would be able to work with it this week or so and get some good results!

Finale

Well, as you can see here maybe this is kind of a short note of what I've been doing lately with my "life" - if I can call it so. Too bad my mind had been too busy to write or think of some words to jot down or even to look inside myself for feelings to express in a poem. However, in the mid of all of that, I'm keeping a record for some of my thoughts about life on Writing.com and I do post them as well sometimes on Twitter and FB. Anyway, probably not the time to post the link for that for the time being.
Times is ticking away and to be sincere about my feelings, I'm loathing and getting disgusted by every second the ticks while I'm in this place. A place that I call home, or maybe I'm forced to call home. Time passes and I feel more estranged and more isolated. Adding to my eyes trouble that makes driving such a hassle to be aware of, the hassle of dealing with the outside world and with such savage and barbaric creatures that call themselves human beings makes my anger deep inside incremental. So much that I feel like crashing everyone I see in front of me with my car, if I can get the chance to. Probably this is the effect for not traveling out for 3 years... Probably I'm on the verge of forgetting that once upon a time, I was a human being.


Thursday, August 10, 2017

Mí Lúnasa…

August is in, and the heat is in surplus combined with humidity. Well, the good part is, my birthday is coming and I'm planning ahead for this day to... sleep some more. If I'm lucky enough I might as well get the chance to have free lunch with friends! Let's pray…
I've been busy the past few weeks doing many things (and skipping many things), but mainly finished a whole post/article for my Arabic blog explaining how I shoot through my old microscope, in hope someone out there find it beneficial anyway. I was also busy working on July's project: motion and splashes. But since I've done splashes before (and they require a messy set-up) I've decided to confine myself to do motion images as much as possible. I think I've posted some trials in the previous post, and some of them were a great fail.

Waiting


As I've mentioned before that the lines from songs of Sabah Fakhri [صباح فخري] are still inspiring me for these shots. My first trials with stroboscopic function didn't go well majorly because of the nature of the clocks or watches I've been using as it seems, so it was inevitable to do some Photoshop work out of the context of photography a bit as in Waiting. However, because of the depth of field, which was not shallow enough, and the irregular gaps between the ghosts of the minutes hands, all that made me think of re-doing the shot again with some fixes.

Waiting II


As shown here in Waiting II, I've pulled the rose closer to the table edge toward the camera to increase the distance and hence enhance the look of the shallow depth of field. However, it seems that I've done it with a bit of extra spices since I doubt that movement of the clock's hands are obvious at this level, but I'll leave that to the viewers. This is not the end of the story as I will be back to this project in a bit.
In my trials to depict motion I arrived at an idea which I've encountered some time ago in fact. A method of merging various channels of various similar-looking images (mainly those containing a sort of motion in them). The method was described by Yuga Kurita, a Japanese photographer. Though his method is a bit different but the final result is essentially the same almost. It's about merging one channel from each shot, in a series. I was set to go and try this new method with some spin-tops!

Chromamotion
Voigtländer 20mm, f/11, 1s, ISO100

Unfortunately, I didn't take a shot for the set, but it was a simple set with camera dangling vertically over the set with a lateral arm. I used my Voigtländer 20mm lens here for its sharpness and quality, and to have more freedom in the field of view as I was planning to crop later on. I've set my Speedlite (580EX II) on second-sync on the camera and directed it to a white cardboard on the side of the set. With some angle it was possible to make elongated shadows for the spinners. All these measures later on, however, proved to be kind of useless! Anyway, the main task was to have a proper image for the motion and that was kind of possible at 1 second exposure. After spinning and shooting several shots, it was time to combine some of them. In Chromamotion, three images were merged by channels. Later on, I've decided to merge all of the shots in sets of threes (made about 6 groups).

Quarks
The sprinkling colors across the white space here reminded me of the quarks so I named it after them. However, despite the colorful look, the motion blur in the original shots is not quite obvious here so I was doubting about the ability of such work to deliver the idea of motion to the viewer; any viewer. Things, however, got into perspective with my next move when I thought about the first shots I've made for Waiting above. Why didn't I think of that before? I can merge those in the same way instead of stacking them together in a regular manner!

Waiting III

I think in Waiting III, the allusion of motion is better and more obvious than Waiting I and Waiting II because of the colors on an almost-black-and-white image in general. This beings me to a conclusion as to why Waiting III is depicting motion better than Quarks or Chromamotion, and I think this is mainly because the image itself has mixed elements of stable objects and those in motion, and in fact those stable objects are, somehow, more general than those in motion. In Waiting III, also, we have a center (the clock's center), something which the motion is going about or around - since it's hard to depict the motion blur in this method it would be better to have the moving object in some periodic motion (visually at least) or attached to a static object (e.g. waves and beach, or moving branches in the wind). This is just my observation for now, and we'll see what to do about it later!

Finale

Well, there had been so much on my table lately, whether it's photography-related or domestic. I've been learning new stuff about Anaglyph making and 3D illusions, specifically for videos. I've posted a video last time which was not very concrete in terms of its 3D effect, but it was a trial and now after learning new things, I might try to record a new video; However, it does require some work on prepping my gear first just a bit.

Source: Amazon
I've stopped my ongoing reading list to read and finish my 2 new books from Amazon, and I've already finished one by Syl Arena (which I've read books of his before) This book is quite easy to digest and the beginning bulk of this book is for beginners, but nevertheless what comes then is quite useful, specially when it comes to discussions about his projects and situations. He describes exactly the mental process as needed to follow on with creating the needed light (even though some professionals might disagree with his methods).

Source: Amazon
Now I've started reading the second book, Schaum's Outlines: Optics, which is supposedly and introductory to the world of optics. However, the book kind of looking weird, because I feel as if it is in fact an answering-model for another major book (or let's say a solution manual). Nevertheless, it gives good information still with some good explanations in paragraphs before giving questions and their solutions. It is in fact a good refresher for me so far because what I've been reading so far is what I've studied long ago in my physics classes and completely forgot about right now!

There are other stuff I need to test and examine too, but waiting for the right time as I'm pressed (and can barely type this blog even!). I have the focusing pyramid (to calibrate the focusing system for lenses) as well as the H-alpha Night Sky filter which I didn't examine properly for the night sky yet, except lately for shooting the lunar eclipse (image at the end of the post). It is a regular job (and imaging) with such a filter and when I ordered it, I was really aiming at using it to shoot at the sun, but seems I have to wait till summer is over or I will simply be a fried egg! As for now, I need to get myself involved in August project with the group, which is about "Books." So far, I have no idea what I'm supposed to do, but only glimpses and visions in my head waiting to get out to reality.
When it comes to travel, it seems that I have to delay my plans a bit further and probably skip this year as well. I guess things are going crazy in this world, too much that a travel itself is a stress that needs a stress-relief. Needless to say, I don't quite have any idea as where I should be going. Sometimes though I wish if I can meet some of those amazing people I knew online… Well, till that time comes, I better get back to my Irish lessons and learning, and maybe add another language to the list.

Lunar Chain


Stock photography by Taher AlShemaly at Alamy

Thursday, July 6, 2017

Micron…

Here I am, back after a little vacation away from this blog for the Eid event (and actually not having time to type it down!). I've been spending Eid sleeping most of the time as I'm trying to fix my sleeping time, but I did some work with my camera and I will talk about some of it in this post. Moreover, I did receive my shipments and I'm trying to find an opportunity to try them out. Anyway, I might keep the talk about these stuff for another post, as most of them are actually accessories and spare parts.

Murder of Colors

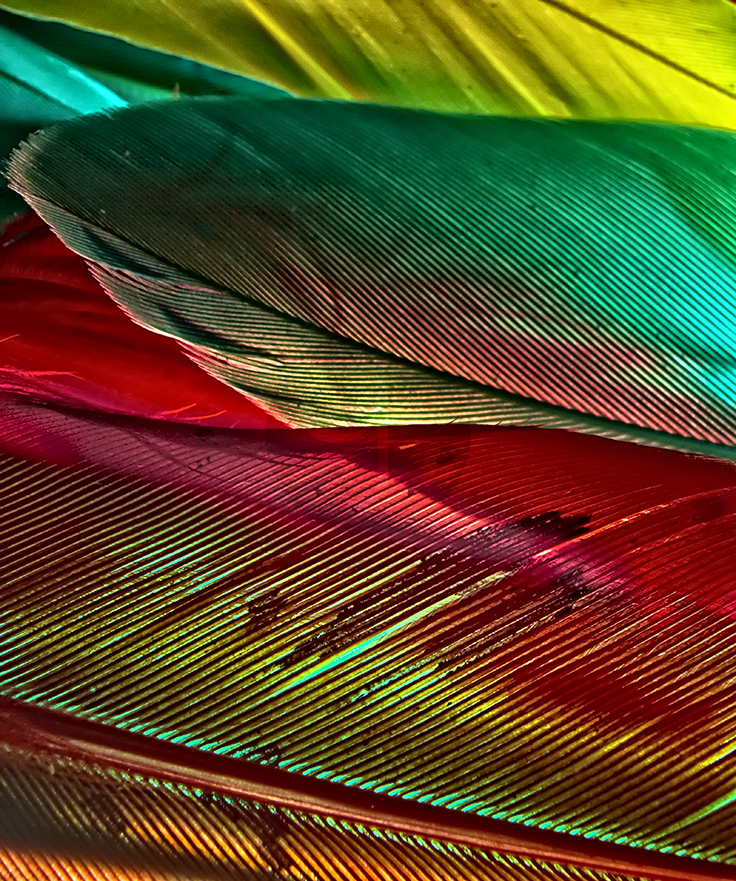
This is the title of a little series I've made, again, with colored feathers as a part of June project with the group which was themed "Abstract." Initially, the idea was to take a shot for some feathers, set randomly, from below with a wide angle lens, in hope that the distortion would serve me here to create an interesting attraction. However, many difficulties occurred, specially with the method of lighting with the speedlites, and after trying many times, I had to give up the idea and do a typical abstract approach as my mind is usually set to go: Macro.

Murder of Colors I
Voigtländer 20mm (R), f/22,
250-1, ISO100.
Changing to macro required a change of in the setting of course, so I placed the speedlites below the set (feathers were sprinkled randomly on a plastic or acrylic sheet) while I shoot them from above using the wireless function in my Canon EOS 7D to control speedlites via infrared. As it is not a matter of HSS, then infrared function can be used with comfort (HSS is not active when controlling flashes via wireless, unless with a special trigger). In this series, I moved from using the usual extension tubes with whatever lens, to reversing the lens with my Vello Macrofier. This method is a saver indeed, as it doesn't add more weight to the camera (which I'm going to shoot with by hand and no tripod), and apparently it does not have all the complications that accompany extension tubes when it comes to the focal plane placement and whether or not the focusing point would be in front of the lens or behind it (which deems it impossible).
Murder of Colors II
Voigtländer 20mm (R), f/22,
250-1, ISO100.
I was set to use Voigtländer 20mm lens on reverse here, as according to my calculations (which I've found out they were wrong later) that it would give a magnification of 2.5X, while using 50mm lens would give about 1X. I needed something extra here to avoid the typical zooming level that I've used previously in most of my abstracts. Also, to get some extra details out of the lines in the feathers. In this series which consists of merely 3 shots (after sorting them out), I think I prefer Murder of Colors I the most, as it has this glow and vibrant coloration, and some strange color cast from one feather onto another (mainly on the yellow feather).

Murder of Colors III
Voigtländer 20mm (R), f/22,
250-1, ISO100.
Unfortunately though, I didn't document this simple set for Murder of Colors, and at the moment, I've just realized that there is a whole different series done with feathers which I've totally forgot about despite being uploaded to stock sites already (and accepted by most)! Anyway, I might try to post about that series later. Seems that my busy schedule (or let's say me getting myself busy schedule) made some gaps in my memory! However, I'm happy for one thing, which is finally having an exact calculation method to estimate the magnification level, but that did not come by while working on Murder of Colors series, but rather later, as I was working with my microscope!


Reverse Magnification
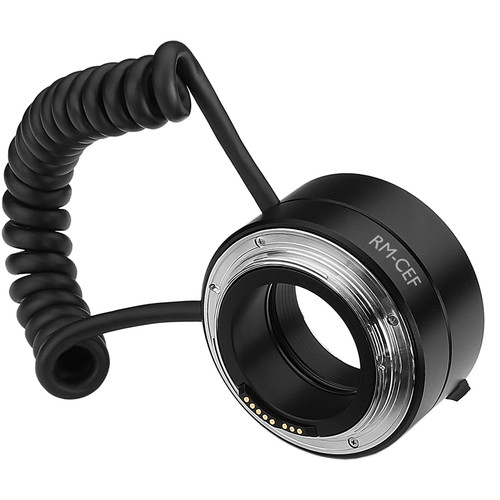
Vello Macrofier
Source: B&H
I talked about how I was wrong with some of my calculations regarding the magnification when using Lens Reversing method. Generally speaking, it is supposed to be just like the calculations done with Coupling Lenses technique, where two lenses are connected in reverse to each other and onto the camera; In this method, the magnification is measured by finding the ratio between first lens (attached to camera) and the reversed lens. I could not really find a concrete formula for magnification by reversing the lens directly onto the camera, but I presumed that the focal length should be 50mm or around that, as it is the "normal" focal length. By that, the magnification is to be calculated as 50/FL, where FL is the reversed lens focal length.
However, as I'm working with my old microscope, I got my interest back again and I started searching again, and all I could find is actually practical method to measure the magnification by shooting rulers and finding the ratio between millimeters in the image and the actual width of the sensor. Doing that practically with a ruler did break my believe about the ratio of 50/FL stated above, and I started to look for the source of that difference, as the magnification ratio with a reversed Voigtländer 20mm which is supposed to be about 2.5X, proved to be higher than that (around 3.2X!).
This made me investigate the specs of my camera again and trying to find the true distance between sensor and the mount (a.k.a. flange focal distance), and to my surprise, it was indeed not 50mm as I was thinking, but 44mm. Yet, this didn't explain the results and I just realized the fact that the Vello Macrofier does add some distance further away from the sensor and it should be added (which was about 20mm). By this, the total distance away from the sensor becomes: 44mm + 20mm = 64mm. Thus, doing the magnification ratio again with this value: 64mm / 20mm (for Voigtländer lens) that would yield 3.2X indeed as measured practically with a ruler (values had been approximated of course and rounded to one decimal place).

The flange place for DSLR (top) and
Mirrorless (bottom) indicated by Red.
Source: Wikipedia
With this result I'm more likely to rely on reversing the lens for my macro shots more than using tubes or lenses coupling, or even using my 100mm macro lens. Even though using a dedicated macro lens has its own benefits of course and its quality. Nevertheless, reversing the lens with Vello Macrofier makes the job easier (specially that it offers an aperture control) and better focusing distance than with extension tubes. To elaborate further, again with Voigtländer 20mm lens, as per calculations, using extension tubes to gain a proper 2X magnification or a bit more with this lens, would yield a focusing point behind the lens front (which is impossible); While using reverse lens method, this enables me to get 3.2X with proper focusing distance (in millimeters of course) in front of the lens. Also, I can add filters (UV at least) to the lens front when in reverse just to increase the distance to the sensor (which I did already and gained about 3.7X). There is a whole new world to be discovered with this method, which made me think of having a specially made hood for my Rokinon 8mm fisheye lens to enable fitting adapters to the front of the lens. If this worked right, then I might be able to gain 8X just like a breeze!

Micro-Macro

Well, the upper part to explain the reverse lens magnification was ignited by this ongoing project of shooting objects under the microscope. I have this microscope since I was 14, and instead of leaving it to collect some dust, I've decided to put it to use with my camera, specially after surfing the net and finding new methods to shoot through the microscope without using a special mount and adapter. Mostly, a point-and-shoot cameras are used for this task (or webcam sometimes) but all I have here is two DSLRs with LOT of possibilities.

My set for shooting through my old microscope.
Using two 12W LEDs to light the set properly.
Well, the hardest part was (and still) making the set ready. My microscope is an old one with one eyepiece protruding upward and even though I can tilt the microscope but I have to keep it standing as it is because the samples I make are usually, well, not professional ones and can easily slide down. Here comes the hard part, with setting the camera (and rail) on the top of the eyepiece, and the small tea table did not make things go easier either. It's a matter of weight lifting and sometimes balancing the tripod with the lateral arm on top or it would fall over. Nevertheless, I made it with many samples and triggered me to do another research for better ways to stack focus my images (a single image won't do here).

Lamina

The beginning was with some of the colored feathers that I've already used many times for my abstract. There are many problems that are already there before I even think of shooting through the microscope. However, I'm not intending on producing Book-Quality images after all (otherwise, I do have a friend to help me with that). As can be seen in Lamina, which was shot from a red feather, such single shots do not bear much depth of field. Thus, there was a call for focus stacking, and this time by changing the focus in the microscope itself, not moving the camera and rail combination.

Hair Bulb

Typically, I would think of Photoshop as the main tool to focus stack my shots, but again, I've realized that however smooth I'd go with the focus, Photoshop would still give out some bad blends as can be seen in Hair Bulb. This shot was is probably one of the fewest that I did with 40X objective on this microscope (and thus reaching total magnification of about 1280X). Zooming so deep sometimes makes a loss of some good details, as well as it is hard to light even with external sources such as two LED bulbs. These discrepancies made me aware of the fact that Photoshop, and like the case with panorama stitching, is not the best solution for the task at hand. And again I go looking for other solutions.

Hair Bulb (Enfuse)
 
I've found many software dedicated to focus stacking and most of them were to be purchased, at the end I've found one freeware which is actually dedicated to blend HDR images, but according to some tutorials I've found, it can be used for focus stacking successfully: EnfuseGUI (the man deserves some donation there!). In the tutorials they use Hugin (another freeware for panorama stitching) to align images, but I've found that it is a command-line thing and needs quite a patience here! Thus, just for aligning my images, I used Photoshop back again (and cropping some excesses). No need to go to the details of the process here, but the results of using Enfuse can be seen on Hair Bulb (Enfuse), where the blend had been much better. I was not lucky all the time though, and most of the time with other stacks, I have to stack on stages (blending portions and then sub-portions, then sub-sub-portions... etc) which takes some time but the results are far more fit than what Photoshop could do. Did Adobe fix such issues in new editions of Photoshop? I really don't know, as I'm using CS5 and got no plans to go beyond that for the time being.

A Study of 20 Fils
"K"
320X
One of the struggles of focus stacking with microscope images is to achieve some 3D-ish look when shooting various specimens. Using external light sources got me the advantage of viewing metallic opaque objects, such as coins, specifically this 20 Fils which I did inspect long time ago by in-camera macro methods  (using lens coupling) and reached about 17X power. The story is different now and I'm able to few the metallic texture up and close! However, there is always the annoyance of artifacts from this old microscope but the fun lingers on. To this moment of typing this post there are still more work going on with some coins which I might post later.
As I've stated before, the fact that I'm using a lens on reverse enables me to add filters to the lens' front and consequently this would also increase the magnification ratio a bit because the distance to the sensor is stretched few millimeters. But to my own experience now, I have to say that having super magnification is not always what you want or need, simply because it might obscure details!

Banana Peel
320X

With filters, seems like I'm having different worlds to discover; Something I'm working on still. Probably the most astonishing view I had so far is that one with Banana Peel which was my first target to use infrared filter (B+W 092, threshold: 650nm). Things were dark and hard to see at first, and I had to raise the ISO to max just to navigate through, but I put it down when I saw something that captured my eyes…

Banana Peel under Infrared

The image you see above is of course the final product of focus stacking and infrared processing, as well as channel swapping. However, these marks were glowing in my LiveView while the rest of the peel (same peel posted above that) was dark while using this filter. I showed my friend this image and told him the story but we both were astonished and could not find a reason for this. The thing is, doing infrared shots for other materials did not yield such result!

Grape Skin (IR)
320X

Grape Skin (Normal)

I think this matter needs more picture taking to find if this thing is really significant for bananas only or there was something wrong with the microscope or my camera! However, I'll keep looking further for more samples to do. Despite being a tiresome job to do with this microscope and the heavy cumbersome gear that I have to deal with, it is still a good source of muse, specially with the arrival of my new H-alpha filter from Lumicon, which I'm dying to use (artistically and scientifically, if I can call it so!).

Finale

I guess this post is long enough as it is now and no need to talk about my new acquired stuff. This is beside not trying them out yet and having any thoughts about them. The Summer is scorching my head as usual and with me back to work after a long vacation during Ramadhan doesn't make things better for either mood or body, but I'm trying to muse myself with the camera and the new stuff. July project with the group is also ongoing right now and somewhat adds a bit of burden to my time which I want to dedicate further to my new toys and activities. Everyone, Everywhere I look, talks about traveling, I guess this is natural since it is Summer, a typical season, but it makes me drool and my mind is busy calculating to see and plan for some vacation outside, before I commit a murder or something. Anyway, my traveling is typically after the busy season, to have some "quiet" time. Yet, my mind is not set yet on a specific destination, nor I'm sure about my budget. Meanwhile, my only companion seems to be my headphone, and the heat…


Stock photography by Taher AlShemaly at Alamy