Showing posts with label 580ex. Show all posts

Thursday, June 1, 2017

Colorado…

Well, Ramadan is here and boy ain't I happy to have a leave off work during this month! Despite my usual troublesome sleeping pattern during this month, yet I feel refreshed at some level and I'm eager to work with my camera more often than before (specially with me doing my experiments near my room). With May project with the group, which is about colors, I've started to re-kindle an old passion for high-speed. The work is still going on as I'm typing this, as there are a number of issues I need to fix still and some more ideas in hope I can try later.

Colorado

The May project was a priority, so I spent some time thinking about what can be done in that venue. It is easier said than done, as colors are everywhere but it's hard to get some concrete and unique work of art involving colors. In the beginning, I was trying to follow my typical steps in creating an idea: Find a deep emotion inside myself, and cast that particular feeling on the subject at hand, be it color, shadows, or whatever. However this step seemed hard and technically I was so mentally confused that I couldn't realize my own feelings or how to organize my thoughts! Thus, I had to shoot for mere fun and I started mumbling with my props and gear to find something colorful.

Colorado I
Canon EF 100mm macro, f/29,
250-1sec, ISO100.
After playing around with some props and accessories, I decided to use the refraction power of water to create some colorful abstracts by using colored Popsicle sticks placed in a separate glass jar behind the glass of water. Later on, however, I've decided to add corn syrup into the water during the shot (putting the camera on timer while pouring already). This was just to add some action to the scene instead of plain silent colors. There was no need to high-speed mode as 1/250 of a second for the shutter speed was enough to kill the ambient light, but the greater hardship was in having a proper framing for the shot since I was working inside my room and could barely have a proper distance to stay away from the set with my 100mm lens, while using 50mm lens would require me to get closer beyond the nearest possible point of focusing.

Colorado II
Canon EF 100mm macro, f/29,
250-1sec, ISO100
Distributing the light was not so hard to do but it was rather hard to adjust (as I usually work in manual mode). I've used 2 white boards on the sides to reflect off the light and later on I've placed a shade on the top of the set to reflect any astray light from below and reflect it back (and it did a great job!). While shooting, there was always something going off which made the power sometimes excessive or too low without even touching any flash settings. Not sure what is causing this but the first culprit in my mind right now is the fact that I was working in LiveView mode. Some professionals always warn against using LiveView mode for serious shooting. However, with my back problems, I find myself often forced to work that way!

Colorado III
Canon EF 100mm macro, f/32,
250-1sec, ISO100
After shooting Colorado I I decided to increase the amount of action and pour even more corn syrup to fill the frame (while some were already accumulating at the bottom of the glass) which created such a mess as seen in Colorado II, but oh well, I guess this is much better than having much plain space as in Colorado I. There was one last shot I needed to try, and here, I've replaced the colored sticks with colored pencils and filled the glass with corn syrup instead of water as I loved the looks of the bubbles in the bottle of the syrup. To add something to the scene, I've placed a small cut from a branch of some plant I've found here (no animals were killed to try this!). At this level, I wanted to step further and try the risks of using f/32 with this lens which I've experienced some weird behavior before at this aperture value. However, after several shots I did get something stable as seen in Colorado III, and even created a 3D Anaglyph out of this scene. Now, I'm creating the habit of documenting the set every time I finish one experiment. I guess it is a good practice?

The set used for Colorado I and Colorado II. A reflector was placed on top during the shoot.

The set used to shoot Colorado III.
I used 2 small candles on the sides in hope to excite the fluid and produce more bubbles inside the syrup but that wasn't useful!

Cherry Boom

I thought I was over with the Colorado experiment above, but then I thought why not implement high-speed onto the project, specially that I'm trying to work in a space near my room (even though no proper table for me yet, as you can see from the sets above). Implementing the idea of colors here emerge from the concept of the color circle and complimentary colors. Thus, I simply googled "Cherry Red Color" and I got the code #a61f34, and starting from there I got the complimentary color which is some degree of cyan. I picked cherry specifically because it was available, and because of its distinctive red color and tiny branch which typically stems out of it. I could have gone with grapes but I think grapes do not have a distinctive shape or color (and the red variety would be typically larger than I need them to be). Thus, the choice for cherries seemed legit!

Final look for the set of the project.

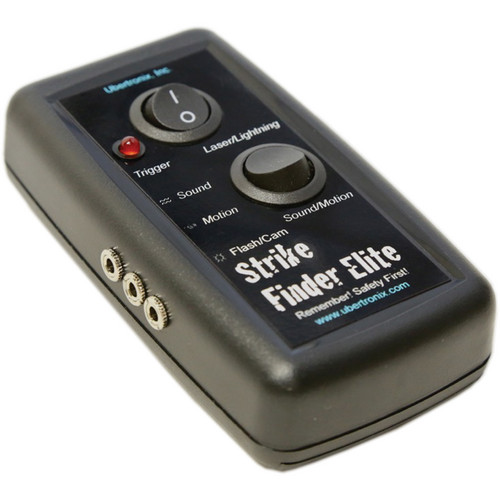
Ubertronix Strike Finder Elite.
Source: B&H
I used watercolors here to color the water and later I've added a bit of milk to kill the transparency of the water a bit. As seen in the set above, I've used here only 2 speedlites (580EX II) and didn't want to use my third speedlite (430EX II). I used here also my UV filter over the lens front just to protect the front from water droplets. I should have protected the flash heads as well with plastic bags but I skipped that actually. The big hurdle was to get my old Ubertronix trigger to work, specifically with a laser-gate. Without detailing the troubles, at the end the laser-gate method proved useless to me because of the shutter lag and the cumbersome laser pointer I was using. Thus, for the rest of the experiment, I went on doing a manual job, holding the cable remote in one hand and dropping the cherry with the other.

Cherry Boom I
Canon EF 100mm Macro, f/9, 3200-1sec, ISO200.

It was apparent from the beginning that I'm having a problem and probably should have used a larger bowl of some sort since the white edge of the plastic dish was hard to remove. Some problems did not show up till later on as I was inspecting the images like Cherry Boom I. Beside the shallow depth at f/9 (which was not enough), it seems that 1/3200 of a second was not enough for the shutter to freeze the water movement! However, during the experiment, I've raised the speed a bit more without really knowing the final outcome that I will be getting later on. Good luck? Maybe!

Cherry Boom II
Canon EF 100mm Macro, f/9, 4000-1sec, ISO200.

The speed of 1/4000 seemed just enough to freeze such a fall! In total, out of 20+ shots, I got merely 2 useful shots and one or two shots for splashes without the cherry(ies) which I simply liked for their shapes but I don't think they would be useful as stock images or printed and displayed. As for Cherry Boom II, the cherry here fell upside down and my brain being in love with illusions, I've decided to rotate the image 180o and thus the water came up and the cherry down, but standing up. What annoys me about Cherry Boom II is, like the other shots, the white space from the plastic dish edge which cannot be removed or substituted. I continued the work further in the next day and going manual too with 1/5000 shutter speed, and changing the camera tilt little bit (and pouring some water into the dish) to hide the white edge as much as possible. Again, out of 20+ shots, I've one suitable shot here.

Cherry Boom III
Canon EF 100mm Macro, f/20,
5000-1sec, ISO320.
Beside enhancing the looks, I went on enhancing the depth of field as well pushing it to f/20 (to have greater chance of having the cherry sharp wherever it falls), but that of course called for an increase in ISO, as I didn't want to use my third speedlite still. Water splashes now are more stable and live! In Cherry Boom III, seeing that the two cherries fell on their side, I've decided to rotate the image 90o clockwise to add a surreal feel to it.
In all of these shots of high speed, there was always a problem with the noise level when processing the images, despite the ISO being relatively low. With my Canon EOS 7D, I'd say that the ISO is somewhat easier to handle up until ISO 800 or around that, but in these images the processing was cumbersome and I do have my doubts about being accepted for exhibitions with the group (if they pass the aesthetic critique). However, some stock websites did already accept these images without a problem and they are up for sale!
Finishing from this cherry project I did proceed to another one, involving high-speed shooting as well, but I will keep that for a future post, as I'm still trying to work on it further.

Finale

After kindling my passion again for high-speed photography (adding to that the lack of locations and ideas for panoramas), and after the failure of my trigger, I've emailed the company asking about the reasons for such time lag and after some discussion, it seems that the reason is my shutter and not the trigger itself. I was advised to connect the trigger to the flash instead of the camera but in my working conditions this is not possible, as working with triggered flashes means opening the shutter in a dark environment while the flash becomes the only source of light. However, reading about some aspects of my camera, it seems that I do have also to adjust some of my photo-shooting habits to reduce the time lag in shutter release (depending on LiveView being one!).
Though I'm on leave without traveling but seems I do have a busy schedule here (beside taking care of Mom), but I feel some satisfaction that I didn't feel in a long time now since I could work with my camera and really think of something to do with it, without feeling exhausted like everyday after coming back from work through the traffic jam. Meanwhile, the idea of traveling is still ticking and tickling my mind, despite the fear of the hassles that I might have to face outside because of all the madness going in the world today, specially for a guy like me from the Middle East.
In the meantime, August is getting closer, my birthday that is, and I'm preparing to have some big order (well, not so big, but a bit big maybe?) of some gear and maybe some books. I would have to place the order before August I presume since there are some items that are considered "special order" (i.e. need time to be prepared and dispatched). This is to be a gift to myself, since no one around give such gifts except of perfumes! On my mind is a 4th speedlite (and probably another 580EX II if available still) and maybe some filters. I feel so excited that I want to place the order right away in the coming few days, but my financial situation and the course of Ramadan makes me hold it back and wait. Thus, I might be placing my order by the end of June or so! I need to miss my camera so much to work with it with passion…

Stock photography by Taher AlShemaly at Alamy

Thursday, December 31, 2015

Firsts of 2015…

Been a long week (by feeling that is). I can't wait to get my share of holidays; well just one day for the new year, but it's worthy. I've been having sleeping problems again but this time because issues with the retracting health. Despite all of that, I did have some fun with my camera and I'm trying to come up with more ideas to work with it.

Checkmate!

Source: Amazon
As I am close to finishing my last photography book in hand at the moment with few pages left to read (in fact cutting out reading it to type these words), I've decided to work on some tiny project 2 weeks ago when I was around the beginning of the book. I didn't post the images in my previous post because they were not processed and not ready. However, I had to change my initial plans drastically for the time being, until I find a suitable set of Chess. Yep, Chess.
Those who know me well, probably know that I hate chess (and checkers); not my typical games for fun. Anyway, I had an idea I wanted to imply which consists of showing a contrast between luck and planning, or maybe you can call it: Fortune and Strategy. I'm thankful to my friend who provided me with a chess set which he got as a present from Iran. Anyway, found out that the chess set is not the typical set as I wished, but the pawns were small miniatures made of metal. The board, though, was beautifully intricate with oriental design. I didn't want to say No to the chance!

Last One Standing
Canon EF 50mm + ET 12mm, f/10, 320-1sec, ISO100.

I have to say, though, that setting up the gear and the set is much of a hurdle! For this reason, and after setting up everything, I left the scene or set as it is and continued the work on several days, trying to find a new perspective in every day visiting the scene along a 3-day period. I've made many shots but probably 2 or 3 were to my liking, like Last One Standing above or Battlefield below. In Last One Standing, and due to the proximity to the set, I had to switch to extension tubes which cause a shift in the focal point of the lens to help the photographer get even closer (and zoom further as well).

Battlefield
Canon EF 50mm, f/7.1, 320-1sec, ISO100.

The general activity is in fact to help me understand flashes more (and I didn't use them in a long time). Thus, there was a plenty of changing positions for the flashes (580EX II and 430EX II) and switching between TTL (Through The Lens) and Manual work. In fact, I find most professionals advice with using TTL mode except in few delicate situations (few of them depend completely on manual mode). Despite the easiness when working with TTL, I've found myself more inclined to switch to manual when my work starts to involve 2 flashguns. Anyway, I started to follow the advises and build up the lighting in the scene one step at a time with test shots (many of them!).

The lighting diagram approximately (the camera as at an angle with the flashgun on the left, and the reflector was closer to the table)


As I was building my lighting setup, one of the points I kept in mind is how to reduce the usage of flashes by re-distributing the beam using reflectors. The reflector I used here is not the "real" professional one, but simply a car shade (cut into half). This reflector is essential to reduce the harshness of the shadows, even though I did raise the 580EX above the tabe level a bit to get a softer touch (a process called "feathering"). Finally, I decided that I needed an overall increment in exposure, specially to light the topmost parts of the pawns. Thus I used the 430EX wrapped in a flag (black modifier) and pointed it up to bounce it off the ceiling. The flag of course is essential to block light coming to the scene. This last addition was put on full power as the ceiling was a bit high up (the table was low-level). As for the camera settings, I've found myself prone to use high-speed or HSS and that means a speed over sync speed. Despite the general low ambient light level, the background was not dim enough and it happened that the flash power in HSS mode was just perfect. It's not necessary to use HSS mode ONLY for moving and freezing objects you know! After all, the depth of field was the main decision-maker and I had to depend extensively on viewing the scene by pressing the DOF button; Not only to ensure the main figure is within range completely, but also to have a nice background blur (not too fuzzy, not too sharp). My main idea was to have a golden atmosphere as to add warmth to the scene (better than the cold look of the metallic pieces). Thus, I've switched the WB to manual and set it at 10,000K (Flash WB would balance the flashgun output only).

The Stand

My last trial was inspired by my brother who helped me with shooting a series from above the set (using the same diagram above but without the flashgun pointing up). Unfortunately, that series wasn't to my liking but I'm still viewing it from time to time and try to extract a good shot from it. My brother suggested that I would capture the set as you see above in The Stand; to have the focus on the far end instead of the near end as in Last One Standing and Battlefield. Here though, and because of the angle of view and the distance I've positioned my camera in, I've thought of using the stacking method. more than 33 shots were taken while moving the camera backward for 1mm at a time. Unfortunately, the initial position for the soldier here didn't help to put it on focus in the beginning (might look good in a small size version but not the original). I ended up using only a fraction of that collection (probably 10). This roll back of the camera also helped in shaping the blurred figure better (if the soldier is in focus, the other pawns in front of the camera are way too blurred to have any recognizable details). Well, that was the last experiment here and I had to pack my stuff after that… such a tedious process!


Firsts

 As 2015 is about to end, I've decided to have a little fun and look back at the pictures I've taken this year. It would need a long time to go through and study back my own work for the whole year and find out my mistakes to learn from them. However, I decided to look for the first things I've done this year.

Cold Fire

I remember Cold Fire was taken when the family was gathering outside when the weather was nice in February (yep, not January). I'm not sure what I was aiming at exactly or what was the initial idea (yes, initial ideas can change in my mind and be something else like the chess experiment above).

BPF in Al-Hamra Tower

Then we have the first panorama done this year: A panorama inside Al-Hamra Tower with BPF group as we were doing a workshop there. It was such an architectural attraction. I wished though no people were around but I had to do it that way. Still a delight to my own eyes. The first panorama this year was stitched in May.

The list ends with the first QTVR, which was done from a panorama taken inside a summer photography gallery by the end of August The panorama and QTVR were done in the last day of the exhibition (which was so quiet back then).


Esir
(captive)
Then, we have the first infrared shot which was a simple setup for a simple idea and using a single flashgun (580EX): Esir. Many shots of this set and many processing methods were done to the photos but probably this edit is my favorite. The infrared filter used here is the circular B+W filter with a threshold of 650nm (weak filter allowing some visible spectrum in the reds to pass).

By this, the list ends. I can't think of "first" stuff to add here for the time being but each shot is typically a new thing for me which makes me think and try to find something new about it. There is some UV shots made but they were all experiments and not quite favorable; they do need a converted camera for real!
I'm currently busy with a workshop in HSS and probably I would share some results here by next week if I could process the images I've taken. It's quite a fun time away from home with some group members doing things together and having a laugh.

I wish for dear readers a happy new year and a more peaceful one than 2015 was. Also, one with low prices as well and more simplicity to our lives. Though I don't usually make resolutions for new years (as it is something that doesn't belong to my own culture) but probably if I was to make a resolution probably it would be to have a simpler life, and courage to work more with my camera.


Happy New Year
Bliain Nua Sásta
كل عام وانتم بخير


Thursday, March 19, 2015

Unprecedented…

Two weeks of upheaval with sickness. Respiratory system infection, and then Conjunctivitis; I was surprised to know that the two are actually connected, as mention in this article. The bright side of the story is a 3 days of medical leave from work, connected to weekend. Not bad. My health still shaky with the tearful cough, but it is the usual story I believe. Coughing always lasts for some days if not months after treatment. I'm not having any medications to treat all of that, just some eye drops and cream for conjunctivitis.

With conjunctivitis. It was redder than this!

With this, and with the closure of Winter's end, seems that my plans to go out at night are somewhat, or completely, diminished. It is clear that my health and immune system is not what it used to be. However, I got myself little boots just in case I need to get a bit deeper into the shore. With this temperature it might not be a good idea to do long exposures here for the level of noise will be something unprecedented, but with more technical knowledge that I've gained along the years, hopefully I'll manage, in case that happens.

Infrolling

Because of the lack of opportunities to go outside at night, I've decided to work more on some infrared shots indoors or in the yard. Some simple experiment. Experiments like this refresh my mind a bit and breaks my idleness with the camera. Thus, I don't necessarily have a goal of achieving a good shot in my mind.

InfraPetals
Canon EF 50mm + 56mm ET, f/16, 4m20s, ISO100.

My first (and second trials) last week were with some small blooms in the yard. Despite the lack of breeze back then, but the shots were not sharp enough, and probably it is for the fact that I didn't adjust the focus (after focusing without the IR filter) to fit the IR range. The Canon EF 50mm f/1.4 lens has a marker for infrared re-focusing, even though, to me, it looks useless - because the distance ring is not marked thoroughly but only at specific distances. Thus, sometimes, you must use intuition and approximation in moving the focusing distance over the red dot for IR focusing.

InfraQuad
Canon EF 50mm + 36mm ET, f/20, 4m20s, ISO100.

The second trial that day wasn't any better. Anyway, I'm not planning to upload those to stock websites (or might try to do so into specific ones). The problem with this quadratic bloom is the way it should be cropped to be enhanced. In fact, I've never got myself satisfied with it, but I tried to remove some of the excess lines.
That was a simple trial outdoors. However, the real work was later done indoors when I noticed a vase with withered flowers and roses. It was made ready to disposal so I picked the vase to my room and made a simple setting. Probably the hardest part is moving around with the Speedlite without fixing it on a stand. The space in my room is not suitable anymore, and spaces around this house were taken. Anyway, work started and first it was by using two Speedlites.

Sigh
Canon EF 50mm, f/8,
5s, ISO100.
It seems, as seen in Sigh, that two Speedlites were not necessary after all. The major one was that made the effect was handheld and pointed directly to the dead rose, while the other one was placed on the side and bounced off a metallic-like surface supposedly to light the front. However, this second Speedlite proved to be a major problem when it showed glare on the glass of the vase, and hence I had to spend a considerable time cloning that out in Photoshop!
Thinking about it now, I could have used the second Speedlite to light the background a bit, but unfortunately, I do not have a proper background here, and nothing was behind this vase except the mess of my room! Anyway, it was a lesson learned the hard way. Yet, Sigh gained some Likes after all for its dramatic look. I doubt it is printable or to be uploaded though for the humongous level of noise, despite the short exposure time of 5 seconds only (and both Speedlites were on full power!).

Eski Güzellik
(old beauty)
Canon EF 50mm + 20mm ET,
f/22, 40s, ISO100.
I wasn't over with this subject yet. I liked the idea of some long exposure "indoors" with this infrared filter. The lights in my room are all energy-saving CFLs and those are a bad source for infrared radiation. Thus, naturally, the exposure without any help from Speedlites is going to be a long shot! However, I tried. The estimated time was about 5 hours and 20 minutes! I did it after all in overnight; put things on and went to bed, and tried to sleep with lights on! To my surprise, the camera didn't record the time properly (probably for the unusual time period) - it was recorded was 15 seconds only! The image was bright and good but unfortunately, shaky and the noise level wasn't promising. The shake is surprising in fact, but probably the only explanation for this is the working A/C in my room which delivered gentle vibrations to the set. Anyway, decided to do it again but with a spot light bulb (which should produce quite enough brightness and infrared as well). The result, Eski Güzellik, received many likes and favors as well. It does have some abstract sense with a side of melancholy to it. Considerable work was done to crop it, and then rotate it (and flip it). For some reason which I'm not sure of, the actual positioning was not quite right for me (maybe because of my left-handedness?). I've finally settled down with the look shown here. And that was the last trial with infrared in past few weeks.

The set used for the final shot.

Finale

Well, I would have liked to talk a bit more about the panoramas that were stitched, specifically old panoramas into new suit, but probably I'll leave that for another time. As always I'm having here a time crisis and I've realized that with my systematic time-schedule to work on some of the projects, I did in fact neglect lot of things, and specifically my Geltani conlang. I'm not sure what's the solution to this so far, but I guess I have to give myself some free time first.
I guess, at least how I think it is, I've been indulging myself into projects and stuff to work on just to let myself forget many things in my life. But this is leaving me exhausted and I'm not sure if all of that is really keeping me going forward. It feels numb here. It's hard to feel something anymore...

An Loch Codlata
(the sleeping lake)


Thursday, August 21, 2014

Snail...

Activities to the minimum and I'm seriously growing sick of summer here. It was my birthday last Sunday, and to pamper myself a bit I had my last "casual" day - but that didn't keep me away from my duties with Mom of course. Next day directly, had a fight with the security in the damned place I call "work". Not bad for a new year of my life I guess...

Golden Crop

I was supposed to talk about this like 2 weeks ago but totally forgot about it, amid all the fuss in my brain going on. It is an Action which can be installed and used in Photoshop to help on with cropping in various methods; mainly, thirds, golden ratio, golden spiral, diagonal method, and triangular method (which is new to me!).

General view for all the methods posted on top of each other using Golden Crop action.

This action is to help people using Photoshop editions before C6 (or was it CC?). As far as I know newer editions have these methods implemented in the Crop tool. You can download it here from Damian Sepczuk's website. Damian provided instructions on how to install the action and use it, as well as a plea for a donation. I would encourage the reader of these lines to give a little - after using the action I do really appreciate Damian's work and sent out a little donation. He deserves it.
One note though worth mentioning here, that the guide lines (made by paths as in vectors) are flexible and do not have fixed ratio. Stating this, it is a fact that the Golden Spiral rule is based on φ:1 ratio for the frame, while most photos nowadays use 4:3 or 3:2 ratios (in landscape orientation, with WxH order). It might be a good idea to crop the canvas size (by using Canvas Size command, or directly by Alt+Ctrl+C) before doing the Golden Spiral when needed. Usually this is done by changing the height to some value that  makes the ratio to the width equals φ, or the Golden Ratio. Mathematically, that would be:

H = W÷1.618 ;

where H is the height we need to find, and W is the width of the image, and 1.618 is the first few digits of the golden ratio. I usually prefer to work in millimeters when doing these calculations to be more precise (and because dimensions in pixels do not accept fractions). This is only a suggestion of course, and the golden spiral would still work and stretch according to your own dragging.

After 34

Just as it was my birthday, I decided to do some selfies, to be the first self portraits done in my own year; my 34th. As most people in my circle know probably, I was never fond of portraiture; it needs some steep education for me. Anyway, decided to improvise something with my two speedlites (580EX II and 430EX II). I didn't have much options with settings within the room, thus I was forced to make the curtains as my background, and instead of using the usual 50mm prime lens, I had to use my Sigma 70-300mm, at 70mm mostly. Somehow the shooting was easy, but the tedious work was still to be done after upload. The speedlites on the other hand were a dilemma.

Schizophrenic
Sigma 70-300mm @70mm,
f/16, 250-1, ISO200.
Generally, the distance from the camera wasn't a big deal, nor the position was. All I had to do is increase the depth (f/16) and sit the focusing distance to some suitable number (which was between 2 and 3 meters here; ~ 6-9ft), and the position was set simply by standing in front of the yellow flashing light of the timer on the front of the camera. The trick was to place the speedlites. One speedlite was pointed to a car shade (with matte silver finish) on my left, and the second one was bounced off the roof to give some hair light. The location this second light was a bit cumbersome and felt it didn't give much bouncing - thus, I've attached it to a monopod and raised the monopod to the highest to make it as close as possible to the roof. There were some minor changes now and then and the majority of the effect was done in processing in fact and not solely by the speedlites, as you can see in Schizophrenic. Funny thing is, I was holding the car shade here as it fell down before the timer is over and the shot is taken.
Cyborg
My editing drill went further as to create a monster actually! The idea was simply to make black and white image with high contrast, but things developed slowly to be the way you see it in Cyborg. It wasn't planned at all. The green color was formed when I actually gave a slight blue tint for the black and white image, and then used the Selective Color tool to manage the grey level (and probably added some yellow there) and ta da! A monster is born! But I have to say that, in general, the shoot was a failure somewhat because I couldn't manage the speedlites correctly. This is mainly a result of not having a vision for the outcome ahead. On the other hand, there is a problem with light modifiers somewhat, like not having umbrellas and large soft boxes. Anyway, I'm not planning to get those as it is not my field of expertise at the moment. It was fun doing it anyway! And finally there was this one shot which was without any special effect, but the irony is, the light distribution wasn't good, and thus I had to balance it by processing.

TJ

Finale

Not much activities to be seen, and I'm not expecting it to change in the near future with this summer and busy mind. I'm really looking forward to just relax and chill with the increase in disrespect from my workplace. I'm trying to measure up my options with actions to take or possible with other sources of income to make. The scientific community in this country is absolutely a null and dull and worthy of nothing. I can't really find what is so special about my job, and any other administrative job around the place.
All what I'm waiting for now is my vacation, with some worries about Mom's care. I barely can bear with the idea of depending on someone else to do "my" job. Otherwise, I'm just hoping with this vacation things will be rejuvenated inside me, and maybe some of my problems are vanished...


Thursday, May 1, 2014

Nacht der Langzeitbelichtungen...

Well, now we are back to the rhythm after two posts about my trip to Failaka; despite the fact that I'm still processing some of the images taken there. But probably the bulk of the images that I really enjoyed taking were already done... till I discover something new though. The B&W processing and tone-splitting sound promising but I do need more time with my images. In the meantime, I'm trying to settle down with time ripples as I'm torn in between two blogs, both of which would require an early preparation to be posted in time. Probably my future posts in this blog would be short (be happy!).

Nacht der Langzeitbelichtungen

I hope dear reader won't consider the title offensive*. It's just a title that reflects what I've been doing since I got back from Failaka island two weeks ago. I'm trying to do the best I can before the weather gets warmer (than this already); long exposures at night time.

Sky and Earth
Rokinon 8mm fisheye, f/8(?), 3.5m, ISO100.

My beginnings were shaky. Despite the fact that the low tide timing was perfect for me, because I wanted to go deeper into the sea shelf (the area which is covered in high tide time), yet, the tide was not low enough. To add to my problems, the beach area was not "silent" at 3:30 a.m.!
My first exposure, Sky and Earth, which was for around 4 minutes, came out blank. Not literally blank but out of features. I was hoping to go deeper into the sea shelf specifically to capture more rocks in the foreground, but it wasn't the case here.

Luminatus
Rokinon 8mm fisheye,
f/8(?), HDR, ISO100.
As you can see, because of the time that lapsed when these images, Sky and Earth and Luminatus, were taken, I've completely forgot what was the aperture used back then in this manual lens; but I doubt I've gone further than f/8 (hence "f/8(?)" in the caption). Luminatus, in particular, was shot about 180 degrees to the other side on the shore, away from the first shot Sky and Earth. Now, I have to admit I don't like both shots, but I did shoot after all. I didn't want to go back with empty hands after struggling to the beach at 3 a.m. that day! Some people commented that they like the transition in the horizon line in Sky and Earth, and I might like it a bit because of its minimalistic approach to the seascape, yet, it's not much more than a play of colors; in fact this is all what I depended on here to make this image work a bit. Otherwise, it is one big fail. Luminatus on the other hand was a fail still but with some liking from my side because of the spot-like effect that surrounds the buildings. This is mainly caused by the lights of the buildings themselves which caused a halo effect somehow. The HDR technique (gathered from long exposures) helped a lot here in controlling the range of the halo, but then some work in Photoshop was required. My night was over then and I had to go back to my car on the soft sands, carrying the load!

Extraterrestrial
Rokinon 8mm fisheye, f/8(?), 8m, ISO100.

The night after was a bit more promising but I have to admit here as well, I didn't expect the results. One of the major differences between an amateur and a professional photographer is the expectation of the final outcome before the work is done. The timing isn't really what I was hoping for because it was close to dawn, and the exposure time, when calculated in the regular way as I usually do, must be shortened than the real calculations; This is because the sun is on rising even though slowly, but it does affect the outcome significantly (in some trials before, the exposure time would be one minute short than calculated to get a proper exposure, or at least a proper histogram distribution).
In theory, when doing long exposure for moving clouds, a cloudy day in fact is not good - this is because the movement would not be so obvious in the sky. The movement won't be noticeable unless there is some spacing in between the clouds. In the meantime, I was thinking: Is it possible to record the movement of a hole in the clouds when a cloudy day? I think I got the answer in Extraterrestrial. I'm not a meteorologist, but it seemed that this place in the sky specifically was like a barrier for the clouds passing through it and hence the lines formed around this specific vacancy. The bright spot in the sky was probably the sun disk which, on location, was completely invisible to the naked eye. Probably this is one of the beauties of doing long exposures: to see the unseen!

Blauentraum
Rokinon 8mm fisheye,
f/8(?), HDR, ISO100.
Just before leaving the place, after observing how much light is shining on the land, I decided to do one last trial, this time for HDR bracketing (and if I remember correctly it was also a series of long exposures). As you may have noticed  in Blauentraum and Extraterrestrial already, I've been using the Fluorescent WB excessively for such time of the day (along with dusk time too). In processing the HDR, I didn't try to do any magic here, but simply eliminate as much as possible the ground of the beach while darkening the sky a bit. The guide line here is not strong, and the only thing I would rely on in this image is the hues and blend of colors. Otherwise, I wouldn't submit this to be judged in a contest!
The coming weeks after that did (and will) witness more long exposure trials but I'll keep these images for later...

* In case the reader is not aware what it means; the title means "night of long exposures"; parallel to the Night of Long Knives (Nacht der Langen Messer), which was a name given to a  series of political murders in the beginnings of the Nazi regime.


Finale

Source: Amazon
 New books now arrived, and I've already started reading it. The new book is a contemplative book somewhat (just like another book I had before) but in a different style somewhat. I do have some list of books that I'm reading already for bedtime (an Agatha Christie novel in Arabic in fact) and at work I'm somewhat busy doing work related to this blog and the other blog, thus reading this book is a challenge for me now. The best I could do for now is to read in between when taking breaks, or when I wait for my fingerprint time before leaving work. The other books are related to Archaeology and principles of optics which I'm also dying to read. The latter specifically looks an old edition; I really didn't check it out! But it doesn't matter as long it gives some basics.

Source: Amazon
On the other hand, I've ordered another flash cable instead of my Vello cord which got broken after some accident. This one (from Pixel) though is cheaper than Vello's. I'm not sure why though, but it works fine and tested it for High-Speed mode on my 580EXII. If it is about the make, then I have to say the Vello is higher in price and yet couldn't stand the fall of a tripod; hence, it wouldn't make a difference for me I guess if I get a cheaper one. After all, I'm not using it excessively for the time being - but that doesn't mean it's not necessary!

This is it for now I guess. I'm not sure I want to talk about work here, because I'm trying to keep myself busy as much as possible just to forget the insults that I see daily in that place. The summer is coming, and the hell is starting to cook my body already. My only condolence is to see students finish off their semester as soon as possible to release some of the jam in this place.
Meanwhile, I do feel guilty though for not doing much work with my Geltani conlang. Two weeks of vacation and yet, I didn't touch it at all and concentrated all my time for photography; it's unfair I guess. Too many things to do, and one body to do them all...

Thursday, March 27, 2014

Snooze...

I think I'm reaching the climax of my endurance capabilities through the past 2 weeks. It is just the fact that nothing goes as planned, and more unexpected events.
People here (and everywhere) are happy for the arrival of spring. However, it is my weeping time. My nighttime photography had already ceased and almost no power is left for me to leave at night. I technically spent 2 weekends sleeping most of the days. With the arrival of summer soon, I'm left to do tiny projects at home, specially in the macro field.
In the meantime, I've already signed for a 2-week leave from work just to rest my nerves from the amount of stupidity that lurks in this workplace (and all workplaces in this country; let's be honest). Everyone thinks I'm traveling somewhere - my chances are slim. The best I might be able to do is to head to Failaka island, if possible, and maybe spend a night there. My leave should start on April 1st and extends till April 17th. The best part of a vacation is to see people go to work while you don't!
Anyway, despite the hibernating activity with photography, I still had some few trials with my camera (and flashes) and might be interesting to share...

Ego

Don't read it wrong; Ego here is the Latin form for I or Myself! For the past week (and also for the coming few days) I've been trying to test my flashes and light modifiers on a real subject this time and not against some slid subject: me.
The fact that I don't really do well with portrait with other people, and yet I don't have someone to help me with testing my gear, leaves me with me! Experts usually advise the photographer not to be the subject of their own self; this is related to the degree of concentration and the attention paid by the photographer to the light formation - it would be lesser in such situations. Anyway, I'm working with my own face here and I don't have much options. The funny part is, as it is supposed to be a check-up for my gear and lighting positions, it became also a trial for some Photoshop experiments.

With RoundFlash
All of the coming shots are taken with my Canon EF 50mm lens, not only for its sharpness or wide aperture (f/1.4, which in fact is not used or needed here), but for its perspective in regard to the distance available for me in the room, and for the scale on the lens' barrel which I used to adjust the focus range properly. The first thing to try out with my flashes is the RoundFlash, beside another flash for the hair light on my right and above my head, with a diffuser. The rest is a simple processing in ACR (Adobe Camera RAW). One of the fascinating aspects of using the RoundFlash is, like the ring-flash, creating an interesting catch light in the eyes. The post-processing included some simple fill light, contrast, vibration, and clarity adjustments.

After the initial (simple) post-processing, I couldn't hold my fingers from doing further editing like I usually do for some friends photos. I have to admit that the edit does scare me a bit! When it comes to black and white converting, there are two possible paths actually: Convert in RAW, or convert in Photoshop. Each one of those has its own benefits and limits in fact. The image you see above is converted in Photoshop (and it is just one image from the series of shots).

RAW Edit
I've picked one of the many shots and this time tried to convert it to B&W in ACR alone without the help of Photoshop. The results, to me, were astonishing. Te image you see on the left is completely edited in RAW without any enhancement in Photoshop. The difference here is, while in Photoshop you can convert to B&W using the Black and White adjustment layer, which in return has specific tonal ranges to fix the black and white tones depending on the colors - in ACR, the tonal ranges available are varied and more delicate than the simple black and white adjustment layer in Photoshop. For example, in the adjustment layer we have tonal sliders for Reds and Yellows; However, in ACR, there are tonal controllers for Reds and Yellows, with another one for Oranges in between. This latter addition can prove very useful. in specific situations, like my selfie here. Usually, in Photoshop, raising the Reds tones to brighten the eyes would brighten the eyes and the face altogether, calling for a need to use layer masks. In ACR, however, the two zones are somewhat easier to control by the Reds and the Oranges tones (and with some fill light increment). At this level, it all looks normal. For more eye-catching bright eyes effect, then, of course, Photoshop is needed again.

The second experiment with the flashes was to light the face from top and bottom, in something like the so-called hatchet lighting. Usually, a hatchet lighting is when lights are used on the left and the right of the subject, but here it's on the vertical plane. To achieve this, beside the head light above my head (with bulb diffuser), I've placed a white cardboard on the ground and bounced the flash from it.

Selfie #4
After many trials to check the position of the lights, I had some nice shots. It seems that this hatchet method is good to show the details of the muscles of the face; though it might not be so pleasant to look at! In Selfie #4, most of the editing is done in ACR as well, including desaturating. However, some editing was needed in Photoshop to boost the eye of the color. Also, some drama was added by sharpening the image excessively.
Unblinking
And there is a big benefit of having some high resolution to your camera; It is some way to make an abstract with suitable resolution out of the general image, like it is in Unblinking. Probably it won't be a good image for a large print after all, but nice to see online! In Unblinking, the image was converted to B&W in Photoshop (except of the eye), and was given a tint to have some drama.

There is a method of manipulating images that I've read something about, in a long time, and back then I really didn't pay much attention. Probably because the talk was technical more than artistic. However, now with the ACR, it seems that this method is opening a new window for the world of Black and White manipulations. This is the method of tone-splitting. The idea is simple: give one tint to the highlights, and another tint for the shadows. The result was somewhat perplexing I have to say!

Selfie #5
I applied this method to one of the selfies taken with the hatchet technique and the results appear interesting. After converting the image (and adjusting the tones accordingly) in ACR, I've applied the tone-splitting (also in ACR) giving the highlights a tint of violet, and the shadows a tint of green. There is in fact no limit for the choices as you can control the tints and their saturation and also the balance between the shadows and the highlights in general. However, it seems reasonable and more appropriate to work within the circle of the laws of the Hue Circle. The method is simple, after adjusting the tint for the highlights by picking a specific hue and adjusting its saturation, I picked a tint for the shadows then after by adding (or subtracting) 180o from the hue value of the highlights; For this reason, it got to violet highlights, and green shadows. I've adjusted the Balance control in ACR towards the highlights simply to reduce the weird look of the hair and black areas of being too green. Also, to add more luster to the eyes, I had to sacrifice the contrast for the whole image, and yes, I could have done it in Photoshop editing later on, but my goal was to produce an image edited in RAW only without much editing in Photoshop; and I think I've done it. This in fact taught me a lesson for the time being: It's not all about pronouncing the tones by adding contrast, but contrast must be added carefully in regard to what features of the image I'm willing to express and show more than the rest.
A note as well I'd like to add: it is a common advise when printing Black and White images, it would be a good idea to add a slight tint (most probably a yellow tint) even in a small amount just to give a color to the image and show some of the details that might be lost in printing. This is because in printers' language, White is almost synonymous with "do not print a thing here". Thus, it is advised to have a slight tint to give some color and life to the image. Anyway, experimenting with your images is always the rule I presume!.

Heaven is Watching

Out of the desire to break my daily routine and also to try to produce something before the summer is finally and completely here, I've decided to do a panorama near my workplace. I have to say though that I was in a fighting mood as well; I was willing to fight anyone who would be interrupting me and try to stop me from taking photos near my workplace. Anyway, at the end things went smooth, but I wish if I can say that to what happened later when processing the panoramas.

Heaven is Watching

That day, I've decided to have lunch near my workplace and head back when the road is less congested. I've walked up to the roundabout which overlooks my workplace (and specifically the building where I work) and started to shoot there, even though it was congested little bit but the road was giving way and getting easier. That was not a big deal for me in fact as the whole thing was an experiment and I'm not looking for perfect conditions, but I did some mistakes later which became both: a regret, and a lesson. Anyway, I was astonished for the clouds hovering over the place and reminded me of the time I spent in Failaka 4 years ago when I had some marvelous shots under clouds of the same type. Bad thing though that I couldn't (for time limitations and capabilities) do any long exposures in that location. Anyway, after shooting the first panorama, I've moved the tripod manually for few centimeters and started to shoot again. I've measured previously the distance between the centers my eyes, which was 7cm, but here I had to do things blindly and I'm sure I've displaced the tripod for no less than 10cm - can produce a big problem, and it did indeed as you will see...

WARNING: DO NOT STARE WITH 3D GLASSES FOR LONG TIME.

The image you see above is not a perfect anaglyph (or as I called it before: panaglyph), but it is one its kind and I'm hoping to do more experiments with this kind of panaglyphs; Because it is a full panorama and not a simple horizontal panorama turned into an anaglyph as I did some weeks ago. However, I've tried hard to give a good alignment for this panorama but it never worked - needless to say the stitching errors that plagued me in between the two panoramas for the left and the right scenes. Without going into details of the stitching errors, I shall discuss here the points that made this unbearable to look at!

  • The distance of the displacement of the tripod seems too large which caused the difference in between the two scenes, visually, large. This would cause hardships when aligning the two scenes at some points.
  • The center of the panorama should have been one of the palms, and this is a misjudgement from my side. Centering the panorama around the center of the roundabout would have produced a more interesting scene like above. This also played a role in the bad alignment between the two scenes - the scene should have been aligned around the palm that was my zero point (and to which the movement of the tripod was parallel), but I was trying hard to align the two scenes to a new point (which was theoretically parallel as well but not quite accurate).
  • The ground on which I was standing was not even. This produced a change in the elevation of the tripod and the camera configuration after the displacement, and henceforth, another problem was added to the alignment process.
With these problems in mind, I'm hoping that these can be avoided in the future for another experiment like this. I just need the good location with interesting architecture or landscape to work with.
There was a plan to produce and work with a planet projection of this same panorama, but because of some internet problems in the current time I decided to delay this research to be posted in a later time. This would give me also more time to investigate the matter and the other possibilities to produce an adequate panaglyph out of this panorama. Just remember please: DO NOT STARE AT THE ANAGLYPH ABOVE FOR A LONG TIME!

Finale

I have to finish this quick and post it. I'm living a life now where I'm expecting a problem wherever I turn and wherever I go. My only escape would be a vacation outside, which I'm already planning for, hopefully to be in September of October. But I have to wait and see the circumstances. Day by day, I feel my luck is draining, and needless to say, my home is throwing my out. What is home, if you just don't feel the respect you need in it? Would it still be called home?
Everyone is telling me that I need a vacation. Everyone is seeing my bent back and my burnt eyes, and they are advising me of some vacation, far away from home and the work environment. But what can I do with added responsibilities? The least to be done now is to have my short vacation for 2 weeks just to rest my body from the everyday traffic, as well as spend some more time with my camera, and if possible go to Failaka. So many hopes I have for such a short vacation in the homeland, but let's see what is going to be achieved after all...